


SSM集成
框架集成核心
如果你的项目中,用到了Spring框架,那么其他框架主要就是和Spring集成!!
和Spring集成的核心思路
1、把当前框架的核心类,交给Spring管理
2、如果框架有事务,那么事务也要统一交给Spring管理
步骤:
Spring
Spring+SpringMVC
Spring+Mybtis
Spring+SpringMVC+Mybatis:管理事务
1.导jar包
Maven项目导包后面再补充,添加依赖即可

spring

springmvc
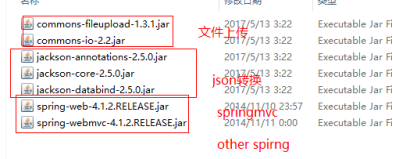
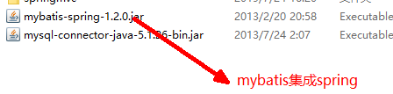
mybatis

spring+mybatis+事务
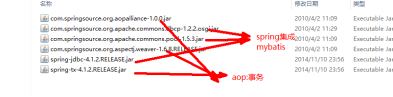
other
2.配置applicationContext.xml
注意这里面SqlSessionFactory的配置中
<!-- mapper.xml位置   注意这个要在resources里创建对应结构的目录-->
        <property name="mapperLocations" value="classpath:cn/dsq/ssm/mapper/*Mapper.xml"></property>

<?xml version="1.0" encoding="UTF-8"?>
<beans xmlns="http://www.springframework.org/schema/beans"
       xmlns:xsi="http://www.w3.org/2001/XMLSchema-instance"
       xmlns:context="http://www.springframework.org/schema/context"
       xmlns:tx="http://www.springframework.org/schema/tx"
       xsi:schemaLocation="
       http://www.springframework.org/schema/beans http://www.springframework.org/schema/beans/spring-beans.xsd
       http://www.springframework.org/schema/context http://www.springframework.org/schema/context/spring-context.xsd
       http://www.springframework.org/schema/tx http://www.springframework.org/schema/tx/spring-tx.xsd
">
    <!--扫描service层-->
    <context:component-scan base-package="cn.dsq.ssm.service"></context:component-scan>
    <!--引入jdbc-->
    <context:property-placeholder location="classpath:jdbc.properties"/>
    <!--dataSource连接池-->
    <bean id="dataSource" class="org.apache.commons.dbcp.BasicDataSource">
        <property name="driverClassName" value="${jdbc.driverClassName}" />
        <property name="url" value="${jdbc.url}" />
        <property name="username" value="${jdbc.username}" />
        <property name="password" value="${jdbc.password}" />
    </bean>
    <!--(sqlSessionFactory-->
    <bean id="sqlSessionFactory" class="org.mybatis.spring.SqlSessionFactoryBean">
        <!--关联连接池-->
        <property name="dataSource" ref="dataSource"></property>
        <!-- mapper.xml位置   注意这个要在resources里创建对应结构的目录-->
        <property name="mapperLocations" value="classpath:cn/dsq/ssm/mapper/*Mapper.xml"></property>
        <!--别名配置-->
        <property name="typeAliasesPackage">
            <value>
                cn.dsq.ssm.domain
                cn.dsq.ssm.query
            </value>
        </property>
    </bean>
    <!-- 处理mapper接口 spring会扫描包产生很多子类 注入到service层-->
    <bean class="org.mybatis.spring.mapper.MapperScannerConfigurer">
        <property name="basePackage" value="cn.dsq.ssm.mapper"></property>
    </bean>
    <!--事务-->
    <bean id="transactionManager" class="org.springframework.jdbc.datasource.DataSourceTransactionManager">
        <property name="dataSource" ref="dataSource"></property>
    </bean>
    <!-- 开启注解支持-->
    <tx:annotation-driven transaction-manager="transactionManager"></tx:annotation-driven>
</beans>
3.配置applicationContext-mvc.xml
<?xml version="1.0" encoding="UTF-8"?>
<beans xmlns="http://www.springframework.org/schema/beans" xmlns:xsi="http://www.w3.org/2001/XMLSchema-instance"
       xmlns:context="http://www.springframework.org/schema/context"
       xmlns:mvc="http://www.springframework.org/schema/mvc"
       xsi:schemaLocation="http://www.springframework.org/schema/beans
       http://www.springframework.org/schema/beans/spring-beans.xsd
       http://www.springframework.org/schema/context
       http://www.springframework.org/schema/context/spring-context.xsd
       http://www.springframework.org/schema/mvc
       http://www.springframework.org/schema/mvc/spring-mvc.xsd">
    <!--扫描controller-->
    <context:component-scan base-package="cn.dsq.ssm.controller"/>
    <!--静态资源处理-->
    <mvc:default-servlet-handler />
    <!--识别@requestMappering等注解支持-->
    <mvc:annotation-driven />
    <!--配置视图解析器-->
    <bean id="internalResourceViewResolver" class="org.springframework.web.servlet.view.InternalResourceViewResolver">
        <property name="prefix" value="/WEB-INF/views/" />
        <property name="suffix" value=".jsp" />
     </bean>
</beans>
4.配置web.xml
<?xml version="1.0" encoding="UTF-8"?>
<web-app xmlns="http://xmlns.jcp.org/xml/ns/javaee"
         xmlns:xsi="http://www.w3.org/2001/XMLSchema-instance"
         xsi:schemaLocation="http://xmlns.jcp.org/xml/ns/javaee http://xmlns.jcp.org/xml/ns/javaee/web-app_3_1.xsd"
         version="3.1">
    <!-- 读取spring配置文件-->
    <context-param>
        <param-name>contextConfigLocation</param-name>
        <param-value>classpath:applicationContext.xml</param-value>
    </context-param>
    <!--监听器-->
    <listener>
        <listener-class>org.springframework.web.context.ContextLoaderListener</listener-class>
    </listener>
    <!-- 核心控制器-->
    <servlet>
        <servlet-name>dispatcherServlet</servlet-name>
        <servlet-class>org.springframework.web.servlet.DispatcherServlet</servlet-class>
        <init-param>
            <param-name>contextConfigLocation</param-name>
            <param-value>classpath:applicationContext-mvc.xml</param-value>
        </init-param>
        <load-on-startup>1</load-on-startup>
    </servlet>
    <servlet-mapping>
        <servlet-name>dispatcherServlet</servlet-name>
        <url-pattern>/</url-pattern>
    </servlet-mapping>
    <!-- 编码过滤器-->
    <filter>
        <filter-name>EncodingFilter</filter-name>
        <filter-class>org.springframework.web.filter.CharacterEncodingFilter</filter-class>
        <init-param>
            <param-name>encoding</param-name>
            <param-value>utf-8</param-value>
        </init-param>
    </filter>
    <filter-mapping>
        <filter-name>EncodingFilter</filter-name>
        <url-pattern>/*</url-pattern>
    </filter-mapping>
</web-app>
完成这几个关键文件的配置就基本完成三大框架的集成


 572
572


 被折叠的 条评论
为什么被折叠?
被折叠的 条评论
为什么被折叠?
 到【灌水乐园】发言


