


vue复习
一、谈谈你对vue的理解
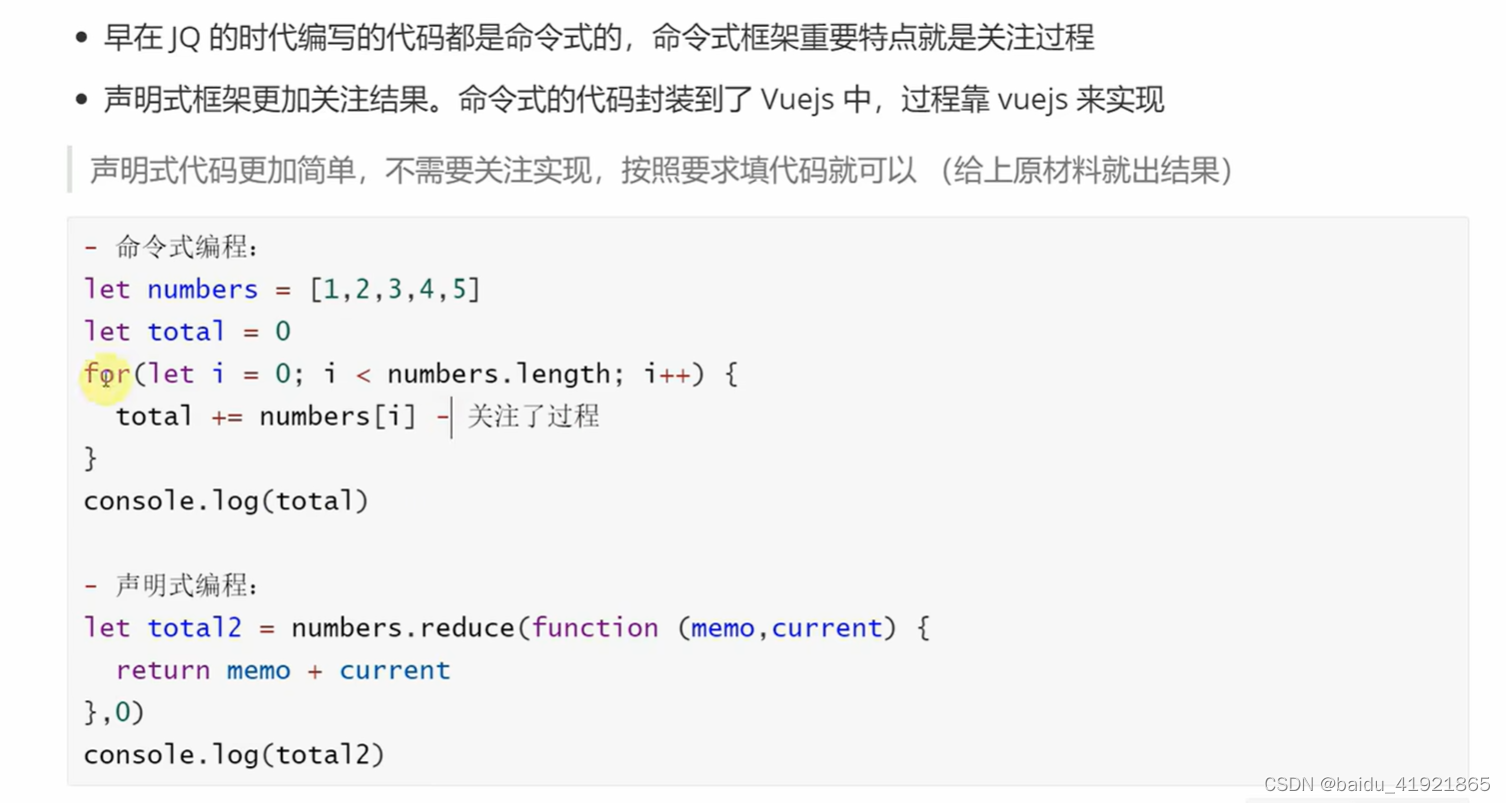
1、声明式、渐进式框架
声明式与命令式区别:
2、MVVM模式
vue不完全遵循MVVM模式,可以使用ref获取dom
3、采用虚拟DOM
用对象描述DOM,减少对真实dom的操作,不依赖真实平台,实现跨平台
虚拟dom(Vdom)是如何生成的?
- 模板template被编译为render渲染函数
- 挂载过程中调用render函数,返回的对像是虚拟dom;
- 在后续的patch过程中进一步转化为真实dom
4、区分编译时(打包)和运行时(浏览器)
5、组件化
实现高内聚、低耦合、单向数据里流,组件级更新
在Vue中,数据流是指数据的传递和管理方式。Vue采用的是单向数据流,也就是,数据是从父组件流向子组件,子组件不能直接修改父组件的数据。
- Vue数据流机制:props和events;
- 数据流管理:
- 状态提升:将组件的数据状态提升到他们共同的父组件中。这样不同的子组件就可以共享相同状态。从而实现数据共享和传递。
- 状态提升可以使得数据流更加明确和可控,但是也会导致组建间的耦合性增加;
- Vuex
- provide / inject
- 状态提升:将组件的数据状态提升到他们共同的父组件中。这样不同的子组件就可以共享相同状态。从而实现数据共享和传递。
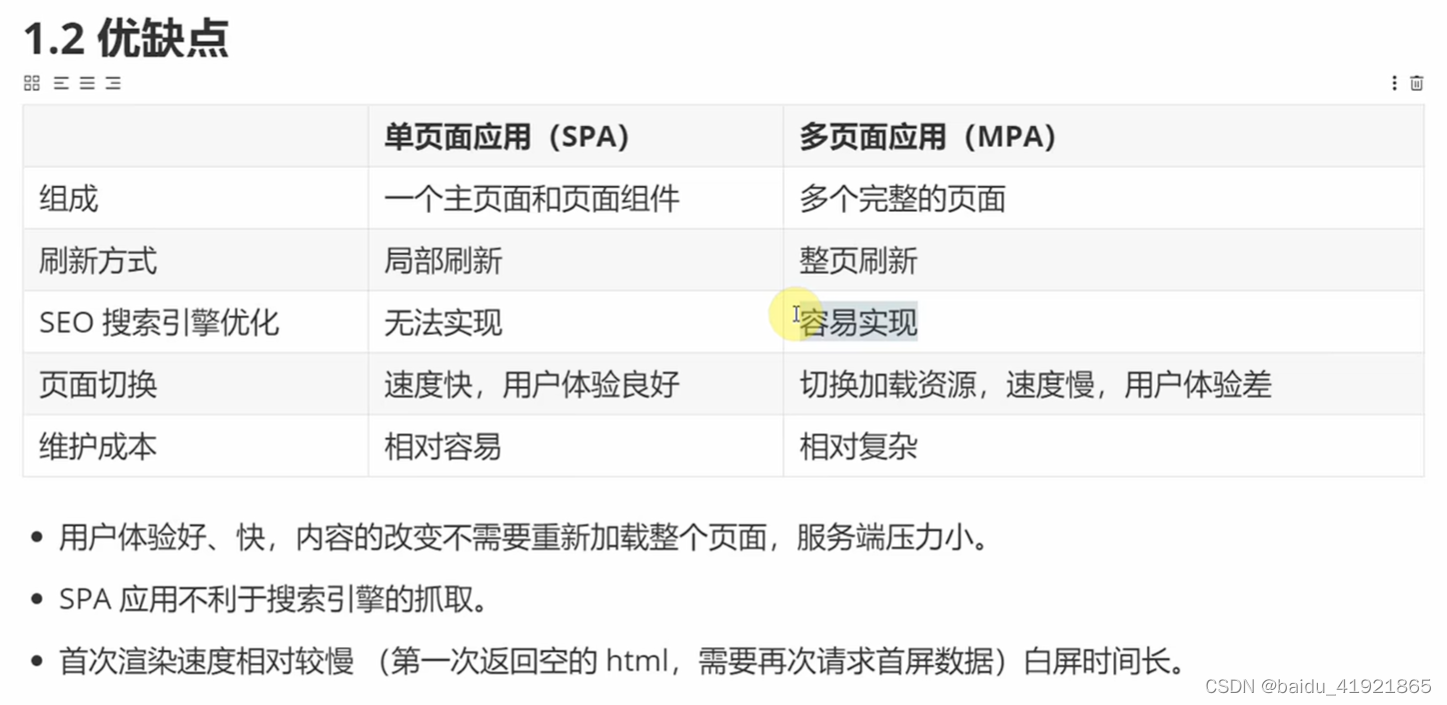
二、谈谈你对SPA的理解?
SPA(single-page application)单页应用,默认情况下我们编写Vue、React都只有一个html页面,并且提供一个挂载点,最终打包后会在此页面中引入对应的资源。(页面的渲染全部是由JS动态进行渲染的)。切换页面时通过监听路由变化,渲染对应的页面 Client Side Rendering,客户端渲染CSR;
MPA(Multi-page application)多页应用,多个html页面,每个页面必须重复加载,js、css等相关资源。(服务端返回完整的html,同时数据也可以在后端进行获取一并返回‘模板引擎’)。多页应用跳转需要整页资源刷新。Server Side Rendering,服务端渲染SSR;
单页面应用缺点:首屏加载时间较长
解决方案:
静态页面预渲染(Static Site Generation)SSG,在构建时生成完整的html页面。(就是在打包的时候,先将页面放到浏览器中运行一下,将HTML保存起来),仅适合静态页面网站。。变化率不高的网站。
SSR+CSR的方式,首屏采用服务端渲染的方式,后续交互采用客户端渲染方式;
三、谈一谈对vue组件化的理解?
webcomponent组件化的核心组成:模板、属性、事件、插槽、生命周期。
UI划分--> 组件化
功能划分--> 模块化
组件化的好处:高内聚、可重用、可组合;
- 组件化开发能大幅提高应用的开发效率、测试性、复用性等;
- 降低更新范围,只重新渲染变化的组件;
补充:
- vue中的每个组件都有一个渲染函数watcher、effect;
- 数据是响应式的,数据变化后会执行watcher或者effect;
- 组件要合理划分,如果不拆分组件,那更新的时候整个页面都要重新更新;
- 如果过分拆分组件会导致watcher、effect产生过多也会造成浪费;
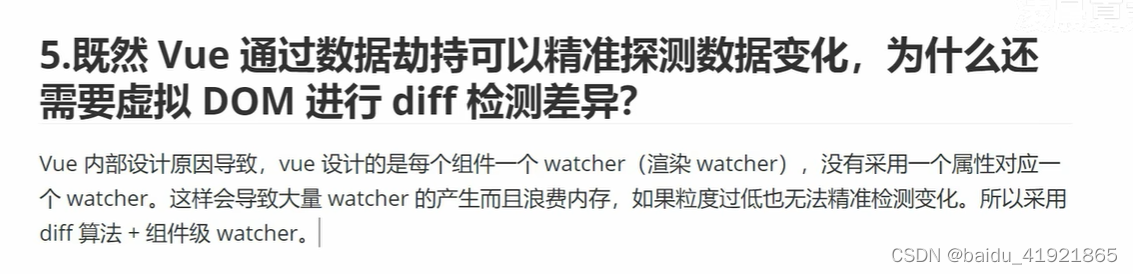
四、既然Vue通过数据劫持可以精准探测数据变化,为什么还需要虚拟dom进行diff检测差异?
五、说一说你对响应式数据的理解?
vue2缺陷
- 在vue2的时候使用defineProperty来进行数据的劫持,需要对属性进行重写添加get及set,性能差;
- 当新增属性和删除属性时无法监控变化。需要通过$set、$delete实现;
- 数组不采用defineProperty来劫持(浪费性能,对所有索引进行劫持会造成性能浪费),需要对数据单独进行处理;
- 对于es6中新产生的Set、Map这些数据结构不支持;
vue2的响应式:
数组的索引和长度无法监控
    let obj = {name:'ty',age:30,n:[1,2,3,4]};
    const newArrayProto = Object.create(Array.prototype);
    const oldArrayProto = Array.prototype;
    ['push','shift','unshift','pop','reverse','sort','splice'].forEach(method=>{
      newArrayProto[method] = function(...args){
        console.log('用户调用了:',method,this)
        oldArrayProto[method].call(this,...args);
      }
    })
    function defineReactive(target,key,value){
      observer(value);
      Object.defineProperty(target,key,{
        get(){
          return value;
        },
        set(newValue){
          if(newValue!==value){
            value=newValue;
            observer(newValue);
          }
        }
      })
    }
    function observer(data){
      if(typeof data!=='object' && data!=null){
        return data;
      }
      if(Array.isArray(data)){
        data.__proto__ = newArrayProto;
      }else{
        for(let key in data){
          defineReactive(data,key,data[key])
        }
      }

    }
    observer(obj);
    console.log(obj)
    obj.n.push(55)
    console.log(obj.n)
vue3的响应式:
let obj = {name:'ty',age:30,n:[1,2,3,4]};
let handler = {
// 搜集effect
get(target,key){
const temp = target[key];
if(typeof temp==='object'){
return new Proxy(temp,handler)
}
return temp;
},
set(target,key,value){
// 触发effect的更新
target[key] = value;
console.log(key,value)
}
};
function reactive(target){
return new Proxy(target,handler)
}
let proxy = reactive(obj);
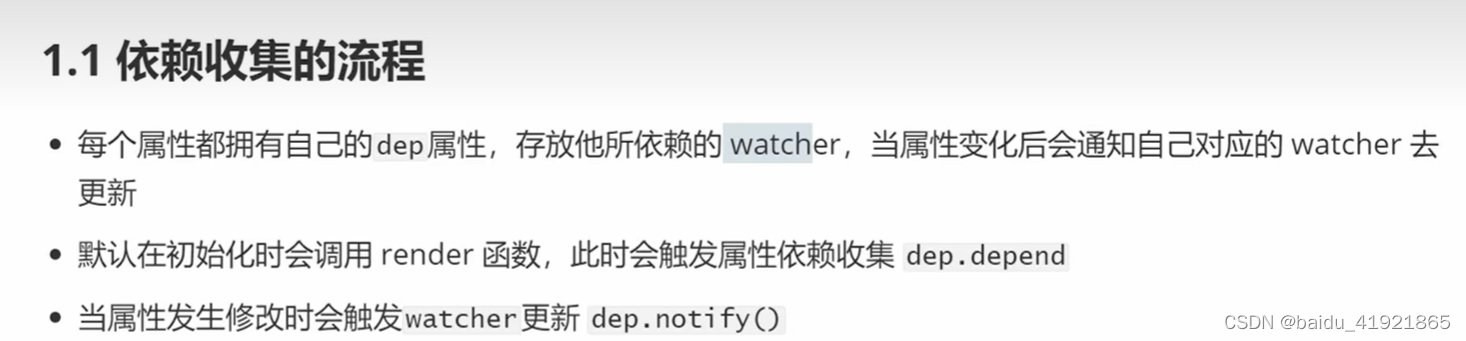
proxy.name = 'ww'六、依赖搜集
vue2依赖搜集:


面试知识点:
1、组合式API与选项式API区别?
- 在逻辑组织与逻辑复用方面,组合式API优于选项式API;
- 组合式API几乎都是函数,有更好的类型推断,对ts支持友好;
- 组合式API对tree-shaking 友好,代码更容易压缩;
- 组合式API中没有this,减少了this指向不明的问题;
2、Vue3 性能提升主要是通过哪几个方面体现的?
回顾vue2,我们知道每个组件实例都对应了一个watcher实例,它会在组件渲染的过程中把用到的数据property记录为依赖,当依赖发生变化,触发setter,则会通知watcher,从而使关联的组件重新渲染;
因此,vue3在编译的阶段,做了进一步优化:
1、diff算法优化:
vue3在diff算法中相比vue2增加了静态标记,其作用是为了会发生变化的地方添加一个flag标记,下次发生变化的时候直接找到该地方进行比较;
2、静态提升:
vue3中对不参与更新的元素,会做静态提升,只会被创建一次,在渲染的时候直接复用。避免重复的创建操作,优化内存;
没做静态提升之前,未参与更新的元素也在render函数内部,会重复创建阶段。
做了静态提升之后,未参与更新的元素,被放置在render函数外围,每次渲染的时候只要取出即可。同时该元素会被打上静态标记值为-1,特殊标志是负整数表示永远不会用于diff;
3、事件监听缓存:
默认情况下绑定事件行为会被视为动态绑定(没开启事件监听缓存),所以每次都会去追踪它的变化。开启事件监听缓存后,没有了静态标记。下次diff算法的时候直接使用。
4、SSR优化
当静态节点大到一定量级的时候,会用createStaticVNode方法在客户端生成一个static node,这些静态node会被直接innerHtml,就不需要创建对象,然后根据对象渲染;
总结:
- 静态节点提升:在template中的不参与变量绑定的节点就属于静态节点,vue3会在render函数中将静态节点用变量保存下来,所以该静态节点只会创建一次。
- 静态属性提升:用变量保存静态属性,如class类名等,用变量保存;
- 预字符串化:大量连续的静态节点,会直接编译成一个字符串节点(vue2会递归处理),vue3直接转为字符串,然后创建真是的dom赋值给innerHTML属性(SSR优化),减少了vue2的递归比较创建时间;
- 缓存事件处理器函数:减少了重复创建,节省时间。
- 标记:区分静态节点(-1)与动态节点(1),每次渲染只diff对比动态节点。
- vue3源码体积小,移除了一些不常用API,如ref等,在用到的时候需要引入才行;
- 响应式系统,defineProperty与proxy
3、Vue3.0响应式原理:
vue3 是使用 ES6 的 Proxy 和 Reflect 相互配合实现数据响应,解决了vue2中视图不能自动更新的问题。
大致分为3个阶段:
- 初始化阶段:组件初始化形成对应的 proxy 对象,然后形成一个负责渲染的 effect。
- get依赖搜集阶段:解析template,触发get,通过proxy对象和key形成dep是,将负责渲染的effect存入deps;
- set派发更新阶段:当属性改变的时候,通过trigger方法,找到对应的deps,将deps分类成computedRunners和effect,然后依次执行。
4、vue3中新特性有哪些?
- 性能提升
- 更好支持ts
- 新增组合式API
- 新增组件
- tree-shaking (摇树优化)清除多余代码优化项目打包体积。
- Custom Renderer API 自定义渲染器
5、vue3生命周期
-
beforeMount => onBeforeMount
-
mounted => onMounted
-
beforeUpdate => onBeforeUpdate
-
updated => onUpdated
-
beforeUnmount => onBeforeUnmount
-
unmount => onUnmounted
- onRenderTracked:每次渲染之后搜集页面响应依赖触发
- onRenderTriggered: 指每次重新渲染被触发的时候,首次页面加载不会触发,当数据改变,页面重新渲染的时候触发
没有beforeCreate和created,因为setup的执行时间比这两个都早一点。
6、script setup干啥的?
script setup是vue3组合式api的语法糖,简化了组合式api的写法,特点如下:
- 属性和方法无需返回,可以直接使用;
- 引入组件的时候会自动注册,无需通过components手动注册;
- 使用definProps接收父组件传递的值;
- useAttrs获取属性,useSlots获取插槽,definEmits获取自定义事件;
- 默认不会对外暴露任何属性,如果有需要可以使用definExpose。
7、vue的组件通信方式:
vue3相关
props:父传子
注意:
- 父组件是setup(),子组件时setup语法糖,是接收不到父组件data里面的数据,只能接收到父组件setup里面的数据;
- 父组件是setup语法糖,子组件时setup(),可以通过props接收到data和setup函数的属性;
但如果在setup里接收,同样只能接收到父组件setup函数里的属性;
$emit:子通过自定义事件传父
expose / ref
子组件抛出数据和方法
defineExpose({
childName: "这是子组件的属性",
someMethod(){
console.log("这是子组件的方法")
}
})
父组件通过 ref 获取子组件的属性和方法
<child ref="comp"></child>
const comp = ref(null)
const handlerClick = () => {
console.log(comp.value.childName) // 获取子组件对外暴露的属性 comp.value.someMethod() // 调用子组件对外暴露的方法
}
attrs 包含父作用域里除了class和style除外的非props属性集合;
// 适用于 Vue3.2版本
const attrs = useAttrs() console.log(attrs) // { msg2:"2222", title: "3333" }
v-model 可以支持多个数据双向绑定
父组件:
<template>
<child v-model:key="key" v-model:value="value"></child>
</template>
<script setup>
import child from "./child.vue"
import { ref, reactive } from "vue"
const key = ref("1111")
const value = ref("2222")
</script>
子组件:
<template>
<el-button @click="handlerClick">按钮</el-button>
</template>
<script setup>
// 方法二 适用于 Vue3.2版本,不需要引入
// import { defineEmits } from "vue"
const emit = defineEmits(["key","value"])
// 用法
const handlerClick = () => {
emit("update:key", "新的key")
emit("update:value", "新的value")
}
</script>
provide / inject
vuex / pinia
// store/index.ts
import { defineStore } from 'pinia';
export const useStore = defineStore('user', {
state: () => {
return {
count: 1,
arr:[]
}
},
getters: {
myCount(state):number{
return state.count + 1;
},
myCount1():number{
return this.count +1
}
},
actions: {
changeState(num: number) {
this.count += num;
}
}
})
// 使用panio:
<script setup>
import { useStore } from '../stores/index'
const store = useStore();
// 更改piano的四种方法
// 方法一
const handlerClick1 = () => {
store.count++
}
// 方法二
const handlerClick2 = () => {
store.$patch({
count: store.count++,
arr:[...store.arr,store.count]
})
}
// 方法三
const handlerClick3 = () => {
store.$patch(state => {
state.count += 1;
state.arr.push(state.count)
})
}
// 方法四
const handlerClick4 = () => {
store.changeState(5)
}
</script>
// 使用panio:
<template>
store:{{ store.count }}-{{ count }}
</template>
<script setup>
import { storeToRefs } from 'pinia'
import { useStore } from '../stores/index'
const store = useStore();
// 解构写法:
const { count } = storeToRefs(useStore())
</script>
mitt:
vue3中没有eventBus跨组件通信,但是现在有一个替代方案,使用mitt.js,原理还是EventBus;
vue2相关
props
.sync:实现在子组件修改父组件内容
// Parent.vue
<template>
<child :page.sync="page"></child>
</template>
<script>
export default { data(){ return { page:1 } } }

// Child.vue
export default {
  props:["page"],
  computed(){ // 当我们在子组件里修改 currentPage 时,父组件的 page 也会随之改变
    currentPage {
      get(){ return this.page },
      set(newVal){
        this.$emit("update:page", newVal)
       }
      }
    }
 }
</script>
v-model
ref
$emit / v-on
$attrs / $listeners
- $attrs:包含父组件作用域里面除了class和style的非props属性集合。通过this.$attrs获取父组件作用域中所有符合条件的属性集合,然后还要继续传给子组件内部的其它组件,可以通过v-bind="$attrs";
- $listeners:包含父作用域里.native除外的监听事件集合。如果还要继续传给子组件内部的其它组件,可以通过v-on="$listeners"
$children / $parent
provide / inject
EventBus
vuex
$root
slot:把子组件的数据通过插槽的方式传给父组件使用,然后再插会到子组件;
// Child.vue
<template>
    <div>
        <slot :user="user"></slot>
    </div>
</template>
export default{
    data(){
        return {
            user:{ name:"沐华" }
        }
    }
}

// Parent.vue
<template>
    <div>
        <child v-slot="slotProps">
            {{ slotProps.user.name }}
        </child>
    </div>
</template>
一、ref函数与reactive函数
1、ref 获取元素节点的几种方式
1、vue2使用$ref:
<template>
  <div id="app">
    <div ref="hello">小猪课堂</div>
  </div>
</template>
<script>
export default {
  mounted() {
    console.log(this.$refs.hello); // <div>小猪课堂</div>
  },
};
</script>
2、vue3中ref访问元素
<template>
  <div ref="hello">小猪课堂</div>
</template>
<script setup lang="ts">
import { onMounted, ref } from "vue";
const hello = ref<any>(null);
onMounted(() => {
  console.log(hello.value); // <div>小猪课堂</div>
});
</script>
3、v-for 中使用 ref
<template>
  <div ref="hello">小猪课堂</div>
  <ul>
    <li v-for="item in 10" ref="itemRefs">
      {{item}} - 小猪课堂
    </li>
  </ul>
</template>
<script setup lang="ts">
import { onMounted, ref } from "vue";


const itemRefs = ref<any>([]);
onMounted(() => {
  console.log(itemRefs.value);
});
</script>
4、ref 绑定函数
<template>
  <div :ref="setHelloRef">小猪课堂</div>
</template>
<script setup lang="ts">
import { ComponentPublicInstance, HTMLAttributes } from "vue";


const setHelloRef = (el: HTMLElement | ComponentPublicInstance | HTMLAttributes) => {
  console.log(el); // <div>小猪课堂</div>
};
</script>
5、ref在v-for中的使用:
<template>
  <ul>
    <li v-for="item in 10" :ref="(el) => setItemRefs(el, item)">
      {{ item }} - 小猪课堂
    </li>
  </ul>
</template>
<script setup lang="ts">
import { ComponentPublicInstance, HTMLAttributes, onMounted } from "vue";
let itemRefs: Array<any> = [];
const setItemRefs = (el: HTMLElement | ComponentPublicInstance | HTMLAttributes, item:number) => {
  if(el) {
    itemRefs.push({
      id: item,
      el,
    });
  }
}
onMounted(() => {
  console.log(itemRefs);
});
</script>
6、 组件上使用ref
在vue3中,使用ref获取子组件时,如果想要获取子组件的数据或者方法,子组件可以通过defineExpose方法暴露数据。
父组件:
<template>
  <child ref="childRef"></child>
</template>
<script setup lang="ts">
import { onMounted, ref } from "vue";
import child from "./child.vue";
const childRef = ref<any>(null);
onMounted(() => {
  console.log(childRef.value); // child 组件实例
  console.log(childRef.value.message); // 我是子组件
});
</script>
子组件:
<template>
  <div>{{ message }}</div>
</template>
<script lang="ts" setup>
import { ref } from "vue";


const message = ref<string>("我是子组件");
const onChange = () => {
  console.log("我是子组件方法")
};
defineExpose({
  message,
  onChange
});
</script>
二、VueUse的一些方法使用
1、createGlobalState 在全局作用域中保留状态
// 定义全局状态 @/stores/userInfo.js
export const globalState = createGlobalState(
() => ref({a:{aa:1}}),
)
// 使用并改变全局状态,其它使用此状态的地方都会改变。
import { globalState } from '@/stores/userInfo.js'
const aa = globalState();
console.log(aa)
const aaaa = () => {
aa.value.a.aa = 22;
}
2、VueUse createGlobalState 和 Pinia 有什么区别呢?
3、useStorage
useStorage 接受四个参数,key为必传参数,其他的为可选参数
- key:保存在本地存储中的键名,用于读取和写入数据。
- defaults:数据默认值,如果本地存储中没有数据时,则使用默认值。类型为MaybeRefOrGetter。
- storage:指定使用的存储类型,localStorage或者sessionStorage,默认为localStorage,参数类型为 StorageLike 或 undefined。
- options:可选的配置对象,UseStorageOptions类型。
4、onClickOutside
检测点击非常简单。但是,当点击发生在一个元素之外时,如何检测?那就有点棘手了。但使用VueUse中的 onClickOutside 组件就很容易能做到这点。代码如下:
<script setup>
import { ref } from 'vue'
import { onClickOutside } from '@vueuse/core'
const container = ref(null)
onClickOutside(container, () => alert('Good. Better to click outside.'))
</script>
<template>
<div>
<p>Hey there, here's some text.</p>
<div class="container" ref="container">
<p>Please don't click in here.</p>
</div>
</div>
</template>
<style lang="scss" scoped>
.container{
border:solid red 1px;
padding:30px;
}
</style>
5、useFocusTrap
下载:
pnpm i @vueuse/integrations
为了拥有可访问的应用程序,正确地管理焦点非常重要。

将immediate设置为true,页面加载时,焦点将被放置在 container 元素中。然后,就不可能在该容器之外的地方做标签。
到达第三个按钮后,再次点击tab键将回到第一个按钮。
就像onClickOutside一样,我们首先为 container 设置了模板ref。
<script setup>
import { ref } from 'vue'
import { useFocusTrap } from '@vueuse/integrations/useFocusTrap'
const container = ref(null)
useFocusTrap(container, { immediate: true })
</script>
<template>
<div>
<el-button type="primary" tab-index="-1">Can't click me</el-button>
<div class="container" ref="container">
<el-button type="error" tab-index="-1">Inside the trap</el-button>
<el-button type="error" tab-index="-1">Can't break out</el-button>
<el-button type="error" tab-index="-1">Stuck here forever</el-button>
</div>
<el-button type="error" tab-index="-1" class="bot">Can't click me</el-button>
</div>
</template>
<style lang="scss" scoped>
.container{
padding:20px;
margin:20px;
border:solid red 1px;
/* display: flex;
flex-flow: column wrap; */
button:hover{
border:solid red 1px
}
button:active{
border:solid black 2px
}
button:focus{
border:solid yellow 3px
}
}
</style>
三、vue3自定义指令
自定义指令生命周期:
- created:在绑定元素的attribute或事件监听器被应用之前调用;
- beforeMount:当指令第一次绑定到元素并且在挂在父组件之前调用;
- mounted:在绑定元素的父组件被挂在后调用,大部分自定义指令都写在这里;
- beforeUpdate:在更新包含组件的VNode之前调用;
- update:在更新包含组件的VNode及其子组件的VNode更新后调用;
- beforeUnmount:在卸载绑定元素的父组件之前调用;
- unmounted:当指令与元素解除绑定且父组件已卸载时,只调用一次;
生命周期的四个参数:
这里七个钩子函数,钩子函数中有回调函数,回调参数有四个,含义基本同vue2;
- el:指令所绑定的元素,可以用来直接操作DOM(可以进行事件绑定);
- binding:我们通过自定义指令传递的各种参数;
- value:传递给指令的值,例如 v-my-directive="1+1",值是2;
- oldValue:之前的值,仅在beforeUpdate和update中可用。无论值是否更改,它都可用;
- arg:传递给指令的参数(如果有的话)。例如在v-my-directive:foo中,参数是foo;
- modifiers:一个包含修饰符的对象(如果有的话)。例如在v-my-directive.foo.bar,修饰符对象是{foo:true,bar:true};
- dir:指令的定义对象;
- instance:使用该指令的组件实例;
- vnode:Vue编译生成的虚拟节点;
- oldVnode:上一个虚拟节点,仅在 update 和 componentUpdated 钩子中可用;
生命周期:
const vFocus = {

  created: (el, binding, vnode, prevNode )=>{

    console.log('created:',el, binding, vnode, prevNode)

  },

  beforeMount: (el, binding, vnode, prevNode)=>{

    console.log('beforeMount:',el, binding, vnode, prevNode)

  },

  mounted: (el, binding, vnode, prevNode)=>{

    console.log('mounted:',el, binding, vnode, prevNode)

  },

  beforeUpdate: (el, binding, vnode, prevNode)=>{

    console.log('beforeUpdate:',el, binding, vnode, prevNode)

  },

  updated: (el, binding, vnode, prevNode)=>{

    console.log('updated:',el, binding, vnode, prevNode)

  },

  beforeUnmount: (el, binding, vnode, prevNode)=>{

    console.log('beforeUnmount',el, binding, vnode, prevNode)

  },

  unmounted: (el, binding, vnode, prevNode)=>{

    console.log('unmounted',el, binding, vnode, prevNode)

  }

  // mounted: (el: any) => {

  //   console.log(el.children)

  //   el.children[0].children[0].focus(); // element-plus组件的focus事件,需要作用在input标签上才有用

  // }

} 
私有自定义指令:
<script setup lang="ts">
const data = ref({
  val1:0
})

// vue3 给输入框绑定focus事件几种方法

// 方法一:自定义指令给原生的input标签
// const vFocus1 = {
//   mounted: (el: any) => {
//     el.focus();
//   }
// }

// 方法二:自定义指令给element-plus的组件
// const vFocus2 = {
//   mounted: (el: any) => {
//     console.log(el.children)
//     el.children[0].children[0].focus(); // element-plus组件的focus事件,需要作用在input标签上才有用
//   }
// }

// 方法三:ref获取页面Dom元素,绑定focus事件(即可作用于原生的dom,也可以作用于element-plus组件)
// const input1 = ref(null);
const input2 = ref(null);
onMounted(() => {
  // input1.value.focus(); // 使用ref获取Dom元素,可以直接给原生的input标签添加focus事件。
  input2.value.focus(); // 使用ref获取Dom元素,可以直接给element-plus组件添加focus事件。
})
</script>
<template>
  <div v-mon>自定义指令</div>
  <!-- <input type="text" v-focus1 > -->
  <input type="text" ref="input1" >
  <!-- <el-input type="text" v-model="data.val1" v-focus2/>  -->
  <!-- <el-input type="text" v-model="data.val1" ref="input2"/>  -->
</template>
全局自定义指令
全局 main.ts定义
const app = createApp(App);
//自定义指令-列表新增元素后自动滚动底部
app.directive("scrollBottom", {
updated(el) {
// 这里的el即是绑定指令处的dom元素
el.scrollTo({
top: el.scrollHeight - el.clientHeight,
behavior: "smooth"
})
}
});
app.use(i18)
.use(createPinia())
.use(router)
.mount('#app')
使用:
<div style="max-height: 300px;overflow: auto;" class="role-drawer" v-scrollBottom>
<div v-for="(item, index) in userForm.roles" :key="item.id + index" class="mb-4">
...
</div>
</div>
常用自定义指令:
1、input标签获取焦点,同上
2、防抖
<script setup lang="ts">
const debounceClick = () => {
console.log(1)
}
const vDebounce = {
mounted(el: any, binding: any) {
let timer:any
el.addEventListener('click', () => {
if (timer) {
clearTimeout(timer)
}
timer = setTimeout(() => {
binding.value()
}, 1000)
})
}
}
</script>
<template>
<el-button type="primary" v-debounce="debounceClick">按钮</el-button>
</template>
3、图片懒加载
4、控制滚动条滚动
四、piano的使用
将piano存储到浏览器本地的方法;还可以使用 piniaPluginPersist 插件实现。
// 将piano数据存储到浏览器本地,实现永久花
const instance = useMainStore();
instance.$subscribe((_, state) => {
localStorage.setItem('login-store', JSON.stringify({ ...state }));
})const old = localStorage.getItem('login-store');
if (old) {
instance.$state = JSON.parse(old);
}
示例:
main.ts
import { createApp } from 'vue'
import '@/styles/main.css'
import '@unocss/reset/tailwind.css'
import 'uno.css'
import '@wangeditor/editor/dist/css/style.css'
import 'vue-json-pretty/lib/styles.css'
import 'element-plus/dist/index.css'
import '@/stores/menu.js'
import { createPinia } from 'pinia'
import { setupLayouts } from 'virtual:generated-layouts'
import { createRouter, createWebHashHistory } from 'vue-router'
import AddProtocol from '@/pages/HKICLAdminPortal/AddProtocol.vue'
import App from '@/App.vue'
import i18 from '@/modules/i18n'
import generatedRoutes from '~pages'
let RouteArr=[
...generatedRoutes,
{ component:AddProtocol, path: '/HKICLAdminPortal/UpdataProtocol', alias: '/HKICLAdminPortal/AddProtocol' }
]
const routes = setupLayouts(RouteArr)
const router = createRouter({
history: createWebHashHistory(),
routes,
})
const app = createApp(App);
app.use(i18)
.use(createPinia())
.use(router)
.mount('#app')
store/index.ts
// store/index.ts
import { defineStore } from 'pinia'
// 1. 定义容器、导出容器
// 参数1:容器的ID,必须是唯一的,后面Pinia会把所有的容器挂载到根容器
// 参数2:一些选项对象,也就是state、getter和action
// 返回值:一个函数,调用即可得到容器实例

// export const useMainStore =  defineStore('main',{
export const useMainStore = defineStore({
  id:'main',
  // 类似于Vue2组件中的data,用于存储全局状态数据,但有两个要求
  // 1. 必须是函数,目的是为了在服务端渲染的时候避免交叉请求导致的数据状态污染
  // 2. 必须是箭头函数,这样是为了更好的 TS 类型推导
  state:()=>{
    return {
      info: "pinia 可以使用",
      count:0
    }
  },
  getters: { // 类似组件的computed,用来封装计算属性,具有缓存的功能;
    count10(state) {
      return state.count + 11;
    },
    count11(state) {
      return this.count + 12;
    },
    count12():number {
      return this.count + 13;
    }
  },
  actions: { // 封装业务逻辑,修改state
    changeState() {
      this.count += 20;
      this.info = 'action修改数据1'
    },
    changeStates(num:number) {
      this.count += num+2;
      this.info = 'action修改数据2'
    },
  }
})

// 2. 使用容器中的 state
// 3. 通过 getter 修改 state
// 4. 使用容器中的 action 同步和异步请求


// 将piano数据存储到浏览器本地,实现永久花

const instance = useMainStore();
instance.$subscribe((_, state) => {
  localStorage.setItem('login-store', JSON.stringify({ ...state }));
})

const old = localStorage.getItem('login-store');
if (old) {
  instance.$state = JSON.parse(old);
}
directive.vue
<script setup lang="ts">
import child from './child.vue'
import { useMainStore } from '@/stores';
const mainStore = useMainStore();
</script>
<template>
<h1>父组件:</h1>
<div>自定义指令:piano:{{ mainStore.count }}-{{ mainStore.info }}</div>
<br>
<br>
<hr>
<br>
<child></child>
</template>
<style lang="scss" scoped>
</style>
child.vue
<script setup lang="ts">
import { useMainStore } from '@/stores';
import { storeToRefs } from 'pinia';
const mainStore = useMainStore();
const { count, info } = storeToRefs(mainStore); // 这样结构的数据具有响应式
// 修改piano数据方式一
const changePino = () => {
mainStore.count += 10;
}
// 修改piano数据方式二 修改解构后的数据
const changePino1 = () => {
count.value += 5;
}
// 修改piano数据方式三
const changePino2 = () => {
mainStore.$patch(state => {
state.count += 15;
state.info = 'piano批量更新'
})
}
const changePino3 = () => {
mainStore.changeState();
}
const changePino4 = () => {
mainStore.changeStates(1);
}
</script>
<template>
<h1>子组件:{{ mainStore.info }}-{{ count }}-{{ info }}</h1>
<div>{{ mainStore.count }}</div>
piana getter:{{ mainStore.count10 }}-{{ mainStore.count11 }}-{{ mainStore.count12 }}
<el-button type="primary" @click="changePino">改变数据</el-button>
<el-button type="primary" @click="changePino1">改变数据1-解构后的数据</el-button>
<el-button type="primary" @click="changePino2">改变数据2</el-button>
<el-button type="primary" @click="changePino3">改变数据3</el-button>
<el-button type="primary" @click="changePino4">改变数据4</el-button>
</template>
<style lang="scss" scoped>
</style>
五、vue API详解
1、ref
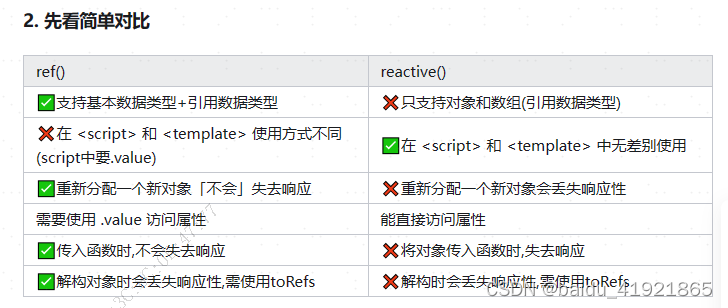
1.1、ref与reactive关系
可以将ref看成reactive的变形版本,这个是由于reactive内部采用Proxy来实现,而Proxy只接受对象作为入参,这才有了ref来解决值类型的数据响应,如果传入ref的是一个对象,内部也会调用reactive方法进行深层响应转换。
1.2、Ref 是如何创建的
我们还是先从定义抓起,ref 接收一个可选的 unknown 做为入参,接着直接调用 createRef
createRef 先判断 value 是否已经是一个 ref, 如果是则直接返回,如果不是接着判断是不是浅观察,如果是浅观察直接构造一个 ref 返回,不是则将 rawValue 转换成 reactive 再构造一个 ref 返回
export function ref(value?: unknown) {
  return createRef(value)
}

/**
 * @description:
 * @param {rawValue} 原始值
 * @param {shallow} 是否是浅观察
 */
function createRef(rawValue: unknown, shallow = false) {
  // 如果已经是ref直接返回
  if (isRef(rawValue)) {
    return rawValue
  }

  // 如果是浅观察直接观察,不是则将 rawValue 转换成 reactive ,
  // reactive 的定义在下方
  let value = shallow ? rawValue : convert(rawValue)

  // ref 的结构
  const r = {
    // ref 标识
    __v_isRef: true,
    get value() {
      // 依赖收集
      track(r, TrackOpTypes.GET, 'value')
      return value
    },
    set value(newVal) {
      if (hasChanged(toRaw(newVal), rawValue)) {
        rawValue = newVal
        value = shallow ? newVal : convert(newVal)
        // 触发依赖
        trigger(
          r,
          TriggerOpTypes.SET,
          'value',
          __DEV__ ? { newValue: newVal } : void 0
        )
      }
    }
  }
  return r
}

// 如是是对象则调用 reactive, 否则直接返回
const convert = <T extends unknown>(val: T): T =>
  isObject(val) ? reactive(val) : val
2、isRef
- 作用:判断一个变量是否为一个 ref 对象。
- 语法:const bol = isRef(x)
import { ref, isRef, reactive } from 'vue'
  const hello = ref('Hello')
  const world = reactive('World')
  console.log(isRef(hello))  // true
  console.log(isRef(world))  // false
3、unref
- 作用:用于返回一个值,如果访问的是 ref变量,就返回其 .value值;如果不是 ref变量,就直接返回。
- 语法:const x = unref(y)
import { ref, unref } from 'vue'
const hello = ref('Hello')
const world = 'World'
console.log(unref(hello)) // 'Hello'
console.log(unref(world)) // 'World'
4、customRef
- 作用:自定义ref对象,把ref对象改写成get/set,进一步可以为它们添加 track/trigger。
- track:依赖搜集
- trigger:触发依赖
<template>
  <h1 v-text='num'></h1>
  <button @click='num++'>自增</button>
</template>

<script setup>
  import { customRef, isRef } from 'vue'
  const num = customRef((track, trigger)=>{
    let value = 100
    return {
      get () {
        track()
        return value
      },
      set (newVal) {
        value = newVal
        trigger()
      }
    }
  })
  console.log(isRef(num)) // true
</script>
5、toRef
- 作用:把一个 reactive对象中的某个属性变成 ref 变量。
- 语法:const x = toRef(reactive(obj), 'key') // x.value
<template>
  <h1 v-text='age'></h1>
</template>

<script setup>
  import { toRef, reactive, isRef } from 'vue'
  let user = { name:'张三', age:10 }

  let age = toRef(reactive(user), 'age')
  console.log(isRef(age))  // true
</script>
6、toRefs
- 作用:把一个reactive响应式对象变成ref变量。
- 语法:const obj1 = toRefs(reactive(obj))
- 应用:在子组件中接收父组件传递过来的 props时,使用 toRefs把它变成响应式的。
<template>
  <h1 v-text='info.age'></h1>
</template>

<script setup>
  import { toRefs, reactive, isRef } from 'vue'
  let user = { name:'张三', age:10 }
  let info = toRefs(reactive(user))

  console.log(isRef(info.age))  // true
  console.log(isRef(info.name))  // true
  console.log(isRef(info))  // true
</script>
7、shallowRef
- 作用:对复杂层级的对象,只将其第一层变成 ref 响应。 (性能优化)
- 语法:const x = shallowRef({a:{b:{c:1}}, d:2}) 如此a、b、c、d变化都不会自动更新,需要借助 triggerRef 来强制更新
const state = shallowRef({ count: 1 })
// 不会触发更改
state.value.count = 2
// 会触发更改
state.value = { count: 2 }
<template>
  <h1 v-text='info.a.b.c'></h1>
  <button @click='changeC'>更新[c]属性</button>

  <h1 v-text='info.d'></h1>
  <button @click='changeD'>更新[d]属性</button>
</template>

<script setup>
  import { shallowRef, triggerRef, isRef } from 'vue'

  let info = shallowRef({a:{b:{c:1}}, d:2})

  console.log(isRef(info.value.a.b.c)) // false
  console.log(isRef(info)) // true
  console.log(isRef(info.a)) // false
  console.log(isRef(info.d)) // false

  const changeC = () => {
    info.value.a.b.c++
    triggerRef(info) // 强制渲染更新
  }

  const changeD = () => {
    info.value.d++
    triggerRef(info) // 强制渲染更新
  }
</script>
8、triggerRef
- 作用:强制更新一个 shallowRef对象的渲染。
- 语法:triggerRef(shallowRef对象)
- 参考代码:见上例。
9、reactive
- 作用:定义响应式变量,一般用于定义引用数据类型。如果是基本数据类型,建议使用ref来定义。
- 语法:const info = reactive([] | {})
10、readonly
- 作用:把一个对象,变成只读的。
- 语法:const rs = readonly(ref对象 | reactive对象 | 普通对象)
<template>
  <h1 v-text='info.foo'></h1>
  <button @click='change'>改变</button>
</template>

<script setup>
  import { reactive, readonly } from 'vue'
  const info = readonly(reactive({bar:1, foo:2}))
  const change = () => {
    info.foo++  // target is readonly
  }
</script>
11、isReadonly
- 作用: 判断一个变量是不是只读的。
- 语法:const bol = isReadonly(变量)
<script setup>
  import { reactive, readonly, isReadonly } from 'vue'

  const info = readonly(reactive({bar:1, foo:2}))
  console.log(isReadonly(info)) // true

  const user = readonly({name:'张三', age:10})
  console.log(isReadonly(user)) // true
</script>
12、isReactive
- 作用:判断一变量是不是 reactive的。
- 注意:被 readonly代理过的 reactive变量,调用 isReactive 也是返回 true的。
<script setup>
  import { reactive, readonly, isReactive } from 'vue'

  const user = reactive({name:'张三', age:10})
  const info = readonly(reactive({bar:1, foo:2}))

  console.log(isReactive(info)) // true
  console.log(isReactive(user)) // true
</script>
13、isProxy
作用:判断一个变量是不是 readonly 或 reactive的。
<script setup>
  import { reactive, readonly, ref, isProxy } from 'vue'

  const user = readonly({name:'张三', age:10})
  const info = reactive({bar:1, foo:2})
  const num = ref(100)

  console.log(isProxy(info)) // true
  console.log(isProxy(user)) // true
  console.log(isProxy(num))  // false
</script>
14、toRaw
- 作用:得到返回 reactive变量或 readonly变量的"原始对象"。
- 语法::const raw = toRaw(reactive变量或readonly变量)
- 说明:reactive(obj)、readonly(obj) 和 obj 之间是一种代理关系,并且它们之间是一种浅拷贝的关系。obj 变化,会导致reactive(obj) 同步变化,反之一样。
<script setup>
  import { reactive, readonly, toRaw } from 'vue'

  const uu = {name:'张三', age:10}
  const user = readonly(uu)
  console.log(uu === user) // false
  console.log(uu === toRaw(user)) // true

  const ii = {bar:1, foo:2}
  const info = reactive(ii)
  console.log(ii === info) // false
  console.log(ii === toRaw(info)) // true
</script>
15、markRaw
- 作用:把一个普通对象标记成"永久原始",从此将无法再变成proxy了。
- 语法:const raw = markRaw({a,b})
<script setup>
  import { reactive, readonly, markRaw, isProxy } from 'vue'

  const user = markRaw({name:'张三', age:10})
  const u1 = readonly(user)  // 无法再代理了
  const u2 = reactive(user)  // 无法再代理了

  console.log(isProxy(u1))  // false
  console.log(isProxy(u2))  // false
</script>
16、shallowReactive
- 作用:定义一个reactive变量,只对它的第一层进行Proxy,,所以只有第一层变化时视图才更新。
- 语法:const obj = shallowReactive({a:{b:9}})
<template>
  <h1 v-text='info.a.b.c'></h1>
  <h1 v-text='info.d'></h1>
  <button @click='change'>改变</button>
</template>

<script setup>
  import { shallowReactive, isProxy } from 'vue'
  const info = shallowReactive({a:{b:{c:1}}, d:2})

  const change = () => {
    info.d++  // 只改变d,视图自动更新
    info.a.b.c++ // 只改变c,视图不会更新
    // 同时改变c和d,二者都更新
  }

  console.log(isProxy(info))  // true
  console.log(isProxy(info.d))  // false
</script>
17、shallowReadonly
- 作用:定义一个reactive变量,只有第一层是只读的。
- 语法:const obj = shallowReadonly({a:{b:9}})
<template>
  <h1 v-text='info.a.b.c'></h1>
  <h1 v-text='info.d'></h1>
  <button @click='change'>改变</button>
</template>

<script setup>
  import { reactive, shallowReadonly, isReadonly } from 'vue'
  const info = shallowReadonly(reactive({a:{b:{c:1}}, d:2}))

  const change = () => {
    info.d++  // d是读的,改不了
    info.a.b.c++ // 可以正常修改,视图自动更新
  }
  console.log(isReadonly(info))  // true
  console.log(isReadonly(info.d))  // false
</script>
18、computed
- 作用:对响应式变量进行缓存计算。
- 语法:const c = computed(fn / {get,set})
<template>
  <div class='page'>
    <span
      v-for='p in pageArr'
      v-text='p'
      @click='page=p'
      :class='{"on":p===page}'
    >
    </span>
  </div>

  <!-- 在v-model上使用computed计算属性 -->
  <input v-model.trim='text' /><br>
  你的名字是:<span v-text='name'></span>
</template>

<script setup>
  import { ref, computed } from 'vue'
  const page = ref(1)
  const pageArr = computed(()=>{
    const p = page.value
    return p>3 ? [p-2,p-1,p,p+1,p+2] : [1,2,3,4,5]
  })

  const name = ref('')
  const text = computed({
    get () { return name.value.split('-').join('') },
    // 支持计算属性的setter功能
    set (val) {
      name.value = val.split('').join('-')
    }
  })
</script>

<style lang='scss' scoped>
  .page {
    &>span {
      display:inline-block; padding:5px 15px;
      border:1px solid #eee; cursor:pointer;
    }
    &>span.on { color:red; }
  }
</style>
19、watch
watch坑点:(监听ref同样)
- 监听reactive定义的响应式数据,oldValue无法正确获取,深度监听无效;
- 监听reactive定义的响应式的某个属性时,deep配置有效;
用法:
- 作用:用于监听响应式变量的变化,组件初始化时,它不执行。
- 语法:const stop = watch(x, (new,old)=>{}),调用stop() 可以停止监听。
- 语法:const stop = watch([x,y], ([newX,newY],[oldX,oldY])=>{}),调用stop()可以停止监听。
<template>
  <h1 v-text='num'></h1>
  <h1 v-text='usr.age'></h1>
  <button @click='change'>改变</button>
  <button @click='stopAll'>停止监听</button>
</template>

<script setup>
  import { ref, reactive, watch, computed } from 'vue'

  // watch监听ref变量、reactive变量的变化
  const num = ref(1)
  const usr = reactive({name:'张三',age:1})
  const change = () => {
    num.value++
    usr.age++
  }
  const stop1 = watch([num,usr], ([newNum,newUsr],[oldNum,oldUsr]) => {
    // 对ref变量,newNum是新值,oldNum是旧值
    console.log('num', newNum === oldNum) // false
    // 对reactive变量,newUsr和oldUsr相等,都是新值
    console.log('usr', newUsr === oldUsr) // true
  })

  // watch还可以监听计算属性的变化
  const total = computed(()=>num.value*100)
  const stop2 = watch(total, (newTotal, oldTotal) => {
    console.log('total', newTotal === oldTotal) // false
  })

  // 停止watch监听
  const stopAll = () => { stop1(); stop2() }
</script>
深度监听与立即执行监听:
watch(() => props.categoryList, (newVal, oldVal) => {
if (newVal && newVal.length > 0) {
if (data.fileNametaskType) {
data.fileNametaskType = newVal[0].value;
}
} else if (!newVal) {
data.fileNametaskType = '';
}
},{immediate: true, deep:true})
20、watchEffect
- 作用:相当于react中的useEffect(),用于执行各种副作用;
- 语法:const stop = watchEffect(fn),默认flush:'pre',前置执行的副作用;
- watchPostEffect,等价于watchEffect(fn,{flush:'post'});后置执行的副作用;
- watchSyncEffect,等价于watchEffect(fn,{flush:'sync'});同步执行的副作用;
- 特点:watchEffect 会自动搜集其内部响应式依赖,当响应式依赖发生变化时,这个watchEffect将再次执行,直到你手动stop()掉它;
如果要操作“更新之后的DOM ”,就要配置 flush: 'post'。
flush 取值:
- pre (默认)
- post (在组件更新后触发,这样你就可以访问更新的 DOM。这也将推迟副作用的初始运行,直到组件的首次渲染完成。)
- sync (与watch一样使其为每个更改都强制触发侦听器,然而,这是低效的,应该很少需要)
作用:有点像computed属性,但是不用返回值。
<template>
  <h1 v-text='num'></h1>
  <button @click='stopAll'>停止掉所有的副作用</button>
</template>

<script setup>
  import { ref, watchEffect } from 'vue'
  let num = ref(0)

  // 等价于 watchPostEffect
  const stop1 = watchEffect(()=>{
    // 在这里你用到了 num.value
    // 那么当num变化时,当前副作用将再次执行
    // 直到stop1()被调用后,当前副作用才死掉
    console.log('---effect post', num.value)
  }, { flush:'post'} )

  // 等价于 watchSyncEffect
  const stop2 = watchEffect(()=>{
    // 在这里你用到了 num.value
    // 那么当num变化时,当前副作用将再次执行
    // 直到stop2()被调用后,当前副作用才死掉
    console.log('---effect sync', num.value)
  }, { flush:'sync'})

  const stop3 = watchEffect(()=>{
    // 如果在这里用到了 num.value
    // 你必须在定时器中stop3(),否则定时器会越跑越快!
    // console.log('---effect pre', num.value)
    setInterval(()=>{
      num.value++
      // stop3()
    }, 1000)
  })

  const stopAll = () => {
    stop1()
    stop2()
    stop3()
  }
</script>
21、生命周期钩子
- 选项式的beforeCreate、created、被setup替代了。setup表示组件被创建之前、props被解析之后执行,他是组合式API的入口。
- 选项式的beforeDestory、destoryed被更名为beforeUnmount、unmounted。
- 新增了两个选项式的生命周期,renderTracked、renderTriggered,它们只是在开发环境使用,常用于调试。
- 在使用setup组合时,不建议使用选项式生命周期,建议使用on*系列hooks生命周期。
<template>
  <h1 v-text='num'></h1>
  <button @click='num++'>自增</button>
</template>

<script setup>
  import {
    ref, onBeforeMount, onMounted,
    onBeforeUpdate, onUpdated,
    onBeforeUnmount, onUnmounted,
    onRenderTracked, onRenderTriggered,
    onActivated, onDeactivated,
    onErrorCaptured
  } from 'vue'

  console.log('---setup')
  const num = ref(100)
  // 挂载阶段
  onBeforeMount(()=>console.log('---开始挂载'))
  onRenderTracked(()=>console.log('---跟踪'))
  onMounted(()=>console.log('---挂载完成'))

  // 更新阶段
  onRenderTriggered(()=>console.log('---触发'))
  onBeforeUpdate(()=>console.log('---开始更新'))
  onUpdated(()=>console.log('---更新完成'))

  // 销毁阶段
  onBeforeUnmount(()=>console.log('---开始销毁'))
  onUnmounted(()=>console.log('---销毁完成'))

  // 与动态组件有关
  onActivated(()=>console.log('---激活'))
  onDeactivated(()=>console.log('---休眠'))

  // 异常捕获
  onErrorCaptured(()=>console.log('---错误捕获'))
</script>
22、provide / inject
- 作用:在组件树中自上而下地传递数据.
- 语法:provide('key', value)
- 语法:const value = inject('key', '默认值')
# App.vue

<script setup>
  import { ref, provide } from 'vue'
  const msg = ref('Hello World')
  // 向组件树中注入数据
  provide('msg', msg)
</script>

# Home.vue

<template>
  <h1 v-text='msg'></h1>
</template>
<script setup>
  import { inject } from 'vue'
  // 消费组件树中的数据,第二参数为默认值
  const msg = inject('msg', 'Hello Vue')
</script>
23、getCurrentInstance
- 作用:用于访问内部组件实例。请不要把它当作在组合式 API 中获取 this 的替代方案来使用。
- 语法:const app = getCurrentInstance()
- 场景:常用于访问 app.config.globalProperties 上的全局数据。
<script setup>
  import { getCurrentInstance } from 'vue'
  const app = getCurrentInstance()
  // 全局数据,是不具备响应式的。
  const global = app.appContext.config.globalProperties
  console.log('app', app)
  console.log('全局数据', global)
</script>
六、Hooks、自定义hooks
七、Hooks、自定义hooks
自定义hook,处理表格问题
定义一个useTable组件:useTables.ts
export function useTable(api: (params: any) => Promise<T>) {
  let params = {}; // 拿到参数
  const [pagination, , , setTotal] = usePagination(() => refresh(params));
  const data = ref([]);
  const loading = ref(true);
  const refresh = (obj: object) => {
    params = obj;
    loading.value = true;
    return api({
      ...params,
      pageNum: pagination.pageNum,
      pageSize: pagination.pageSize,
      status: '',
    }).then((res) => {
      data.value = res.data.list;
      setTotal(res.data.totalNoOfResults);
    }).finally(() => {
      loading.value = false;
    });
  };
  return [data, refresh, pagination,loading];
}

// 分页相关功能
export function usePagination(cb: any, sizeOption: Array<number> = [10, 30, 50]):any {
  const pagination = reactive({
    pageNum: 1,
    total: 0,
    sizeOption,
    pageSize: sizeOption[0],
    onPageChange: (page: number) => {
      console.log('翻页:',page)
      pagination.pageNum = page;
      return cb()
    },
    onSizeChange: (pageSize: number)=>{
      pagination.pageNum = 1;
      pagination.pageSize = pageSize;
      return cb();
    },
    setTotal(total:number) {
      pagination.total = total;
    },
    reset() {
      pagination.pageNum = 1;
      pagination.total = 0;
      pagination.pageSize = pagination.sizeOption[0];
    }
  })

  return [
    pagination,
    pagination.onPageChange,
    pagination.onSizeChange,
    pagination.setTotal,
  ]
}
在myTable.vue中使用useTable组件:
<template>
  <el-button type="primary" @click="refresh">Search</el-button>
  <el-button type="primary" @click="q">q</el-button>
  <el-table :data="tableData" style="width: 100%" v-loading="loading">
    <el-table-column prop="fileName" label="fileName" width="340" />
    <el-table-column prop="originFileName" label="originFileName" width="356">
      <template #default="scope">
        <template v-for="item in scope.row.originFileName?.split('\n')">
          <el-tag v-if="item" class="ml-2 mb-2" style="line-height: 25px;" type="success">
            {{ item }}
          </el-tag>
        </template>
      </template>
    </el-table-column>
    <el-table-column prop="createdBy" label="createdBy" width="116" />
    <el-table-column prop="remark" label="remark" min-width="110" />
    <el-table-column prop="msgId" label="msgId" width="338" />
  </el-table>

  <!-- 分页器 -->
  <el-pagination
    v-model:current-page="pagination.current"
    v-model:page-size="pagination.pageSize"
    :page-sizes="pagination.sizeOption"
    size="small"
    layout="sizes, prev, pager, next"
    :total="pagination.total"
    @size-change="pagination.onSizeChange"
    @current-change="pagination.onPageChange"
  />
</template>

<script lang="ts" setup>
import {useTable} from '@/assets/useTable'
import { dataSubmissionListUpload } from '@/api'

const [tableData, refresh, pagination,loading] = useTable(dataSubmissionListUpload);

refresh({
  originFileName: null,
  fileName: null,
  msgId: null,
  remark: null,
  uploadBy: null,
  startTime: undefined,
  endTime: undefined,
  orderedBy: 'createdTime',
  orders: 'desc',
});
</script>


 448
448


 被折叠的 条评论
为什么被折叠?
被折叠的 条评论
为什么被折叠?
 到【灌水乐园】发言


