


SpringCloudAlibaba整合oss官网示例:https://github.com/alibaba/aliyun-spring-boot/tree/master/aliyun-spring-boot-samples/aliyun-oss-spring-boot-sample
首先肯定是开通oss服务了(免费的):
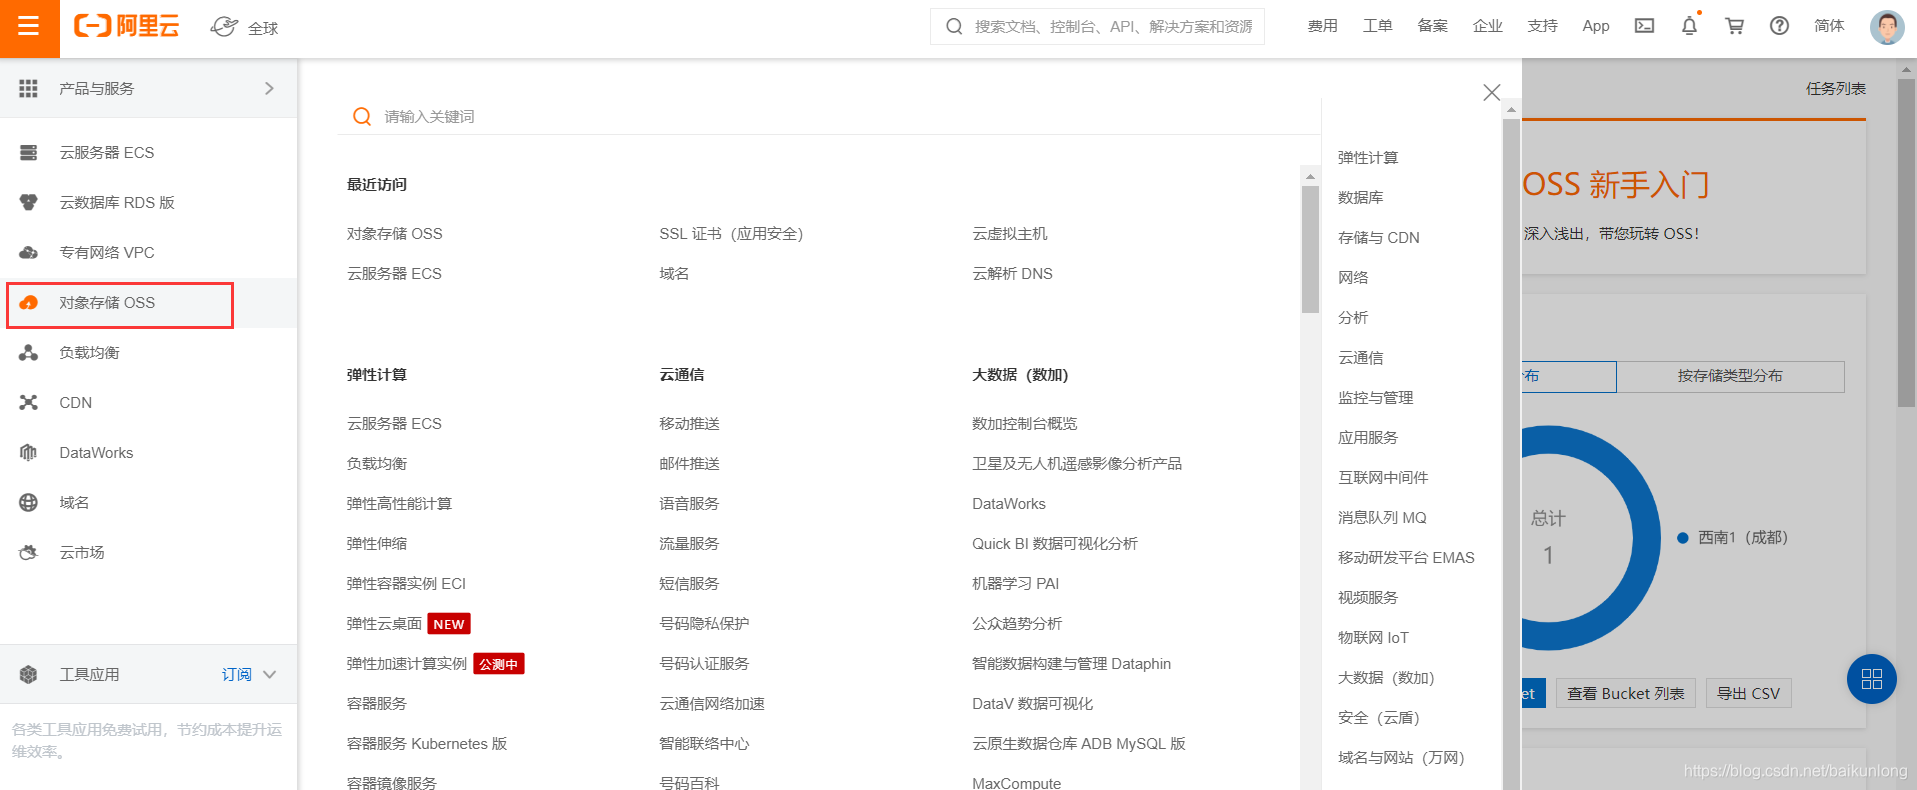
然后创建一个bucket:

然后新建一个module,作为专门处理第三方服务的微服务:

引入依赖:
<?xml version="1.0" encoding="UTF-8"?>
<project xmlns="http://maven.apache.org/POM/4.0.0" xmlns:xsi="http://www.w3.org/2001/XMLSchema-instance"
         xsi:schemaLocation="http://maven.apache.org/POM/4.0.0 https://maven.apache.org/xsd/maven-4.0.0.xsd">
    <modelVersion>4.0.0</modelVersion>
    <groupId>com.atguigu.gulimall</groupId>
    <artifactId>gulimall-third-party</artifactId>
    <version>0.0.1-SNAPSHOT</version>
    <name>gulimall-third-party</name>
    <description>各种第三方服务</description>

    <parent>
        <groupId>com.atguigu.gulimall</groupId>
        <artifactId>gulimall</artifactId>
        <version>0.0.1-SNAPSHOT</version>
    </parent>

    <dependencies>
        <!--里面包含了nacos注册中心和配置中心-->
        <dependency>
            <groupId>com.atguigu.gulimall</groupId>
            <artifactId>gulimall-common</artifactId>
            <exclusions>
                <!--排除mybatis-->
                <exclusion>
                    <groupId>com.baomidou</groupId>
                    <artifactId>mybatis-plus-boot-starter</artifactId>
                </exclusion>
            </exclusions>
        </dependency>
        <dependency>
            <groupId>org.springframework.boot</groupId>
            <artifactId>spring-boot-starter-web</artifactId>
        </dependency>
        <dependency>
            <groupId>org.springframework.cloud</groupId>
            <artifactId>spring-cloud-starter-openfeign</artifactId>
        </dependency>

        <dependency>
            <groupId>org.springframework.boot</groupId>
            <artifactId>spring-boot-starter-test</artifactId>
            <scope>test</scope>
        </dependency>

<!--        <dependency>-->
<!--            <groupId>com.alibaba.cloud</groupId>-->
<!--            <artifactId>spring-cloud-starter-alicloud-oss</artifactId>-->
<!--        </dependency>-->
        <dependency>
            <groupId>com.alibaba.cloud</groupId>
            <artifactId>aliyun-oss-spring-boot-starter</artifactId>
        </dependency>
    </dependencies>

    <dependencyManagement>
        <dependencies>
            <dependency>
                <groupId>org.springframework.cloud</groupId>
                <artifactId>spring-cloud-dependencies</artifactId>
                <version>${spring-cloud.version}</version>
                <type>pom</type>
                <scope>import</scope>
            </dependency>
            <dependency>
                <groupId>org.springframework.boot</groupId>
                <artifactId>spring-boot-dependencies</artifactId>
                <version>${spring-boot.version}</version>
                <type>pom</type>
                <scope>import</scope>
            </dependency>
            <dependency>
                <groupId>com.alibaba.cloud</groupId>
                <artifactId>aliyun-spring-boot-dependencies</artifactId>
                <version>1.0.0</version>
                <type>pom</type>
                <scope>import</scope>
            </dependency>
        </dependencies>
    </dependencyManagement>

    <build>
        <plugins>
            <plugin>
                <groupId>org.apache.maven.plugins</groupId>
                <artifactId>maven-compiler-plugin</artifactId>
                <version>3.8.1</version>
                <configuration>
                    <source>1.8</source>
                    <target>1.8</target>
                    <encoding>UTF-8</encoding>
                </configuration>
            </plugin>
            <plugin>
                <groupId>org.springframework.boot</groupId>
                <artifactId>spring-boot-maven-plugin</artifactId>
                <version>2.1.18.RELEASE</version>
                <configuration>
                    <mainClass>com.atguigu.gulimall.thirdparty.GulimallThirdPartyApplication</mainClass>
                </configuration>
                <executions>
                    <execution>
                        <id>repackage</id>
                        <goals>
                            <goal>repackage</goal>
                        </goals>
                    </execution>
                </executions>
            </plugin>
        </plugins>
    </build>

</project>
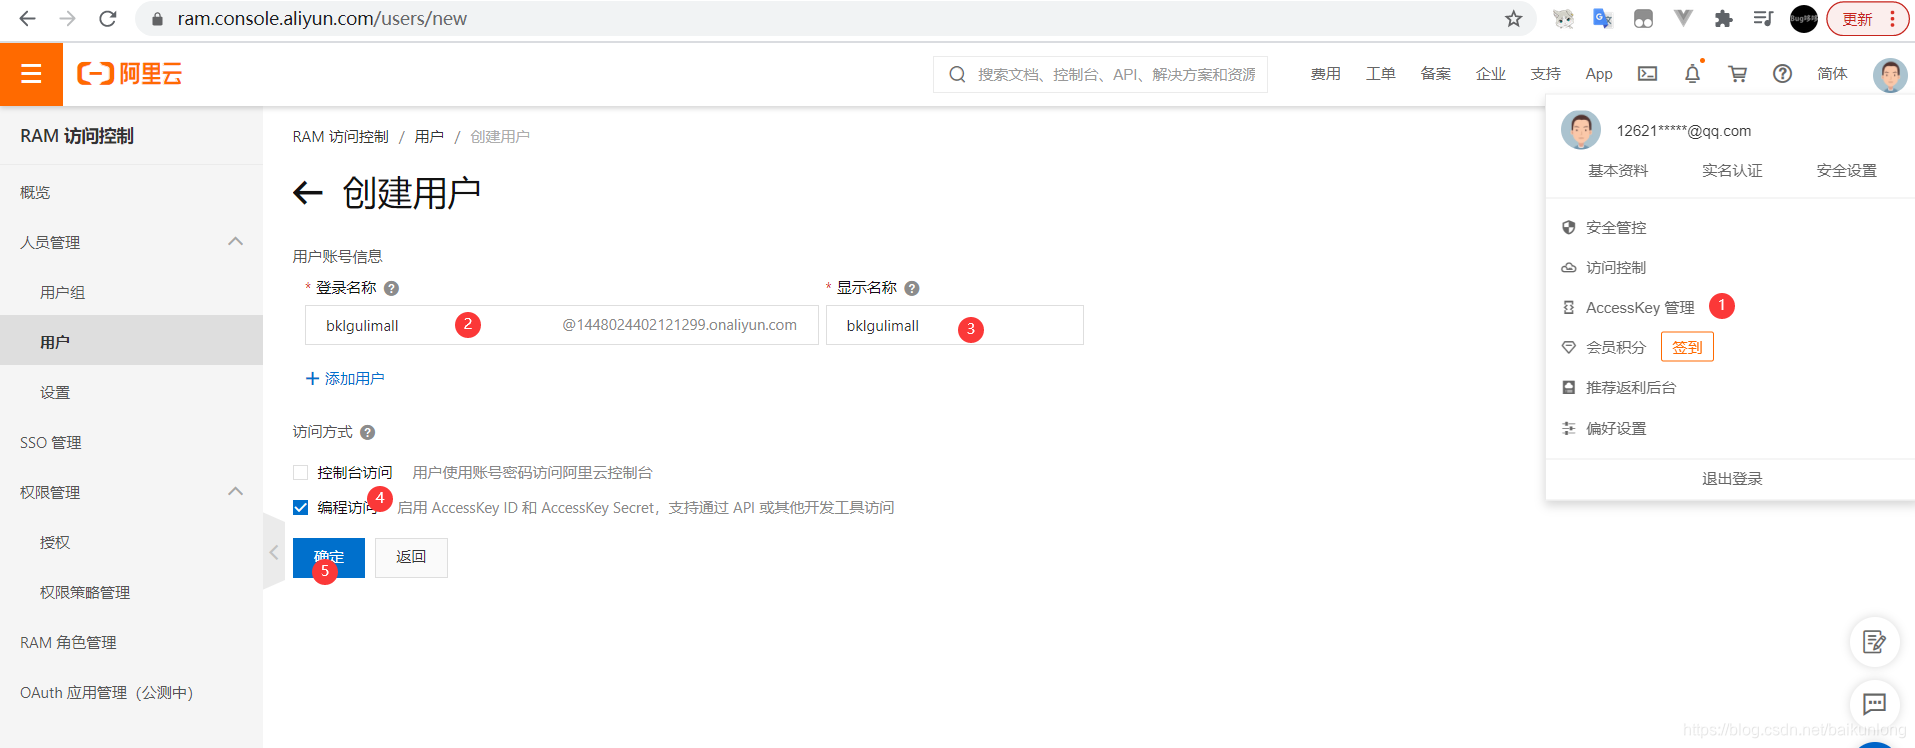
根据图片步骤,进行子账号创建(避免将自己的满权限key暴露在代码里):
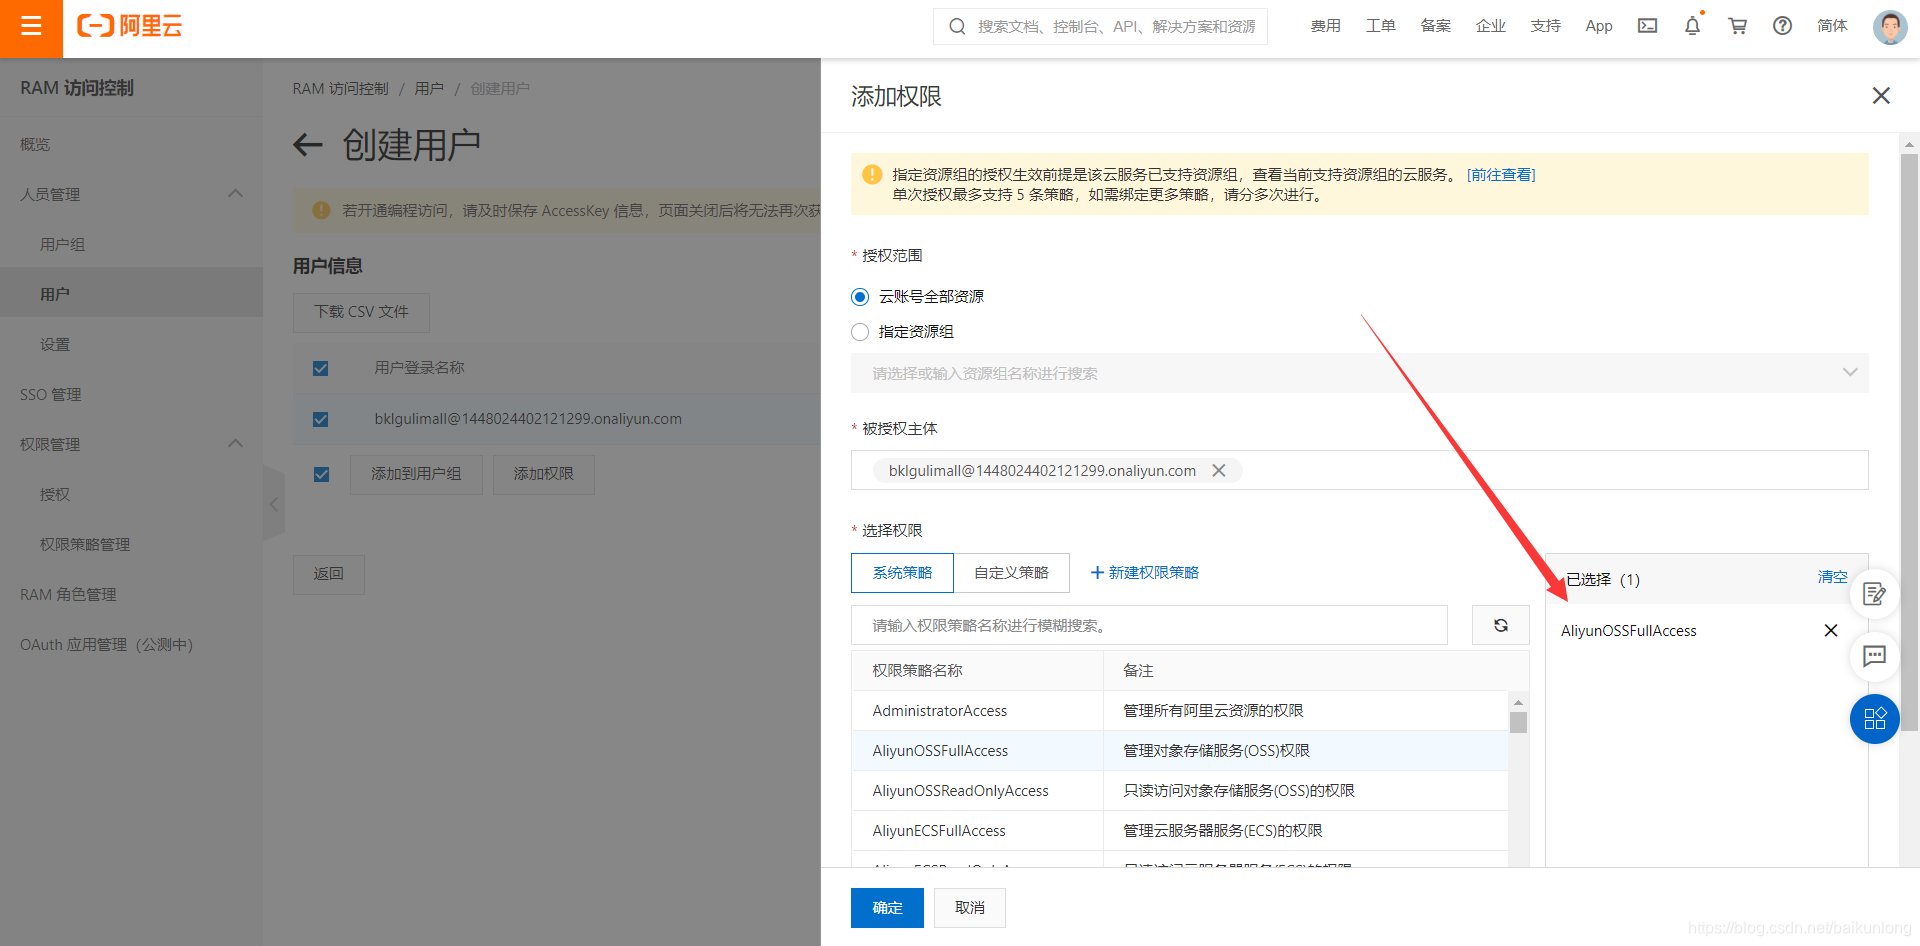
赋予oss的读写权限:
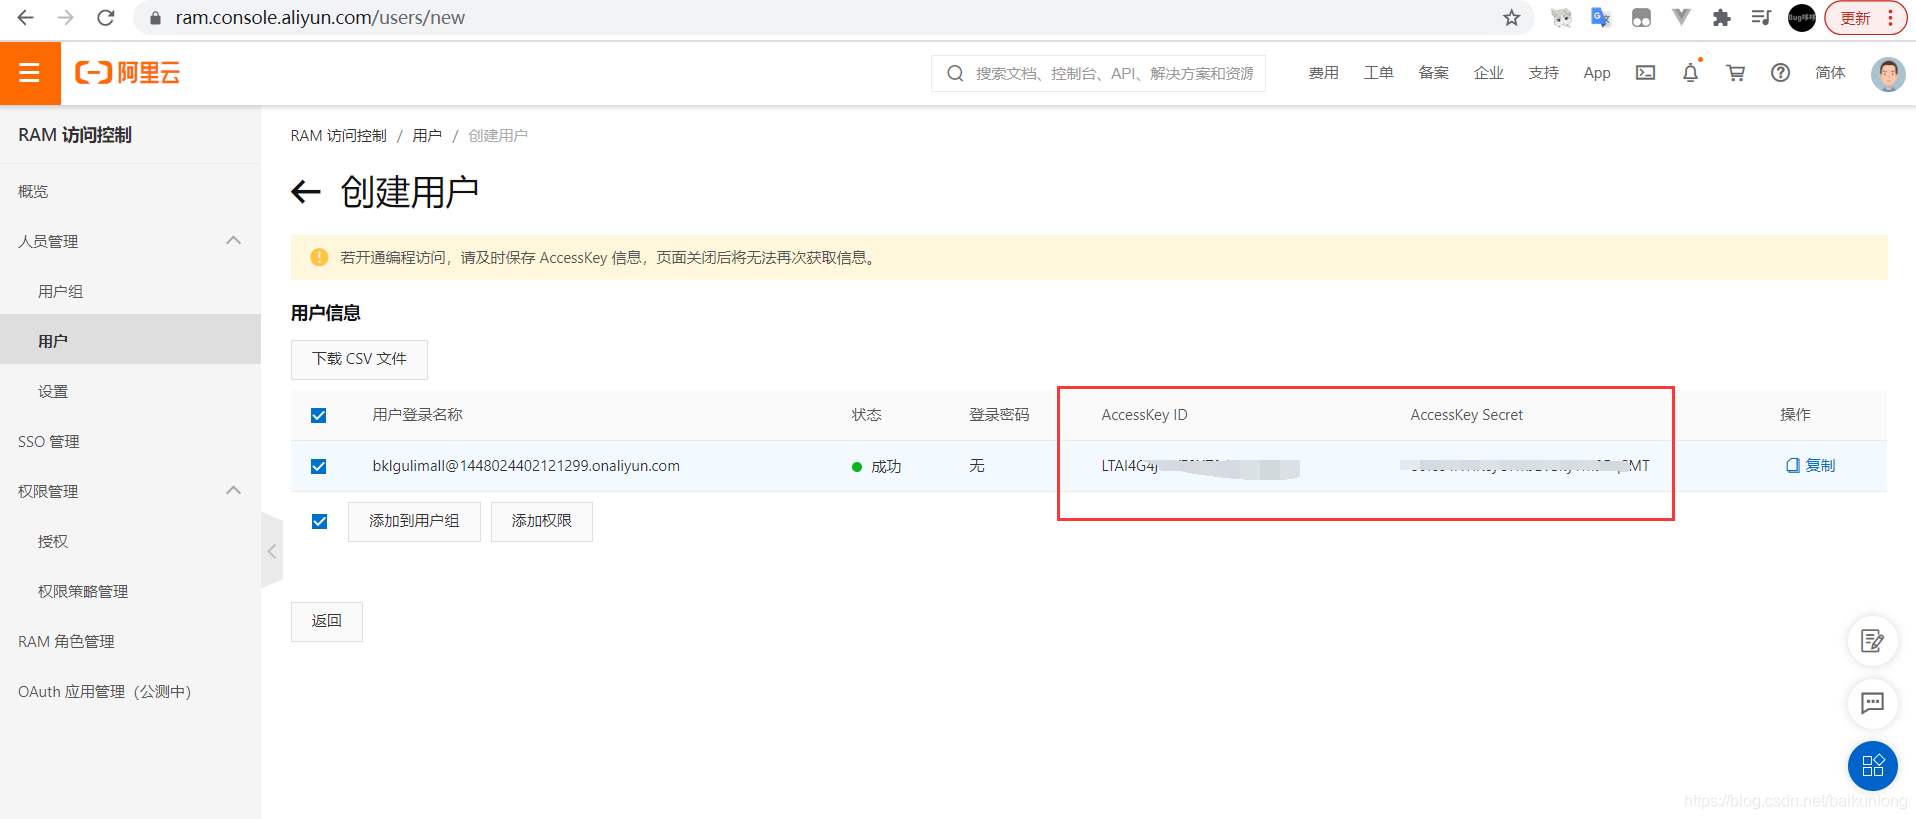
然后复制好访问key和密钥:
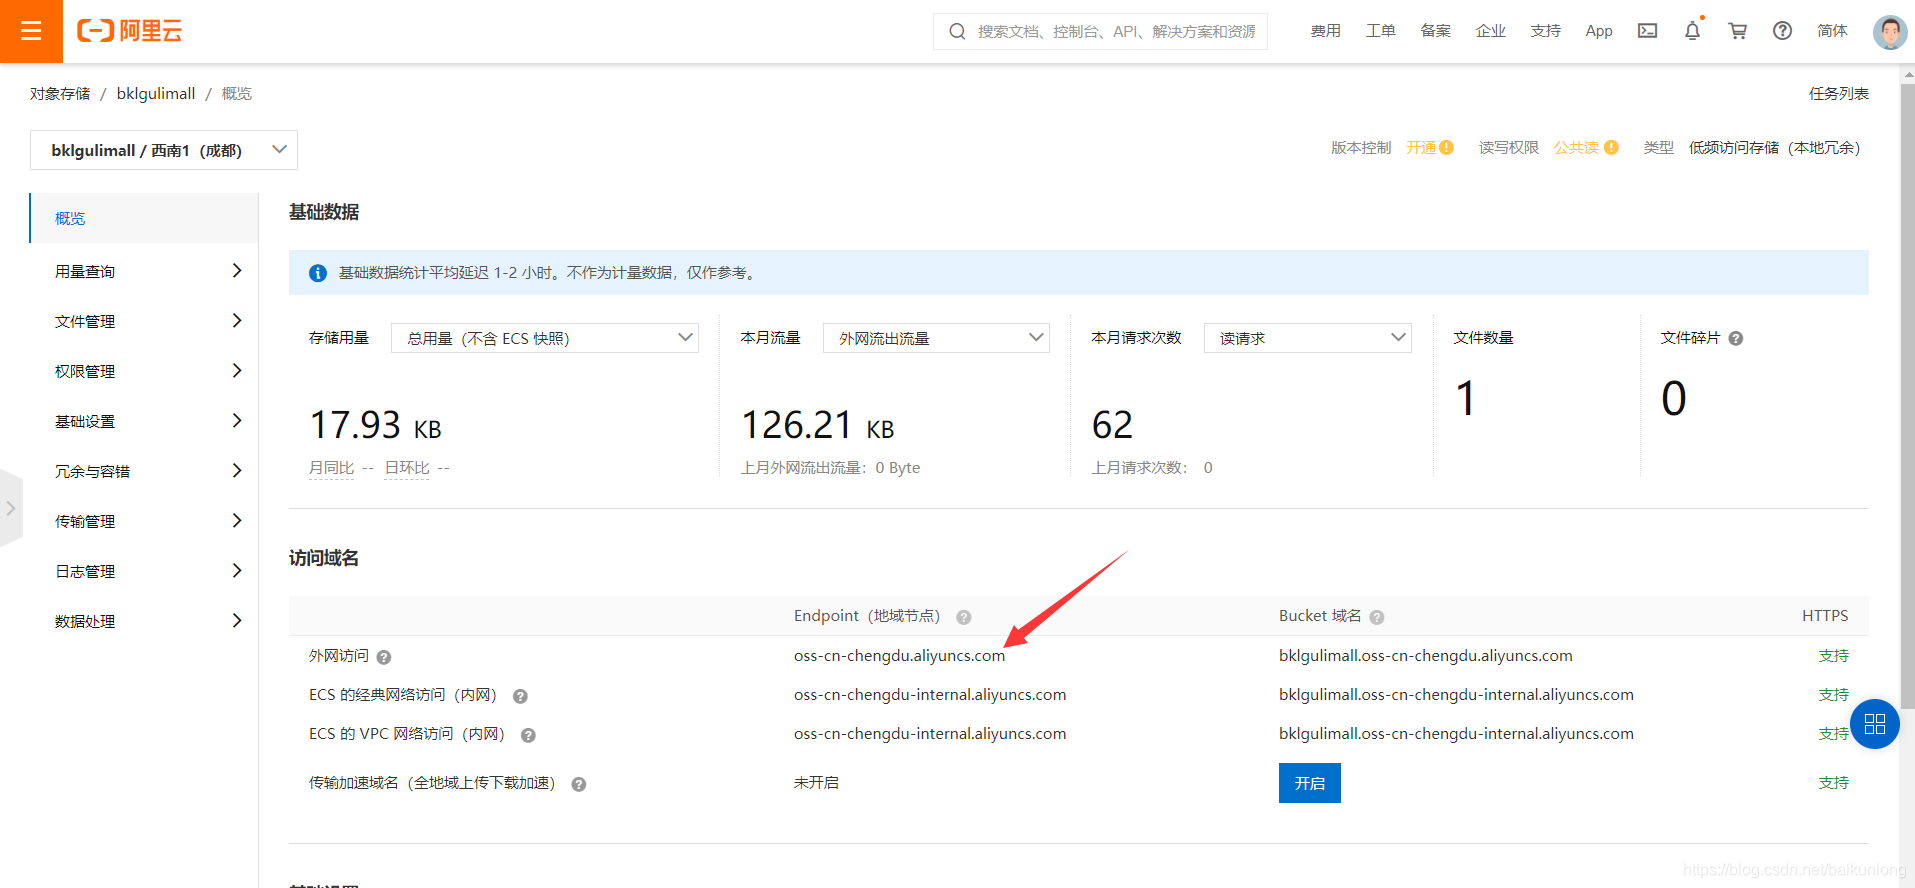
复制endpoint:
来到nacos配置中心,创建个命名空间:
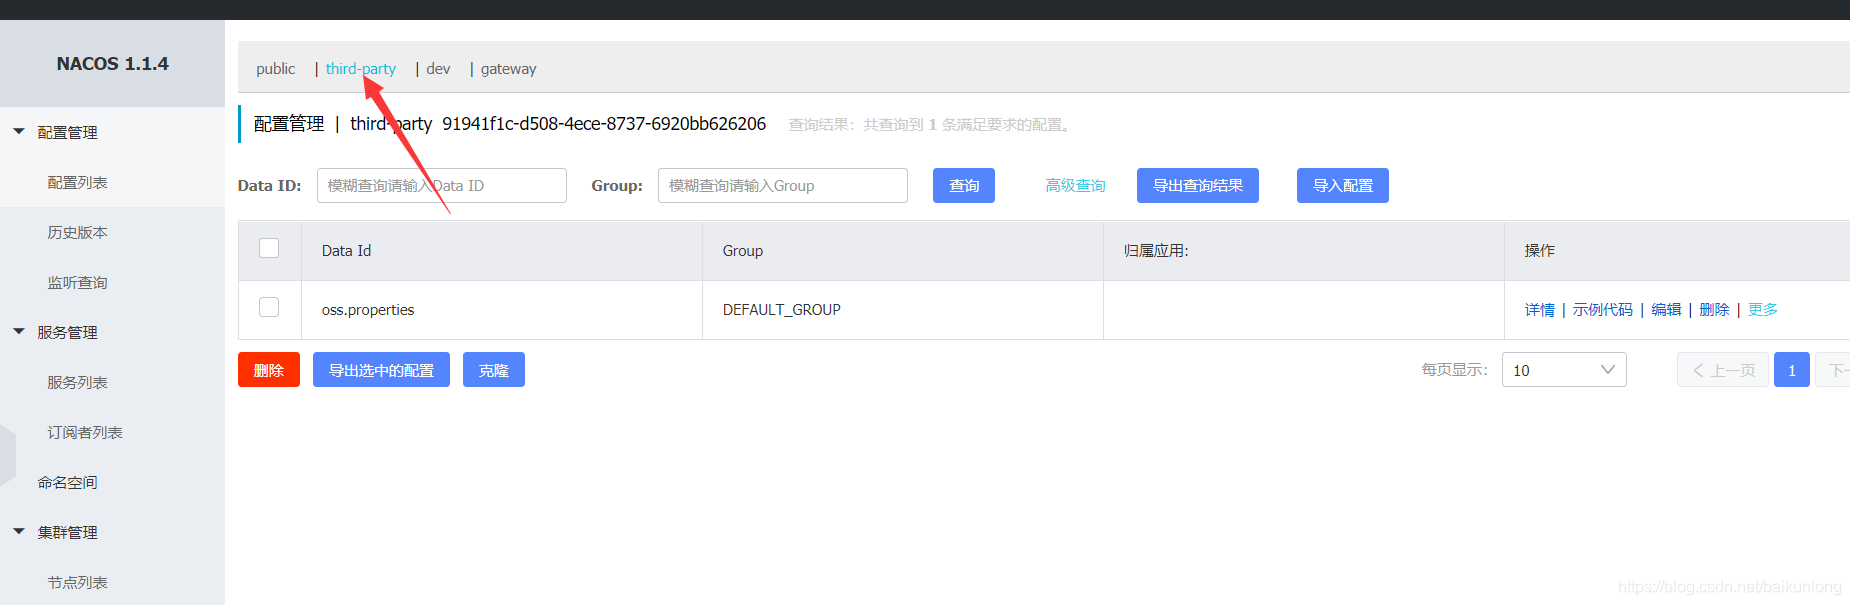
创建配置文件:
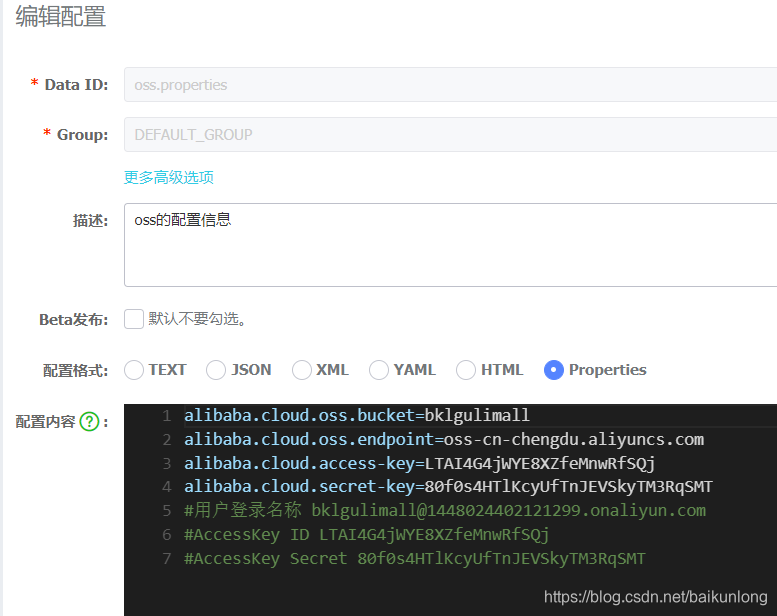
创建bootstrap.properties:
# 应用名称
spring.application.name=gulimall-third-party
# 应用服务 WEB 访问端口
server.port=30000

#注册中心
spring.cloud.nacos.discovery.server-addr=127.0.0.1:8848

#配置中心
spring.cloud.nacos.config.server-addr=127.0.0.1:8848
#命名空间
spring.cloud.nacos.config.namespace=91941f1c-d508-4ece-8737-6920bb626206

spring.cloud.nacos.config.ext-config[0].data-id=oss.properties
spring.cloud.nacos.config.ext-config[0].refresh=true
测试:
    @Autowired
    OSSClient ossClient;

    @Test
    public void contextLoads() throws FileNotFoundException {
        FileInputStream in = new FileInputStream("C:\\Users\\baikunlong\\Desktop\\images\\流浪猫狗救助协会_files\\1.jpg");
        ossClient.putObject("bklgulimall","小猫1.jpg",in);
        ossClient.shutdown();
        System.out.println("上传完成");
    }
到这里就能正常上传文件了。
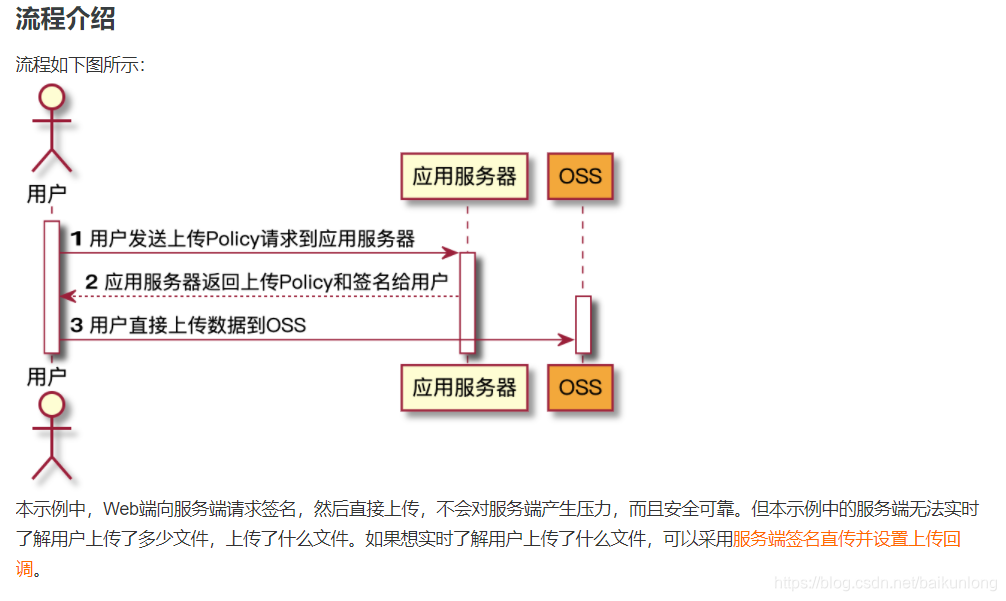
进入主题
经过上面的操作,虽然能上传文件了,但是存在以下问题:
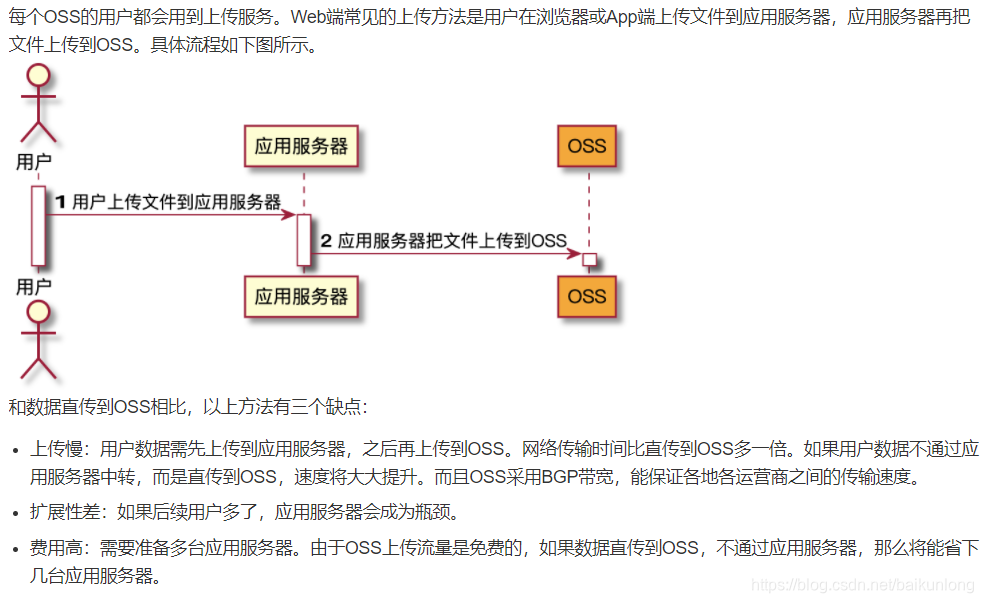
解决方案:
使用服务端签名的方式进行上传:
服务端签名,写一个接口:
package com.atguigu.gulimall.thirdparty.controller;
import com.aliyun.oss.OSS;
import com.aliyun.oss.common.utils.BinaryUtil;
import com.aliyun.oss.model.MatchMode;
import com.aliyun.oss.model.PolicyConditions;
import com.atguigu.common.utils.R;
import org.springframework.beans.factory.annotation.Autowired;
import org.springframework.beans.factory.annotation.Value;
import org.springframework.web.bind.annotation.RequestMapping;
import org.springframework.web.bind.annotation.RestController;
import java.text.SimpleDateFormat;
import java.util.Date;
import java.util.LinkedHashMap;
import java.util.Map;
@RestController
public class OssController {
@Autowired
OSS ossClient;
@Value("${alibaba.cloud.oss.endpoint}")
private String endpoint;
@Value("${alibaba.cloud.oss.bucket}")
private String bucket;
@Value("${alibaba.cloud.access-key}")
private String accessId;
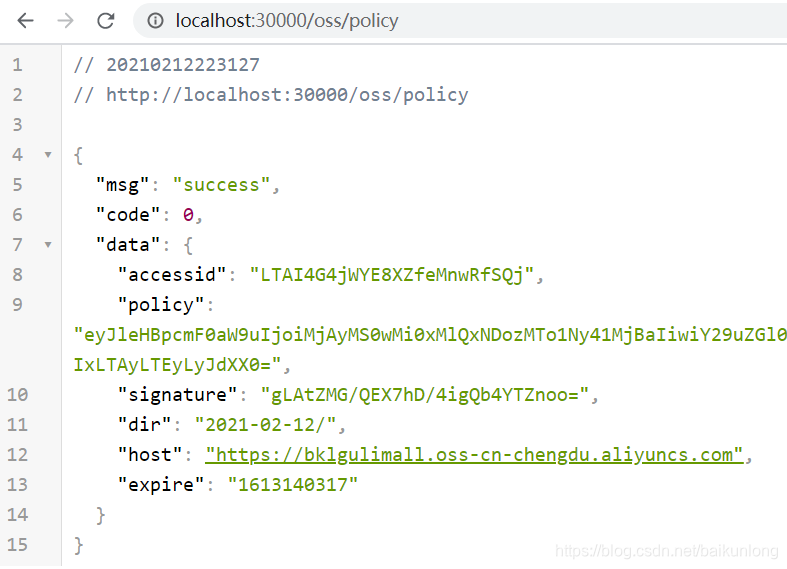
@RequestMapping("/oss/policy")
public R policy() {
//https://gulimall-hello.oss-cn-beijing.aliyuncs.com/hahaha.jpg
String host = "https://" + bucket + "." + endpoint; // host的格式为 bucketname.endpoint
// callbackUrl为 上传回调服务器的URL,请将下面的IP和Port配置为您自己的真实信息。
// String callbackUrl = "http://88.88.88.88:8888";
String format = new SimpleDateFormat("yyyy-MM-dd").format(new Date());
String dir = format + "/"; // 用户上传文件时指定的前缀。
Map<String, String> respMap = null;
try {
long expireTime = 30;
long expireEndTime = System.currentTimeMillis() + expireTime * 1000;
Date expiration = new Date(expireEndTime);
PolicyConditions policyConds = new PolicyConditions();
policyConds.addConditionItem(PolicyConditions.COND_CONTENT_LENGTH_RANGE, 0, 1048576000);
policyConds.addConditionItem(MatchMode.StartWith, PolicyConditions.COND_KEY, dir);
String postPolicy = ossClient.generatePostPolicy(expiration, policyConds);
byte[] binaryData = postPolicy.getBytes("utf-8");
String encodedPolicy = BinaryUtil.toBase64String(binaryData);
String postSignature = ossClient.calculatePostSignature(postPolicy);
respMap = new LinkedHashMap<String, String>();
respMap.put("accessid", accessId);
respMap.put("policy", encodedPolicy);
respMap.put("signature", postSignature);
respMap.put("dir", dir);
respMap.put("host", host);
respMap.put("expire", String.valueOf(expireEndTime / 1000));
// respMap.put("expire", formatISO8601Date(expiration));
} catch (Exception e) {
// Assert.fail(e.getMessage());
System.out.println(e.getMessage());
}
return R.ok().put("data",respMap);
}
}
参考官网:https://help.aliyun.com/document_detail/91868.html?spm=a2c4g.11186623.2.10.56077d9cJ5BDOY
访问测试:
因为要使用网关统一访问,配置下规则:
        - id: gulimall-third-party
          uri: lb://gulimall-third-party
          predicates:
            - Path=/api/thirdparty/**
          filters:
            - RewritePath=/api/thirdparty/(?<segment>.*),/$\{segment}
重启网关后访问网关88:

接下来对接前端:
首先去权限管理下设置允许跨域:
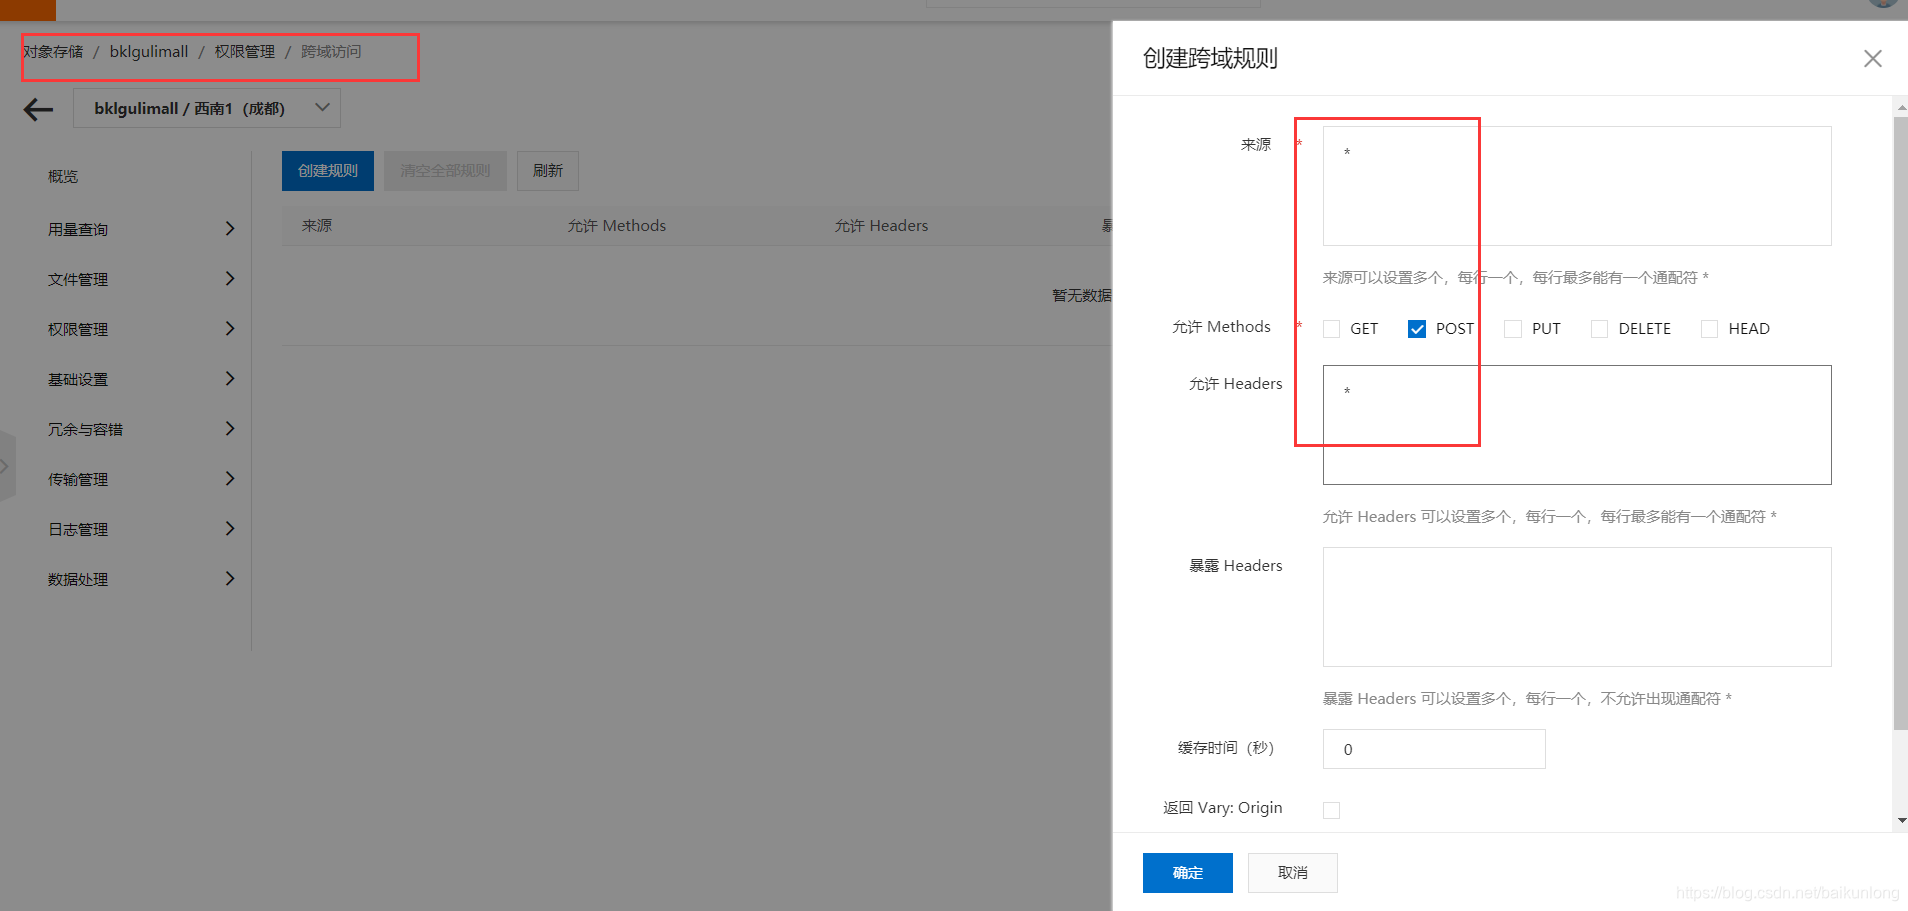
然后再搞前端代码。
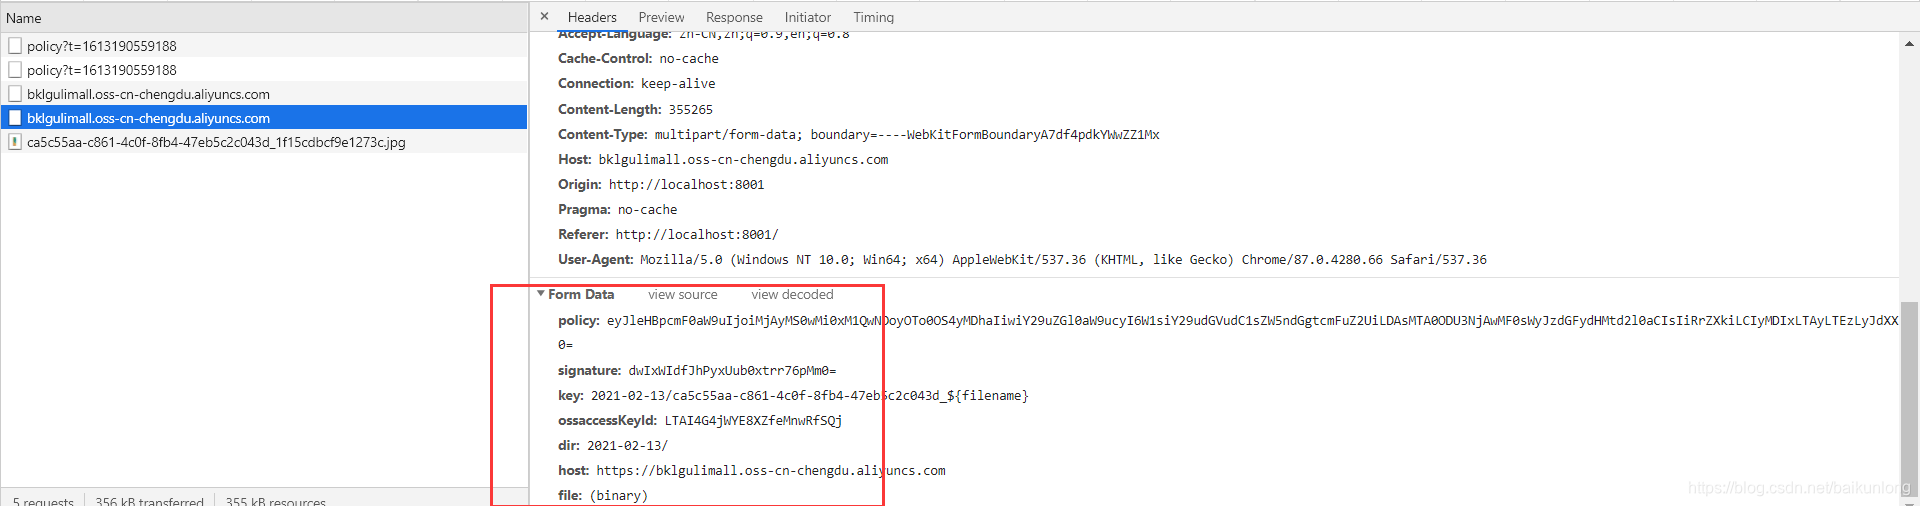
大致流程为:
- 选择文件
- 请求得到签名
- 上传表单数据
传递如下参数即可:


 1万+
1万+


 被折叠的 条评论
为什么被折叠?
被折叠的 条评论
为什么被折叠?
 到【灌水乐园】发言


