


本文内容来自对github上提供的文档的翻译,由于本人英文水平有限,可能会有很多不当之处,还请各位大神予以指教和批评。
androidannotations是由 Pierre-Yves Ricau创建的,文档说明由Kay-Uwe Janssen编写。
github地址:
- 项目地址:https://github.com/excilys/androidannotations
- 文档介绍:https://github.com/excilys/androidannotations/wiki
- 官网网址:http://androidannotations.org/
目标
通过依赖注入的方式实现:
- View、资源的初始化
- 事件绑定
- 服务注册
- 简单的线程模型,通过annotation表示方法运行在UI线程还是后台线程。
优点
- 在编译时生成子类,对性能没有影响,并且我们能够check the code 来查看它是如何工作的。
- 项目大小只有50kb。
- 有效的简化代码,避免重复繁琐工作的进行。
- 使我们的代码更加便于维护。
androidannotations是如何工作的
androidannotations使用 Java Annotation Processing Tool标准动态添加一个额外的资源目录,用来存放生成的子类。
Activity注解
例如:当我们使用@EActivity 注解activity时,会在同一个包下的另一个资源目录中生成一个在名称末尾添加了“_”的同名子类。下面的例子清楚的显示了这一特性。
//使用@EActivity注解MyActivity
package com.some.company;
@EActivity
public class MyActivity extends Activity {
  // ...
}

//注解后生成的子类,会在原activity名称后添加一个"_"
package com.some.company;
public final class MyActivity_ extends MyActivity {
  // ...
}这个生成的子类会在注解的activity中添加一些重写的方法,如oncreate()等,并将这些方法的调用权限授权给原activity。正是因为这个原因,我们在清单文件中注册activity时,名称后面千万不能忘记在末尾加上”_”.
使用@EActivity注解进行布局绑定
@EActivity的参数必须是有效的布局id,表示此布局将被作为the Content View在activity中使用,相当于我们经常使用的setContentView(R.layout.main)。代码示例如下:@EActivity(R.layout.main) public class MyActivity extends Activity { }可以不给此注解提供参数,这时表示我们将会采用传统的方式,即在onCreate方法中调用setContentView方法进行布局绑定。代码示例如下:
@EActivity
public class MyListActivity extends ListActivity {

    @Override
    public void onCreate(Bundle savedInstanceState) {
        super.onCreate(savedInstanceState);
        setContentView(R.layout.main);
    }

}
利用annotated启动一个activity
通常情况下,我们start一个activity时,会调用startActivity(this,MyListActivity.class),这时启动的activity参数是MyListActivity,但是使用AndroidAnnotations时,我们需要调用的activity参数应该是MyListActivity_,即startActivity(this,MyListActivity_.class)。Intent绑定启动activity
从AndroidAnntations2.4开始,提供了一个启动注解生成activity的静态帮助类,通过它我们可以:通过绑定intent来启动activity;
//// Starting the activity
MyListActivity_.intent(context).start();
绑定一个到activity的intent
// Building an intent from the activity
Intent intent = MyListActivity_.intent(context).get();
在绑定intent时,定义flags
// You can provide flags
MyListActivity_.intent(context).flags(FLAG_ACTIVITY_CLEAR_TOP).start();
定义通过intent传送的数据
// You can even provide extras defined with @Extra in the activity
MyListActivity_.intent(context).myDateExtra(someDate).start();
从AndroidAnntations2.7开始,我们可以使用startActivityForResult()方法来启动activity了。
MyListActivity_.intent(context).startForResult(REQUEST_CODE);使用@OnActivityResult注解来获取结果:
@OnActivityResult(REQUEST_CODE)
void onResult(int resultCode) {
}
@OnActivityResult的参数必须是integer常量,这个常量是启动activity时提供的请求码。onResult方法可以有多个参数:
- 携带返回数据的android.content.Intent
- int或Integer的resultCode。
下面是几个@OnActivityResult的示例:
 @OnActivityResult(REQUEST_CODE)
 void onResult(int resultCode, Intent data) {
 }

 @OnActivityResult(REQUEST_CODE)
 void onResult(int resultCode) {
 }

 @OnActivityResult(ANOTHER_REQUEST_CODE)
 void onResult(Intent data) {
 }

 @OnActivityResult(ANOTHER_REQUEST_CODE)
 void onResult() {
 }
从AndroidAnntations3.2开始,可以使用@OnActivityResult.Extra向带有返回参数的intent注入extra。这个注解只能作为参数使用,并要保证使用此参数的方法已经和 @OnActivityResult注解进行绑定了。参数的类型必须是可添加的Bundle,其value就是结果data的key。如果没有设置,则使用变量名作为key。下面是几个例子:
@OnActivityResult(REQUEST_CODE)
void onResult(int resultCode, Intent data, @OnActivityResult.Extra String value) {
}

@OnActivityResult(REQUEST_CODE)
void onResult(int resultCode, @OnActivityResult.Extra(value = "key") String value) {
}

@OnActivityResult(REQUEST_CODE)
void onResult(@OnActivityResult.Extra String strVal, @OnActivityResult.Extra int intVal) {
}
从AndroidAnntations3.3开始,我们可以通过绑定intent来轻松的传递Bundle了。MyListActivity_.intent(context).withOptions(bundle).start();从AndroidAnntations4.0开始,可以在绑定intent时,添加过渡动画了!
MyListActivity_.intent(context).start().withAnimation(enterAnimRes, exitAnimRes));
Fragment注解
使用注解操作Fragments
在AndroidAnnotation2.6之前,并没有fragment使用的注解支持,然而我们确信通过继承FragmentActivity取代继承Activity并 不会破坏AndroidAnnotations。就像这样:@EActivity(R.id.main) public class DetailsActivity extends FragmentActivity { }2.6之后AndroidAnnotations对android.app.Fragment和android.support.v4.app.Fragment都提供了支持,并能动态识别fragment的类型来使用正确的API。
对fragment而言,需要使用@EFragment注解。示例如下:@EFragment public class MyFragment extends Fragment { }使用注解后,同样会生成一个以”“结尾的子类,如MyFragment。当创建一个新的fragment时,需要在布局文件中使用生成的子类,像这样:
<LinearLayout xmlns:android="http://schemas.android.com/apk/res/android"
    android:layout_width="fill_parent"
    android:layout_height="fill_parent"
    android:orientation="horizontal" >

    <fragment
        android:id="@+id/myFragment"
        android:name="com.company.MyFragment_"
        android:layout_width="fill_parent"
        android:layout_height="fill_parent" />

</LinearLayout>
Java代码中这样创建新实例:
MyFragment fragment = new MyFragment_();或使用builder:
MyFragment fragment = MyFragment_.builder().build();在fragment中,我们可以使用所有的注解:
@EFragment
public class MyFragment extends Fragment {
    @Bean
    SomeBean someBean;

    @ViewById
    TextView myTextView;

    @App
    MyApplication customApplication;

    @SystemService
    ActivityManager activityManager;

    @OrmLiteDao(helper = DatabaseHelper.class, model = User.class)
    UserDao userDao;

    @Click
    void myButton() {
    }

    @UiThread
    void uiThread() {

    }

    @AfterInject
    void calledAfterInjection() {
    }

    @AfterViews
    void calledAfterViewInjection() {
    }

    @Receiver(actions = "org.androidannotations.ACTION_1")
    protected void onAction1() {

    }
}
View injection and event listener binding will only be based on viewscontained inside the fragment. Note, however, that it’s isn’t currently the case for @EBean injected inside fragments: they haveaccess to the activity views.
上面这段话摘自github上提供的文档说明,没有看明白,如果有了解这方面的大神,可以在评论中告诉我,我将不胜感激!^_^
- 使用注解给fragment绑定布局
很简单,只需要给@EFragment添加参数即可。这个参数就是要绑定布局的ID。
 @EFragment(R.layout.my_fragment_layout)
 public class MyFragment extends Fragment {
 }
如果我们需要重写onCreateView()方法时,比如需要用到savedInstanceState时,我们仍然可以使用这个注解,只需要将方法的返回值设置为null即可。 - 强制布局注入
从AndroidAnnotation3.3开始,如果使用注解的类中onCreateView方法返回null,或其父类的onCreateView方法返回null而子类没用重写父类的该方法,我们就只是把要注入的布局当做第一个注解参数。这时因为我们不想重载onCreateView方法返回的空布局。在某些情况下,下面这些行为是可以预期的:例如,一个类继承自ListFragment,它的onCreateView方法返回为null,并且布局没有通过@EFragment注解注入。为了在这种情况下实现功能,我们需要添加一个boolean类型的forceLayoutInjection参数。如果设置为true,布局注入将忽视onCreateView方法的返回值。,但是这个参数默认情况下为false,所以如果没有明确的指出forceLayoutInjection为true,布局将会被该方法的返回值替代(It is false by default, so the old behavior takes place if you do not explicitly set forceLayoutInjection to true.)。 注入Fragments
可以使用 @EActivity, @EFragment, @EView, @EViewGroup, @EBean, using @FragmentById or @FragmentByTag注解标签将fragment注入到类中,如果没有特殊给定值,将在注解中使用变量名。- 使用@FragmentById or @FragmentByTag只能将fragment注入,不能创建fragment。所以我们要保证fragment已经存在activity中(布局文件中定义或者oncreate方法中创建)。
- 即使fragment没有使用@EFragment注解标注,我们也可以将这些fragment注入到activity中。
@EActivity(R.layout.fragments)
public class MyFragmentActivity extends FragmentActivity {
  @FragmentById
  MyFragment myFragment;

  @FragmentById(R.id.myFragment)
  MyFragment myFragment2;

  @FragmentByTag
  MyFragment myFragmentTag;

  @FragmentByTag("myFragmentTag")
  MyFragment myFragmentTag2;
}
相关方法
从AndroidAnnotation4.0开始,出现的基于注解的方法:@EActivity(R.layout.fragments) public class MyFragmentActivity extends FragmentActivity { @FragmentById void setOneFragmentById(MyFragment myFragmentId){ // do something with myFragmentId } void setMultipleFragmentsById(@FragmentById MyFragment myFragmentId, @FragmentById(R.id.myFragment) MyFragment myFragmentId2){ // do something with myFragmentId and myFragmentId2 } @FragmentByTag void setOneFragmentByTag(MyFragment myFragmentTag){ // do something with myFragmentTag } void setMultipleFragmentsByTag(@FragmentByTag MyFragment myFragmentTag, @FragmentByTag("myFragmentTag") MyFragment myFragmentTag2){ // do something with myFragmentTag and myFragmentTag2 } }使用注解时,DialogFragment要注意:
很不幸,在使用注解@EFragment时,我们不能通过onCreateDialog()方法创建新的Dialog实例。我们只能调用super.onCreateDialog(),设置其返回的Dialog实例。然后我们可以在由@AfterViews注解的方法中来自定义views。Fragment Argument
从AndroidAnnotations 2.7开始,可以使用@FragmentArg注解标签对Fragment绑定对应的参数。
在生成的builder中,setter方法总是使用字段名称作为参数名称。默认情况下,绑定参数值的关键就是字段名称,不过我们可以通过给标签提供一个值来改变这一点。
@EFragment
public class MyFragment extends Fragment {

  //提供一个值来改变setter参数名
  @FragmentArg("myStringArgument")
  String myMessage;

  //默认情况
  @FragmentArg
  String anotherStringArgument;

  @FragmentArg("myDateExtra")
  Date myDateArgumentWithDefaultValue = new Date();

}- 相关方法
从 AndroidAnnotations 4.0开始:
@EFragment
public class MyFragment extends Fragment {

  @FragmentArg
  void setOneFragmentArg(@FragmentArg("myStringArgument") String myMessage){
    // do something with myMessage
  }

   void setMultipleFragmentArgs(@FragmentArg String anotherStringArgument, @FragmentArg("myDateExtra") Date myDateArgument){
    // do something with anotherStringArgument and myDateArgument
  }

}
Fragment 构造器拥有对这些参数的专用方法:
MyFragment myFragment = MyFragment_.builder()
  .myMessage("Hello")
  .anotherStringArgument("World")
  .build();
自定义类的注解(如实体类等)
我们可以使用注解@EBean标注非Android标准组件(如Activity、service)的类。注意:这个@EBean要求被标注的类只用一个构造函数,并且这个构造函数不能有参数(或者,向AndroidAnnotations 2.7中一样,只能拥有一个Context类型的参数)。
@EBean
public class MyClass {

}- 在已经使用注解的类中或Android组件中引用另外一个被注解的类只需要使用@Bean注解即可
@EBean
public class MyOtherClass {

//引用另外一个被注解的自定义类
  @Bean
  MyClass myClass;

}
如果这个被标注类不是单例的话,使用@Bean注解后,我们将会获得它的实例。
与@Bean相关的方法
@EActivity
public class MyActivity extends Activity {
  @Bean
  void setOneBean(MyClass myClass){
    // do something with myClass
  }

   void setMultipleBeans(@Bean MyClass myClass, @Bean MyOtherClass myOtherClass){
    // do something with myClass and myOtherClass
  }
}
值得注意的是,生成的子类都是final类,也就意味着生成的子类是不可被继承的。然而,我们可以继承原始类,并且原始类中生成的代码也将为子类使用(However, you can extends original classes and generated code will be also generated for the child class. )。这适用于所有的注解。
例如:下面MyChildActivity也会有myOtherClass的注入。@EActivity public class MyChildActivity extends MyActivity { }注入接口的实现类到定义的接口字段中
从Since AndroidAnnotations 2.5开始,如果想要根据Since AndroidAnnotations 的API使用依赖关系,比如实现接口。我们可以通过@Bean的参数来实现。只需要将实现类作为@Bean的参数传进去即可,但是要保证实现类由@EBean标注了并且实现了该接口。@EActivity public class MyActivity extends Activity { /* A MyImplementation instance will be injected. * MyImplementation must be annotated with @EBean and implement MyInterface. */ @Bean(MyImplementation.class) MyInterface myInterface; }虽然这样做以后,类仍然知道其以来的实现,但是至少使用这些依赖的代码必须根据API实现。
@EBean支持的注解
在@EBean标注的类中可以使用几乎全部的AA 注解。@EBean public class MyClass { @SystemService NotificationManager notificationManager; @UiThread void updateUI() { } }我们可以在@EBean标注的类中使用和view相关的标注(如@View,@Click… …)。
@EBean
public class MyClass {
  @ViewById
  TextView myTextView;
  @Click(R.id.myButton)
  void handleButtonClick() {

  }
}
注意:只有在依赖MyClass类的根Android组件(Activity等)包含需要的views,上面的代码才能有效。否则myTextView将会是null,handleButtonClick方法将永远不会被调用。
使用@RootContext可以获取到Bean的context对象,如下:@EBean public class MyClass { //1.@RootContext能取到调用该Bean的context,构造方法不用传context @RootContext Context context; //2.得到的是调用Activity的context对象 @RootContext Activity activity; // 3.得到的是调用service的Context对象 @RootContext Service service; // 4.得到的是调用MyActivity的context对象 @RootContext MyActivity myActivity; }- 与RootContext相关的方法
从AndroidAnnotations 4.0开始:
    @EBean
    public class MyBean {

      @RootContext
      void setContext(Context context){
        // do something with context
      }

      @RootContext
      void setService(Service service){
        // do something with service
      }
    }
依赖注入后执行代码过程
当@EBean标注的类的构造方法被调用时,其字段还没有被注入,所以下面代码中的MyClass类的service字段将会是null。@EActivity public class MyActivity extends Activity { @Bean MyClass myClass;//MyClass类可以看上文中的代码 }如果想要在build时执行代码,在依赖注入后我们需要使用@AfterInject注解标注一些方法:
@EBean
public class MyClass {
  @SystemService
  NotificationManager notificationManager;
  @Bean
  MyOtherClass dependency;
  public MyClass() {
    // notificationManager and dependency are null
  }
  //标注后service将会被注入
  @AfterInject
  public void doSomethingAfterInjection() {
    // notificationManager and dependency are set
  }
}
警告:
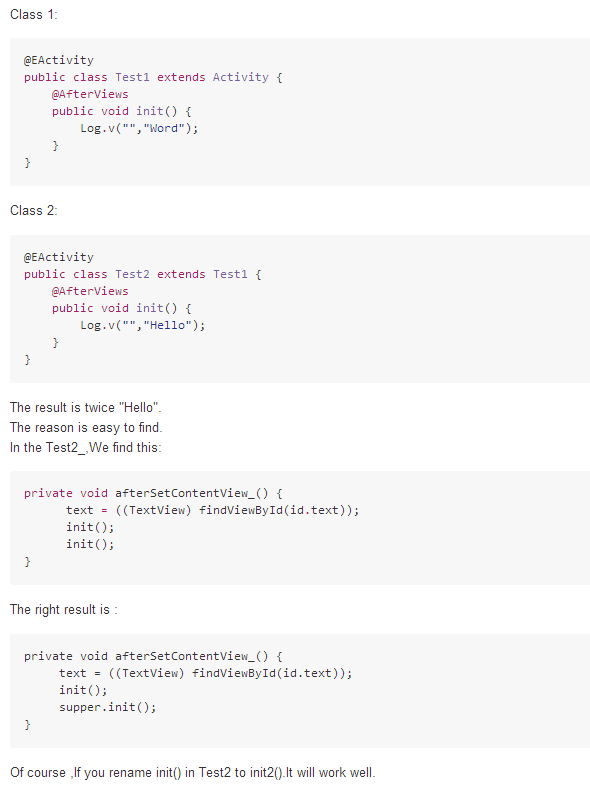
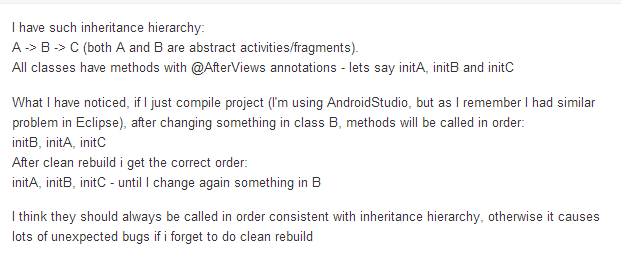
父类和子类中不能出现由@AfterViews, @AfterInject or @AfterExtras标注的同名方法,否则会出现错误。如github有人提出这样的问题(https://github.com/excilys/androidannotations/issues/591):
如图,当把Test2中的init()方法名变更一下,就可以运行正确了。
- 当我们调用这些注解标注的方法时有固定的顺序,但是对于由相同注解@AfterXXX标注的方法在调用时是没有固定顺序的。如github上有人提出这样的问题(https://github.com/excilys/androidannotations/issues/810):
@AfterXXX调用顺序
- 使用相同的@AfterXXX标注的方法的调用顺序
同一个类中使用相同@AfterXXX标注的方法的调用顺序是无法保证的。如果我们想要按照一定的顺序调用多个方法,应该创建一个被标注的方法,然后按照一定的顺序使用这个方法去调用其他的方法。如果要处理父/子类中使用相同@AfterXXX标注的方法,我们可以在https://github.com/excilys/androidannotations/issues/810#issuecomment-31218529找到答案。
当 @AfterExtras标注的方法被调用时,所有没和view关联的注入都会被完成。因此使用@Bean标注的字段是很安全的方式。这些views只会在@AfterViews标注的方法调用时才会被获取。
每当intent到达Activity时,@AfterExtras 标注的方法都会被调用。
对于Activity而言,每次执行setContentView()方法时,@AfterViews被标注的方法都会被调用。- 使用相同的@AfterXXX标注的方法的调用顺序
Extras
使用注解@Extra标注的字段,表示Activity的字段需要连同开启此Activity的intent传来的相应Extra一起被注入。
示例:
@EActivity
public class MyActivity extends Activity {

  //myStringExtra和字段myMessage一起被注入
  @Extra("myStringExtra")
  String myMessage;

  //myDateExtra和字段myDateExtraWithDefaultValue 一起被注入
  @Extra("myDateExtra")
  Date myDateExtraWithDefaultValue = new Date();

}
从AndroidAnnotations 2.6开始,如果没有为@Extra添加参数,则直接使用字段名作为extra的名称。如:
@EActivity
public class MyActivity extends Activity {

  // The name of the extra will be "myMessage"
  @Extra
  String myMessage;
}- 相关方法
从AndroidAnnotations 4.0开始:
@EActivity
public class MyActivity extends Activity {

  @Extra("myStringExtra")
  void setOneExtra(String myMessage){
    // do something with myMessage
  }

   void setMultipleExtrass(@Extra String myMessage, @Extra("myDateExtra") Date myDateExtraWithDefaultValue){
    // do something with myMessage and myDateExtraWithDefaultValue
  }

}我们可以使用前面提到的Intent绑定启动activity方法来传递extra values。
onNewIntent()方法
从AndroidAnnotations 2.6开始,AndroidAnnotations重写了setIntent方法,并会在调用该方法时自动注入指定intent传递的extras。这就有便于我们在onNewIntent方法中调用setIntent方法时自动注入extras。@EActivity public class MyActivity extends Activity { @Extra("myStringExtra") String myMessage; @Override protected void onNewIntent(Intent intent) { super.onNewIntent(intent); //传递intent时自动注入extras setIntent(intent); } }从AndroidAnnotations 3.2开始,如果在Activity中有被 @AfterExtras标注的方法,我们就可以重写onNewIntent方法来调用setIntent方法。
警告:
从AndroidAnnotations 4.0开始,我们不再重载onNewIntent方法,如果有需要的话,只能自己手动重载该方法了。extras注入后执行的代码
如果在注入extras之后需要进行操作的话,我们需要将执行逻辑方法标注上@AfterExtras。如:@EActivity public class MyClass { @Extra String someExtra; @Extra int anotherExtra; @AfterExtras public void doSomethingAfterExtrasInjection() { // someExtra and anotherExtra are set to the value contained in the incoming intent // if an intent does not contain one of the extra values the field remains unchanged } }
Views注入
@ViewById代表Activity的字段和布局中的view进行了绑定,相当于调用了findViewById方法。可以把布局中相应view的id可以放在注解参数的位置进行指定,如@ViewById(R.id.myTextView)。如果没有给注解添加参数,就会使用字段的名字。字段的访问权限千万不能设置为私有。
示例:
@EActivity
public class MyActivity extends Activity {

  // 没有给定参数时,按照 R.id.myEditText注入
  @ViewById
  EditText myEditText;

  @ViewById(R.id.myTextView)
  TextView textView;
}- 相关方法
从AndroidAnnotation4.0开始:
@EActivity
public class MyActivity extends Activity {

  @ViewById
  void setOneView(EditText myEditText){
    // do something with myEditText
  }
   void setMultipleBeans(@ViewById EditText myEditText, @ViewById(R.id.myTextView) TextView textView){
    // do something with myEditText and textView
  }
}- @ViewsById
从AndroidAnnotations 3.1开始使用的注解标签。与@ViewById相似,只是此标签用来注入一系列的view。会在java.util.List or android.view.View的子类字段上进行标注。它的参数值是一组R.id.*的值。注入完成之后,除去为null的view之外(为了避免增加null检查的代码),这些view的ID会被保存在list集合中。
@EActivity
public class MyActivity extends Activity {

//注入完成后,这些textView的ID会被保存到list集合中
  @ViewsById({R.id.myTextView1, R.id.myOtherTextView})
  List<TextView> textViews;

  @AfterViews
  void updateTextWithDate() {
    for (TextView textView : textViews) {
      textView.setText("Date: " + new Date());
    }
  }
}- 相关方法
从AndroidAnnotations 4.0开始:
@EActivity
public class MyActivity extends Activity {

  @ViewsById({R.id.myTextView1, R.id.myOtherTextView})
  void setViews(List<TextView> textViews){
    // do something with textViews
  }
}- @AfterViews
@AfterViews表示被标注的方法会在view绑定后被调用。
onCreate方法被调用时,@ViewById还没有被执行,因此,我们只能在@AfterViews标注的方法中添加view绑定之后要执行的逻辑。
@EActivity(R.layout.main)
public class MyActivity extends Activity {

    @ViewById
    TextView myTextView;

    @AfterViews
    void updateTextWithDate() {
        myTextView.setText("Date: " + new Date());
    }
我们可以用@AfterViews标注多个方法,但是一定要记得,我们不可以在onCreate方法中使用任何和view绑定的字段,否则会抛出空指针异常。
@EActivity(R.layout.main)
public class MyActivity extends Activity {

    @ViewById
    TextView myTextView;

    @Override
    public void onCreate(Bundle savedInstanceState) {
        super.onCreate(savedInstanceState);
        // DON'T DO THIS !! It will throw a NullPointerException, myTextView is not set yet.
        // myTextView.setText("Date: " + new Date());
    }
注入总是尽快进行的,因此我们可以很放心的使用任何被注解标注的字段,如@AfterView标注的方法中被@Extra或者@InstanceState标注的字段,因为这些注解不要求任何view的注入。所以我们可以很安全地假设@AfterViews标注的方法中这些字段已经被它们的预期值初始化了。
@EActivity(R.layout.main)
public class MyActivity extends Activity {

    @ViewById
    TextView myTextView;

    @InstanceState
    Integer textPosition;

    @AfterViews
    void updateTextPosition() {
                    myTextView.setSelection(textPosition);         //Sets the cursor position of myTextView
    }
自定义view注解
从事一段时间的开发以后,我们会发现一件事情:我们经常会在不同的位置用到相同的布局,从而会不停的调用相同的方法来控制这些布局。自定义view会帮我们从这些繁琐的工作中解放出来。
创建自定义组件时,我们会用到@EView 和@EViewGroup 。
- @EView
从AndroidAnnotations 2.4开始:
创建一个继承View的类并用@EView进行标注。这样,我们就可以在这个类中使用注解进行逻辑操作了。如:
@EView
public class CustomButton extends Button {

        @App
        MyApplication application;

        @StringRes
        String someStringResource;

    public CustomButton(Context context, AttributeSet attrs) {
        super(context, attrs);
    }
}
在布局文件中使用自定义的view,名称上不要忘记要加上“_”:
<?xml version="1.0" encoding="utf-8"?>
<LinearLayout xmlns:android="http://schemas.android.com/apk/res/android"
    android:layout_width="match_parent"
    android:layout_height="match_parent"
    android:orientation="vertical" >
    <-- 名称上记得加"_"-->
    <com.androidannotations.view.CustomButton_
        android:layout_width="match_parent"
        android:layout_height="wrap_content" />
</LinearLayout>
当然,也可以通过代码动态创建,只是名称上也要添加”_”:
CustomButton button = CustomButton_.build(context);- 自定义ViewGroup注解
从AndroidAnnotations 2.2开始,我们可以使用@EViewGroup自定义ViewGroup。
1.创建要用到的布局文件:
<?xml version="1.0" encoding="utf-8"?>
<merge xmlns:android="http://schemas.android.com/apk/res/android" >

    <ImageView
        android:id="@+id/image"
        android:layout_alignParentRight="true"
        android:layout_alignBottom="@+id/title"
        android:layout_width="wrap_content"
        android:layout_height="wrap_content"
        android:src="@drawable/check" />

    <TextView
        android:id="@+id/title"
        android:layout_toLeftOf="@+id/image"
        android:layout_width="match_parent"
        android:layout_height="wrap_content"
        android:textColor="@android:color/white"
        android:textSize="12pt" />

    <TextView
        android:id="@+id/subtitle"
        android:layout_width="match_parent"
        android:layout_height="wrap_content"
        android:layout_below="@+id/title"
        android:textColor="#FFdedede"
        android:textSize="10pt" />

</merge>
使用merge标签可以:在布局文件被引用时,子布局会直接被添加到父布局上去,我们可以在view树上看到。
上述代码中使用了很多relativeLayout特有的属性,是因为这个布局文件我打算放到RelativeLayout中去。
下面我们在代码中创建自定义的view:
@EViewGroup(R.layout.title_with_subtitle)
public class TitleWithSubtitle extends RelativeLayout {

    @ViewById
    protected TextView title, subtitle;

    public TitleWithSubtitle(Context context, AttributeSet attrs) {
        super(context, attrs);
    }

    public void setTexts(String titleText, String subTitleText) {
        title.setText(titleText);
        subtitle.setText(subTitleText);
    }

}
如何使用自定义的view呢?
很简单,我们可以像引用其他控件一样在布局文件中找到位置带包名引用即可,要注意的是,类名称一定是带“_”的。
<?xml version="1.0" encoding="utf-8"?>
<LinearLayout xmlns:android="http://schemas.android.com/apk/res/android"
    android:layout_width="match_parent"
    android:layout_height="match_parent"
    android:gravity="center"
    android:orientation="vertical" >

    <com.androidannotations.viewgroup.TitleWithSubtitle_
        android:id="@+id/firstTitle"
        android:layout_width="match_parent"
        android:layout_height="wrap_content" />

    <com.androidannotations.viewgroup.TitleWithSubtitle_
        android:id="@+id/secondTitle"
        android:layout_width="match_parent"
        android:layout_height="wrap_content" />

    <com.androidannotations.viewgroup.TitleWithSubtitle_
        android:id="@+id/thirdTitle"
        android:layout_width="match_parent"
        android:layout_height="wrap_content" />

</LinearLayout>
在Activity中声明并使用自定义控件:
@EActivity(R.layout.main)
public class Main extends Activity {

    @ViewById
    protected TitleWithSubtitle firstTitle, secondTitle, thirdTitle;

    @AfterViews
    protected void init() {

        firstTitle.setTexts("decouple your code",
                "Hide the component logic from the code using it.");

        secondTitle.setTexts("write once, reuse anywhere",
                "Declare you component in multiple " +
                "places, just as easily as you " +
                "would put a single basic View.");

        thirdTitle.setTexts("Let's get stated!",
                "Let's see how AndroidAnnotations can make it easier!");
    }
}
同样的,很多其他的注解标签在自定义控件中也是可以使用的。
AdapterViewEvents
在AdapterView中,我们可以使用以下注解来绑定方法去处理事件:
- @ItemClick:点击事件
- @ItemLongClick:长点击事件
- @ItemSelect:条目选择事件
这些注解的值是R.id.*,可以是多个。如果没有给定值,那么会把方法的名称当做值的名称。
被@ItemClick或@ItemLongClick标注的方法必须拥有一个参数,这个参数可以是任意类型,当调用adapter.getItem(position)时,会使用这个参数。
被@ItemSelect标注的方法可能会有一个或两个参数。第一个参数必须是boolean类型,第二个参数是从adapter被选择的位置传来的object类型。
如:
@EActivity(R.layout.my_list)
public class MyListActivity extends Activity {

    // ...

    @ItemClick
    public void myListItemClicked(MyItem clickedItem) {

    }

    @ItemLongClick
    public void myListItemLongClicked(MyItem clickedItem) {

    }

    @ItemSelect
    public void myListItemSelected(boolean selected, MyItem selectedItem) {

    }

}
从AndroidAnnotations 2.4开始,如果被这些注解标注的方法的参数给定的是int类型,则说明从adapter传来的不是对象,而是该对象所在的位置,或者说是被点击的位置。
Resource注解
所有的@xxxRes标签代表Activity中的字段要和res文件夹下的相对应的资源绑定了。res的ID同样是作为@xxxRes的参数进行传递的,如果没有给定参数,那么将使用字段的名称作为id的名称。
- @StringRes
用来和string资源进行绑定。如:
@EActivity
public class MyActivity extends Activity {
  @StringRes(R.string.hello)
  String myHelloString;
  @StringRes
  String hello;
}- @ColorRes
用来绑定颜色资源。
@EActivity
public class MyActivity extends Activity {

  @ColorRes(R.color.backgroundColor)
  int someColor;

  @ColorRes
  int backgroundColor;

}- @AnimationRes
用来绑定XmlResourceParser字段(不太常用)或Animation字段(常用)。
@EActivity
public class MyActivity extends Activity {

  @AnimationRes(R.anim.fadein)
  XmlResourceParser xmlResAnim;

  @AnimationRes
  Animation fadein;

}- @DimensionRes
用来检索dimension资源。
@EActivity
public class MyActivity extends Activity {

  @DimensionRes(R.dimen.fontsize)
  float fontSizeDimension;

  @DimensionRes
  float fontsize;

}- @DimensionPixelOffsetRes
用来检索dimension资源,会将检索到的dimension的小数部分全部截去,保留整型值,除此之外与@DimensionRes是一样的。
@EActivity
public class MyActivity extends Activity {

  @DimensionPixelOffsetRes(R.string.fontsize)
  int fontSizeDimension;

  @DimensionPixelOffsetRes
  int fontsize;
}- @DimensionPixelSizeRes
用来检索dimension资源,会将检索到的dimension四舍五入保留整型值,除此之外与@DimensionRes是一样的。
@EActivity
public class MyActivity extends Activity {

  @DimensionPixelSizeRes(R.string.fontsize)
  int fontSizeDimension;

  @DimensionPixelSizeRes
  int fontsize;

}- 其他的资源注解标签
- @BooleanRes
- @ColorStateListRes
- @DrawableRes
- @IntArrayRes
- @IntegerRes
- @LayoutRes
- @MovieRes
- @TextRes
- @TextArrayRes
- @StringArrayRes
- 相关方法
从AndroidAnnotations 4.0开始:这两个方法适用于上面提到的所有资源注解标签。
@EActivity
public class MyActivity extends Activity {

  @ColorRes(R.color.backgroundColor)
  void setOneResource(int someColor){
    // do something with someColor
  }

   void setMultipleBeans(@StringRes(R.string.hello) String myHelloString, @StringRes String hello){
    // do something with myHelloString and hello
  }

}
Application注解
从AndroidAnnotations 2.4开始,我们可以对application类使用注解标注了,用到的注解标签为:@EApplication。除了和view、extras相关的注解标签,其他的我们都可以用到这个类中。
@EApplication
public class MyApplication extends Application {

  public void onCreate() {
    super.onCreate();
    initSomeStuff();
  }

  @SystemService
  NotificationManager notificationManager;

  @Bean
  MyEnhancedDatastore datastore;

  @RestService
  MyService myService;

  @OrmLiteDao(helper = DatabaseHelper.class, model = User.class)
  UserDao userDao;

  @Background
  void initSomeStuff() {
    // init some stuff in background
  }
}
从AndroidAnnotations 2.1开始,我们可以使用@APP标签标注我们的application字段,不仅可以在Application类中,其他被注解标注的类中同样可以使用。
@EActivity
public class MyActivity extends Activity {

  @App
  MyApplication application;

}
=============================================
@EBean
public class MyBean {
  @App
  MyApplication application;

}
从AndroidAnnotations 3.0开始,Application类必须由@EApplication进行标注
- 相关方法
从AndroidAnnotations 4.0开始:
@EBean
public class MyBean {

  @App
  void setApplication(MyApplication application){
    // do something with application
  }

}
Service注解
从AndroidAnnotations 2.4开始,我们可以使用@EService来标注service。
@EService
public class MyService extends Service {}
除了与views、extras相关的注解标签,我们可以任意使用AA注解标签。如:
@EService
public class MyService extends IntentService {

  @SystemService
  NotificationManager notificationManager;

  @Bean
  MyEnhancedDatastore datastore;

  @RestService
  MyRestClient myRestClient;

  @OrmLiteDao(helper = DatabaseHelper.class, model = User.class)
  UserDao userDao;

  public MyService() {
      super(MyService.class.getSimpleName());
  }

  @Override
  protected void onHandleIntent(Intent intent) {
    // Do some stuff...

    showToast();
  }

  @UiThread
  void showToast() {
    Toast.makeText(getApplicationContext(), "Hello World!", Toast.LENGTH_LONG).show();
  }
}
使用注解开启服务
和activity一样,在启动服务时也要在服务名称末尾添加“_”,如:startService(this, MyService_.class);通过内部构造器来增强服务:
MyService_.intent(getApplication()).start();从 AndroidAnnotations 3.0开始,通过内部构造器的stop方法来停止之前开启的增强服务。
MyService_.intent(getApplication()).stop();intent绑定启动服务
从AndroidAnnotation2.7开始,提供了一个启动注解生成service的静态帮助类。通过它我们可以:启动service
// Starting the service
MyService_.intent(context).start();
绑定到service的intent
// Building an intent from the activity
Intent intent = MyService_.intent(context).build();
设置flags
// You can provide flags
MyService_.intent(context).flags(Intent.FLAG_GRANT_READ_URI_PERMISSION).start();
intentService
从AndroidAnnotations 3.0开始,对于@EIntentService标注的类中的方法,我们可以通过@ServiceAction注解标签来进行简单的操作。至于@EService,除了与view、extras相关的注解标签,我们几乎可以任意使用。
@EIntentService
public class MyIntentService extends IntentService {

    public MyIntentService() {
        super("MyIntentService");
    }

    @ServiceAction
    void mySimpleAction() {
        // ...
    }

    @ServiceAction
    void myAction(String param) {
        // ...
    }

    @Override
    protected void onHandleIntent(Intent intent) {
        // Do nothing here
    }
}
我们可以通过内部构造器来增强intentService:
MyIntentService_.intent(getApplication()) //
    .myAction("test") //
    .start();
如果在构造器中调用多个方法,将只执行最后一个。
从Since AndroidAnnotations 3.3开始注意:
即使IntentService#onHandleIntent 是抽象的,我们仍然需要添加一个空实现。为了简便,AndroidAnnotations提供了AbstractIntentService 类,实现了该方法,所以我们不用再添加空实现了。
SystemService
@SystemService注解标签表示Activity的字段被注入到对应的安卓系统服务中。相当于调用了 Context.getSystemService() 方法。@EActivity public class MyActivity extends Activity { @SystemService NotificationManager notificationManager; }相关方法
从AndroidAnnotations 4.0开始:@EActivity public class MyActivity extends Activity { @SystemService void setNotificationManager(NotificationManager notificationManager){ // do something with notificationManager } void setMultipleServices(@SystemService NotificationManager notificationManager, @SystemService AudioManager audioManager){ // do something with notificationManager and audioManager } }
broadcastreceivers注解
@EReceiver
从 AndroidAnnotations 2.4开始,我们可以使用@EReceiver注解标签标注BroadcastReceiver。@EReceiver public class MyReceiver extends BroadcastReceiver {}除了与view、extras相关的注解标签,我们几乎可以使用任意的AA注解。
@EReceiver public class MyReceiver extends BroadcastReceiver { @SystemService NotificationManager notificationManager; @Bean SomeObject someObject; }- @ReceiverAction
从AndroidAnnotations 3.2开始,我们可以使用此注解标签在接受者中进行简单的广播操作。默认情况下,AndroidAnnotations 会根据被标注的方法名来判断执行的操作,不过我们可以通过给标签添加参数来传递另外一个操作。
被此标签标注的方法可能包含以下参数:
- android.content.Context:void onReceive(Context context, Intent intent)传递过来额context;
- android.content.Intent:void onReceive(Context context, Intent intent)传递过来的intent;
- 任何可能通过intent传递的被@ReceiverAction.Extra标注的序列化参数(Parcelable 或Serializable 类型的参数)。
@EReceiver
public class MyIntentService extends BroadcastReceiver {
    //一个参数:intent
    @ReceiverAction("BROADCAST_ACTION_NAME")
    void mySimpleAction(Intent intent) {
        // ...
    }

    //两个参数:extra、context
    @ReceiverAction
    void myAction(@ReceiverAction.Extra String valueString, Context context) {
        // ...
    }

    //两个参数:extra、extra
    @ReceiverAction
    void anotherAction(@ReceiverAction.Extra("specialExtraName") String valueString, @ReceiverAction.Extra long valueLong) {
        // ...
    }

    @Override
    public void onReceive(Context context, Intent intent) {
        // empty, will be overridden in generated subclass
    }
}
从Since AndroidAnnotations 3.3开始,注意:
即使BroadcastReceiver#onReceive是抽象的,我们仍然需要添加一个空实现。为了方便,AndroidAnnotations提供了 AbstractBroadcastReceiver类,实现了该方法,因此我们不再需要添加空实现了。
注意:
我们可以通过添加@ReceiverAction的参数来添加多个动作。
    @ReceiverAction({"MULTI_BROADCAST_ACTION1", "MULTI_BROADCAST_ACTION2"})
    void multiAction(Intent intent) {
        // ...
    }
我们可以通过dataScheme属性 ,我们可以设置一个或多个接受者处理的数据类型。
@EReceiver
public class MyIntentService extends BroadcastReceiver {

  @ReceiverAction(actions = android.content.Intent.VIEW, dataSchemes = "http")
  protected void onHttp() {
    // Will be called when an App wants to open a http website but not for https.
  }

  @ReceiverAction(actions = android.content.Intent.VIEW, dataSchemes = {"http", "https"})
  protected void onHttps() {
    // Will be called when an App wants to open a http or https website.
  }

}- @Receiver
通过此标签,我们可以向Activity/Fragment/service/intentService发送通知,而省掉了声明 BroadcastReceiver的过程。
@EActivity
public class MyActivity extends Activity {

  @Receiver(actions = "org.androidannotations.ACTION_1")
  protected void onAction1() {
  }
}
被@Receiver标记的方法 的参数:
- AndroidAnnotations 3.2之前,最多只有一个android.content.Intent。
- AndroidAnnotations 3.2之后,可能包含以下参数:
- android.content.Context:void onReceive(Context context, Intent intent)传递过来额context;
- android.content.Intent:void onReceive(Context context, Intent intent)传递过来的intent;
- 任何可能通过intent传递的被@Receiver.Extra标注的序列化参数(Parcelable 或Serializable 类型的参数)。
@EActivity
public class MyActivity extends Activity {

  @Receiver
  void myAction(@Receiver.Extra String valueString, Context context) {
    // ...
  }

  @Receiver
  void anotherAction(@Receiver.Extra("specialExtraName") String valueString, @Receiver.Extra long valueLong) {
    // ...
  }
}
Registration(注册)
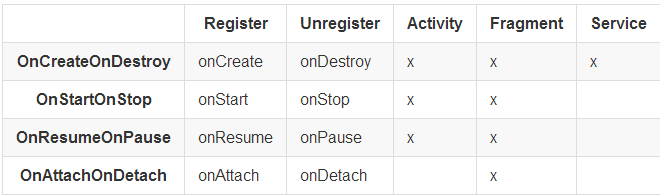
用于在父类(Activity、Fragment、service)的生命周期中注册或注销一个广播接收者。
registerAt属性用来指定何时注册或注销广播接收者。默认值为OnCreateOnDestroy。
下面这张图标显示了何时注册/注销会发生,并显示了其属性值在什么时候会用到。
示例:
@EFragment
public class MyFragment extends Fragment {

  @Receiver(actions = "org.androidannotations.ACTION_1")
  protected void onAction1RegisteredOnCreateOnDestroy() {
  }

  @Receiver(actions = "org.androidannotations.ACTION_2", registerAt = Receiver.RegisterAt.OnAttachOnDetach)
  protected void onAction2RegisteredOnAttachOnDetach(Intent intent) {
  }

  @Receiver(actions = "org.androidannotations.ACTION_3", registerAt = Receiver.RegisterAt.OnStartOnStop)
  protected void action3RegisteredOnStartOnStop() {
  }

  @Receiver(actions = "org.androidannotations.ACTION_4", registerAt = Receiver.RegisterAt.OnResumeOnPause)
  protected void action4RegisteredOnResumeOnPause(Intent intent) {
  }

}
Local 广播
注册广播时,设置local参数可以通过LocalBroadcastManager实现本地注册,而不是使用父类的context。
local的默认值为false。
@EService
public class MyService extends Service {

  @Receiver(actions = "org.androidannotations.ACTION_1", local = true)
  protected void onAction1OnCreate() {
  }

  @Override
  public IBinder onBind(Intent intent) {
    return null;
  }

}
ContentProvider注解
从AndroidAnnotations 2.4开始,我们可以使用@EProvider注解标签标注ContentProvider。
示例:
@EProvider
public class MyContentProvider extends ContentProvider {

}
除了与view、extra相关的注解,我们几乎可以使用所有的AA注解。
示例:
@EProvider
public class MyContentProvider extends ContentProvider {

  @SystemService
  NotificationManager notificationManager;

  @Bean
  MyEnhancedDatastore datastore;

  @OrmLiteDao(helper = DatabaseHelper.class, model = User.class)
  UserDao userDao;

  @UiThread
  void showToast() {
    Toast.makeText(getContext().getApplicationContext(), "Hello World!", Toast.LENGTH_LONG).show();
  }
}
和TextView相关的注解
- HTML
AndroidAnnotations 2.2开始,我们可以通过@FromHtml和@HtmlRes两个注解标签来向TextView中添加HTML。
下面给出HTML字符串的资源文件:
<?xml version="1.0" encoding="utf-8"?>
<resources>
    <string name="hello_html"><![CDATA[Hello <b>World</b>!]]></string>
</resources>
@HtmlRes
此注解和@StringRes类似,都是绑定字符串资源。不同的是,次注解会通过调用HTML.fromHtml()方法来格式话字符串。
示例:
@EActivity
public class MyActivity extends Activity {

  // Injects R.string.hello_html
  @HtmlRes(R.string.hello_html)
  Spanned myHelloString;

  // Also injects R.string.hello_html
  @HtmlRes
  CharSequence helloHtml;
}
@FromHtml
当TextView被@ViewById标注后,可以使用此注解标注该TextView。作用是:将HTML字符串添加到TextView中。
示例:
@EActivity
public class MyActivity extends Activity {

  @ViewById(R.id.my_text_view)
  @FromHtml(R.string.hello_html)
  TextView textView;

  // Injects R.string.hello_html into the R.id.hello_html view
  @ViewById
  @FromHtml
  TextView helloHtml;

}
文本变化监听
此功能适用于AndroidAnnotations 2.6及之后。@TextChange
当指定TextView或其子类的TextView上的文本发生变化时,使用此注解可以接收到文本变化的监听事件。此事件由android.text.TextWatcher.onTextChanged(CharSequence s, int start, int before, int count)定义。
此注解的参数可以是一个或多个TextView的R.id.*,如果没有给定参数,将使用被标注的方法名作为参数。这个方法可能包含多个参数:- android.widget.TextView:明确监听事件的view;
- java.lang.CharSequence:获得被修改的文本;
- int start:修改的起始位置;
- int before:修改前文本的长度;
- int count:修改的文本个数。
示例:
 @TextChange(R.id.helloTextView)
 void onTextChangesOnHelloTextView(CharSequence text, TextView hello, int before, int start, int count) {
    // Something Here
 }

 @TextChange
 void helloTextViewTextChanged(TextView hello) {
    // Something Here
 }

 @TextChange({R.id.editText, R.id.helloTextView})
 void onTextChangesOnSomeTextViews(TextView tv, CharSequence text) {
    // Something Here
 }

 @TextChange(R.id.helloTextView)
 void onTextChangesOnHelloTextView() {
    // Something Here
 }
@BeforeTextChange
当指定TextView或其子类的TextView上的文本发生变化之前,使用此注解可以接收到文本变化的监听事件。此事件由android.text.TextWatcher.beforeTextChanged(CharSequence s, int start, int count, int after)定义。此注解的参数可以是一个或多个TextView的R.id.*,如果没有给定参数,将使用被标注的方法名作为参数。这个方法可能包含多个参数:- android.widget.TextView:明确监听事件的view;
- java.lang.CharSequence:获取修改之前的文本;
- int start:修改的起始位置;
- int count:修改的文本个数;
- int after:修改后的文本长度。
示例:
 @BeforeTextChange(R.id.helloTextView)
 void beforeTextChangedOnHelloTextView(TextView hello, CharSequence text, int start, int count, int after) {
    // Something Here
 }

 @BeforeTextChange
 void helloTextViewBeforeTextChanged(TextView hello) {
    // Something Here
 }

 @BeforeTextChange({R.id.editText, R.id.helloTextView})
 void beforeTextChangedOnSomeTextViews(TextView tv, CharSequence text) {
    // Something Here
 }

 @BeforeTextChange(R.id.helloTextView)
 void beforeTextChangedOnHelloTextView() {
    // Something Here
 }
@AfterTextChange
当指定TextView或其子类的TextView上的文本发生变化之后,使用此注解可以接收到文本变化的监听事件。此事件由android.text.TextWatcher.afterTextChanged(Editable s)定义。此注解的参数可以是一个或多个TextView的R.id.*,如果没有给定参数,将使用被标注的方法名作为参数。这个方法可能包含多个参数:- android.widget.TextView:明确监听事件的view;
- android.text.Editable:在修改的文本上做改变。
示例:
 @AfterTextChange(R.id.helloTextView)
 void afterTextChangedOnHelloTextView(Editable text, TextView hello) {
    // Something Here
 }

 @AfterTextChange
 void helloTextViewAfterTextChanged(TextView hello) {
    // Something Here
 }

 @AfterTextChange({R.id.editText, R.id.helloTextView})
 void afterTextChangedOnSomeTextViews(TextView tv, Editable text) {
    // Something Here
 }

 @AfterTextChange(R.id.helloTextView)
 void afterTextChangedOnHelloTextView() {
    // Something Here
 }
@EditorAction
从AndroidAnnotations 3.1开始。
当指定TextView或其子类的TextView被编辑时,使用此注解可以接收到文本变化的监听事件。此事件由android.widget.TextView.OnEditorActionListener#onEditorAction(android.widget.TextView, int, android.view.KeyEvent)定义。此注解的参数可以是一个或多个TextView的R.id.*,如果没有给定参数,将使用被标注的方法名作为参数。这个方法可能包含多个参数:- android.widget.TextView:明确监听事件的view;
- int 类型的参数:获取actionId;
- android.view.KeyEvent;
这个方法的返回值类型可以是void或boolean。
- boolean:被标注的方法的返回值将被返回给生成的监听方法(指示别人处理);
- void:监听方法总是返回true(自己处理)。
示例:
  @EditorAction(R.id.helloTextView)
  void onEditorActionsOnHelloTextView(TextView hello, int actionId, KeyEvent keyEvent) {
    // Something Here
  }

  @EditorAction
  void helloTextViewEditorAction(TextView hello) {
    // Something Here
  }

  @EditorAction({R.id.editText, R.id.helloTextView})
  void onEditorActionsOnSomeTextViews(TextView tv, int actionId) {
    // Something Here
  }

  @EditorAction(R.id.helloTextView)
  void onEditorActionsOnHelloTextView() {
    // Something Here
  }


  @EditorAction(R.id.helloTextView)
  boolean onEditorActionsOnHelloTextView() {
    // Something Here
    return false;
  }
SharedPreference注解
AndroidAnnotations 从2.1开始,提供了SharedPreferencesHelpers,允许我们使用SharedPreference。
定义SharedPreference
1、创建一个接口,并用 @SharedPref进行标注。如:
@SharedPref
public interface MyPrefs {

        // The field name will have default value "John"
    @DefaultString("John")
    String name();

        // The field age will have default value 42
    @DefaultInt(42)
    int age();

        // The field lastUpdated will have default value 0
    long lastUpdated();

}
使用@Pref注解标签,在Activity中创建定义的SharedPreferences 实例:
@EActivity
public class MyActivity extends Activity {
    @Pref
    MyPrefs_ myPrefs;//注意:类型是带“_”的
}
在Activity中创建SharedPreferences 使用的类型,必须是生成的类,即名称带“_”的子类,千万不要使用原始类名
相关方法
从AndroidAnnotations 4.0开始:
@EActivity
public class MyActivity extends Activity {

  @Pref
  void setOnePref(MyPrefs_ myPrefs){
    // do something with myPrefs
  }

  void setMultiplePrefs(@Pref MyPrefs_ myPrefs, @Pref AnotherPrefs_ anotherPrefs){
    // do something with myPrefs and anotherPrefs
  }

}
之后可以调用如下方法:
// Simple edit
myPrefs.name().put("John");

// Batch edit
myPrefs.edit()
  .name()
  .put("John")
  .age()
  .put(42)
  .apply();

// Preference clearing:
myPrefs.clear();

// Check if a value exists:
boolean nameExists = myPrefs.name().exists();

// Reading a value
long lastUpdated = myPrefs.lastUpdated().get();

// Reading a value and providing a fallback default value
long now = System.currentTimeMillis();
long lastUpdated = myPrefs.lastUpdated().getOr(now);
设置默认值
从AndroidAnnotations 3.0开始,可以使用注解标签设置默认值:@DefaultRes
示例:
@SharedPref
public interface MyPrefs {
    @DefaultRes(R.string.defaultPrefName)
    String resourceName();

    @DefaultRes // uses 'R.string.defaultPrefAge' to set default value
    String defaultPrefAge();
}
使用字符串作为SharedPreferences的key
从AndroidAnnotations 3.1开始,我们可以使用strings文件中的字符串作为SharedPreferences的key,只需要将该字符串的ID设为keyRes的属性值。如:
@SharedPref
public interface MyPrefs {
    @DefaultString(value = "John", keyRes = R.string.myPrefKey)
    String name();

    @DefaultRes(keyRes = R.string.myOtherPrefKey)
    String defaultPrefAge();
}
Scope
我们可以给通过设置value为下面的值来给SharedPreferences命名:
- ACTIVITY:名为MyActivity_MyPrefs的SharedPreferences专用;
- ACTIVITY_DEFAULT:名为MyActivity 的SharedPreferences专用;
- APPLICATION_DEFAULT:名为MyPrefs的SharedPreferences专用,是默认的SharedPreference 或UNIQUE。
因此,如果定义的接口需要单独的SharedPreferences,为了保证所有的Activity能够分享同一个SharedPreferences,我们应该这样做:
@SharedPref(value=SharedPref.Scope.UNIQUE)
public interface MyPrefs {
///
}
在PreferenceActivity或PreferenceFragment中使用上面定义的SharedPreferences接口
public static String PREF_NAME = "MyPrefs";

// in onCreate

// Using your MyPrefs values
this.getPreferenceManager().setSharedPreferencesName(PREF_NAME);

// Opening the layout
addPreferencesFromResource(R.xml.prefs);
@PreferenceScreen
从AndroidAnnotations3.3开始,我们可以使用@PreferenceScreen注解来给组件(如Activity)添加preference布局了。此注解可以用在PreferenceActivity或PreferenceFragment或其子类上,同时,该组件必须用@EActivity或@EFragment标注。
如:
@PreferenceScreen(R.xml.settings)
@EActivity
public class SettingsActivity extends PreferenceActivity {

    @PreferenceByKey(R.string.myPref1)
    Preference myPreference1;

                   @PreferenceByKey(R.string.checkBoxPref)
    CheckBoxPreference checkBoxPref;

    @AfterPreferences
    void initPrefs() {
        checkBoxPref.setChecked(false);
    }
}注意:如果同时我们还是用了@ViewById或@AfterViews,可能会出现view为null的情况。(我们可以在这里找到原因:https://github.com/excilys/androidannotations/issues/1574#issuecomment-148840535)
从AndroidAnnotations3.3.1开始,@PreferenceScreen支持对android.support.v4.PreferenceFragment和com.github.machinarius.preferencefragment.PreferenceFragment的标注。注意:这两个类不是Android官方的类。
@PreferenceByKey
此注解可以用来标注Preference及其子类中的字段、PreferenceActivity或PreferenceFragment的子类,并且保证这些类已经被@EActivity或@EFragment标注。
此标注的值必须是字符串资源的id,和Preference的key关联。
被标注的Preference必须是在@AfterPreference标注的方法中第一次出现。
例如:
@EActivity
public class SettingsActivity extends PreferenceActivity {

    @PreferenceByKey(R.string.myPref1)
    Preference myPreference1;

    @PreferenceByKey(R.string.checkBoxPref)
    CheckBoxPreference checkBoxPref;

    @AfterPreferences
    void initPrefs() {
        checkBoxPref.setChecked(false);
    }
}
相关方法
从AndroidAnnotations4.0开始:
@EActivity
public class SettingsActivity extends PreferenceActivity {

  @PreferenceByKey(R.string.myPref1)
  void setOnePreference(Preference myPreference1){
    // do something with myPreference1
  }

   void setMultiplePreferences(@PreferenceByKey(R.string.myPref1) Preference myPreference1, @PreferenceByKey(R.string.checkBoxPref) CheckBoxPreference checkBoxPref){
    // do something with myPreference1 and checkBoxPref
  }

}
@PreferenceChange
此标签代表指定的Preference被改变时,被标注的方法会被调用,并会接收到OnPreferenceChangeListener.onPreferenceChange定义的事件。
此标签的值是和Preference及其子类关联的字符串资源的id,可以给定有多个。如果没有设置值,被标注的方法名将作为该字符串资源的名称进行绑定。
被标注的方法可能含有多个参数:
- Preference参数:标志此方法的目标preference;
- newVlaue:获得这个preference的 Object、Set、Strings或String参数
如:
@PreferenceChange(R.string.myPref)
void checkedChangedOnMyButton(boolean newValue, Preference preference) {
    // Something Here
}

@PreferenceChange
void myPrefPreferenceChanged(Preference preference) {
    // Something Here
}

@PreferenceChange({R.string.myPref1, R.string.myPref2})
void preferenceChangeOnMultiplePrefs(Preference preference, String newValue) {
    // Something Here
}

@PreferenceChange(R.string.myPref)
void preferenceChangeOnMyPref() {
    // Something Here
}
从AndroidAnnotations 3.3.1开始,Float、Integer、Long等原始 Android类也被支持作为上述参数中的newVlaue存在。因为Android Preference使用的是strings而不是numbers,AndroidAnnotations会自动解析strings,并将获得的数值传给被@PreferenceChange标注的方法。
例如:
@PreferenceChange(R.string.myPref1)
void preferenceChangeIntParameter(Preference preference, int newValue) {
    // Something Here
}
从AndroidAnnotations 4.0开始,Preference的任意子类都能够传递到方法中(如ListPreference)。
@PreferenceClick
此注解表示当Preference被用户点击时,被它标注的相对应的方法将会被触发,并接收到OnPreferenceClickListener#onPreferenceClick定义的事件。
此注解的值是相应的Preference或其子类的id值,可以有多个。如果没有设置值,那么方法名将被作为Preference的名称进行关联。
被它标注的方法可能含有这样一个参数:
- Preference参数:表示被点击的Preference对象。
如:
@PreferenceClick(R.string.myPref)
void clickOnMyPref() {
    // Something Here
}

@PreferenceClick
void myPrefPreferenceClicked(Preference preference) {
    // Something Here
}
从AndroidAnnotations 4.0开始,任何Preference的子类都可以被传送给被此注解标注的方法(如ListPreference)。
@PreferenceHeaders
此注解可以用来标注被@EActivity标注的PreferenceActivity的子类,向其注入资源中定义的preference headers。它的值是一个R.xml.*。
如:
@PreferenceHeaders(R.xml.preference_headers)
@EActivity
public class SettingsActivity extends PreferenceActivity {

    @PreferenceByKey(R.string.myPref1)
    Preference myPreference1;

    @PreferenceByKey(R.string.checkBoxPref)
    CheckBoxPreference checkBoxPref;

    @AfterPreferences
    void initPrefs() {
        checkBoxPref.setChecked(false);
    }
}
@AfterPreferences
在addPreferenceFromResource被调用后,此注解标注的方法会被调用。addPreferenceFromResource会在super.onCreate()的末尾被调用。所有preference相关的代码都在被此注解标注的方法中完成。
如:
@EActivity
public class SettingsActivity extends PreferenceActivity {

    @PreferenceByKey(R.string.checkBoxPref)
    CheckBoxPreference checkBoxPref;

    @AfterPreferences
    void initPrefs() {
        checkBoxPref.setChecked(false);
    }
}
事件绑定
@Click表明被此注解标注的方法必须和相对应的具有点击功能的view进行绑定。我们可以通过给它设置参数来指定和谁绑定在一块,此参数就是该view的id,如果不指定参数,框架会把方法的名字作为view的名字进行绑定,所以如果不给定参数的话,我们的参数要和控件的名字保持一致。
提示:方法不能设为私有。
例如:
@Click(R.id.myButton)
void myButtonWasClicked() {
    [...]
}

@Click
void anotherButton() {
    [...]
}

@Click
void yetAnotherButton(View clickedView) {
    [...]
}

@Click({R.id.myButton, R.id.myOtherButton})
void handlesTwoButtons() {
    [...]
}
从androidAnnotations4.0开始,view的任何子类都可以传递给方法(如button)中。
键盘的点击事件
从AndroidAnnotations 4.0开始,在实现了KeyEvent.Callback接口的类中,我们可以很简单的操作下面这四种和键盘相关的事件。
- @KeyDown
- @KeyUp
- @KeyLongPress
- @KeyMultiple
我们可以通过注解的参数来设置key code或key codes。使用KeyEvent.KEYCODE_*常量,我们可以很容易地传递codes。例如,
@KeyDown(KeyEvent.KEYCODE_ENTER)
@KeyDown({ KeyEvent.KEYCODE_0,KeyEvent.KEYCODE_1 })
如果没有设置key code,会认为方法的名称就是key code。
如果Enter键的操作被调用,可能出现的命名是enter、onEnter、enterPressed、onEnterPressed。
被这四个注解标注的方法可能的返回值类型为void、boolean或Boolean。如果返回的是void,将被认为返回的是true(如:这个方法处理了这个事件)。
@KeyDown, @KeyUp, @KeyLongPress
被标注的方法可能有一个或没有参数。如果有参数,这个参数只能是可能被触发的那个keyEvent。注意:这个方法绝对不能是私有的。同一个类中,不同的方法不能处理同一个事件。
@EActivity
public class MyActivity extends Activity {

    @KeyDown
    void enterPressed() {
        //...
    }

    @KeyUp(KeyEvent.KEYCODE_ESCAPE)
    boolean handleEscapeActionUpEvent() {
        //...
        return false;
    }

    @KeyLongPress({ KeyEvent.KEYCODE_F, KeyEvent.KEYCODE_G })
    void fOrGKeyLongPress(KeyEvent keyEvent) {
        //...
    }
}
@KeyMultiple
被标注的方法可以有0-2个参数,这些参数可以是:
- int或Integer类型的参数:表示重复点击的次数。
- 要触发的keyEvent。
方法不能是私有的。同一个类中,不同的方法不能处理同一个事件。
例如:
@EActivity
public class MyActivity extends Activity {

    @KeyMultiple
    void onEnterPressed() {
        //
    }

    @KeyMultiple(KeyEvent.KEYCODE_ESCAPE)
    boolean handleEscapeActionMultipleEvent(int count) {
        //
        return false;
    }

    @KeyMultiple({ KeyEvent.KEYCODE_F, KeyEvent.KEYCODE_G })
    void fOrGKeyWasMultiplePressed(int count, KeyEvent keyEvent) {
        //
    }
}
PageChangeEvents
从AndroidAnnotations 4.0开始,当页面的滑动状态发生变化时,被此注解标注的方法会接收到android.support.v4.view.ViewPager.OnPageChangeListener.onPageScrollStateChanged(int state) 定义的事件。注解的值是android.support.v4.view.ViewPager的子类的R.id.*,可以是多个。如果没有设置值,方法名会被用作这个值。被标注的方法可能有这样参数:
- android.support.v4.view.ViewPager类型的参数:指定那个viewPager触发这个事件;
- int类型的参数:获取滑动状态。
这些参数都是可选的。
例如:
@PageScrollStateChanged(R.id.viewpager)
void onPageScrollStateChanged(ViewPager view, int state) {
    // Something Here
}

@PageScrollStateChanged
void viewPager(ViewPager view) {
    // Something Here
}

@PageScrollStateChanged({R.id.viewPager1, R.id.viewPager2})
void onPageScrollStateChangedOnMultipleViewPager(ViewPager v, int anything) {
    // Something Here
}

@PageScrollStateChanged(R.id.viewpager)
void onPageScrollStateChangedNoParam() {
    // Something Here
}
@PageScrolled
当当前页面滑动时,无论是程序启动的平滑滚动的一部分还是用户启动的触摸滚动,被注解的方法都会接收到android.support.v4.view.ViewPager.OnPageChangeListener.onPageScrolled(int position, float positionOffset, int positionOffsetPixels)定义的事件。注解的值是android.support.v4.view.ViewPager子类的R.id.*,可以是多个。如果没有设置,方法名会被认为是该值。被标注的方法可能有以下几个参数:
- android.support.v4.view.ViewPager:触发事件的viewPager;
- int类型的参数:当前显示的第一个页面的position。如果positionOffset不是0,那么第position+1个页面将会被显示。
- float参数:范围为【0,1),表示页面滑动的偏移量,或者说偏移的百分比。
- int参数:页面偏移的像素数。
这些参数都是可选的。
例如:
@PageScrolled(R.id.viewpager)
void onPageScrolled(ViewPager view, int position, float positionOffset, int positionOffsetPixels) {
    // Something Here
}

@PageScrolled
void viewPager(ViewPager view) {
    // Something Here
}

@PageScrolled({R.id.viewPager1, R.id.viewPager2})
void onPageScrolledOnMultipleViewPager(ViewPager v, int position) {
    // Something Here
}

@PageScrolled(R.id.viewpager)
void onPageScrolledNoParam() {
    // Something Here
}
@PageSelected
当某一页面被选择时,被此注解标注的方法会接收到android.support.v4.view.ViewPager.OnPageChangeListener.onPageSelected(int position)定义的事件。它的值为 android.support.v4.view.ViewPager子类的R.id.*。如果值没有设置,方法名将被认为是该值。被标注的方法可以有以下参数:
- android.support.v4.view.ViewPager:触发事件的viewPager
- int参数:被选择的页面的position。
这些参数是可选的。
例如:
@PageSelected(R.id.viewpager)
void onPageSelected(ViewPager view, int state) {
    // Something Here
}

@PageSelected
void viewPager(ViewPager view) {
    // Something Here
}

@PageSelected({R.id.viewPager1, R.id.viewPager2})
void onPageSelectedOnMultipleViewPager(ViewPager v, int anything) {
    // Something Here
}

@PageSelected(R.id.viewpager)
void onPageSelectedNoParam() {
    // Something Here
}
NonConfigurationInstance:配置改变,重新载入
从AndroidAnnotations 2.5开始,当配置中发生改变时,Activity会被销毁并重新创建。这个特性对于重载资源是很有利的,但是我们经常需要在新旧Activity中进行图片加载、网络访问、子线程等操作,这样就很麻烦了。
这也就是我们需要这个注解的地方。我们可以使用这个注解标注在Activity中定义的字段,这样就可以在配置改变时保留它们的实例,如横竖屏切换时,保留当前Activity中的数据状态。
如:
@EActivity
public class MyActivity extends Activity {

  @NonConfigurationInstance
  Bitmap someBitmap;

  @NonConfigurationInstance
  @Bean
  MyBackgroundTask myBackgroundTask;

}
警告:我们可以使用这个注解标注除了和Activity向关联的字段之外的任何字段,如Drawable、Adapter、View或其他和context相关的对象,都不可以被标注。如果标注了,将会引起这些资源或view的泄露,从而导致内存泄露。
上述警告内容不适用于被@Bean标注的实体类字段,因为AndroidAnnotations 自动地重新绑定其上下文。


 796
796


 被折叠的 条评论
为什么被折叠?
被折叠的 条评论
为什么被折叠?
 到【灌水乐园】发言


