首先你得安装一个adt-eclipse
参考资料
http://www.crifan.com/android_eclipse_offline_install_adt/
然后就可以运行adt-eclipse来进行打包
1.新建Android一个项目
打开Eclipse,单击菜单栏的“File”->把鼠标光标移动到“New”->在弹出的列表框中,如果直接能看到“Android Applicaion Project”选项项,则直接单击此选项,否则选择最下面的“Other...”,在弹出的窗口中,展开“Android”项,选择“Android Applicaion Project”,然后“Next”;


其实还有一个方法就是直接点Eclipse工具栏的如下图所指示的图标:

在新弹出的窗口中按下图提s示填写相关信息,一路“Next”,直到点击“Finish”,这样第一个Android程序就创建好了,这是你会发现Eclipse左边多了一个你新创建的Android项目。


2.将sencha touch项目导入
因为需要加入cordova,所以我们需要从http://cordova.apache.org/下载一个cordova的包
http://archive.apache.org/dist/cordova/cordova-2.6.0-src.zip我现在用的是2.6版本的
在安卓项目中结构目录如下:
如图我们需要将cordova的jar包引入,然后需要在res/xml目录下加入cordova的配置文件config.xml
代码如下:
 1 <?xml version="1.0" encoding="utf-8"?>
 2 <!--
 3        Licensed to the Apache Software Foundation (ASF) under one
 4        or more contributor license agreements.  See the NOTICE file
 5        distributed with this work for additional information
 6        regarding copyright ownership.  The ASF licenses this file
 7        to you under the Apache License, Version 2.0 (the
 8        "License"); you may not use this file except in compliance
 9        with the License.  You may obtain a copy of the License at
10
11          http://www.apache.org/licenses/LICENSE-2.0
12
13        Unless required by applicable law or agreed to in writing,
14        software distributed under the License is distributed on an
15        "AS IS" BASIS, WITHOUT WARRANTIES OR CONDITIONS OF ANY
16        KIND, either express or implied.  See the License for the
17        specific language governing permissions and limitations
18        under the License.
19 -->
20 <cordova>
21     <!--
22     access elements control the Android whitelist.
23     Domains are assumed blocked unless set otherwise
24      -->
25
26     <access origin="http://127.0.0.1*"/> <!-- allow local pages -->
27
28     <!-- <access origin="https://example.com" /> allow any secure requests to example.com -->
29     <!-- <access origin="https://example.com" subdomains="true" /> such as above, but including subdomains, such as www -->
30     <access origin=".*"/>
31
32     <!-- <content src="http://mysite.com/myapp.html" /> for external pages -->
33     <content src="index.html" />
34
35     <log level="DEBUG"/>
36     <preference name="useBrowserHistory" value="true" />
37     <preference name="exit-on-suspend" value="false" />
38 <plugins>
39     <plugin name="App" value="org.apache.cordova.App"/>
40     <plugin name="Geolocation" value="org.apache.cordova.GeoBroker"/>
41     <plugin name="Device" value="org.apache.cordova.Device"/>
42     <plugin name="Accelerometer" value="org.apache.cordova.AccelListener"/>
43     <plugin name="Compass" value="org.apache.cordova.CompassListener"/>
44     <plugin name="Media" value="org.apache.cordova.AudioHandler"/>
45     <plugin name="Camera" value="org.apache.cordova.CameraLauncher"/>
46     <plugin name="Contacts" value="org.apache.cordova.ContactManager"/>
47     <plugin name="File" value="org.apache.cordova.FileUtils"/>
48     <plugin name="NetworkStatus" value="org.apache.cordova.NetworkManager"/>
49     <plugin name="Notification" value="org.apache.cordova.Notification"/>
50     <plugin name="Storage" value="org.apache.cordova.Storage"/>
51     <plugin name="FileTransfer" value="org.apache.cordova.FileTransfer"/>
52     <plugin name="Capture" value="org.apache.cordova.Capture"/>
53     <plugin name="Battery" value="org.apache.cordova.BatteryListener"/>
54     <plugin name="SplashScreen" value="org.apache.cordova.SplashScreen"/>
55     <plugin name="Echo" value="org.apache.cordova.Echo" />
56     <plugin name="Globalization" value="org.apache.cordova.Globalization"/>
57     <plugin name="InAppBrowser" value="org.apache.cordova.InAppBrowser"/>
58 </plugins>
59 </cordova>
然后需要修改AndroidManifest.xml进行权限配置等
代码如下:
 1 <?xml version="1.0" encoding="utf-8"?>
 2 <manifest xmlns:android="http://schemas.android.com/apk/res/android"
 3     package="com.example.jy110"
 4     android:hardwareAccelerated="true"
 5     android:versionCode="1"
 6     android:versionName="1.0"
 7     android:windowSoftInputMode="adjustPan" >
 8
 9     <supports-screens
10         android:anyDensity="true"
11         android:largeScreens="true"
12         android:normalScreens="true"
13         android:resizeable="true"
14         android:smallScreens="true"
15         android:xlargeScreens="true" />
16
17     <uses-sdk
18         android:minSdkVersion="8"
19         android:targetSdkVersion="16" />
20
21     <uses-permission android:name="android.permission.CAMERA" />
22     <uses-permission android:name="android.permission.VIBRATE" />
23     <uses-permission android:name="android.permission.ACCESS_COARSE_LOCATION" />
24     <uses-permission android:name="android.permission.ACCESS_FINE_LOCATION" />
25     <uses-permission android:name="android.permission.ACCESS_LOCATION_EXTRA_COMMANDS" />
26     <uses-permission android:name="android.permission.INTERNET" />
27     <uses-permission android:name="android.permission.RECEIVE_SMS" />
28     <uses-permission android:name="android.permission.RECORD_AUDIO" />
29     <uses-permission android:name="android.permission.RECORD_VIDEO" />
30     <uses-permission android:name="android.permission.MODIFY_AUDIO_SETTINGS" />
31     <uses-permission android:name="android.permission.READ_CONTACTS" />
32     <uses-permission android:name="android.permission.WRITE_CONTACTS" />
33     <uses-permission android:name="android.permission.WRITE_EXTERNAL_STORAGE" />
34     <uses-permission android:name="android.permission.ACCESS_NETWORK_STATE" />
35     <uses-permission android:name="android.permission.GET_ACCOUNTS" />
36     <uses-permission android:name="android.permission.BROADCAST_STICKY" />
37
38     <application
39         android:allowBackup="true"
40         android:icon="@drawable/ic_launcher"
41         android:label="@string/app_name"
42         android:theme="@style/AppTheme" >
43         <activity
44             android:name="com.example.jy110.Jy110Activity"
45             android:configChanges="orientation|keyboardHidden|keyboard|screenSize|locale"
46             android:label="@string/app_name"
47             android:theme="@android:style/Theme.Black.NoTitleBar" >
48             <intent-filter>
49                 <action android:name="android.intent.action.MAIN" />
50
51                 <category android:name="android.intent.category.LAUNCHER" />
52             </intent-filter>
53         </activity>
54     </application>
55
56 </manifest>
现在环境基本配置完成了,接下来就把我们的html5项目引入进去
我们将做好的项目放进一个www的文件,如下图:
然后将整个www文件放入安卓项目的assets目录下

然后修改src之中的项目启动文件,我这里是Jy110Activity文件,代码如下
 1 package com.example.jy110;
 2
 3 import org.apache.cordova.DroidGap;
 4
 5 import android.annotation.TargetApi;
 6 import android.os.Bundle;
 7
 8
 9 public class Jy110Activity extends DroidGap {
10     private int retryCount = 0;
11     @Override
12     public void onCreate(Bundle savedInstanceState) {
13         super.onCreate(savedInstanceState);
14         //设置启动图片
15         super.setIntegerProperty("splashscreen", R.drawable.splash);
16         super.init();
17         //解决4.1以上安卓白屏问题
18         if(android.os.Build.VERSION.SDK_INT > android.os.Build.VERSION_CODES.ICE_CREAM_SANDWICH_MR1) {
19             fixJellyBeanIssues();
20         }
21         //运行html5项目
22         super.loadUrl("file:///android_asset/www/index.html",5000);
23     }
24
25     @TargetApi(16)
26     protected void fixJellyBeanIssues() {
27         System.out.println(super.appView.toString());
28         try {
29             super.appView.getSettings().setAllowUniversalAccessFromFileURLs(true);
30         } catch(NullPointerException e) {
31             System.out.println(e.toString());
32         }
33     }
34
35     @Override
36     public void onReceivedError( int errorCode, String description, String failingUrl)
37     {
38         if(retryCount < 3) {
39             retryCount++;
40             super.loadUrl("file:///android_asset/www/index.html");
41         } else {
42             super.loadUrl("file:///android_asset/www/fail.html");
43         }
44         return;
45     }
46
47 }
在st项目中引入cordova.js文件,在app.js中加入以下代码
Ext.Loader.setConfig({
    enabled: true
});
/*
*请自行添加模拟数据
*这里涉及到了
*路由:controller.Main
*List:view.img.List
*历史记录支持、自动销毁、自定义消息提示:view.img.util.CardPanel
*登录、注册:controller.User和view.user
*Carousel:view.img.List和controller(除开user)
*如有问题请联系qq:534502520 q群:224711028 213119459@魔狼再世 欢迎交流
*此版本已在安卓中打包测试
*/
Ext.application({
    name: 'app',
    appFolder: 'app',
    controllers: ['Main', 'User','Img'],
    views: ['util.CardPanel'],
    //请求地址
    postUrl: 'http://localhost:40231/PictureManager/mynetpic/',
    //过期时间
    sessionTimeout: 1000 * 60 * 60 * 24 * 30,
    launch: function () {
        Ext.Viewport.add({
            xclass: 'app.view.util.CardPanel'
        });
        // 等待加载PhoneGap
        document.addEventListener("deviceready", onDeviceReady, false);
        // PhoneGap加载完毕后执行,这样就可以在项目中使用PhoneGap调用手机硬件
        function onDeviceReady() {
        }
    }
});
这样就算完成了,之后就是打包项目了。
3.签名打包
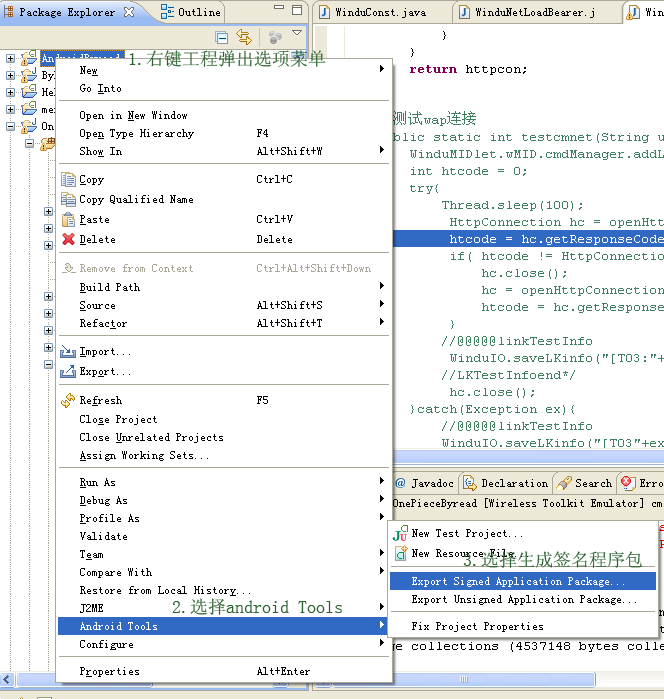
Eclipse工程中右键工程,弹出选项中选择 android工具-生成签名应用包:
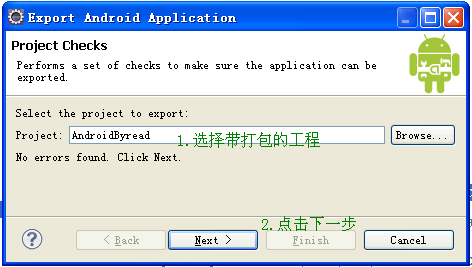
选择需要打包的android项目工程:
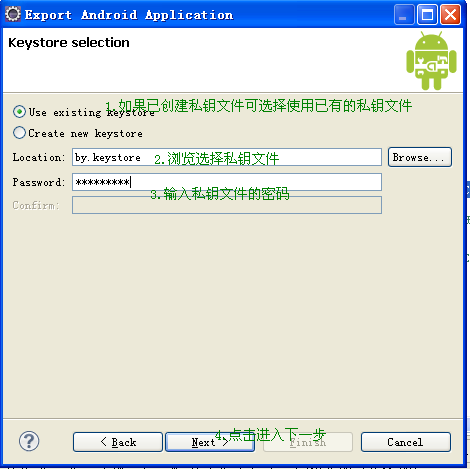
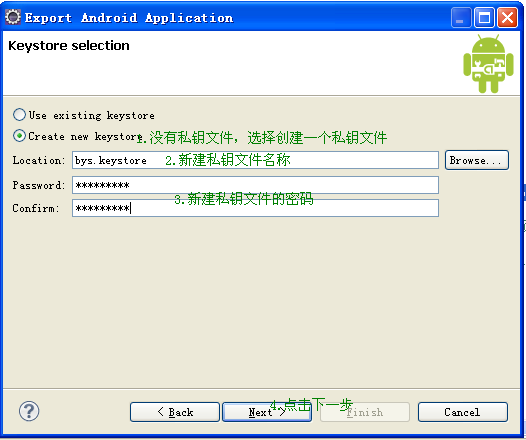
如果已有私钥文件,选择私钥文件输入密码,如果没有参见第6和7步创建私钥文件:
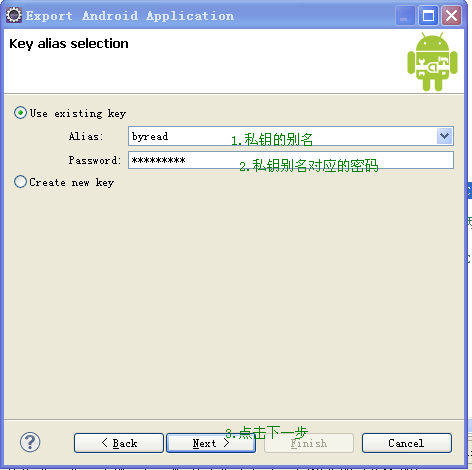
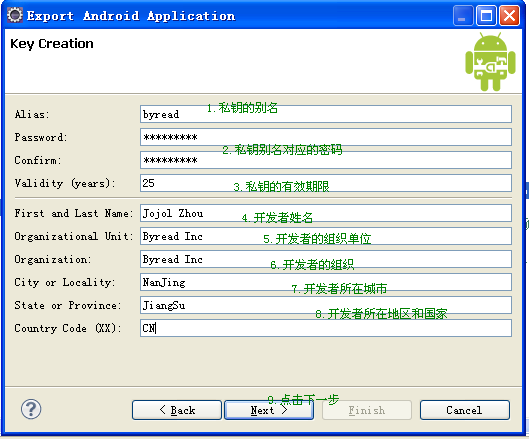
4.输入私钥别名和密码:
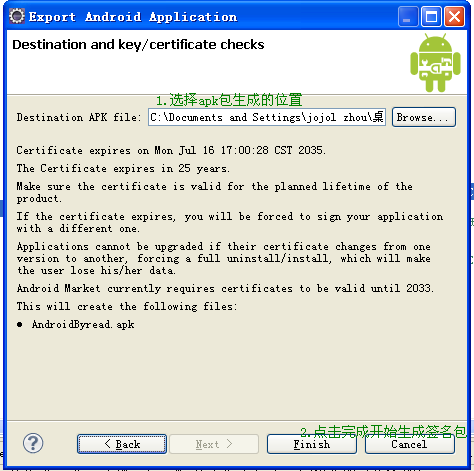
5.选择APK存储的位置,并完成设置 开始生成:
6.没有私钥文件的情况,创建私钥文件:
7.输入私钥文件所需信息,并创建:
*SDK的安装目录最后不要有中文和空格,否则会出现不必要的错误。如果你的安装路径包含Program Files(有空格),用ADT打包会报错,Ant方式打包的也会报错,没关系,不用重装,解决方法:配置SDk环境变量和在Eclipse中配置SDK路径的时候把Program Files改为Progra~1即可。(而且改成其他的都不行,只能是Progra~1,不信试试,这是Dos的规格)。
附上项目实例一份,在adt-eclipse工具中,file-Import


选择导入即可
http://download.csdn.net/detail/jy02534655/5635403


 1820
1820

 被折叠的 条评论
为什么被折叠?


