


前言
在前面分析getHandler时,我们发现返回的并不是简单的HandlerMethod而是HandlerExecutionChain,本篇就是完成对其中拦截器分析。
概述
在分析之前,我们先记住几个类名,HandlerInterceptor、HandlerInterceptorAdapter、MappedInterceptor。
- HandlerInterceptor是spring mvc的基础接口,它提供了三个抽象方法,分别在获取到handler之后、适配器调用了hander之后、渲染视图之后
- HandlerInterceptorAdapter是HandlerInterceptor接口的抽象类,我们在开发扩展时,一般不去实现HandlerInterceptor,而是去继承这个抽象类。
- MappedInterceptor是HandlerInterceptor的实现类,我们在配置文件中的拦截器都会被包装成这个类。
贴上配置
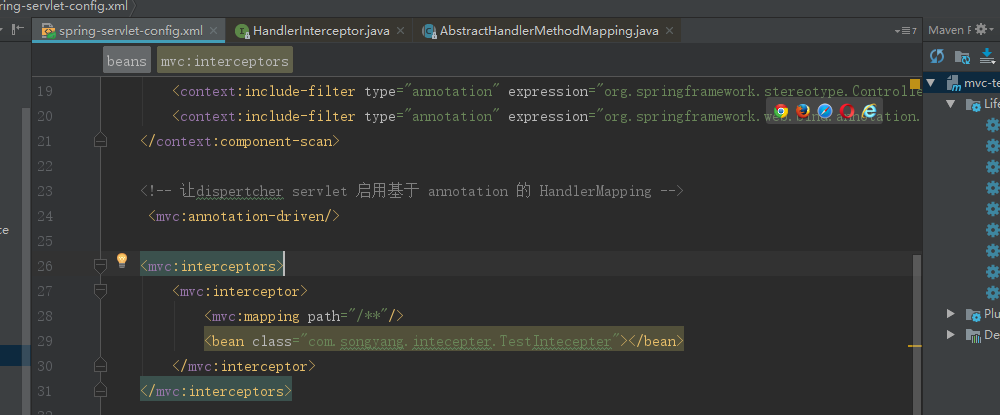
源码分析
上面添加了拦截器的配置,那么第一步肯定的配置的解析过程,我们找到相应的解析器进行去
- 解析<mvc:interceptors>的配置,注册bean定义信息到容器中,这个过程比较简单
- 遍历<mvc:interceptors>下所有的<mvc:interceptor>
- 创建MappedInterceptor的定义信息,并把路径映射信息、指定的拦截器bean给设置进去
- 向容器中注册MappedInterceptor的定义信息
//InterceptorsBeanDefinitionParser类的方法
//解析<mvc:interceptors>标签
public BeanDefinition parse(Element element, ParserContext parserContext) {
    CompositeComponentDefinition compDefinition = new CompositeComponentDefinition(element.getTagName(), parserContext.extractSource(element));
    parserContext.pushContainingComponent(compDefinition);

    RuntimeBeanReference pathMatcherRef = null;
    if (element.hasAttribute("path-matcher")) {
        pathMatcherRef = new RuntimeBeanReference(element.getAttribute("path-matcher"));
    }

    List<Element> interceptors = DomUtils.getChildElementsByTagName(element, "bean", "ref", "interceptor");
    for (Element interceptor : interceptors) {
        RootBeanDefinition mappedInterceptorDef = new RootBeanDefinition(MappedInterceptor.class);
        mappedInterceptorDef.setSource(parserContext.extractSource(interceptor));
        mappedInterceptorDef.setRole(BeanDefinition.ROLE_INFRASTRUCTURE);

        ManagedList<String> includePatterns = null;
        ManagedList<String> excludePatterns = null;
        Object interceptorBean;
        if ("interceptor".equals(interceptor.getLocalName())) {
            includePatterns = getIncludePatterns(interceptor, "mapping");
            excludePatterns = getIncludePatterns(interceptor, "exclude-mapping");
            Element beanElem = DomUtils.getChildElementsByTagName(interceptor, "bean", "ref").get(0);
            interceptorBean = parserContext.getDelegate().parsePropertySubElement(beanElem, null);
        }
        else {
            interceptorBean = parserContext.getDelegate().parsePropertySubElement(interceptor, null);
        }
        mappedInterceptorDef.getConstructorArgumentValues().addIndexedArgumentValue(0, includePatterns);
        mappedInterceptorDef.getConstructorArgumentValues().addIndexedArgumentValue(1, excludePatterns);
        mappedInterceptorDef.getConstructorArgumentValues().addIndexedArgumentValue(2, interceptorBean);

        if (pathMatcherRef != null) {
            mappedInterceptorDef.getPropertyValues().add("pathMatcher", pathMatcherRef);
        }

        String beanName = parserContext.getReaderContext().registerWithGeneratedName(mappedInterceptorDef);
        parserContext.registerComponent(new BeanComponentDefinition(mappedInterceptorDef, beanName));
    }

    parserContext.popAndRegisterContainingComponent();
    return null;
}
- 在分析找到Controller的那篇中,我们看到RequestMappingHandlerMapping是实现了ApplicationAware接口的,所有在实例化的时候要调用setApplicationContext接口的。而这个方法的实现类是在RequestMappingHandlerMapping的父类ApplicationObjectSupport中的。这个方法设置给RequestMappingHandlerMapping设置了application属性,并初始化上下文。
//ApplicationObjectSupport类的方法
//设置容器对象到当前对象中
public final void setApplicationContext(ApplicationContext context) throws BeansException {
    if (context == null && !isContextRequired()) {
        // Reset internal context state.
        this.applicationContext = null;
        this.messageSourceAccessor = null;
    }
    else if (this.applicationContext == null) {
        // Initialize with passed-in context.
        if (!requiredContextClass().isInstance(context)) {
            throw new ApplicationContextException(
                    "Invalid application context: needs to be of type [" + requiredContextClass().getName() + "]");
        }
        this.applicationContext = context;
        this.messageSourceAccessor = new MessageSourceAccessor(context);
        initApplicationContext(context);
    }
    else {
        // Ignore reinitialization if same context passed in.
        if (this.applicationContext != context) {
            throw new ApplicationContextException(
                    "Cannot reinitialize with different application context: current one is [" +
                    this.applicationContext + "], passed-in one is [" + context + "]");
        }
    }
}
- 初始化上下文,这里我们先看到AbstractHandlerMapping有两个拦截器相关的属性。再看到初始化上下文的方法,这里主要做三件事
- 扩展interceptors列表,这里是一个空方法,并没有实现。注意的在我们的配置中并没有配置interceptors这个属性,所有这个列表是空的。如果要设置,可以通过配置<bean>标签的方式配置RequestMappingHandlerMapping
- 查看容器中所有的MappedInterceptor.class的对象,添加到adaptedInterceptor中
- 遍历所有的intercptors,如果HandlerInterceptor或WebRequestInterceptor接口的实现类,则适配后,添加到adaptedInterceptors中。提一下的WebRequestInterceptor接口,这个接口是针对请求的。
这里我们没有配置interceptors,所以这里为空,没有添加到adaptedInterceptors中的。
private final List<Object> interceptors = new ArrayList<Object>();

private final List<HandlerInterceptor> adaptedInterceptors = new ArrayList<HandlerInterceptor>();
//AbstractHandlerMapping类的方法
//这里完成了对拦截器属性的设置
protected void initApplicationContext() throws BeansException {
    extendInterceptors(this.interceptors);
    detectMappedInterceptors(this.adaptedInterceptors);
    initInterceptors();
}
//AbstractHandlerMapping类的方法
protected void detectMappedInterceptors(List<HandlerInterceptor> mappedInterceptors) {
    mappedInterceptors.addAll(
            BeanFactoryUtils.beansOfTypeIncludingAncestors(
                    getApplicationContext(), MappedInterceptor.class, true, false).values());
}

protected HandlerInterceptor adaptInterceptor(Object interceptor) {
    if (interceptor instanceof HandlerInterceptor) {
        return (HandlerInterceptor) interceptor;
    }
    else if (interceptor instanceof WebRequestInterceptor) {
        return new WebRequestHandlerInterceptorAdapter((WebRequestInterceptor) interceptor);
    }
    else {
        throw new IllegalArgumentException("Interceptor type not supported: " + interceptor.getClass().getName());
    }
}

protected void initInterceptors() {
    if (!this.interceptors.isEmpty()) {
        for (int i = 0; i < this.interceptors.size(); i++) {
            Object interceptor = this.interceptors.get(i);
            if (interceptor == null) {
                throw new IllegalArgumentException("Entry number " + i + " in interceptors array is null");
            }
            this.adaptedInterceptors.add(adaptInterceptor(interceptor));
        }
    }
}

protected HandlerInterceptor adaptInterceptor(Object interceptor) {
    if (interceptor instanceof HandlerInterceptor) {
        return (HandlerInterceptor) interceptor;
    }
    else if (interceptor instanceof WebRequestInterceptor) {
        return new WebRequestHandlerInterceptorAdapter((WebRequestInterceptor) interceptor);
    }
    else {
        throw new IllegalArgumentException("Interceptor type not supported: " + interceptor.getClass().getName());
    }
}
- 上面分析了拦截器的在IOC中的设置过程。下面我们去看请求过程,再次来到DispatcherServlet的doDispatch方法。同样地我们过滤掉一些与本次分析无关的代码。大体可以分为下面几步,
- 获取HandlerExecutionChain
- 前置处理
- handler执行
- 后置处理
- 后置处理请求完成时处理(没有异常时会在processDispatchResult中执行)
- 异步请求时的处理,这里不进行分析
//DispatcherServlet类的方法
protected void doDispatch(HttpServletRequest request, HttpServletResponse response) throws Exception {
    ......
    HandlerExecutionChain mappedHandler = null;
    try {
            ......
            mappedHandler = getHandler(processedRequest);
            ......
            if (!mappedHandler.applyPreHandle(processedRequest, response)) {
                return;
            }
            ......
            mv = ha.handle(processedRequest, response, mappedHandler.getHandler());
            ......
            mappedHandler.applyPostHandle(processedRequest, response, mv);
        }
     ......
     processDispatchResult(processedRequest, response, mappedHandler, mv, dispatchException);
    }
    catch (Exception ex) {
        triggerAfterCompletion(processedRequest, response, mappedHandler, ex);
    }
    catch (Throwable err) {
        triggerAfterCompletion(processedRequest, response, mappedHandler,
                new NestedServletException("Handler processing failed", err));
    }
    finally {
        if (asyncManager.isConcurrentHandlingStarted()) {
            // Instead of postHandle and afterCompletion
            if (mappedHandler != null) {
                mappedHandler.applyAfterConcurrentHandlingStarted(processedRequest, response);
            }
        }
        ......
    }
}
- 获取HandlerExecutionChain,这里比较整个非常清晰。就是把AbstractHandlerMapping中的adaptedInterceptors进行遍历,如果是MappedInterceptor,则判断是否满足路径匹配规则,是则添加到HandlerExecutionChain中,如果是其它类型的拦截器,则直接加到处理链中。
//DispatcherServlet类的方法
//获取HandlerExecutionChain
protected HandlerExecutionChain getHandler(HttpServletRequest request) throws Exception {
    for (HandlerMapping hm : this.handlerMappings) {
        if (logger.isTraceEnabled()) {
            logger.trace(
                    "Testing handler map [" + hm + "] in DispatcherServlet with name '" + getServletName() + "'");
        }
        HandlerExecutionChain handler = hm.getHandler(request);
        if (handler != null) {
            return handler;
        }
    }
    return null;
}
//AbstractHandlerMapping类的方法
//获取HandlerExecutionChain
public final HandlerExecutionChain getHandler(HttpServletRequest request) throws Exception {
    Object handler = getHandlerInternal(request);
    if (handler == null) {
        handler = getDefaultHandler();
    }
    if (handler == null) {
        return null;
    }
    // Bean name or resolved handler?
    if (handler instanceof String) {
        String handlerName = (String) handler;
        handler = getApplicationContext().getBean(handlerName);
    }

    HandlerExecutionChain executionChain = getHandlerExecutionChain(handler, request);
    if (CorsUtils.isCorsRequest(request)) {
        CorsConfiguration globalConfig = this.corsConfigSource.getCorsConfiguration(request);
        CorsConfiguration handlerConfig = getCorsConfiguration(handler, request);
        CorsConfiguration config = (globalConfig != null ? globalConfig.combine(handlerConfig) : handlerConfig);
        executionChain = getCorsHandlerExecutionChain(request, executionChain, config);
    }
    return executionChain;
}
//AbstractHandlerMapping类的方法
//获取HandlerExecutionChain
protected HandlerExecutionChain getHandlerExecutionChain(Object handler, HttpServletRequest request) {
    HandlerExecutionChain chain = (handler instanceof HandlerExecutionChain ?
            (HandlerExecutionChain) handler : new HandlerExecutionChain(handler));

    String lookupPath = this.urlPathHelper.getLookupPathForRequest(request);
    for (HandlerInterceptor interceptor : this.adaptedInterceptors) {
        if (interceptor instanceof MappedInterceptor) {
            MappedInterceptor mappedInterceptor = (MappedInterceptor) interceptor;
            if (mappedInterceptor.matches(lookupPath, this.pathMatcher)) {
                chain.addInterceptor(mappedInterceptor.getInterceptor());
            }
        }
        else {
            chain.addInterceptor(interceptor);
        }
    }
    return chain;
}
- 前置处理,就是去遍历处理链中拦截顺,一个顺序处理。注意的是,当拦截器返回false时会调用triggerAfterCompletion方法
//HandlerExecutionChain的方法
//前置处理
boolean applyPreHandle(HttpServletRequest request, HttpServletResponse response) throws Exception {
    HandlerInterceptor[] interceptors = getInterceptors();
    if (!ObjectUtils.isEmpty(interceptors)) {
        for (int i = 0; i < interceptors.length; i++) {
            HandlerInterceptor interceptor = interceptors[i];
            if (!interceptor.preHandle(request, response, this.handler)) {
                triggerAfterCompletion(request, response, null);
                return false;
            }
            this.interceptorIndex = i;
        }
    }
    return true;
}
- 后置处理/请求完成时处理,遍历处理,注意地是,是倒序处理的。
//HandlerExecutionChain的方法
//后置处理
void applyPostHandle(HttpServletRequest request, HttpServletResponse response, ModelAndView mv) throws Exception {
    HandlerInterceptor[] interceptors = getInterceptors();
    if (!ObjectUtils.isEmpty(interceptors)) {
        for (int i = interceptors.length - 1; i >= 0; i--) {
            HandlerInterceptor interceptor = interceptors[i];
            interceptor.postHandle(request, response, this.handler, mv);
        }
    }
}

//HandlerExecutionChain链的方法
//请求完成时的处理
void triggerAfterCompletion(HttpServletRequest request, HttpServletResponse response, Exception ex)
        throws Exception {

    HandlerInterceptor[] interceptors = getInterceptors();
    if (!ObjectUtils.isEmpty(interceptors)) {
        for (int i = this.interceptorIndex; i >= 0; i--) {
            HandlerInterceptor interceptor = interceptors[i];
            try {
                interceptor.afterCompletion(request, response, this.handler, ex);
            }
            catch (Throwable ex2) {
                logger.error("HandlerInterceptor.afterCompletion threw exception", ex2);
            }
        }
    }
}
参考链接
- https://www.cnblogs.com/weknow619/p/6341395.html(ContextLoaderListener与DispatcherServlet的创建的上下文)
- http://www.cnblogs.com/fangjian0423/p/springMVC-dispatcherServlet.html(源码分析参考博文)
- https://blog.csdn.net/qq_21033663/article/details/52374436(解析器参考博文)


 2万+
2万+


 被折叠的 条评论
为什么被折叠?
被折叠的 条评论
为什么被折叠?
 到【灌水乐园】发言


