


系统环境:Android 13(高通8550)
一、背景
Android13中,为双网卡模式,有eth0和eth1两个网卡,eth0为业务网卡,eth1为管理网卡,设置ip时,一般设置的是业务网,博主这边设置Ip时封装了一个setip.sh,里面根据persist.ruichi.native_agent属性,判断是上层设置网络还是Native层设置网络。
示例命令如下:
setip.sh eth0 192.168.16.155 255.255.255.0 192.168.16.1 114.114.114.114
二、设置ip流程分析
1、setip.sh中接收到ip、netmask、gateway、dns等参数,通过广播形式发送
am broadcast -n $BROADCAST_PACKAGE -a android.net.action.ETHERNET_IP_CHANGED --es netMode "static" --es nic $1 --es ipaddr $2 --es netMask $3 --es gateway $4 --es dns1 $52、EthernetBoardcastReceive.java文件中接收到广播,处理相关设置逻辑,主要工作流程总结如下:
(1)、广播接收的值设置到Property属性和eeprom中
  readSystemCMD("setprop persist.net.ipaddr " + Ip);
                readSystemCMD("setprop persist.net.mEthNetmask " + Netmask);
                readSystemCMD("setprop persist.net.mEthGateway " + Gateway);
                readSystemCMD("setprop persist.net.dns1 " + dns1);
                readSystemCMD("setprop persist.net.dns2 " + dns2);
                readSystemCMD("eeprom_tools set 16 " + "'" + Ip + " " + Netmask + " " + " " + Gateway + " " + dns1 + " " + dns2 + "'");
(2)、将封装后的IP等值写入配置文件
    private static final String ETHERNET_DIR = "/data/misc/ethernet/";
    private static final String ETH0 = "ipconfig.txt";
    private static final String ETH1 = "ipconfig1.txt";


   /*
     * save ipconfig in /data/misc/ethernet/
     */
    private void saveNetConfig(String nicName, IpConfiguration ipConfiguration) {
        File dir = new File(ETHERNET_DIR);
        if (!dir.exists()) {
            dir.mkdir();
        }

        File config;
        if (nicName.equals("eth0")) {
            config = new File(ETHERNET_DIR, ETH0);
        } else if (nicName.equals("eth1")) {
            config = new File(ETHERNET_DIR, ETH1);
        } else {
            Log.w(TAG, "Invalid nic name : " + nicName);
            return;
        }

        if (config.exists()) {
            Log.i(TAG, "Recreate config file :" + config.getName());
            config.delete();
        } else {
            Log.i(TAG, "Save " + nicName + " config to " + config.getName());
        }

        IpConfigStore store = new IpConfigStore();
        ArrayMap<String, IpConfiguration> map = new ArrayMap<>();
        if (nicName.equals("eth0")) {
            map.put("eth0", ipConfiguration);
            Log.d(TAG, "writeIpConfigurations for eth0");
            store.writeIpConfigurations(ETHERNET_DIR + ETH0, map);
        } else if (nicName.equals("eth1")) {
            map.put("eth1", ipConfiguration);
            Log.d(TAG, "writeIpConfigurations for eth1");
            store.writeIpConfigurations(ETHERNET_DIR + ETH1, map);
        } else {
            Log.w(TAG, "Invalid nic name : " + nicName);
            return;
        }
}
三、EthernetBoardcastReceive.java中更改日志编译调试
路径:Qualcomm8550_CS/qssi/LA.QSSI.13.0/LINUX/android/packages/apps/Settings/src/com/android/settings/EthernetBoardcastReceive.java
1、在广播接收处更改日志
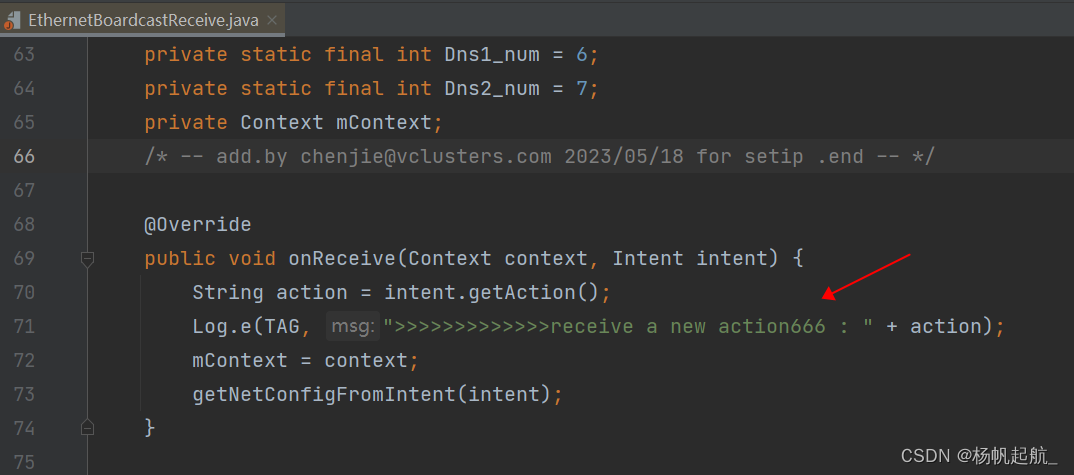
2、编译
(1)、qssi/LA.QSSI.13.0/LINUX/android 目录下执行 source build/envsetup.sh & lunch 40
(2)、qssi/LA.QSSI.13.0/LINUX/android 目录下执行 mmm packages/apps/Settings
如果编译test目录中的文件报错,删除即可
rm packages/apps/Settings/tests/robotests/src/com/android/settings/biometrics/combination/CombinedBiometricStatusPreferenceControllerTest.java
(3)、编译生成的文件目录: out/target/product/qssi/system_ext/priv-app/Settings/Settings.apk
(4)、替换系统中该目录原先的 system_ext/priv-app/Settings/Settings.apk
(5)、查看settings服务
service list | grep settings
(6)、重启服务(重启服务,新push 的apk才会生效)
am restart settings
(7)、执行setip.sh脚本,查看日志
setip.sh eth0 192.168.16.155 255.255.255.0 192.168.16.1 114.114.114.114
logcat -s EthernetBoardcastReceive,日志如下:
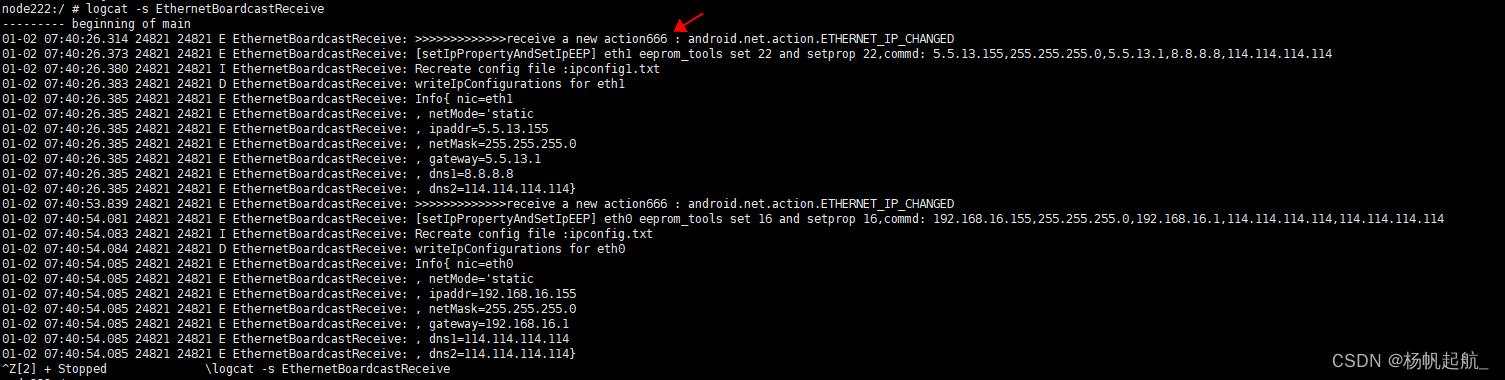
从上面可以看到,我们更改的日志已生效


 被折叠的 条评论
为什么被折叠?
被折叠的 条评论
为什么被折叠?
 到【灌水乐园】发言


