


项目源码:https://github.com/dillyant/JAVA/tree/master/springbootmybatis
准备环境: springboot mysql数据库,测试数据库yanwftest
数据准备:
CREATE TABLE `user_t` (
`id` int(11) NOT NULL AUTO_INCREMENT,
`user_name` varchar(40) NOT NULL,
`password` varchar(255) NOT NULL,
`age` int(4) NOT NULL,
PRIMARY KEY (`id`)
) ENGINE=InnoDB AUTO_INCREMENT=2 DEFAULT CHARSET=utf8;
INSERT INTO `user_t` VALUES ('1', '测试', 'sfasgfaf', '24');
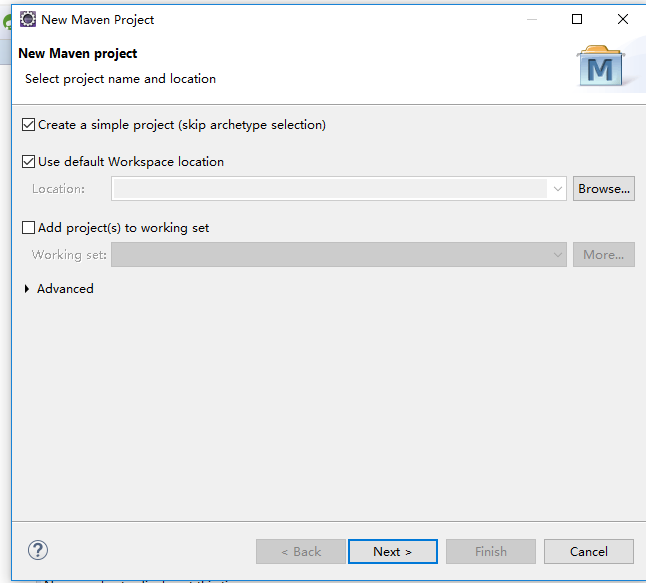
1.创建maven项目 File->New->Maven Project,选择Create a simple project
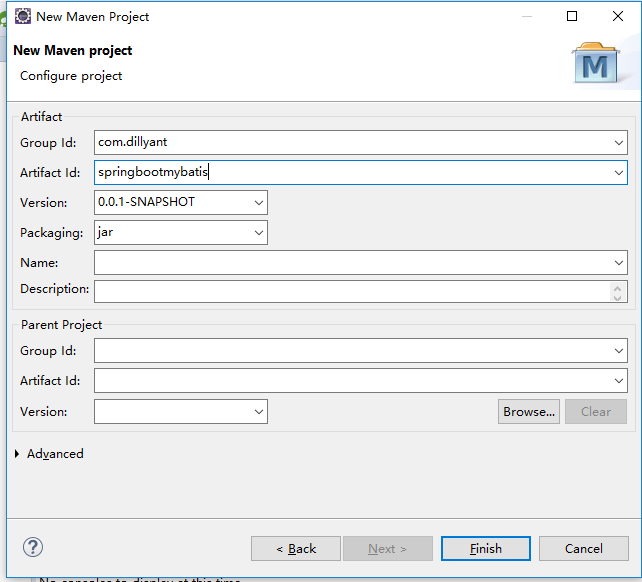
填写Group Id,Artifact Id
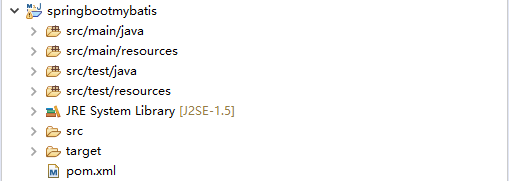
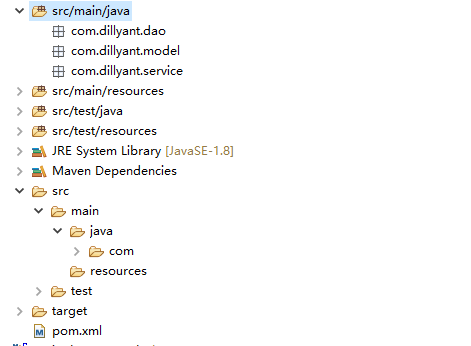
创建之后目录结构如下:
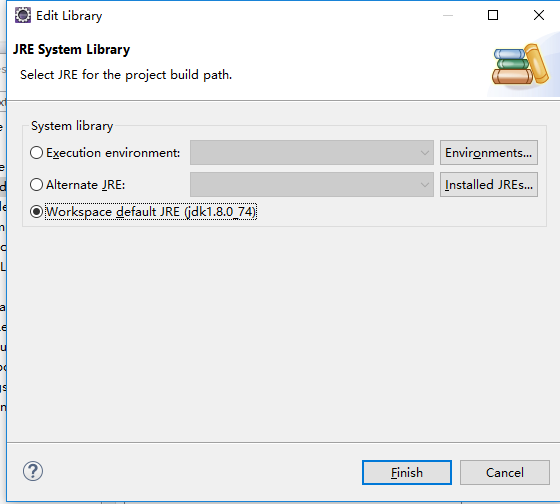
2.自定义配置项目,选中当前项目右键,Properties->Libraries,选择JRE ->Edit
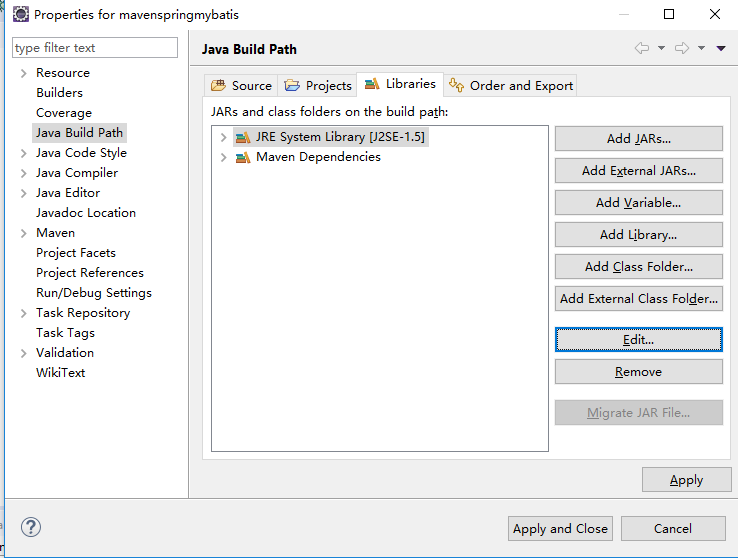
修改jre为Workspace default JRE。
3.修改pom.xml,如下
<
project
xmlns
=
"http://maven.apache.org/POM/4.0.0"
xmlns:xsi
=
"http://www.w3.org/2001/XMLSchema-instance"
xsi:schemaLocation
=
"http://maven.apache.org/POM/4.0.0 http://maven.apache.org/xsd/maven-4.0.0.xsd"
>
<
modelVersion
>
4.0.0
</
modelVersion
>
<
groupId
>
com.dillyant
</
groupId
>
<
artifactId
>
springbootmybatis
</
artifactId
>
<
version
>
0.0.1-SNAPSHOT
</
version
>
<
packaging
>
jar
</
packaging
>
<
name
>
springbootmybatis
</
name
>
<
url
>
http://maven.apache.org
</
url
>
<
parent
>
<
groupId
>
org.springframework.boot
</
groupId
>
<
artifactId
>
spring-boot-starter-parent
</
artifactId
>
<
version
>
1.5.6.RELEASE
</
version
>
</
parent
>
<
properties
>
<
mybatis-spring-boot.version
>
1.3.0
</
mybatis-spring-boot.version
>
<
java.version
>
1.8
</
java.version
>
</
properties
>
<
dependencies
>
<
dependency
>
<
groupId
>
junit
</
groupId
>
<
artifactId
>
junit
</
artifactId
>
<
scope
>
test
</
scope
>
</
dependency
>
<
dependency
>
<
groupId
>
org.springframework.boot
</
groupId
>
<
artifactId
>
spring-boot-starter
</
artifactId
>
</
dependency
>
<!-- https://mvnrepository.com/artifact/org.mybatis.spring.boot/mybatis-spring-boot-starter -->
<
dependency
>
<
groupId
>
org.mybatis.spring.boot
</
groupId
>
<
artifactId
>
mybatis-spring-boot-starter
</
artifactId
>
<
version
>
${mybatis-spring-boot.version}
</
version
>
</
dependency
>
<
dependency
>
<
groupId
>
mysql
</
groupId
>
<
artifactId
>
mysql-connector-java
</
artifactId
>
</
dependency
>
<!-- https://mvnrepository.com/artifact/com.alibaba/fastjson -->
<
dependency
>
<
groupId
>
com.alibaba
</
groupId
>
<
artifactId
>
fastjson
</
artifactId
>
<
version
>
1.2.32
</
version
>
</
dependency
>
</
dependencies
>
<
build
>
<
plugins
>
<!-- Package as an executable jar/war -->
<
plugin
>
<
groupId
>
org.springframework.boot
</
groupId
>
<
artifactId
>
spring-boot-maven-plugin
</
artifactId
>
</
plugin
>
</
plugins
>
<
resources
>
<
resource
>
<
directory
>
src/main/java
</
directory
>
<
includes
>
<
include
>
**/*.xml
</
include
>
</
includes
>
</
resource
>
<
resource
>
<
directory
>
src/main/resources
</
directory
>
<
includes
>
<
include
>
**.*
</
include
>
</
includes
>
</
resource
>
</
resources
>
</
build
>
</
project
>
更新maven,右键项目maven->update project...
4.添加jar包目录结构如下
5.添加源码
包名:com.dillyant.model
类文件名:User.java
package
com.dillyant.model;
public
class
User {
private
Integer
id
;
private
String
userName
;
private
String
password
;
private
Integer
age
;
public
Integer getId() {
return
id
;
}
public
void
setId(Integer
id
) {
this
.
id
=
id
;
}
public
String getUserName() {
return
userName
;
}
public
void
setUserName(String
userName
) {
this
.
userName
=
userName
==
null
?
null
:
userName
.trim();
}
public
String getPassword() {
return
password
;
}
public
void
setPassword(String
password
) {
this
.
password
=
password
==
null
?
null
:
password
.trim();
}
public
Integer getAge() {
return
age
;
}
public
void
setAge(Integer
age
) {
this
.
age
=
age
;
}
}
包名:com.dillyant.dao
类文件名:UserMapper.java
package
com.dillyant.dao;
import
com.dillyant.model.User;
public
interface
UserMapper {
User selectByPrimaryKey(Integer
id
);
}
包名:
com.dillyant.dao
XML文件名:UserMapper.xml
<?
xml
version
=
"1.0"
encoding
=
"UTF-8"
?>
<!
DOCTYPE
mapper
PUBLIC
"-//mybatis.org//DTD Mapper 3.0//EN"
"http://mybatis.org/dtd/mybatis-3-mapper.dtd"
>
<
mapper
namespace
=
"com.dillyant.dao.UserMapper"
>
<
select
id
=
"selectByPrimaryKey"
parameterType
=
"java.lang.Integer"
resultType
=
"com.dillyant.model.User"
>
select
id, user_name, password, age
from user_t
where id =
#{id,jdbcType=INTEGER}
</
select
>
</
mapper
>
包名:
com.dillyant.service
类文件名:IUserService.java
package
com.dillyant.service;
import
com.dillyant.model.User;
public
interface
IUserService {
public
User getUserById(
int
userId
);
}
包名:
com.dillyant.service
类文件名:UserServiceImpl.java
package com.dillyant.service;
import javax.annotation.Resource;
import org.springframework.stereotype.Service;
import com.dillyant.dao.UserMapper;
import com.dillyant.model.User;
import com.dillyant.service.IUserService;
@Service
public class UserServiceImpl implements IUserService {
@Resource
private UserMapper userMapper;
@Override
public User getUserById(int userId) {
return this.userMapper.selectByPrimaryKey(userId);
}
}
包名:
com.dillyant
类文件名:SpringBootConsoleApplication.java
package
com.dillyant;
import
org.apache.log4j.Logger;
import
org.mybatis.spring.annotation.MapperScan;
import
org.springframework.boot.Banner;
import
org.springframework.boot.CommandLineRunner;
import
org.springframework.boot.SpringApplication;
import
org.springframework.boot.autoconfigure.SpringBootApplication;
import
com.alibaba.fastjson.JSON;
import
com.dillyant.model.User;
import
com.dillyant.service.UserServiceImpl;
import
static
java.lang.System.exit;
import
javax.annotation.Resource;
@SpringBootApplication
@MapperScan
(
"com.dillyant.dao"
)
public
class
SpringBootConsoleApplication
implements
CommandLineRunner {
private
static
Logger
logger
= Logger.getLogger(SpringBootConsoleApplication.
class
);
@Resource
private
UserServiceImpl
userService
;
@Override
public
void
run(String...
args
)
throws
Exception {
User
user
=
userService
.getUserById(1);
logger
.info(JSON.toJSONString(
user
));
exit(0);
}
public
static
void
main(String[]
args
) {
SpringApplication
app
=
new
SpringApplication(SpringBootConsoleApplication.
class
);
app
.setBannerMode(Banner.Mode.
OFF
);
app
.run(
args
);
}
}
6 resources目录下添加配置文件
目录结构如下:
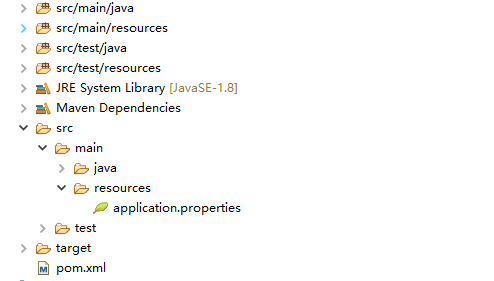
spring boot配置文件:application.properties
#DATASOURCE
spring.datasource.driverClassName =
com.mysql.jdbc.Driver
spring.datasource.url =
jdbc:mysql://127.0.0.1:3306/yanwftest?useUnicode=true&characterEncoding=utf-8
spring.datasource.username =
tips
spring.datasource.password =
tips
spring.datasource.max-active=
20
spring.datasource.max-idle=
8
spring.datasource.min-idle=
8
spring.datasource.initial-size=
10
mybatis.typeAliasesPackage=
com.dillyant.model
mybatis.mapperLocations=
classpath:com/dillyant/dao/*.xml
7.运行测试,通过。

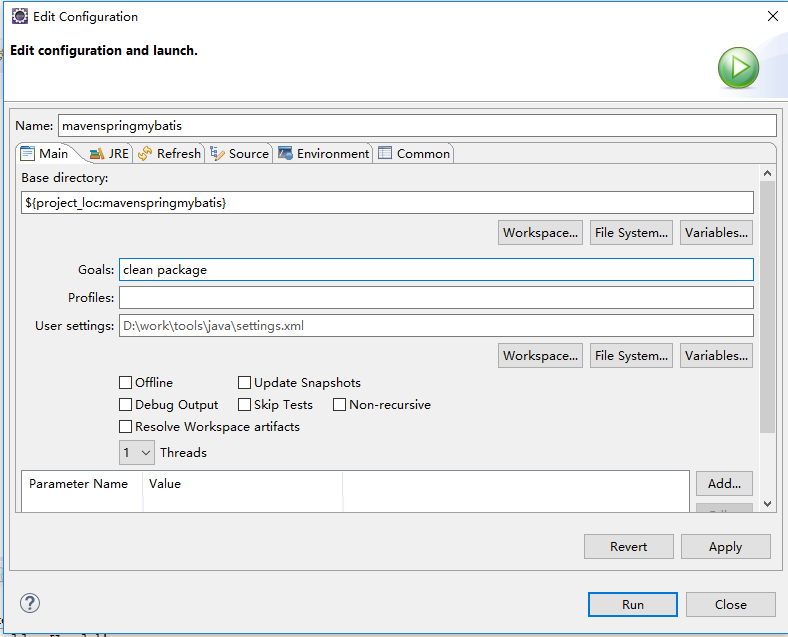
8.使用maven插件打包,选择当前项目右键,Run As->Maven Build , Goals为 clean package,Run
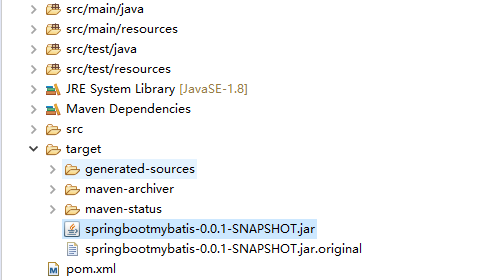
生成的jar包如下
9.可执行jar包运行如下:


 4938
4938


 被折叠的 条评论
为什么被折叠?
被折叠的 条评论
为什么被折叠?
 到【灌水乐园】发言


