


64位现在比较流行了,所以有很多朋友想把过去用VB6写的Inventor dll插件(32位)做个升级,以便支持64位Inventor。有两种方法可以实现这个目标。一种是把dll插件修改成exe插件,第二种方法是把VB6插件转变成VB.NET插件。Brian的博客对这两种方法有非常详细地介绍。
以下转载至:http://modthemachine.typepad.com/my_weblog/2009/10/visual-basic-6-add-ins-and-64-bit.html
原文:
Visual Basic 6 Add-Ins and 64-Bit
I saw a question in the customization newsgroup where someone has an Add-In written using Visual Basic 6 and wants to use that add-in with the 64-bit version of Inventor. In doing this there are some issues to be aware of:
- 64-bit Windows can run both 32-bit and 64-bit applications (exe's and dll's).
- Visual Basic 6 can only create 32-bit applications (exe's and dll's).
- A 64-bit exe can only load 64-bit dll's. It cannot use 32-bit dll's.
In this case, Inventor is a 64-bit exe and the Add-In is a dll. A VB 6 Add-In will be a 32-bit dll. Based on the statements above, this means that it can't be used by 64-bit Inventor since that results in a 64-bit exe trying to load a 32-bit dll. There are two possible solutions; change the add-in to be an exe instead of a dll or convert the add-in to .Net where you have the ability to create a 64-bit dll.
Changing a VB 6 Add-In from a DLL to an EXE
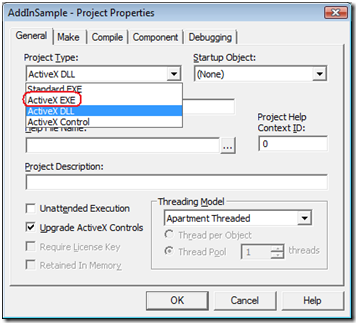
Changing an existing VB 6 Add-In from a dll to an exe is very easy. Open the project and use the Properties command in the Project menu to display the dialog shown below. Change the project type from "AcitveX DLL" to "ActiveX EXE". Recompile and now you have an exe Add-in. However, continue reading…
There are two things to be aware of when converting a dll Add-In to an exe Add-In. The first is that the performance of the exe Add-In won't be as good as the dll Add-In. A dll Add-In is loaded into Inventor's process space and API calls are made directly. An exe Add-In runs in its own process space and is separate from Inventor. This requires API calls to be marshaled between the two processes which is not as efficient. How much slower it is will differ from Add-In to Add-In because it depends on what kind of API calls you're making.
The second issue is more of a problem and is a side-effect of the fact that data has to be marshaled between the two processes. Inventor's API relies on Microsoft technology to do the marshaling between the two processes. Unfortunately, this technology doesn't support the marshaling of bitmap data. This means that any Inventor API calls you make where an IPictureDisp object is passed as an argument won't work with an exe Add-In.
Their are only a few calls in Inventor's API that work with bitmaps but one of these is a function that most Add-Ins use. That's the AddButtonDefinition method that's used to create a button for the user-interface. An exe Add-In won't be able to have icons on its buttons because of this limitation. Icons are optional so you can remove those arguments from the AddButtonDefinition call and then the Add-In should function correctly but you'll only have text on the button instead of an icon.
Another area of the API where a bitmap is used is when getting or setting the thumbnail image for a document. This will fail for an exe Add-In.
Using the VB6 version of the SimpleAddIn sample that's delivered as part of Inventor's SDK, here are the changes that are required to make it work on 64-bit Windows.
- Change the project type to ActiveX EXE, as explained above.
-
Comment out the lines that load the bitmaps for the icons.
Dim oIcon1 As IPictureDisp
' Dim oIcon2 As IPictureDisp
' Dim oIcon3 As IPictureDisp
' Set oIcon1 = LoadPicture(App.Path & "/AddSlotOption.ico")
' Set oIcon2 = LoadPicture(App.Path & "/Slot.ico")
' Set oIcon3 = LoadPicture(App.Path & "/Toggle.ico") -
Edit the lines where the buttons are created to remove the icons. The following three lines (please pay attention to the line wrapping) are changed from this:
Set oButtonDefAddOption = ..., "Add slot option", oIcon1, oIcon1)
Set oButtonDefDrawSlot = ... , "Draw Slot", oIcon2, oIcon2)
Set oButtonDefToggleSlotState = ..., "Toggle Slot State", oIcon3, oIcon3)to this:
Set oButtonDefAddOption = ..., "Add slot option")
Set oButtonDefDrawSlot = ... , "Draw Slot")
Set oButtonDefToggleSlotState = ..., "Toggle Slot State")This is possible because the icon arguments are optional.
- Compile the Add-In to create the EXE version of it and run the the registration file to register it, (AddInSample.reg in the case of the example Add-In).
- Run Inventor to make sure the Add-In is loading and working correctly on a 32-bit system.
The tricky part now is getting this Add-In to register correctly on a 64-bit system. Since it's a 32-bit application, by default it will register itself in the 32-bit section of the registry on a 64-bit system, but Inventor will only look for Add-Ins in the main section of the registry, which is the 64-bit section in this case. The following steps illustrate one way to get the registration in the correct area on the 64-bit system. -
Find out the CLSID for your Add-In. There are two ways to find this out. If you're already using a .reg file to register your Add-In, it will be in that. Here's the second line from the AddInSample.reg file that's part of the sample.
[HKEY_CLASSES_ROOT/CLSID/{DB59D9A7-EE4C-434A-BB5A-F93E8866E872}]
The "{DB59D9A7-EE4C-434A-BB5A-F93E8866E872}" portion of the line is the CLSID of the Add-In. Just remembering the first 3 or 4 characters is enough for what you need to do in the subsequent steps.
The other way to find out the CLSID is to look it up in the registry. First, you need to know what to look up. You can use the ProgID of your Add-In. This is determined by the name of your project and the name of the class that supports the Add-In interface. You can see these in the Properties window inside Visual Basic. In this case the ProgID of the Add-In will be "AddInSample.clsSampleAddIn".
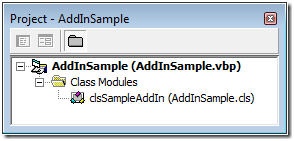
Run RegEdit and look in the HKEY_CLASSES_ROOT section for the ProgID of your Add-In. This is shown below for the sample Add-In.
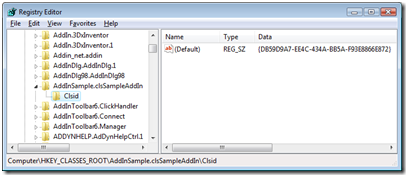
Once you've found the ProgID for the Add-In, expand the key in the registry and then expand the Clsid key and select "Clsid". In the right-hand portion of the Registry Editor you'll see the CLSID of your Add-in.
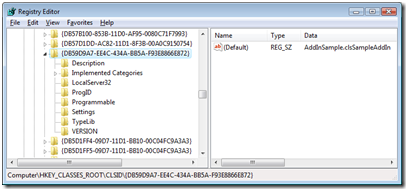
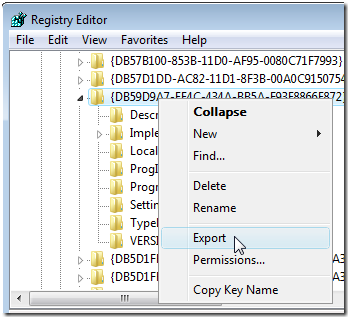
- Now using the Registry Editor, find the HKEY_CLASSES_ROOT/CLSID section of the registry. Within this key, find the CLSID for your Add-In. The picture below shows this key selected in the browser and expanded so you can see its subkeys. You can verify that you have the correct registry key by checking on the right-hand side of the Registry Editor to see if the ProgID matches the one for your Add-In.
- Right-click on the CLSID key of your Add-In and choose Export, as shown below. Specify a name and save the .reg file.
- Copy the Add-In to the 64-bit system by copying the EXE, the reg file you just created in the previous step, and any other files your Add-in might require. The SimpleAddIn sample doesn't need anything except these two files but your Add-In may need some other files.
-
Edit the .reg file so that it contains the correct path for your Add-In as it exists on the 64-bit system. You'll need to edit one line in the .reg file to correct the path. The edited portion is highlighted below. Notice how the backslashes of the actual path are replaced with double back slashes.
[HKEY_CLASSES_ROOT/CLSID/{DB59D9A7-…-F93E8866E872}/LocalServer32]
@="C://Users//ekins//Documents//AddInSample.exe" - Run the .reg file to register your Add-In. When you run Inventor, your Add-In should be running and work. If it isn't working, check the Add-In Manager to see if your Add-In is in the list. If it is in the list but isn't listed as being loaded, then the Add-In is likely failing in the Activate method. Make sure you removed the icons as instructed above and double-check that you're not trying to access something that's not available on the 64-bit machine.
If your Add-In doesn't show up at all in the Add-In Manager then go through the directions above and double-check that you didn't leave out anything. For your Add-In to not show up at all indicates that it's not being registered correctly.
Converting a Visual Basic 6 Add-In to 64-Bit
Visual Basic 6 is only capable of creating 32-bit applications. To convert an existing project to a 64-bit application will require porting the application to VB.Net, which does support the creation of a 64-bit application. VB.Net has a VB 6 conversion tool but I would suggest that you NOT use it. Instead, I would use the Add-In Wizard that's delivered as part of Inventor's SDK to create a new Add-In and copy the code manually from VB 6 into the VB.Net project. There are too many differences between VB 6 and VB.Net and my experience is that cleaning up the resulting code from the conversion is harder than copying over smaller portions of code at a time an manually converting it.
You'll also need to recreate your dialogs. The dialogs are much more powerful in VB.Net so this lets you take advantage of those new features. The basics of converting your code is covered in this post: Converting VBA Auto Macros to an Add-In.


 2697
2697


 被折叠的 条评论
为什么被折叠?
被折叠的 条评论
为什么被折叠?
 到【灌水乐园】发言


