


承接上文,本篇我们深入源码层面,看下Spring是如何实现AOP的。
一、示例代码
先从一段简单的示例代码入手。如下
public class TestBean {
    public void test() {
        System.out.println("test");
    }
}

// 定义一个切面
// 使用AspectJ的语法,告诉spring这是一个切面,切面包含了一些增强的规则
// 1.哪些需要增强
// 2.如何增强
// 3.什么时机增强(before、after、around、throwException)
@Aspect
public class AspectJTest {

    @Pointcut("execution(* *.test(..))")
    public void test() {
    }

    @Before("test()")
    public void beforeTest() {
        System.out.println("beforeTest");
    }

    @After("test()")
    public void afterTest() {
        System.out.println("afterTest");
    }

    @Around("test()")
    public Object aroundTest(ProceedingJoinPoint p) {
        System.out.println("before1");
        Object o = null;
        try {
            o = p.proceed();
        } catch (Throwable e) {
            e.printStackTrace();
        }
        System.out.println("after1");
        return o;
    }
}

public static void main(String[] args) {
    ClassPathXmlApplicationContext application = new ClassPathXmlApplicationContext("xiaokui1/xiaokui.xml");
    TestBean testBean = (TestBean)application.getBean("testBean");
    testBean.test();
}

// 省略输出
配置文件如下
<beans>
    <aop:aspectj-autoproxy/>
    <bean id="testBean" class="xiaokui1.TestBean"/>
    <bean class="xiaokui1.AspectJTest"/>
</beans>
这就是Spring AOP带来的神奇功效了。Spring实现了对所有类的test方法进行增加,是辅助功能可以独立于核心业务之外,方便与程序的扩展和解耦。
那么,Spring究竟是如何实现AOP的呢?首先我们知道,Spring是否支持注解的AOP是由一个配置文件控制的,也就是<aop:aspectj-autoproxy/>,当在配置文件中声明了这句配置的时候,Spring就会支持注解的AOP,那么我们的分析就从这句开始。
# /spring-aop/src/main/resources/META-INF/spring.handlers内容如下
# 相信有之前xml对于自定义标签的加载,看到这里不会陌生
http\://www.springframework.org/schema/aop=org.springframework.aop.config.AopNamespaceHandler
Ps:新版都是基于注解 @EnableAspectJAutoProxy,可能很多人对于xml配置方式不是很熟悉了。但鉴于本文写的时间较早(2019年),这里不对注解形式深入展开。
读者如有兴趣,可以查看Spring源码系列后续相关文章,里面对于对于注解(如**@EnableAsync**、@EnableTransactionManagement、@EnableCaching等),有深入讨论。
二、寻找代理入口
之前讲过Spring中的自定义注解,如果声明了自定义注解,那么就一定会在程序中的某个地方注册了对应的解析器。有如下代码
// 个人网站:xiaokui.site。微信公众号:好看的HK。
public class AopNamespaceHandler extends NamespaceHandlerSupport {

	public void init() {
		// In 2.0 XSD as well as in 2.1 XSD.
		registerBeanDefinitionParser("config", new ConfigBeanDefinitionParser());
		registerBeanDefinitionParser("aspectj-autoproxy", new AspectJAutoProxyBeanDefinitionParser());
		registerBeanDefinitionDecorator("scoped-proxy", new ScopedProxyBeanDefinitionDecorator());

		// Only in 2.0 XSD: moved to context namespace as of 2.1
		registerBeanDefinitionParser("spring-configured", new SpringConfiguredBeanDefinitionParser());
	}
}
由此我们可以得知,在解析配置文件的时候,一旦遇到aspectj-autoproxy配置时就会使用解析器AspectJAutoProxyBeanDefinitionParser进行解析,那么我们来看一看AspectJAutoProxyBeanDefinitionParser的内部实现。
所有实现BeanDefinitionParser接口的子类,入口都是从parse方法开始的,AspectJAutoProxyBeanDefinitionParser的parse方法如下
public BeanDefinition parse(Element element, ParserContext parserContext) {
	// 注册AnnotationAwareAspectJAutoProxyCreator
  AopNamespaceUtils.registerAspectJAnnotationAutoProxyCreatorIfNecessary(parserContext, element);
    // 对于注解中子类的处理
    extendBeanDefinition(element, parserContext);
    return null;
}
其中registerAspectJAnnotationAutoProxyCreatorIfNecessary方法使我们比较关心的,也是关键逻辑的实现。
// 注册AspectJAnnotationAutoProxyCreator
public static void registerAspectJAnnotationAutoProxyCreatorIfNecessary(
        ParserContext parserContext, Element sourceElement) {
	// 1.注册或升级AutoProxyCreator
    BeanDefinition beanDefinition = AopConfigUtils.registerAspectJAnnotationAutoProxyCreatorIfNecessary(
            parserContext.getRegistry(), parserContext.extractSource(sourceElement));
    // 2.对于proxy-target-class以及expose-proxy属性的处理
    useClassProxyingIfNecessary(parserContext.getRegistry(), sourceElement);
    // 3.注册组件并通知,便于监听器做进一步处理
    // 其中beanDefinition的className为AnnotationAwareAspectJAutoProxyCreator
    registerComponentIfNecessary(beanDefinition, parserContext);
}
三、AOP核心实现
在 registerAspectJAnnotationAutoProxyCreatorIfNecessary 方法中主要完成了3件事情,基本每行代码就是一个完整的逻辑。
1、准备ProxyCreator
对于AOP的实现,基本上都是靠 AnnotationAwareAspectJAutoProxyCreator 去完成,它可以根据@Point注解定义的切点来自动代理相匹配的bean。但是为了配置简便,Spring使用了自定义配置来帮助我们自动注册AnnotationAwareAspectJAutoProxyCreator,其注册过程就是在这里实现的。
为了行文方便,后面 AnnotationAwareAspectJAutoProxyCreator 简称为 ProxyCreator。
public static BeanDefinition registerAspectJAnnotationAutoProxyCreatorIfNecessary(BeanDefinitionRegistry registry, Object source) {
    return registerOrEscalateApcAsRequired(AnnotationAwareAspectJAutoProxyCreator.class, registry, source);
}

private static BeanDefinition registerOrEscalateApcAsRequired(Class cls, BeanDefinitionRegistry registry, Object source) {
    Assert.notNull(registry, "BeanDefinitionRegistry must not be null");
    // 如果已经存在了自动代理创建器且存在的自动代理创建器与现在的不一致,那么需要根据优先级来判断
    // 值为 org.springframework.aop.config.internalAutoProxyCreator
    if (registry.containsBeanDefinition(AUTO_PROXY_CREATOR_BEAN_NAME)) {
        BeanDefinition apcDefinition = registry.getBeanDefinition(AUTO_PROXY_CREATOR_BEAN_NAME);
        if (!cls.getName().equals(apcDefinition.getBeanClassName())) {
            int currentPriority = findPriorityForClass(apcDefinition.getBeanClassName());
            int requiredPriority = findPriorityForClass(cls);
            if (currentPriority < requiredPriority) {
                // 升级,改变BeanDefinition最重要的就是改变bean所对应的className属性
                apcDefinition.setBeanClassName(cls.getName());
            }
        }
        // 如果已经存在自动代理创建器并且与将要创建的一致,那么无需再次创建
        return null;
    }
    // 返回这个Class的BeanDefinition
    RootBeanDefinition beanDefinition = new RootBeanDefinition(cls);
    beanDefinition.setSource(source);
    // 这里又set进了一个属性
    beanDefinition.getPropertyValues().add("order", Ordered.HIGHEST_PRECEDENCE);
    beanDefinition.setRole(BeanDefinition.ROLE_INFRASTRUCTURE);
    // 这一步很关键,
    // 其中AUTO_PROXY_CREATOR_BEAN_NAME为 org.springframework.aop.config.internalAutoProxyCreator
    // clas为AnnotationAwareAspectJAutoProxyCreator.class,实现了SmartInstantiationAwareBeanPostProcessor接口
    registry.registerBeanDefinition(AUTO_PROXY_CREATOR_BEAN_NAME, beanDefinition);
    return beanDefinition;
}
以上代码实现了自动注册AnnotationAwareAspectJAutoProxyCreator类的功能,同时这里还涉及到了一个优先级的问题,如果已经存在自动代理创建器,而且存在的自动代理创建器与现在的不一致,那么需要根据优先级来判断到底需要使用哪个。
这里插一句,当我们知道在这里向Spring注册了BeanPostProcessor,下一步我们的关注点就是它对bean施加后处理的规则,即那些bean是需要代理的。
2、设置两个代理配置
暂时先放一放上面的那一个疑问,继续往下。
useClassProxyingIfNecessary方法实现了proxy-target-class属性以及expose-proxy属性的处理。
private static void useClassProxyingIfNecessary(BeanDefinitionRegistry registry, Element sourceElement) {
    if (sourceElement != null) {
        // 对于proxy-target-class属性的处理
        boolean proxyTargetClass = Boolean.valueOf(sourceElement.getAttribute(PROXY_TARGET_CLASS_ATTRIBUTE));
        if (proxyTargetClass) {
            AopConfigUtils.forceAutoProxyCreatorToUseClassProxying(registry);
        }
        // 对于expose-proxy属性的处理
        boolean exposeProxy = Boolean.valueOf(sourceElement.getAttribute(EXPOSE_PROXY_ATTRIBUTE));
        if (exposeProxy) {
            AopConfigUtils.forceAutoProxyCreatorToExposeProxy(registry);
        }
    }
}

// 反射初始化时,设置默认属性,以让BeanDefinition不会丢失设置属性
public static void forceAutoProxyCreatorToUseClassProxying(BeanDefinitionRegistry registry) {
    if (registry.containsBeanDefinition(AUTO_PROXY_CREATOR_BEAN_NAME)) {
        BeanDefinition definition = registry.getBeanDefinition(AUTO_PROXY_CREATOR_BEAN_NAME);
        definition.getPropertyValues().add("proxyTargetClass", Boolean.TRUE);
    }
}

static void forceAutoProxyCreatorToExposeProxy(BeanDefinitionRegistry registry) {
    if (registry.containsBeanDefinition(AUTO_PROXY_CREATOR_BEAN_NAME)) {
        BeanDefinition definition = registry.getBeanDefinition(AUTO_PROXY_CREATOR_BEAN_NAME);
        definition.getPropertyValues().add("exposeProxy", Boolean.TRUE);
    }
}

// 除了上述两个属性外exposeProxy、proxyTargetClass,还有order属性,所以当初始化时,会和其他bean表现有点不同,具体表现这populateBean这个阶段
@SuppressWarnings("deprecation")  // for postProcessPropertyValues
protected void populateBean(String beanName, RootBeanDefinition mbd, @Nullable BeanWrapper bw) {
    // 省略其他代码
    // 对于大部分bean来说,PropertyValues是不会修改的,所以不会有这个逻辑
    if (pvs != null) {
        applyPropertyValues(beanName, mbd, bw, pvs);
    }
}
3、注册ProxyCreator
// 注册到spring
private static void registerComponentIfNecessary(@Nullable BeanDefinition beanDefinition, ParserContext parserContext) {
    if (beanDefinition != null) {
        BeanComponentDefinition componentDefinition =
                new BeanComponentDefinition(beanDefinition, AopConfigUtils.AUTO_PROXY_CREATOR_BEAN_NAME);
        parserContext.registerComponent(componentDefinition);
    }
}
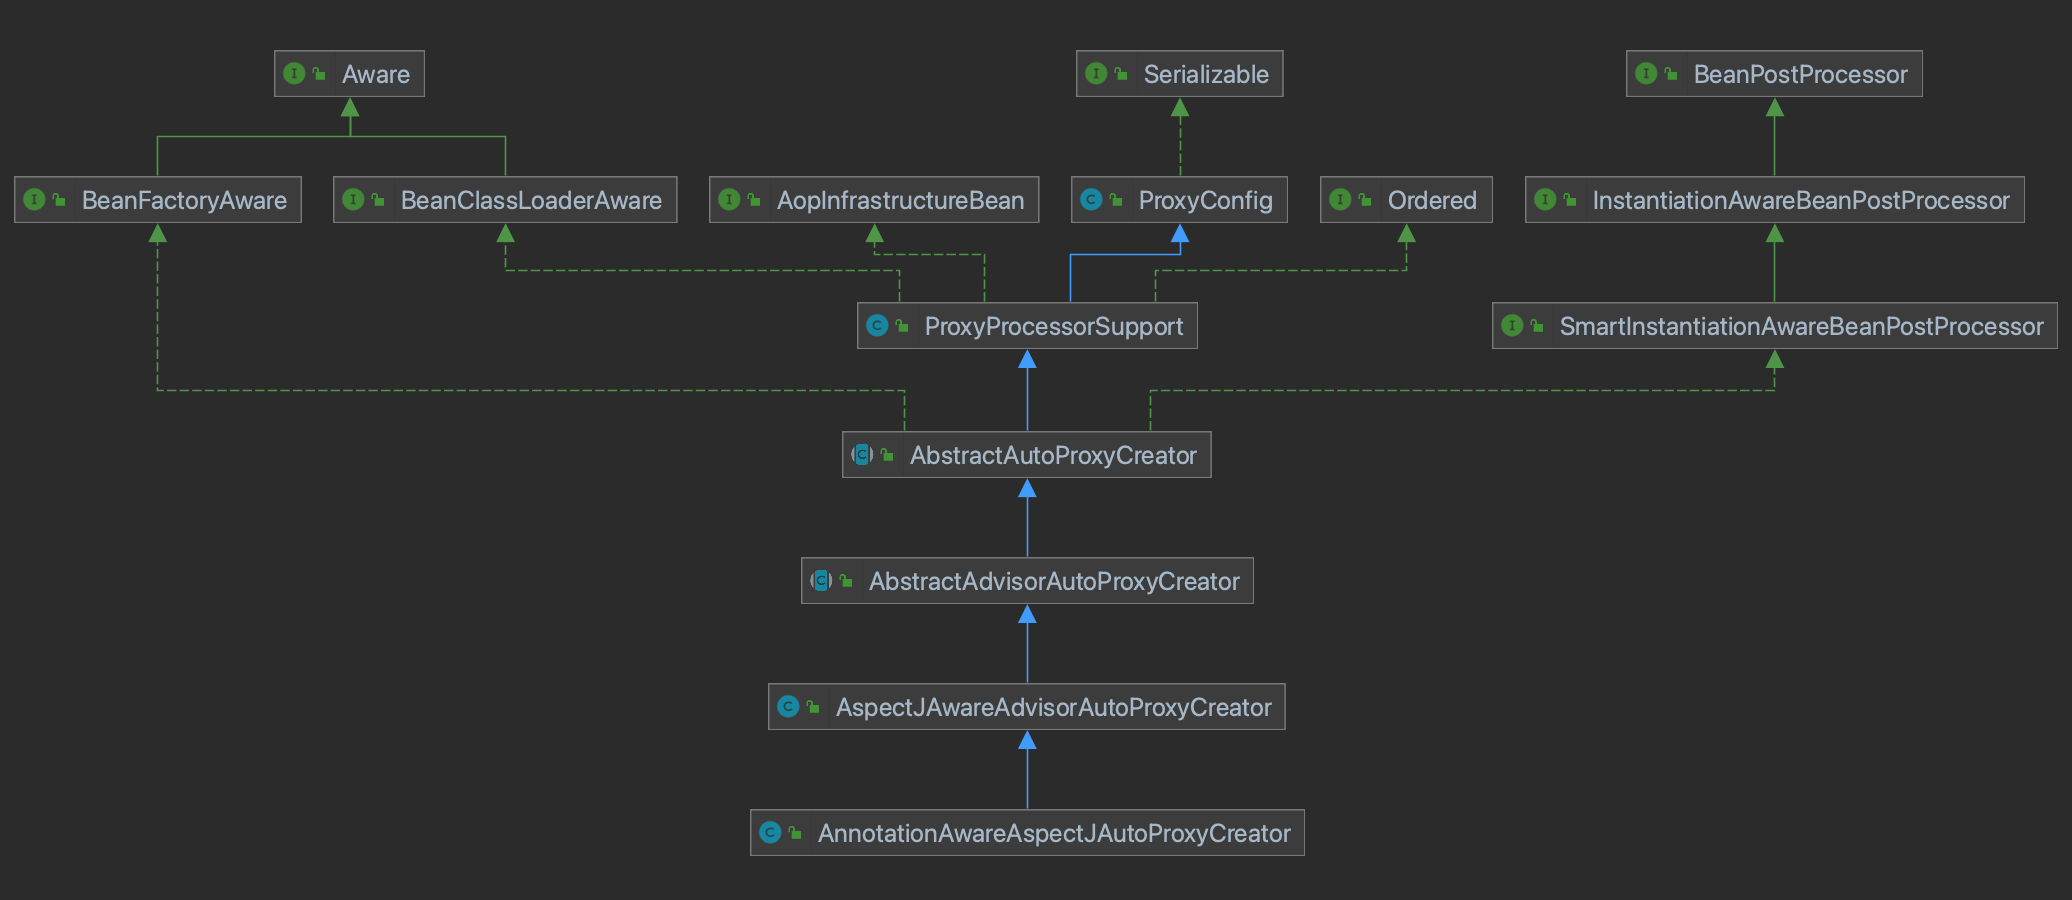
四、ProxyCreator
前面我们知道,真正干活的是 AnnotationAwareAspectJAutoProxyCreator,我们看下他的类结构
1、InstantiationAwareBeanPostProcessor
我们看下 InstantiationAwareBeanPostProcessor 接口的三个方法:
- postProcessBeforeInstantiation:在对象实例化前直接返回一个对象(如代理对象)来代替通过内置的实例化流程创建对象。
- postProcessAfterInstantiation:在对象实例化完毕,执行populateBean之前。如果返回false,则spring不再对对应的bean实例进行自动依赖注入。
- postProcessProperties:在spring处理完默认的成员属性,应用到指定的bean之前进行回调,可以用来检查和修改属性,最终返回的PropertyValues会应用到bean中。@Autowired、@Resource等就是根据这个回调来实现最终注入依赖的属性的。
2、SmartInstantiationAwareBeanPostProcessor
- predictBeanType:预测此类最终返回的bean类型。
- determineCandidateConstructors:确定bean进行实例化的构造方法。
- getEarlyBeanReference:获取对象early引用,用于解决循环依赖。
3、ProxyCreator具体实现
被代理对象只需要提供一个Class对象即可,因此我们可以很轻易的发现代理过程是在 InstantiationAwareBeanPostProcessor#postProcessBeforeInstantiation、postProcessAfterInitialization。
为啥会有涉及到两个环节呢?从源码注释中也能看出,第一步主要是处理自定义代理策略(第一部分已有讨论),第二步才是真正Spring AOP干活的地方。
@Override
public Object postProcessBeforeInstantiation(Class<?> beanClass, String beanName) {
    Object cacheKey = getCacheKey(beanClass, beanName);
    if (!StringUtils.hasLength(beanName) || !this.targetSourcedBeans.contains(beanName)) {
        if (this.advisedBeans.containsKey(cacheKey)) {
            return null;
        }
        if (isInfrastructureClass(beanClass) || shouldSkip(beanClass, beanName)) {
            this.advisedBeans.put(cacheKey, Boolean.FALSE);
            return null;
        }
    }
    // 承接上一章节
    // 如果我们自定义了代理数据源,那么将在这里进行初始化
    TargetSource targetSource = getCustomTargetSource(beanClass, beanName);
    if (targetSource != null) {
        if (StringUtils.hasLength(beanName)) {
            this.targetSourcedBeans.add(beanName);
        }
        Object[] specificInterceptors = getAdvicesAndAdvisorsForBean(beanClass, beanName, targetSource);
        Object proxy = createProxy(beanClass, beanName, specificInterceptors, targetSource);
        this.proxyTypes.put(cacheKey, proxy.getClass());
        return proxy;
    }
    return null;
}

// 如果该 Bean 被子类标识为代理 Bean,则使用配置的拦截器创建代理
@Override
public Object postProcessAfterInitialization(@Nullable Object bean, String beanName) {
    if (bean != null) {
        Object cacheKey = getCacheKey(bean.getClass(), beanName);
        if (this.earlyProxyReferences.remove(cacheKey) != bean) {
            // 我们重点看下这一方法,看下spring是如何判断类是否需要代理 & 如何进行代理的
            return wrapIfNecessary(bean, beanName, cacheKey);
        }
    }
    return bean;
}
五、wrapIfNecessary
把关注点放在If Necessary,而不是How Proxy。
// 来源于类 AbstractAutoProxyCreator
protected Object wrapIfNecessary(Object bean, String beanName, Object cacheKey) {
    // 如果已经处理过
    if (beanName != null && this.targetSourcedBeans.containsKey(beanName)) {
        return bean;
    }
    // 无需增强
    if (Boolean.FALSE.equals(this.advisedBeans.get(cacheKey))) {
        return bean;
    }
    // 给定的bean来是否代表一个基础设施类,基础设施类不应代理,或者配置了指定bean不需要自动代理
    if (isInfrastructureClass(bean.getClass()) || shouldSkip(bean.getClass(), beanName)) {
        // 标为不需要处理
        this.advisedBeans.put(cacheKey, Boolean.FALSE);
        return bean;
    }

    // 如果存在增强方法则创建代理,这个逻辑比较重要
    // Create proxy if we have advice.
    Object[] specificInterceptors = getAdvicesAndAdvisorsForBean(bean.getClass(), beanName, null);
    // 如果获取到了增强则需要针对增强创建代理
    if (specificInterceptors != DO_NOT_PROXY) {
        this.advisedBeans.put(cacheKey, Boolean.TRUE);
        // 创建代理
        Object proxy = createProxy(bean.getClass(), beanName, specificInterceptors, new SingletonTargetSource(bean));
        this.proxyTypes.put(cacheKey, proxy.getClass());
        return proxy;
    }

    this.advisedBeans.put(cacheKey, Boolean.FALSE);
    return bean;
}
方法中我们已经看到了代理创建的雏形。当然,真正开始之前还需要经过一些判断,比如是否已经处理过或者是否是需要跳过的bean,而真正创建代理的代码是从getAdvicesAndAdvisorsForBean开始的。
创建代理主要包含了两个步骤:
- 获取增强方法或者增强器:getAdvicesAndAdvisorsForBean(bean.getClass(), beanName, null)。
- 根据获取的增强进行代理:createProxy(bean.getClass(), beanName, specificInterceptors, new SingletonTargetSource(bean))。
本方法的每一步其实都经历了大量复杂的逻辑,首先来看看获取增强器方法的实现逻辑。
1、哪些需要加强?
注意这一步是下一步的前置条件,也是判断一个对象是否需要代理的关键。
这里先附上结论,便于读者有个大概的印象:判断一个对象是否需要代理,在于是否匹配AspectJ的Pointcut匹配规则(方法级别),或自定义Advisor增强器的Pointcu匹配规则。
// 来源于类 AbstractAdvisorAutoProxyCreator
protected Object[] getAdvicesAndAdvisorsForBean(
        Class<?> beanClass, String beanName, @Nullable TargetSource targetSource) {
    List<Advisor> advisors = findEligibleAdvisors(beanClass, beanName);
    if (advisors.isEmpty()) {
        return DO_NOT_PROXY;
    }
    return advisors.toArray();
}

protected List<Advisor> findEligibleAdvisors(Class beanClass, String beanName) {
    // 1.找出候选的增强器
    List<Advisor> candidateAdvisors = findCandidateAdvisors();
    // 2.再确定可以施加的增强器
    // 默认Advisor类型为 InstantiationModelAwarePointcutAdvisor
    List<Advisor> eligibleAdvisors = findAdvisorsThatCanApply(candidateAdvisors, beanClass, beanName);
    // 加入 org.springframework.aop.interceptor.ExposeInvocationInterceptor.ADVISOR
    // 因此实际的Advisor为n + 1,且这一个总是数组/List的第一位
    extendAdvisors(eligibleAdvisors);
    if (!eligibleAdvisors.isEmpty()) {
        // 保证上面的在第一位
        eligibleAdvisors = sortAdvisors(eligibleAdvisors);
    }
    return eligibleAdvisors;
}

@Override
protected void extendAdvisors(List<Advisor> candidateAdvisors) {
    AspectJProxyUtils.makeAdvisorChainAspectJCapableIfNecessary(candidateAdvisors);
}
对于指定bean的增强方法的获取一定是包含两个步骤的,获取所有的增强以及寻找所有增强中适用与bean的增强并应用,那么findCandidateAdvisors与findAdvisorsThatCanApply便是做了这两件事情。当然,如果无法找到对应的增强器便返回DO_NOT_PROXY,其中DO_NOT_PROXY为null。
1、搜寻自定义增强
// 来自于类 AnnotationAwareAspectJAutoProxyCreator
protected List<Advisor> findCandidateAdvisors() {
	// 1.这一步的作用主要寻找用户显式定义的 Advisor
    List<Advisor> advisors = super.findCandidateAdvisors();
    // 2.搜寻被@AspectJ标记的类
    advisors.addAll(this.aspectJAdvisorsBuilder.buildAspectJAdvisors());
    return advisors;
}

// 来自于类 AbstractAdvisorAutoProxyCreator
protected List<Advisor> findCandidateAdvisors() {
    Assert.state(this.advisorRetrievalHelper != null, "No BeanFactoryAdvisorRetrievalHelper available");
    // 这里代码较多,简而言之就是搜寻 Advisor 的子类bean
    return this.advisorRetrievalHelper.findAdvisorBeans();
}
2、搜寻@AspectJ增强
顾名思义,上一步是创建自定义的Advisor,那么这一步是创建符合AspectJ语法规则的Advisor。
这里提前梳理一下流程,大致如下:
- 遍历所有bean,寻找被AspectJ注解标记的类。
- 再分析该类中的具体advisor,如对于@After、@Before来说,两个advisor是不一样的。
- 根据Pointcut规则,创建对应的advisor。
如下是代码细节
// 有了上一章节的补充,相信这里不难理解
// 本质是将 @AspectJ语法 转换为代码 -> Advisor
public List<Advisor> buildAspectJAdvisors() {
    List<String> aspectNames = null;
    synchronized (this) {
        // 被@AspectJ标注的bean的List
        aspectNames = this.aspectBeanNames;
        // 如果没指定@AspectJ、自定义Advisor,那么根据includePatterns去匹配Advisor,默认为null
        // 此逻辑必走,保证了 aspectNames 有值
        if (aspectNames == null) {
            List<Advisor> advisors = new LinkedList<Advisor>();
            aspectNames = new LinkedList<String>();
            // 获取所有beanName
            String[] beanNames =
                    BeanFactoryUtils.beanNamesForTypeIncludingAncestors(this.beanFactory, Object.class, true, false);
            // 循环所有的beanName,找出对应的增强方法
            for (String beanName : beanNames) {
                // 不合法的bean则略过,由子类定义规则,默认返回true
				// 匹配includePatterns规则
                if (!isEligibleBean(beanName)) {
                    continue;
                }
                // We must be careful not to instantiate beans eagerly as in this
                // case they would be cached by the Spring container but would not
                // have been weaved
                // 获取对应的bean类型
                Class beanType = this.beanFactory.getType(beanName);
                if (beanType == null) {
                    continue;
                }

                // ====== 如果存在Aspect注解,核心判断逻辑 ======
                if (this.advisorFactory.isAspect(beanType)) {
                    aspectNames.add(beanName);
                    AspectMetadata amd = new AspectMetadata(beanType, beanName);
                    if (amd.getAjType().getPerClause().getKind() == PerClauseKind.SINGLETON) {
                        MetadataAwareAspectInstanceFactory factory =
                                new BeanFactoryAspectInstanceFactory(this.beanFactory, beanName);
                        // 解析标记AspectJ注解中的增强方法
                        List<Advisor> classAdvisors = this.advisorFactory.getAdvisors(factory);
                        if (this.beanFactory.isSingleton(beanName)) {
                            this.advisorsCache.put(beanName, classAdvisors);
                        }
                        else {
                            this.aspectFactoryCache.put(beanName, factory);
                        }
                        advisors.addAll(classAdvisors);
                    }
                    else {
                        // Per target or per this.
                        if (this.beanFactory.isSingleton(beanName)) {
                            throw new IllegalArgumentException("Bean with name '" + beanName +
                                    "' is a singleton, but aspect instantiation model is not singleton");
                        }
                        MetadataAwareAspectInstanceFactory factory =
                                new PrototypeAspectInstanceFactory(this.beanFactory, beanName);
                        this.aspectFactoryCache.put(beanName, factory);
                        advisors.addAll(this.advisorFactory.getAdvisors(factory));
                    }
                }
            }
            // ==== 这里存在赋值 ====
            this.aspectBeanNames = aspectNames;
            return advisors;
        }
    }

    if (aspectNames.isEmpty()) {
        return Collections.EMPTY_LIST;
    }
    List<Advisor> advisors = new LinkedList<Advisor>();
    for (String aspectName : aspectNames) {
        List<Advisor> cachedAdvisors = this.advisorsCache.get(aspectName);
        if (cachedAdvisors != null) {
            // 注意这一步,虽然@AspectJ只对应一个aspectNames,但里面有多个切点,如@After、@Before
            // 所以这里的Advisor也是有多个的
            advisors.addAll(cachedAdvisors);
        }
        else {
            MetadataAwareAspectInstanceFactory factory = this.aspectFactoryCache.get(aspectName);
            advisors.addAll(this.advisorFactory.getAdvisors(factory));
        }
    }
    return advisors;
}
至此,我们已经完成了Advisor的提取。
3、确定与bean对应增强
// 找到所有Advisor后,就看能不能对这个bean使用了
protected List<Advisor> findAdvisorsThatCanApply(
        List<Advisor> candidateAdvisors, Class<?> beanClass, String beanName) {
	// 使用ThreadLocal保证beanName可见性
    ProxyCreationContext.setCurrentProxiedBeanName(beanName);
    try {
        return AopUtils.findAdvisorsThatCanApply(candidateAdvisors, beanClass);
    }
    finally {
        ProxyCreationContext.setCurrentProxiedBeanName(null);
    }
}


public static List<Advisor> findAdvisorsThatCanApply(List<Advisor> candidateAdvisors, Class<?> clazz) {
    if (candidateAdvisors.isEmpty()) {
        return candidateAdvisors;
    }
    List<Advisor> eligibleAdvisors = new ArrayList<>();
    for (Advisor candidate : candidateAdvisors) {
        // 不走这个逻辑,因为不是 IntroductionAdvisor
        if (candidate instanceof IntroductionAdvisor && canApply(candidate, clazz)) {
            eligibleAdvisors.add(candidate);
        }
    }
    boolean hasIntroductions = !eligibleAdvisors.isEmpty();
    for (Advisor candidate : candidateAdvisors) {
        if (candidate instanceof IntroductionAdvisor) {
            // already processed
            continue;
        }
        // 关键的一行
        if (canApply(candidate, clazz, hasIntroductions)) {
            eligibleAdvisors.add(candidate);
        }
    }
    return eligibleAdvisors;
}

// 这个逻辑追主要区别于下面逻辑的点在于对 IntroductionAdvisor 的处理,一般来说,不需要特别关心
// 1 PointcutAdvisor是方法级别,需要用到Pointcut和Advisor。注意Pointcut可以使用任何类型的Pointcut,Advice也可以任何类型的Advice
// 2 IntroductionAdvisor是类级别, 只能使用IntroductionAdvice类型的Advice
public static boolean canApply(Advisor advisor, Class<?> targetClass, boolean hasIntroductions) {
    if (advisor instanceof IntroductionAdvisor) {
        // 这个地方有点似曾相识?
        return ((IntroductionAdvisor) advisor).getClassFilter().matches(targetClass);
    }
    else if (advisor instanceof PointcutAdvisor) {
        PointcutAdvisor pca = (PointcutAdvisor) advisor;
        // 我们关注点在这里
        return canApply(pca.getPointcut(), targetClass, hasIntroductions);
    }
    else {
        // It doesn't have a pointcut so we assume it applies.
        return true;
    }
}

public static boolean canApply(Pointcut pc, Class<?> targetClass, boolean hasIntroductions) {
    Assert.notNull(pc, "Pointcut must not be null");
    // 熟悉的代码
    if (!pc.getClassFilter().matches(targetClass)) {
        return false;
    }

    MethodMatcher methodMatcher = pc.getMethodMatcher();
    if (methodMatcher == MethodMatcher.TRUE) {
        // No need to iterate the methods if we're matching any method anyway...
        return true;
    }
	// 还是对于 IntroductionAdvisor 的处理
    IntroductionAwareMethodMatcher introductionAwareMethodMatcher = null;
    if (methodMatcher instanceof IntroductionAwareMethodMatcher) {
        introductionAwareMethodMatcher = (IntroductionAwareMethodMatcher) methodMatcher;
    }

    Set<Class<?>> classes = new LinkedHashSet<>();
    if (!Proxy.isProxyClass(targetClass)) {
        classes.add(ClassUtils.getUserClass(targetClass));
    }
    classes.addAll(ClassUtils.getAllInterfacesForClassAsSet(targetClass));

    for (Class<?> clazz : classes) {
        Method[] methods = ReflectionUtils.getAllDeclaredMethods(clazz);
        for (Method method : methods) {
            if (introductionAwareMethodMatcher != null ?
                    introductionAwareMethodMatcher.matches(method, targetClass, hasIntroductions) :
                // 我们关注这一行,熟悉的代码
                // 使用@AspectJ,那么它的Pointcut类型就是 AspectJExpressionPointcut
                    methodMatcher.matches(method, targetClass)) {
                return true;
            }
        }
    }

    return false;
}
那么到此位置,我们就找到了找到了需要的Advisor,接下来就是应用了。
2、createProxy
在获取了所有对应bean的增强器后,便可以进行代理的创建了。
// 来源于类 AbstractAutoProxyCreator
protected Object createProxy(Class<?> beanClass, @Nullable String beanName,
        @Nullable Object[] specificInterceptors, TargetSource targetSource) {

    if (this.beanFactory instanceof ConfigurableListableBeanFactory) {
        AutoProxyUtils.exposeTargetClass((ConfigurableListableBeanFactory) this.beanFactory, beanName, beanClass);
    }

    ProxyFactory proxyFactory = new ProxyFactory();
    proxyFactory.copyFrom(this);

   	// 如果不强制使用CGLIB代理
    // 这里只是设置属性
    if (!proxyFactory.isProxyTargetClass()) {
        // 那么对于继承类使用CGLIB
        if (shouldProxyTargetClass(beanClass, beanName)) {
            proxyFactory.setProxyTargetClass(true);
        }
        else {
            // 对于接口使用JDK代理
            evaluateProxyInterfaces(beanClass, proxyFactory);
        }
    }

    Advisor[] advisors = buildAdvisors(beanName, specificInterceptors);
    // 加入增强器
    proxyFactory.addAdvisors(advisors);
    // 设置要代理的类
    proxyFactory.setTargetSource(targetSource);

    // 子类继承类AbstractAutoProxyCreator,以重写customizeProxyFactory方法逻辑,默认空实现
    customizeProxyFactory(proxyFactory);

    // 用来控制代理工厂被配置之后,是否还允许修改通知
    // 缺省值为false,即在代理被配置之后,不允许修改代理的配置
    proxyFactory.setFrozen(this.freezeProxy);
    if (advisorsPreFiltered()) {
        proxyFactory.setPreFiltered(true);
    }
    return proxyFactory.getProxy(getProxyClassLoader());
}
1、createAopProxy
由于Spring中涉及过多的拦截器、增强器、增强方法等方式来对多级进行增强,所以非常有必要统一封装成Advisor来进行代理的创建。
完成了增强的封装过程,那么解析最重要的一步就是代理的创建与获取了。
// 来源于类 ProxyCreatorSupport
public Object getProxy(@Nullable ClassLoader classLoader) {
    return createAopProxy().getProxy(classLoader);
}

protected final synchronized AopProxy createAopProxy() {
    if (!this.active) {
        // 主要是触发监听事件 AdvisedSupportListener
        activate();
    }
    return getAopProxyFactory().createAopProxy(this);
}

public AopProxyFactory getAopProxyFactory() {
    // 其中 this.aopProxyFactory = new DefaultAopProxyFactory();
    return this.aopProxyFactory;
}

// 终于抓住了这个幕后凶手了,有没有这样的感觉?
public class DefaultAopProxyFactory implements AopProxyFactory, Serializable {

    // 最终都是调用这个方法以创建代理
	@Override
	public AopProxy createAopProxy(AdvisedSupport config) throws AopConfigException {
        if (config.isOptimize() || config.isProxyTargetClass() || hasNoUserSuppliedProxyInterfaces(config)) {
			Class<?> targetClass = config.getTargetClass();
			if (targetClass == null) {
				throw new AopConfigException("TargetSource cannot determine target class: " +
						"Either an interface or a target is required for proxy creation.");
			}
			if (targetClass.isInterface() || Proxy.isProxyClass(targetClass)) {
				return new JdkDynamicAopProxy(config);
			}
			return new ObjenesisCglibAopProxy(config);
		}
		else {
			return new JdkDynamicAopProxy(config);
		}
	}
}
下面是对上文创建代理的总结
- 如果目标对象实现了接口,默认情况下会采用JDK的动态代理实现代理。
- 如果目标对象实现了接口,可以通过设置proxy-target-class=true强制使用CGLIB实现代理。
- 如果目标对象没有实现接口,必须采用CGLIB库。
2、getProxy(JDK)
有了代理对象后,现在需要获取代理对象了。
那么我们看看Spring中的JDK代理实现是不是也是这么做的,继续之前的跟踪,到达JdkDynamicAopProxy的getProxy。
// 这里以jdk代理为例
@Override
public Object getProxy(@Nullable ClassLoader classLoader) {
    if (logger.isTraceEnabled()) {
        logger.trace("Creating JDK dynamic proxy: " + this.advised.getTargetSource());
    }
    // 除了原class接口,还额外加入 Advised、SpringProxy、DecoratingProxy接口
    Class<?>[] proxiedInterfaces = AopProxyUtils.completeProxiedInterfaces(this.advised, true);
    // 寻找接口上定义的equals、hashcode方法,主要是处理default方法逻辑
    findDefinedEqualsAndHashCodeMethods(proxiedInterfaces);
    // 创建实例,当我们打印 userService.getClass().getInterfaces();
    // 会发现会多出额外的3个接口,正因为这个原因,所以Spring创建的JDK代理对象会比原JDK创建的代理多出不少方法
    // 当我们确定这个是Spring创建的JDK代理对象时,那么就可以通过这个3个接口里面的方法获取/修改相应的信息
    // 判断方法为 AopUtils.isJdkDynamicProxy(obj)、AopUtils.isCglibProxy(obj)
    return Proxy.newProxyInstance(classLoader, proxiedInterfaces, this);
}

// jdk
public static boolean isJdkDynamicProxy(@Nullable Object object) {
    return (object instanceof SpringProxy && Proxy.isProxyClass(object.getClass()));
}
public static boolean isProxyClass(Class<?> cl) {
    return Proxy.class.isAssignableFrom(cl) && proxyClassCache.containsValue(cl);
}

// cglib
public static boolean isCglibProxy(@Nullable Object object) {
    // ClassUtils.CGLIB_CLASS_SEPARATOR = $$
    return (object instanceof SpringProxy &&
            object.getClass().getName().contains(ClassUtils.CGLIB_CLASS_SEPARATOR));
}

// 通过注释我们知道,这个方法不仅会完成对原class接口的提取,还会加入Spring内置的父接口
static Class<?>[] completeProxiedInterfaces(AdvisedSupport advised, boolean decoratingProxy) {
    Class<?>[] specifiedInterfaces = advised.getProxiedInterfaces();
    if (specifiedInterfaces.length == 0) {
        // No user-specified interfaces: check whether target class is an interface.
        Class<?> targetClass = advised.getTargetClass();
        if (targetClass != null) {
            if (targetClass.isInterface()) {
                advised.setInterfaces(targetClass);
            }
            else if (Proxy.isProxyClass(targetClass)) {
                advised.setInterfaces(targetClass.getInterfaces());
            }
            specifiedInterfaces = advised.getProxiedInterfaces();
        }
    }
    boolean addSpringProxy = !advised.isInterfaceProxied(SpringProxy.class);
    boolean addAdvised = !advised.isOpaque() && !advised.isInterfaceProxied(Advised.class);
    boolean addDecoratingProxy = (decoratingProxy && !advised.isInterfaceProxied(DecoratingProxy.class));
    int nonUserIfcCount = 0;
    if (addSpringProxy) {
        nonUserIfcCount++;
    }
    if (addAdvised) {
        nonUserIfcCount++;
    }
    if (addDecoratingProxy) {
        nonUserIfcCount++;
    }
    Class<?>[] proxiedInterfaces = new Class<?>[specifiedInterfaces.length + nonUserIfcCount];
    System.arraycopy(specifiedInterfaces, 0, proxiedInterfaces, 0, specifiedInterfaces.length);
    int index = specifiedInterfaces.length;
    if (addSpringProxy) {
        proxiedInterfaces[index] = SpringProxy.class;
        index++;
    }
    if (addAdvised) {
        proxiedInterfaces[index] = Advised.class;
        index++;
    }
    if (addDecoratingProxy) {
        proxiedInterfaces[index] = DecoratingProxy.class;
    }
    return proxiedInterfaces;
}


// 寻找接口上定义的equals、hashcode方法
private void findDefinedEqualsAndHashCodeMethods(Class<?>[] proxiedInterfaces) {
    for (Class<?> proxiedInterface : proxiedInterfaces) {
        Method[] methods = proxiedInterface.getDeclaredMethods();
        for (Method method : methods) {
            if (AopUtils.isEqualsMethod(method)) {
                this.equalsDefined = true;
            }
            if (AopUtils.isHashCodeMethod(method)) {
                this.hashCodeDefined = true;
            }
            if (this.equalsDefined && this.hashCodeDefined) {
                return;
            }
        }
    }
}
通过之前的示例我们知道,JDKProxy的使用关键是创建自定义的InvocationHandler,而InvocationHandler中包含了需要覆盖的方法getProxy,而当前的方法正是完成这个操作的。
再次去确认一下,JdkDynamicAopProxy也确实实现了InvocationHandler接口,那么我们就可以推断还有一个invoke方法,并且JdkDynamicAopProxy会把AOP的核心逻辑写在其中。
// 来自于类 JdkDynamicAopProxy
// 当调用代理对象方法时,才会进入这个逻辑
@Override
@Nullable
public Object invoke(Object proxy, Method method, Object[] args) throws Throwable {
    Object oldProxy = null;
    boolean setProxyContext = false;

    TargetSource targetSource = this.advised.targetSource;
    Object target = null;

    try {
        if (!this.equalsDefined && AopUtils.isEqualsMethod(method)) {
            // The target does not implement the equals(Object) method itself.
            return equals(args[0]);
        }
        else if (!this.hashCodeDefined && AopUtils.isHashCodeMethod(method)) {
            // The target does not implement the hashCode() method itself.
            return hashCode();
        }
        else if (method.getDeclaringClass() == DecoratingProxy.class) {
            // There is only getDecoratedClass() declared -> dispatch to proxy config.
            // 注意这个逻辑,当调用DecoratingProxy接口getDecoratedClass()进这个逻辑
            // 一般不调,一般返回被代理类型
            return AopProxyUtils.ultimateTargetClass(this.advised);
        }
        else if (!this.advised.opaque && method.getDeclaringClass().isInterface() &&
                method.getDeclaringClass().isAssignableFrom(Advised.class)) {
            // Service invocations on ProxyConfig with the proxy config...
            // 大致同上,对于Advised接口的支持
            return AopUtils.invokeJoinpointUsingReflection(this.advised, method, args);
        }
		// 真正的创建代理逻辑在下面
        Object retVal;

        if (this.advised.exposeProxy) {
            // Make invocation available if necessary.
            oldProxy = AopContext.setCurrentProxy(proxy);
            setProxyContext = true;
        }

        // Get as late as possible to minimize the time we "own" the target,
        // in case it comes from a pool.
        target = targetSource.getTarget();
        Class<?> targetClass = (target != null ? target.getClass() : null);

        // Get the interception chain for this method.
        // ==== 获取Advisor增强器 ====
        List<Object> chain = this.advised.getInterceptorsAndDynamicInterceptionAdvice(method, targetClass);

        // Check whether we have any advice. If we don't, we can fallback on direct
        // reflective invocation of the target, and avoid creating a MethodInvocation.
        if (chain.isEmpty()) {
            Object[] argsToUse = AopProxyUtils.adaptArgumentsIfNecessary(method, args);
            retVal = AopUtils.invokeJoinpointUsingReflection(target, method, argsToUse);
        }
        else {
            // We need to create a method invocation...
            MethodInvocation invocation =
                    new ReflectiveMethodInvocation(proxy, target, method, args, targetClass, chain);
            // ==== 这才是真正调用的地方 ====
            // Proceed to the joinpoint through the interceptor chain.
            retVal = invocation.proceed();
        }

        // Massage return value if necessary.
        Class<?> returnType = method.getReturnType();
        if (retVal != null && retVal == target &&
                returnType != Object.class && returnType.isInstance(proxy) &&
                !RawTargetAccess.class.isAssignableFrom(method.getDeclaringClass())) {
            retVal = proxy;
        }
        else if (retVal == null && returnType != Void.TYPE && returnType.isPrimitive()) {
            throw new AopInvocationException(
                    "Null return value from advice does not match primitive return type for: " + method);
        }
        return retVal;
    }
    finally {
        if (target != null && !targetSource.isStatic()) {
            // Must have come from TargetSource.
            targetSource.releaseTarget(target);
        }
        if (setProxyContext) {
            // Restore old proxy.
            AopContext.setCurrentProxy(oldProxy);
        }
    }
}

// 这里主要还是起一个数据的载体的左右
// 便于下文的统一调用
protected ReflectiveMethodInvocation(
        Object proxy, @Nullable Object target, Method method, @Nullable Object[] arguments,
        @Nullable Class<?> targetClass, List<Object> interceptorsAndDynamicMethodMatchers) {

    this.proxy = proxy;
    this.target = target;
    this.targetClass = targetClass;
    this.method = BridgeMethodResolver.findBridgedMethod(method);
    this.arguments = AopProxyUtils.adaptArgumentsIfNecessary(method, arguments);
    this.interceptorsAndDynamicMethodMatchers = interceptorsAndDynamicMethodMatchers;
}
3、proceed
上面的方法中最主要的工作就是创建了一个拦截器链,并使用ReflectiveMethodInvocation类进行了链的封装,而在ReflectiveMethodInvocation类的proceed方法中实现了拦截器的逐一调用。
继续探究,在proceed方法中是怎么实现前置增强在目标方法前调用,后置增强在目标方法后调用的逻辑。
// 回想起以下之前JDK实现代理的例子
@Override
public Object invoke(Object proxy, Method method, Object[] args) throws Throwable {
    // 底层还是通过反射
    System.out.println("==== before ====");
    Object result = method.invoke(target, args);
    System.out.println("==== after ====");
    return result;
}

@Override
@Nullable
// 那么这里大致逻辑应该和上面是一样的
// 假设这里有3个我们自定义的增强器,分别是@Before、@After、@AfterReturing
// 那么我们期望的顺序是最开始是 ExposeInvocationInterceptor、先执行@Before、再执行method、再执行@After
// 然而真实情况却不是有序的
public Object proceed() throws Throwable {
    // We start with an index of -1 and increment early.
    // 通过数组下标遍历增强器,默认从-1开始,统一调用入口均为MethodInterceptor接口的invoke方法
    // 如果这个条件成立,说明已遍历完所有拦截器,开始真正调用代理方法了
    if (this.currentInterceptorIndex == this.interceptorsAndDynamicMethodMatchers.size() - 1) {
        // 调用代理方法
        return invokeJoinpoint();
    }
    // 第一个拦截器/增强器肯定是 ExposeInvocationInterceptor
    // 值得一提的是,这里的拦截器是无序的,所以,如何正确有序的应用这些增强是一个问题!
	// 获取下一个要执行的拦截器
    Object interceptorOrInterceptionAdvice =
            this.interceptorsAndDynamicMethodMatchers.get(++this.currentInterceptorIndex);
    if (interceptorOrInterceptionAdvice instanceof InterceptorAndDynamicMethodMatcher) {
        // Evaluate dynamic method matcher here: static part will already have
        // been evaluated and found to match.
        InterceptorAndDynamicMethodMatcher dm =
                (InterceptorAndDynamicMethodMatcher) interceptorOrInterceptionAdvice;
        Class<?> targetClass = (this.targetClass != null ? this.targetClass : this.method.getDeclaringClass());
        if (dm.methodMatcher.matches(this.method, targetClass, this.arguments)) {
            return dm.interceptor.invoke(this);
        }
        else {
            // Dynamic matching failed.
            // Skip this interceptor and invoke the next in the chain.
            // 不匹配则不执行拦截器
            return proceed();
        }
    }
    else {
        // It's an interceptor, so we just invoke it: The pointcut will have
        // been evaluated statically before this object was constructed.
        // 普通拦截器,直接调用拦截器
        // 将this作为参数传递一保证当前实例中调用链的执行
        return ((MethodInterceptor) interceptorOrInterceptionAdvice).invoke(this);
    }
}

// 来自ExposeInvocationInterceptor
@Override
public Object invoke(MethodInvocation mi) throws Throwable {
    // mi就是之前的this,即ReflectiveMethodInvocation
    MethodInvocation oldInvocation = invocation.get();
    invocation.set(mi);
    try {
        // 因此这一步又回到了之前的proceed
        return mi.proceed();
    }
    finally {
        invocation.set(oldInvocation);
    }
}

// 继续调用下一个拦截器
// 来自MethodBeforeAdviceInterceptor
@Override
public Object invoke(MethodInvocation mi) throws Throwable {
    // before的逻辑调用
    this.advice.before(mi.getMethod(), mi.getArguments(), mi.getThis());
    // 继续调用下一个
    return mi.proceed();
}

// 来自AfterReturningAdviceInterceptor
@Override
public Object invoke(MethodInvocation mi) throws Throwable {
    // 再继续往下调,思想是动态规划
    Object retVal = mi.proceed();
    // 注意这里的调用顺序
    this.advice.afterReturning(retVal, mi.getMethod(), mi.getArguments(), mi.getThis());
    // 这里是返回结果
    return retVal;
}

// 来自AspectJAfterAdvice
@Override
public Object invoke(MethodInvocation mi) throws Throwable {
    try {
        return mi.proceed();
    }
    finally {
        // 注意这里的finally代码块
        invokeAdviceMethod(getJoinPointMatch(), null, null);
    }
}

// 来自AfterReturningAdviceInterceptor
// 这里还可以来个before,为什么呢,因为最终的调用逻辑实在遍历完所有拦截器后再真正调用
// 熟悉算法的读者,应该不难看出这是动态规划的思想,很奇妙的应用
@Override
public Object invoke(MethodInvocation mi) throws Throwable {
    this.advice.before(mi.getMethod(), mi.getArguments(), mi.getThis());
    return mi.proceed();
}
在proceed方法中,或许代码逻辑并没有我们想象得那么复杂(包含了一点动态规划的算法思想在里面),ReflectiveMethodInvocation中的主要职责是维护链接调用的计数器,记录当前调用链接的位置,以便链可以有序地进行下去,那么在这个方法中并没有我们之前设想的维护各种增强的顺序,而是将此工作委托给了各个增强器,使各个增强器在内部逻辑实现。
4、invokeJoinpoint
// 这才是隐藏在幕后的最大boss!!!
// 打个广告,关注微信公众号:好看的HK,第一时间掌握最新动态!
@Nullable
protected Object invokeJoinpoint() throws Throwable {
    return AopUtils.invokeJoinpointUsingReflection(this.target, this.method, this.arguments);
}

@Nullable
public static Object invokeJoinpointUsingReflection(@Nullable Object target, Method method, Object[] args)
        throws Throwable {

    // Use reflection to invoke the method.
    try {
        // 熟悉的代码
        ReflectionUtils.makeAccessible(method);
        return method.invoke(target, args);
    }
    catch (InvocationTargetException ex) {
        // Invoked method threw a checked exception.
        // We must rethrow it. The client won't see the interceptor.
        throw ex.getTargetException();
    }
    catch (IllegalArgumentException ex) {
        throw new AopInvocationException("AOP configuration seems to be invalid: tried calling method [" +
                method + "] on target [" + target + "]", ex);
    }
    catch (IllegalAccessException ex) {
        throw new AopInvocationException("Could not access method [" + method + "]", ex);
    }
}
5、getProxy(CGLIB)
再来看一下CGLIB的代理实现,如下
// 有了之前的基础,再看CGLIB就好多了,还是先看下之前的示例
public class CglibProxyTest {

    public static void main(String[] args) {
        Enhancer enhancer = new Enhancer();
        // 注意这里并不需要事先初始化代理对象
        enhancer.setSuperclass(CglibProxyTest.class);
        enhancer.setCallback(new MethodInterceptorImpl());

        CglibProxyTest cglibProxyTest = (CglibProxyTest) enhancer.create();
        cglibProxyTest.test();
        System.out.println(cglibProxyTest);
    }

    public void test () {
        System.out.println("CglibProxyTest test()");
    }

    private static class MethodInterceptorImpl implements MethodInterceptor {
        @Override
        public Object intercept(Object obj, Method method, Object[] args, MethodProxy proxy) throws Throwable {
            System.out.println("before invoke " + method);
            Object result = proxy.invokeSuper(obj, args);
            System.out.println("after invoke " + method);
            return result;
        }
}

// CGLIB开始创建代理
@Override
public Object getProxy(@Nullable ClassLoader classLoader) {
    if (logger.isTraceEnabled()) {
        logger.trace("Creating CGLIB proxy: " + this.advised.getTargetSource());
    }

    try {
        Class<?> rootClass = this.advised.getTargetClass();
        Assert.state(rootClass != null, "Target class must be available for creating a CGLIB proxy");

        Class<?> proxySuperClass = rootClass;
        if (rootClass.getName().contains(ClassUtils.CGLIB_CLASS_SEPARATOR)) {
            proxySuperClass = rootClass.getSuperclass();
            Class<?>[] additionalInterfaces = rootClass.getInterfaces();
            for (Class<?> additionalInterface : additionalInterfaces) {
                this.advised.addInterface(additionalInterface);
            }
        }

        // Validate the class, writing log messages as necessary.
        validateClassIfNecessary(proxySuperClass, classLoader);

        // Configure CGLIB Enhancer...
        // 第一步创建new Enhancer
        Enhancer enhancer = createEnhancer();
        if (classLoader != null) {
            enhancer.setClassLoader(classLoader);
            if (classLoader instanceof SmartClassLoader &&
                    ((SmartClassLoader) classLoader).isClassReloadable(proxySuperClass)) {
                enhancer.setUseCache(false);
            }
        }
        // 第二步设置代理类父类、父接口
        enhancer.setSuperclass(proxySuperClass);
        // 注意这里又加入Spring内置的接口,区别于JDK,这里只有两个SpringAop、Advised,而没有DecoratingProxy
        enhancer.setInterfaces(AopProxyUtils.completeProxiedInterfaces(this.advised));
        enhancer.setNamingPolicy(SpringNamingPolicy.INSTANCE);
        enhancer.setStrategy(new ClassLoaderAwareGeneratorStrategy(classLoader));
		// 第三步设置Callback
        Callback[] callbacks = getCallbacks(rootClass);
        Class<?>[] types = new Class<?>[callbacks.length];
        for (int x = 0; x < types.length; x++) {
            types[x] = callbacks[x].getClass();
        }
        // fixedInterceptorMap only populated at this point, after getCallbacks call above
        enhancer.setCallbackFilter(new ProxyCallbackFilter(
                this.advised.getConfigurationOnlyCopy(), this.fixedInterceptorMap, this.fixedInterceptorOffset));
        enhancer.setCallbackTypes(types);

        // Generate the proxy class and create a proxy instance.
        return createProxyClassAndInstance(enhancer, callbacks);
    }
    catch (CodeGenerationException | IllegalArgumentException ex) {
        throw new AopConfigException("Could not generate CGLIB subclass of " + this.advised.getTargetClass() +
                ": Common causes of this problem include using a final class or a non-visible class",
                ex);
    }
    catch (Throwable ex) {
        // TargetSource.getTarget() failed
        throw new AopConfigException("Unexpected AOP exception", ex);
    }
}
以上方法完整地阐述了一个创建Spring中的Enhancer的过程,读者可以参考Enhancer的文档查看每个步骤的含义,这里最重要的是通过getCallbacks方法设置拦截器链。
private Callback[] getCallbacks(Class<?> rootClass) throws Exception {
    // Parameters used for optimization choices...
    boolean exposeProxy = this.advised.isExposeProxy();
    boolean isFrozen = this.advised.isFrozen();
    boolean isStatic = this.advised.getTargetSource().isStatic();

    // Choose an "aop" interceptor (used for AOP calls).
    // 一般就是这个了
    Callback aopInterceptor = new DynamicAdvisedInterceptor(this.advised);

    // Choose a "straight to target" interceptor. (used for calls that are
    // unadvised but can return this). May be required to expose the proxy.
    Callback targetInterceptor;
    if (exposeProxy) {
        targetInterceptor = (isStatic ?
                new StaticUnadvisedExposedInterceptor(this.advised.getTargetSource().getTarget()) :
                new DynamicUnadvisedExposedInterceptor(this.advised.getTargetSource()));
    }
    else {
        targetInterceptor = (isStatic ?
                new StaticUnadvisedInterceptor(this.advised.getTargetSource().getTarget()) :
                new DynamicUnadvisedInterceptor(this.advised.getTargetSource()));
    }

    // Choose a "direct to target" dispatcher (used for
    // unadvised calls to static targets that cannot return this).
    Callback targetDispatcher = (isStatic ?
            new StaticDispatcher(this.advised.getTargetSource().getTarget()) : new SerializableNoOp());

    Callback[] mainCallbacks = new Callback[] {
        	// 注意这行注释
            aopInterceptor,  // for normal advice
            targetInterceptor,  // invoke target without considering advice, if optimized
            new SerializableNoOp(),  // no override for methods mapped to this
            targetDispatcher, this.advisedDispatcher,
            new EqualsInterceptor(this.advised),
            new HashCodeInterceptor(this.advised)
    };

    Callback[] callbacks;

    // If the target is a static one and the advice chain is frozen,
    // then we can make some optimizations by sending the AOP calls
    // direct to the target using the fixed chain for that method.
    if (isStatic && isFrozen) {
        Method[] methods = rootClass.getMethods();
        Callback[] fixedCallbacks = new Callback[methods.length];
        this.fixedInterceptorMap = new HashMap<>(methods.length);

        // TODO: small memory optimization here (can skip creation for methods with no advice)
        for (int x = 0; x < methods.length; x++) {
            Method method = methods[x];
            List<Object> chain = this.advised.getInterceptorsAndDynamicInterceptionAdvice(method, rootClass);
            fixedCallbacks[x] = new FixedChainStaticTargetInterceptor(
                    chain, this.advised.getTargetSource().getTarget(), this.advised.getTargetClass());
            this.fixedInterceptorMap.put(method, x);
        }

        // Now copy both the callbacks from mainCallbacks
        // and fixedCallbacks into the callbacks array.
        callbacks = new Callback[mainCallbacks.length + fixedCallbacks.length];
        System.arraycopy(mainCallbacks, 0, callbacks, 0, mainCallbacks.length);
        System.arraycopy(fixedCallbacks, 0, callbacks, mainCallbacks.length, fixedCallbacks.length);
        this.fixedInterceptorOffset = mainCallbacks.length;
    }
    else {
        callbacks = mainCallbacks;
    }
    return callbacks;
}
在getCallback中Spring考虑了很多情况,但是对于我们来说,只需要理解最常用的的就可以了。
// 来自类 DynamicAdvisedInterceptor
// 这里的逻辑跟之前JDK的逻辑是大同小异的,熟悉代码逻辑
@Override
@Nullable
public Object intercept(Object proxy, Method method, Object[] args, MethodProxy methodProxy) throws Throwable {
    Object oldProxy = null;
    boolean setProxyContext = false;
    Object target = null;
    TargetSource targetSource = this.advised.getTargetSource();
    try {
        if (this.advised.exposeProxy) {
            // Make invocation available if necessary.
            oldProxy = AopContext.setCurrentProxy(proxy);
            setProxyContext = true;
        }
        // Get as late as possible to minimize the time we "own" the target, in case it comes from a pool...
        target = targetSource.getTarget();
        Class<?> targetClass = (target != null ? target.getClass() : null);
        // 获取拦截器/增强器链
        List<Object> chain = this.advised.getInterceptorsAndDynamicInterceptionAdvice(method, targetClass);
        Object retVal;
        // Check whether we only have one InvokerInterceptor: that is,
        // no real advice, but just reflective invocation of the target.
        if (chain.isEmpty() && Modifier.isPublic(method.getModifiers())) {
            Object[] argsToUse = AopProxyUtils.adaptArgumentsIfNecessary(method, args);
            retVal = methodProxy.invoke(target, argsToUse);
        }
        else {
            // We need to create a method invocation...
            // ReflectiveMethodInvocation变成了ReflectiveMethodInvocation
            // CglibMethodInvocation继承自ReflectiveMethodInvocation
            // 注意这里的proceed方法,有意思吧
            retVal = new CglibMethodInvocation(proxy, target, method, args, targetClass, chain, methodProxy).proceed();
        }
        retVal = processReturnType(proxy, target, method, retVal);
        return retVal;
    }
    finally {
        if (target != null && !targetSource.isStatic()) {
            targetSource.releaseTarget(target);
        }
        if (setProxyContext) {
            // Restore old proxy.
            AopContext.setCurrentProxy(oldProxy);
        }
    }
}

// 至此,整个动态代理分析完毕
@Override
@Nullable
public Object proceed() throws Throwable {
    try {
        return super.proceed();
    }
    catch (RuntimeException ex) {
        throw ex;
    }
    catch (Exception ex) {
        if (ReflectionUtils.declaresException(getMethod(), ex.getClass())) {
            throw ex;
        }
        else {
            throw new UndeclaredThrowableException(ex);
        }
    }
}
上述的实现与JDK方式实现代理中的invoke方法大同小异,都是首先构造,然后封装此链进行串联调用,稍有些区别就是在JDK中直接构造ReflectiveMethodInvocation,而在CGLIB中是使用CglibMethodInvocation。CglibMethodInvocation继承自ReflectiveMethodInvocation,但是proceed方法并没有重写。
ps:如果还是没理解,可以再看上一章节的 SysAdvisor,再跟下源码,会好懂很多。
总结就不写了吧,只能说豁然开朗!希望对读者有所帮助。


 201
201

 被折叠的 条评论
为什么被折叠?
被折叠的 条评论
为什么被折叠?
 到【灌水乐园】发言


