


热点数据的缓存
意思即为把经常被访问的数据存储到redis中,以后再查找该数据时,优先从redis中查询,如果redis没有被命中,则才会查询数据。并把查询的结果放入redis中以便下次能从redis中获取。
这样就可以提高查询效率, 降低数据库的访问频率,减少数据库的压力。
那什么样的数据适合放入缓存呢?
查询频率高的数据、 修改频率低的数据、 数据安全性要求不高的。
实例:
创建一个springboot项目,导入依赖,修改配置文件
 <dependencies>
        <dependency>
            <groupId>org.springframework.boot</groupId>
            <artifactId>spring-boot-starter-data-redis</artifactId>
        </dependency>
        <dependency>
            <groupId>org.springframework.boot</groupId>
            <artifactId>spring-boot-starter-web</artifactId>
        </dependency>

        <dependency>
            <groupId>mysql</groupId>
            <artifactId>mysql-connector-java</artifactId>
        </dependency>
        <dependency>
            <groupId>com.baomidou</groupId>
            <artifactId>mybatis-plus-boot-starter</artifactId>
            <version>3.5.1</version>
        </dependency>
        <dependency>
            <groupId>org.projectlombok</groupId>
            <artifactId>lombok</artifactId>
            <optional>true</optional>
        </dependency>
        <dependency>
            <groupId>org.springframework.boot</groupId>
            <artifactId>spring-boot-starter-test</artifactId>
            <scope>test</scope>
        </dependency>
    </dependencies>
#数据源
spring.datasource.driver-class-name=com.mysql.cj.jdbc.Driver
spring.datasource.url=jdbc:mysql://localhost:3306/qy666?serverTimezone=Asia/Shanghai
spring.datasource.username=root
spring.datasource.password=1234
#redis
spring.redis.host=192.168.184.130
spring.redis.port=6380
#mybatis-plus
mybatis-plus.configuration.log-impl=org.apache.ibatis.logging.stdout.StdOutImpl
配置缓存和序列化文件
@Configuration
public class RedisConfig {

    @Bean
    public RedisTemplate<String, Object> redisTemplate(RedisConnectionFactory factory) {
        RedisTemplate<String, Object> template = new RedisTemplate<>();
        RedisSerializer<String> redisSerializer = new StringRedisSerializer();
        Jackson2JsonRedisSerializer jackson2JsonRedisSerializer = new Jackson2JsonRedisSerializer(Object.class);
        ObjectMapper om = new ObjectMapper();
        om.setVisibility(PropertyAccessor.ALL, JsonAutoDetect.Visibility.ANY);
        om.enableDefaultTyping(ObjectMapper.DefaultTyping.NON_FINAL);
        jackson2JsonRedisSerializer.setObjectMapper(om);
        template.setConnectionFactory(factory);
        //key序列化方式
        template.setKeySerializer(redisSerializer);
        //value序列化
        template.setValueSerializer(jackson2JsonRedisSerializer);
        //value hashmap序列化
        template.setHashValueSerializer(jackson2JsonRedisSerializer);
        return template;
    }

    @Bean
    public CacheManager cacheManager(RedisConnectionFactory factory) {
        RedisSerializer<String> redisSerializer = new StringRedisSerializer();
        Jackson2JsonRedisSerializer jackson2JsonRedisSerializer = new Jackson2JsonRedisSerializer(Object.class);
        //解决查询缓存转换异常的问题
        ObjectMapper om = new ObjectMapper();
        om.setVisibility(PropertyAccessor.ALL, JsonAutoDetect.Visibility.ANY);
        om.enableDefaultTyping(ObjectMapper.DefaultTyping.NON_FINAL);
        jackson2JsonRedisSerializer.setObjectMapper(om);
        // 配置序列化(解决乱码的问题),过期时间600秒
        RedisCacheConfiguration config = RedisCacheConfiguration.defaultCacheConfig()
                .entryTtl(Duration.ofSeconds(600)) //缓存过期10分钟 ---- 业务需求。
                .serializeKeysWith(RedisSerializationContext.SerializationPair.fromSerializer(redisSerializer))//设置key的序列化方式
                .serializeValuesWith(RedisSerializationContext.SerializationPair.fromSerializer(jackson2JsonRedisSerializer)) //设置value的序列化
                .disableCachingNullValues();
        RedisCacheManager cacheManager = RedisCacheManager.builder(factory)
                .cacheDefaults(config)
                .build();
        return cacheManager;
    }


}
实体类
@Data
@TableName("tbl_dept")
public class Dept {
    @TableId(type = IdType.AUTO)
    private Integer did;
    @TableField(value = "d_name")
    private String dname;
    private String loc;
}
dao层
public interface DeptDao extends BaseMapper<Dept> {
}
service层 在需要缓存的方法上加上相应注解
public interface DeptService {

    Dept findById(Integer id);

    int delete(Integer id);

    Dept insert(Dept dept);

    Dept update(Dept dept);
}
@Service
public class DeptServiceImpl implements DeptService {
    @Autowired
    private DeptDao deptDao;
    @Autowired
    private RedisTemplate redisTemplate;

    @Override
    @Cacheable(cacheNames = "dept",key = "#id")
    public Dept findById(Integer id) {
        Dept dept = deptDao.selectById(id);
        return dept;
    }

    @Override
    @CacheEvict(cacheNames = "dept",key = "#id")
    public int delete(Integer id){
        int row = deptDao.deleteById(id);
        return row;
    }

    @Override
    public Dept insert(Dept dept){
        int insert = deptDao.insert(dept);
        return dept;
    }

    @Override
    @CachePut(cacheNames = "dept",key = "#dept.did")
    public Dept update(Dept dept){
        int i = deptDao.updateById(dept);
        return dept;
    }


}
controller层
@RestController
@RequestMapping("/dept")
public class DeptController {
    @Autowired
    private DeptService deptService;

    @GetMapping("/getById/{id}")
    public Dept getById(@PathVariable Integer id ){
        Dept dept = deptService.findById(id);
        return dept;
    }

    @GetMapping("/delete/{id}")
    public int delete(@PathVariable Integer id){
        return deptService.delete(id);
    }

    @GetMapping("/insert")
    public Dept insert(Dept dept){
        return deptService.insert(dept);
    }

    @GetMapping("/update")
    public Dept update(Dept dept){
        return deptService.update(dept);
    }

}
启动类
@SpringBootApplication
@MapperScan(basePackages = "com.aaa.dao")
@EnableCaching
public class Qy168SpringbootRedis02Application {

    public static void main(String[] args) {
        SpringApplication.run(Qy168SpringbootRedis02Application.class, args);
    }

}
测试结果
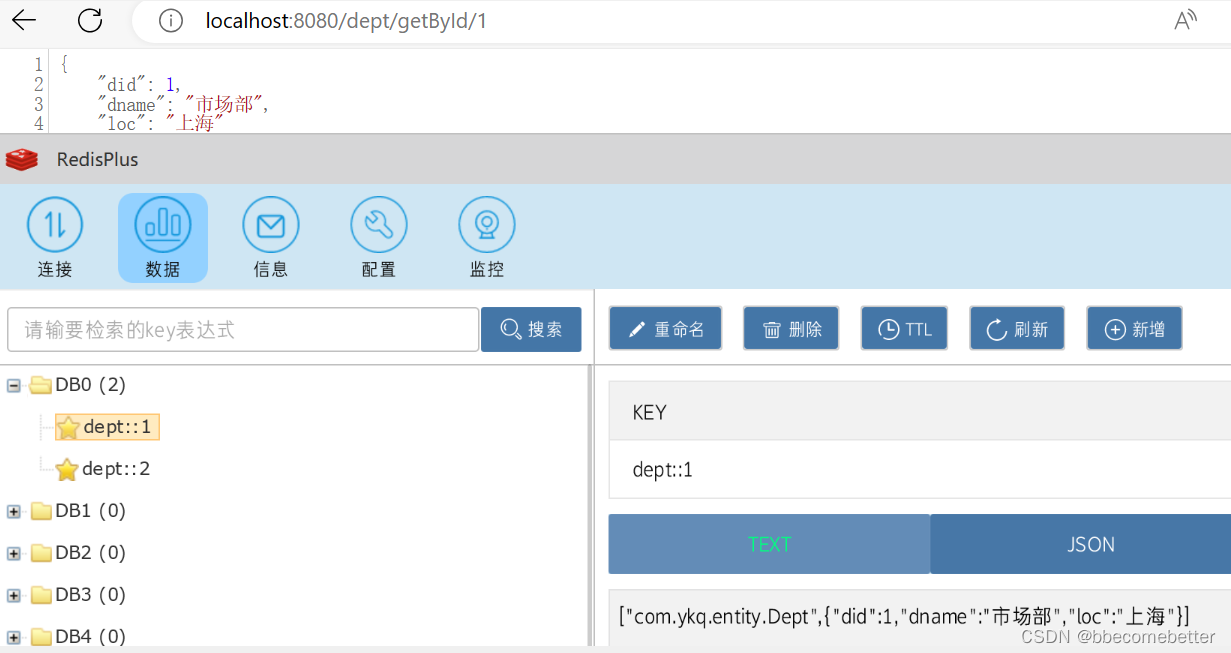


此时可以看到,redis中已经有了数据信息。
使用redis实现分布式锁
当我们使用一个出售服务时,如果系统的并发量太高,就可能会出现线程安全问题,出现重卖、超卖的情况发生,举个例子:
实例:
创建一个spring boot项目,导入依赖,修改配置文件
  <dependencies>
        <dependency>
            <groupId>org.springframework.boot</groupId>
            <artifactId>spring-boot-starter-web</artifactId>
        </dependency>

        <dependency>
            <groupId>com.baomidou</groupId>
            <artifactId>mybatis-plus-boot-starter</artifactId>
            <version>3.4.2</version>
        </dependency>


        <dependency>
            <groupId>org.springframework.boot</groupId>
            <artifactId>spring-boot-starter-data-redis</artifactId>
        </dependency>

        <dependency>
            <groupId>mysql</groupId>
            <artifactId>mysql-connector-java</artifactId>
            <scope>runtime</scope>
        </dependency>
        <dependency>
            <groupId>org.projectlombok</groupId>
            <artifactId>lombok</artifactId>
            <optional>true</optional>
        </dependency>
        <dependency>
            <groupId>org.springframework.boot</groupId>
            <artifactId>spring-boot-starter-test</artifactId>
            <scope>test</scope>
        </dependency>
    </dependencies>
server.port=8088
spring.datasource.driver-class-name=com.mysql.cj.jdbc.Driver
spring.datasource.username=root
spring.datasource.password=1234
spring.datasource.url=jdbc:mysql://localhost:3306/qy666?serverTimezone=Asia/Shanghai
# 配置redis服务器的地址
spring.redis.host=192.168.184.130
spring.redis.port=6380
实体类
@Data
@TableName("tbl_stock")
public class Stock {
    @TableId(type = IdType.AUTO)
    private int productid;
    @TableField("num")
    private int stock;
}
dao层(这里没有使用mybatis puls 体验了下mybatis注解的使用)
@Mapper
public interface StockDao {
    @Select("select num from tbl_stock where productid=#{productid}")
    int findById(Integer productid);

    @Update("update tbl_stock set num=num-1 where productid=#{productid} ")
    void update(Integer productid);
}
controller层
@RestController
public class StockController {

    @Autowired
    private StockService02 stockService;

    //根据商品编号减库存
    @GetMapping("/incr/{productid}")
    public String incr(@PathVariable Integer productid){
         return stockService.decrement(productid);
    }
}
service层
@Service
public class StockService02 {

    @Autowired
    private StockDao stockDao;

    public String decrement(Integer productid) {

        int num = stockDao.findById(productid);
        if (num > 0) {
            stockDao.update(productid);
            System.out.println("商品编号为:" + productid + "的商品库存剩余:" + (num - 1) + "个");
            return "商品编号为:" + productid + "的商品库存剩余:" + (num - 1) + "个";
        } else {
            System.out.println("商品编号为:" + productid + "的商品库存不足。");
            return "商品编号为:" + productid + "的商品库存不足。";
        }
    }
}
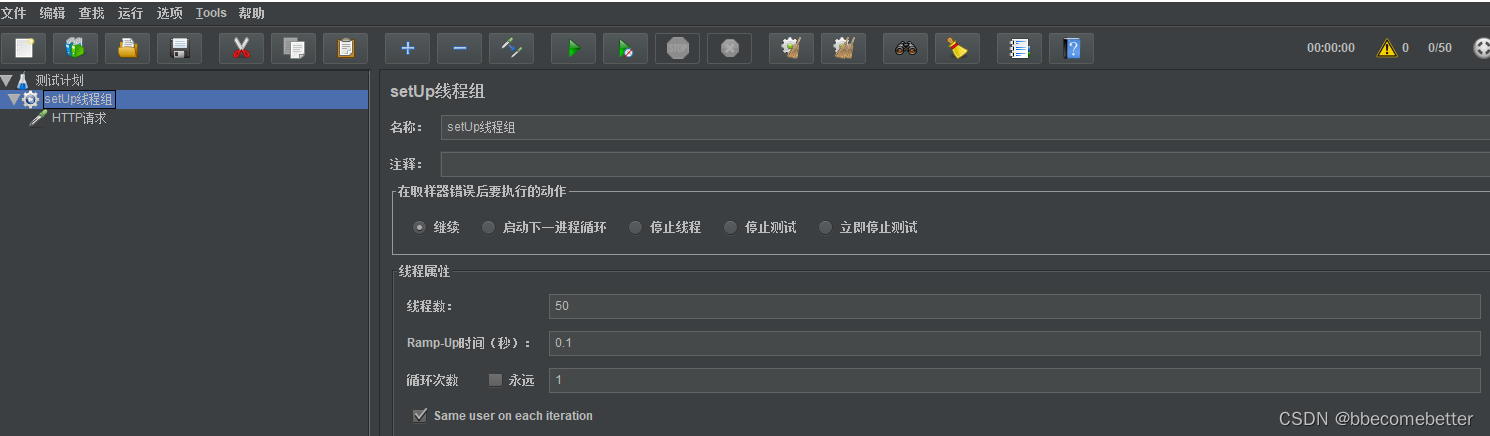
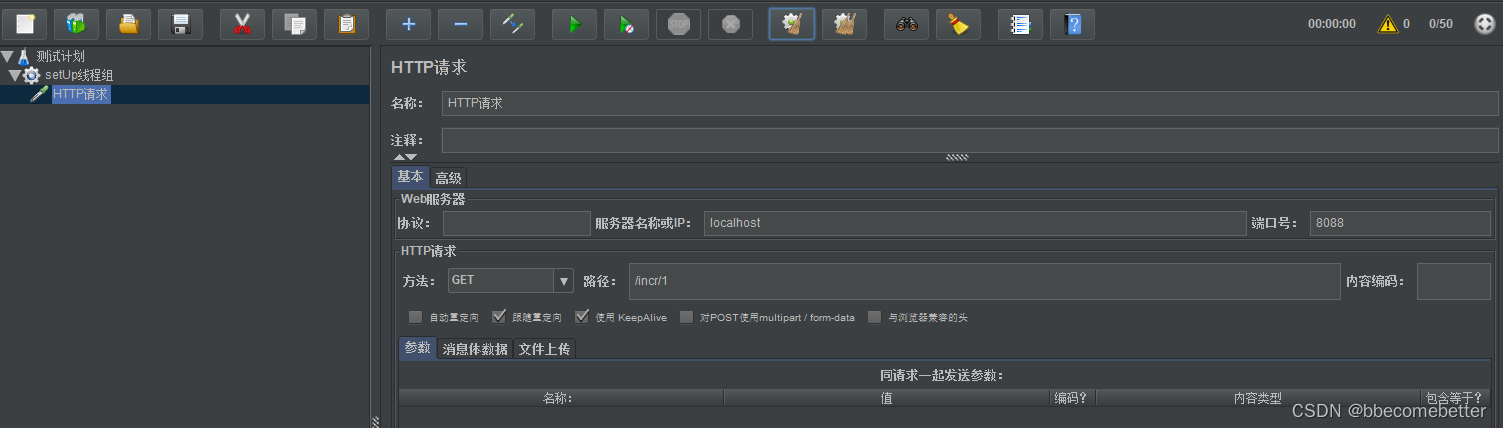
这时我们使用jmeter测压工具,来并发访问出售功能
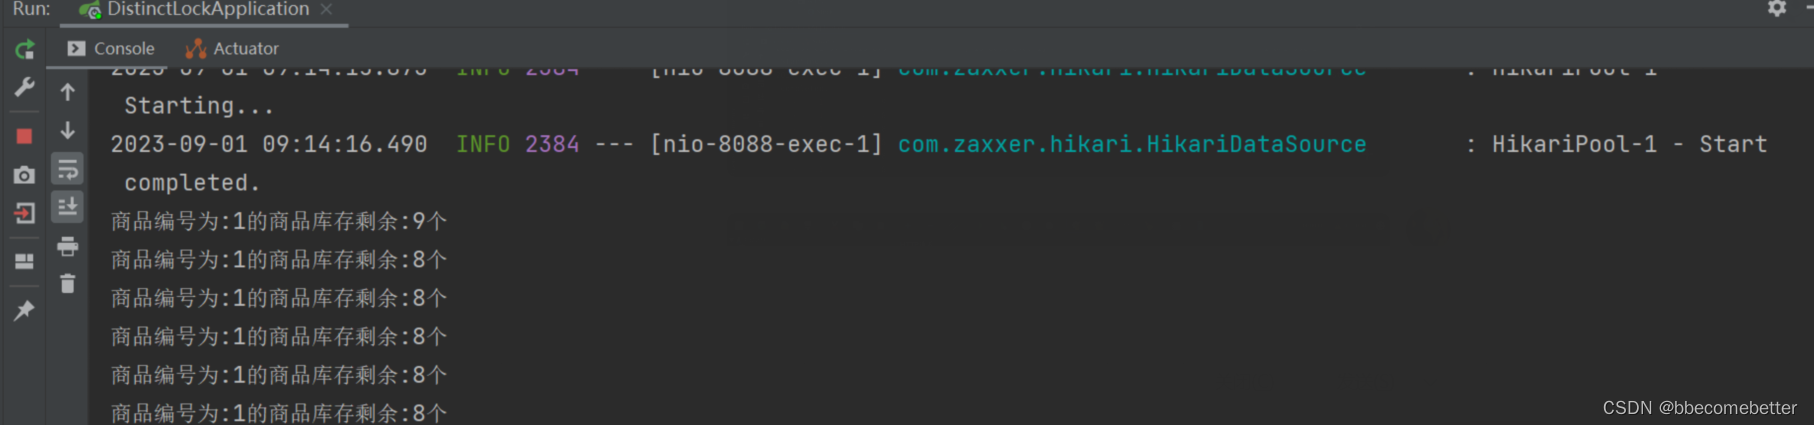 此时出现了重卖和超卖的线程安全问题。
想解决这个问题只需要加上锁即可。
@Service
public class StockService02 {

    @Autowired
    private StockDao stockDao;

    public String decrement(Integer productid) {
        synchronized (this) {
            int num = stockDao.findById(productid);
            if (num > 0) {
                stockDao.update(productid);
                System.out.println("商品编号为:" + productid + "的商品库存剩余:" + (num - 1) + "个");
                return "商品编号为:" + productid + "的商品库存剩余:" + (num - 1) + "个";
            } else {
                System.out.println("商品编号为:" + productid + "的商品库存不足。");
                return "商品编号为:" + productid + "的商品库存不足。";
            }
        }
    }
}
但是,如果我们访问的是一个出售服务的集群,那么后台的服务器就有可能同时拿到统一把锁,这时还会出现超卖,重卖的问题。
这时就需要我们的redis来解决此问题了。
redis单线程
当使用了redis,当线程拿锁时就会进行排队,这样就不会出现同时拿锁的现象了。
只需修改service层代码
@Service
public class StockService02 {

    @Autowired
    private StockDao stockDao;
    //---通过jmeter压测后发现商品出现--线程安全问题。
    //--如何解决上面的线程安全问题: 加锁。【自动锁synchronized 或手动锁 Lock】
    //--如果我们现在的项目部署时为一个集群--如果再高并发下使用【自动锁synchronized 或手动锁 Lock】有出现了线程安全问题。【自动锁synchronized 或手动锁 Lock】他们属于jvm锁。
    //--如何解决集群下线程安全问题。

    @Autowired
    private StringRedisTemplate redisTemplate;
    public String decrement(Integer productid) {
        ValueOperations<String, String> forValue = redisTemplate.opsForValue();
        Boolean flag = forValue.setIfAbsent("product::" + productid, "xxxxx", 30, TimeUnit.SECONDS);
        if (flag) {
            try {
                int num = stockDao.findById(productid);
                if (num > 0) {
                    stockDao.update(productid);
                    System.out.println("商品编号为:" + productid + "的商品库存剩余:" + (num - 1) + "个");
                    return "商品编号为:" + productid + "的商品库存剩余:" + (num - 1) + "个";
                } else {
                    System.out.println("商品编号为:" + productid + "的商品库存不足。");
                    return "商品编号为:" + productid + "的商品库存不足。";
                }
            } finally {
                redisTemplate.delete("prodcut::" + productid);
            }
        } else {
            try {
                Thread.sleep(100);
            } catch (InterruptedException e) {
                e.printStackTrace();
            }
            return decrement(productid);
        }
    }
}
redis实现分布式的缺陷
"当使用了redis,当线程拿锁时就会进行排队,这样就不会出现同时拿锁的现象了。",虽然这么说,但是,如果程序的运行时间太长,超过了redis锁的时间,那么就会出现Bug,超过了锁的时间,就会再拿一把锁,释放第一把锁时,会释放最后拿到的锁。这也是redis实现分布式的缺陷。
我们可以使用第三方插件redisson来解决这个问题,redisson提供了一个看门狗机制,如果加锁后,检测到程序还在运行时,就延长锁的生存时间。
还是这个实例,在依赖中引入redisson
<dependency>
<groupId>org.redisson</groupId>
<artifactId>redisson</artifactId>
<version>3.23.4</version>
</dependency>
在启动类中创建一个RedissonClient对象,交于spring容器管理
@Bean //返回的对象交于spring容器来管理
 public RedissonClient redissonClient(){
     Config config = new Config();
     config.useSingleServer().setAddress("redis://192.168.223.158:6379");
     RedissonClient redissonClient = Redisson.create(config);
     return redissonClient;
 }
修改service层代码
@Service
public class StockService02 {
    @Autowired
    private StockDao stockDao;
    @Autowired
    private RedissonClient redissonClient;

    public String decrement(Integer productid) {
        //获取指定的锁对象
        RLock rlock = redissonClient.getLock("product::" + productid);
        //加锁
        rlock.lock(30,TimeUnit.SECONDS);
        try {
            //如果返回true表示获取锁成功,返回的是false表示获取锁失败
            int num = stockDao.findById(productid);
            if (num > 0) {
                stockDao.update(productid);
                System.out.println("商品编号为:" + productid + "的商品库存剩余:" + (num - 1) + "个");
                return "商品编号为:" + productid + "的商品库存剩余:" + (num - 1) + "个";
            } else {
                System.out.println("商品编号为:" + productid + "的商品库存不足。");
                return "商品编号为:" + productid + "的商品库存不足。";
            }
        }finally {
            //释放锁资源
            rlock.unlock();
        }
    }
}
扩充知识:缓存穿透、雪崩等
什么是缓存穿透?
缓存穿透就是数据库中没有该数据,缓存中也没有该数据,这时有人恶意访问这种数据。
解决方案:
1、在控制层对一些不合法的数据进行校验。
2、使用布隆过滤器。把数据库中存在的id放入一个大的bitmap数组中,当查询一个不存在的id时就会被该过滤器过滤掉。
3、把数据中查询的空对象也存入缓存中。但是这个对象的存储时间一般不超过5分钟。
什么是缓存雪崩?
所谓的缓存雪崩就是缓存中出现大量数据过期的现象,而就在这时有大量的请求访问这些数据。压力顶到数据库。从而造成数据库压力过大。
会出现缓存雪崩的情况和解决方案:
1、项目刚上线。---预先把数据存放的缓存中
2、存中的数据在某个时间端内出现大量过期。 ---设置散列的过期时间。
3、redis宕机。----搭建redis集群
如何保证缓存数据和数据库数据一致?
1、合理的设置缓存的过期时间
2、 当执行CUD操作时,要同步修改缓存数据。


 591
591


 被折叠的 条评论
为什么被折叠?
被折叠的 条评论
为什么被折叠?
 到【灌水乐园】发言


