


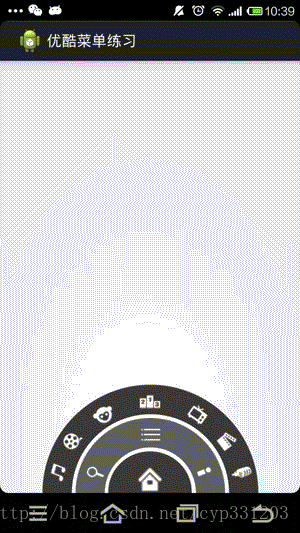
先来看看效果:
一眼看上去好像还挺炫的,感觉比较复杂。。。实际上并不难,下面我们来看看如何实现:
基本素材就是下面三个:


我们先来看看布局文件怎么写,实际上这里这三张图片都差不多,我们这里使用RelativeLayout,方便后续小图标的加入,基本就是centerInParent和aliagnParentBottom,只是外圈小图标的安排要稍微注意一下,这里我们左半边图标以最左边的一个图标为基准,右半边的图标以最右边的一个图标为基准,在这里分别是iv_channel1和iv_channel7:
- <RelativeLayout xmlns:android="http://schemas.android.com/apk/res/android"
- xmlns:tools="http://schemas.android.com/tools"
- android:layout_width="match_parent"
- android:layout_height="match_parent"
- tools:context="${relativePackage}.${activityClass}" >
- <RelativeLayout
- android:id="@+id/level1"
- android:layout_width="100dp"
- android:layout_height="50dp"
- android:layout_alignParentBottom="true"
- android:layout_centerHorizontal="true"
- android:background="@drawable/level1" >
- <ImageView
- android:id="@+id/iv_icon_home"
- android:layout_width="50dp"
- android:layout_height="50dp"
- android:layout_centerInParent="true"
- android:src="@drawable/icon_home" />
- </RelativeLayout>
- <RelativeLayout
- android:id="@+id/level2"
- android:layout_width="180dp"
- android:layout_height="90dp"
- android:layout_alignParentBottom="true"
- android:layout_centerHorizontal="true"
- android:background="@drawable/level2" >
- <ImageView
- android:layout_width="wrap_content"
- android:layout_height="wrap_content"
- android:layout_alignParentBottom="true"
- android:layout_margin="10dp"
- android:src="@drawable/icon_search" >
- </ImageView>
- <ImageView
- android:layout_width="wrap_content"
- android:layout_height="wrap_content"
- android:layout_alignParentBottom="true"
- android:layout_alignParentRight="true"
- android:layout_margin="10dp"
- android:src="@drawable/icon_myyouku" >
- </ImageView>
- <ImageView
- android:id="@+id/iv_icon_menu"
- android:layout_width="wrap_content"
- android:layout_height="wrap_content"
- android:layout_centerHorizontal="true"
- android:layout_marginTop="5dp"
- android:src="@drawable/icon_menu" />
- </RelativeLayout>
- <RelativeLayout
- android:id="@+id/level3"
- android:layout_width="260dp"
- android:layout_height="130dp"
- android:layout_alignParentBottom="true"
- android:layout_centerHorizontal="true"
- android:background="@drawable/level3" >
- <ImageView
- android:id="@+id/iv_channel1"
- android:layout_width="wrap_content"
- android:layout_height="wrap_content"
- android:layout_alignParentBottom="true"
- android:layout_marginBottom="10dp"
- android:layout_marginLeft="5dp"
- android:src="@drawable/channel1" />
- <ImageView
- android:id="@+id/iv_channel2"
- android:layout_width="wrap_content"
- android:layout_height="wrap_content"
- android:layout_above="@id/iv_channel1"
- android:layout_alignLeft="@id/iv_channel1"
- android:layout_marginBottom="7dp"
- android:layout_marginLeft="18dp"
- android:src="@drawable/channel2" />
- <ImageView
- android:id="@+id/iv_channel3"
- android:layout_width="wrap_content"
- android:layout_height="wrap_content"
- android:layout_above="@id/iv_channel2"
- android:layout_alignLeft="@id/iv_channel2"
- android:layout_marginBottom="2dp"
- android:layout_marginLeft="35dp"
- android:src="@drawable/channel3" />
- <ImageView
- android:id="@+id/iv_channel4"
- android:layout_width="wrap_content"
- android:layout_height="wrap_content"
- android:layout_centerHorizontal="true"
- android:layout_marginTop="5dp"
- android:src="@drawable/channel4" />
- <ImageView
- android:id="@+id/iv_channel7"
- android:layout_width="wrap_content"
- android:layout_height="wrap_content"
- android:layout_alignParentBottom="true"
- android:layout_alignParentRight="true"
- android:layout_marginBottom="10dp"
- android:layout_marginRight="5dp"
- android:src="@drawable/channel7" />
- <ImageView
- android:id="@+id/iv_channel6"
- android:layout_width="wrap_content"
- android:layout_height="wrap_content"
- android:layout_above="@id/iv_channel7"
- android:layout_alignRight="@id/iv_channel7"
- android:layout_marginBottom="7dp"
- android:layout_marginRight="18dp"
- android:src="@drawable/channel6" />
- <ImageView
- android:id="@+id/iv_channel5"
- android:layout_width="wrap_content"
- android:layout_height="wrap_content"
- android:layout_above="@id/iv_channel6"
- android:layout_alignRight="@id/iv_channel6"
- android:layout_marginBottom="2dp"
- android:layout_marginRight="35dp"
- android:src="@drawable/channel5" />
- </RelativeLayout>
- </RelativeLayout>
布局完之后的效果:

之后我们就可以开始着手这个怎么实现,我们的基本想法是(小房子图标所在的为level1,第二圈灰色的部分为level2,最外圈为level3):
1、点击小房子图标,如果level2和level3都处于显示状态,则将这两层都隐藏,如果这两层都不存在,则只将level2显示出来;如果只有level2显示着,那么将level2隐藏
2、点击levle2的”三“字图标,则实现隐藏和显示level3组件
3、点击手机的menu键,则实现如果level1,2,3都处于显示状态,则将三者都隐藏,如果只有level1、level2显示,则将level1、2隐藏,如果只有level1显示,则将level1隐藏;如果没有任何level显示着,则将level1和level2显示出来
4、上面的显示和隐藏的过程,都使用动画来实现
基本逻辑关系已经理清楚了,那么现在的问题就在于这个Animation如何写;显然我们这里需要用到一个RotateAnimation旋转动画,由于这里牵涉到旋出和旋入的效果,我们必须要清楚这个动画的角度是如何定的,比如从0~180是旋入还是旋出效果?
经过实验,我们发现,RotateAnimation的角度如下,我们可以发现,它的角度定义是按照顺时针增长的:

那么按照这个角度来看,我们如果想要组件顺时针旋入,同时顺时针旋出的话,角度是要如何确定的呢?

从上图可以比较容易看出来,顺时针旋出的话,角度是从0~180度,那么旋入呢?是不是从180~0度?,实际上这里旋入应该是180~360度。
同样的,如果这里想实现逆时针出入的话,角度可以设为0~-180和-180~-360度,留给大家自己试试。
在角度确定好之后呢,我们可以来着手实现动画效果,这里由于三个组件level1、level2、level3的动画都是一致的,所以这里选择使用一个工具类,来实现几个静态方法,来定义动画,达到复用的效果:
工具类如下:
- package com.alexchen.youkumenuexercise.utils;
- import android.view.View;
- import android.view.animation.RotateAnimation;
- public class AnimationUtils {
- //旋出的动画,无延迟时间
- public static void startAnimationOut(View view) {
- startAnimationOut(view, 0);
- }
- //旋入的动画,无延迟时间
- public static void startAnimationIn(View view) {
- startAnimationIn(view, 0);
- }
- //旋出的动画
- //delay为动画延迟的时间,单位是毫秒
- public static void startAnimationOut(View view, long delay) {
- RotateAnimation animation = new RotateAnimation(0, 180,
- view.getWidth() / 2, view.getHeight());
- animation.setDuration(500);
- animation.setStartOffset(delay);
- animation.setFillAfter(true);
- view.startAnimation(animation);
- }
- //旋入的动画
- //delay为动画延迟的时间,单位是毫秒
- public static void startAnimationIn(View view, long delay) {
- RotateAnimation animation = new RotateAnimation(180, 360,
- view.getWidth() / 2, view.getHeight());
- animation.setDuration(500);
- animation.setStartOffset(delay);
- animation.setFillAfter(true);
- view.startAnimation(animation);
- }
- }
其中设置了两个能够延时开启动画的方法,为的是让三个组件进出的时候能够体现出层次感,让用户体验更好。
最后是Activity中的代码,这里没有做任何生命周期相关的处理,只是简单的实现功能:
- package com.alexchen.youkumenuexercise;
- import com.alexchen.youkumenuexercise.utils.AnimationUtils;
- import android.app.Activity;
- import android.os.Bundle;
- import android.view.KeyEvent;
- import android.view.View;
- import android.view.View.OnClickListener;
- import android.widget.ImageView;
- import android.widget.RelativeLayout;
- public class MainActivity extends Activity implements OnClickListener {
- private RelativeLayout level1;
- private RelativeLayout level2;
- private RelativeLayout level3;
- private ImageView iv_icon_menu;
- private ImageView iv_icon_home;
- /**
- * 表示level3是否是现状状态,默认为true
- */
- private boolean isLevel3In;
- private boolean isLevel2In;
- private boolean isLevel1In;
- @Override
- protected void onCreate(Bundle savedInstanceState) {
- super.onCreate(savedInstanceState);
- setContentView(R.layout.activity_main);
- isLevel3In = true;
- isLevel2In = true;
- isLevel1In = true;
- initViews();
- setOnclickListenersForViews();
- }
- /**
- * 设置views的监听事件
- */
- private void setOnclickListenersForViews() {
- iv_icon_home.setOnClickListener(this);
- iv_icon_menu.setOnClickListener(this);
- }
- /**
- * 初始化需要的view组件
- */
- private void initViews() {
- level1 = (RelativeLayout) findViewById(R.id.level1);
- level2 = (RelativeLayout) findViewById(R.id.level2);
- level3 = (RelativeLayout) findViewById(R.id.level3);
- iv_icon_menu = (ImageView) findViewById(R.id.iv_icon_menu);
- iv_icon_home = (ImageView) findViewById(R.id.iv_icon_home);
- }
- /**
- * activity响应的点击事件
- */
- @Override
- public void onClick(View v) {
- switch (v.getId()) {
- case R.id.iv_icon_menu:
- if (isLevel3In) {
- // 如果level3是显示的,那么就让出去
- AnimationUtils.startAnimationOut(level3);
- isLevel3In = false;
- } else {
- // 如果level3是不显示的,那么让其进入
- AnimationUtils.startAnimationIn(level3);
- isLevel3In = true;
- }
- break;
- case R.id.iv_icon_home:
- if (isLevel2In) {
- // 如果level2是显示状态
- AnimationUtils.startAnimationOut(level2, 200);
- isLevel2In = false;
- } else {
- AnimationUtils.startAnimationIn(level2);
- isLevel2In = true;
- }
- if (isLevel3In) {
- AnimationUtils.startAnimationOut(level3);
- isLevel3In = false;
- }
- break;
- default:
- break;
- }
- }
- @Override
- public boolean onKeyDown(int keyCode, KeyEvent event) {
- if (keyCode == KeyEvent.KEYCODE_MENU) {
- // 如果是menu键按下的话:
- changeLevelState();
- }
- return super.onKeyDown(keyCode, event);
- }
- /**
- * 改变三个圆环的状态
- */
- private void changeLevelState() {
- if (isLevel1In) {
- AnimationUtils.startAnimationOut(level1, 400);
- isLevel1In = false;
- } else {
- AnimationUtils.startAnimationIn(level1);
- isLevel1In = true;
- }
- if (isLevel2In) {
- AnimationUtils.startAnimationOut(level2, 200);
- isLevel2In = false;
- } else {
- AnimationUtils.startAnimationIn(level2, 200);
- isLevel2In = true;
- }
- if (isLevel3In) {
- AnimationUtils.startAnimationOut(level3);
- isLevel3In = false;
- }
- }
- }


 被折叠的 条评论
为什么被折叠?
被折叠的 条评论
为什么被折叠?
 到【灌水乐园】发言


