


Spring 集成 MyBatis
将 MyBatis 与 Spring 进行整合,主要解决的问题就是将 SqlSessionFactory 对象交由 Spring来管理。所以,该整合,只需要将 SqlSessionFactory 的对象生成器 SqlSessionFactoryBean 注册在 Spring 容器中,再将其注入给 Dao 的实现类即可完成整合。
实现 Spring 与 MyBatis 的整合常用的方式:扫描的 Mapper 动态代理
Spring 像插线板一样,mybatis 框架是插头,可以容易的组合到一起。插线板 spring 插 上 mybatis,两个框架就是一个整体。
1、MySQL 创建数据库 springdb,新建表 Student

2、maven 依赖 pom.xml
        <dependency>
            <groupId>junit</groupId>
            <artifactId>junit</artifactId>
            <version>4.11</version>
            <scope>test</scope>
        </dependency>
        <dependency>
            <groupId>org.springframework</groupId>
            <artifactId>spring-context</artifactId>
            <version>5.2.5.RELEASE</version>
        </dependency>
        <dependency>
            <groupId>org.springframework</groupId>
            <artifactId>spring-tx</artifactId>
            <version>5.2.5.RELEASE</version>
        </dependency>
        <dependency>
            <groupId>org.springframework</groupId>
            <artifactId>spring-jdbc</artifactId>
            <version>5.2.5.RELEASE</version>
        </dependency>
        <dependency>
            <groupId>org.mybatis</groupId>
            <artifactId>mybatis</artifactId>
            <version>3.5.1</version>
        </dependency>
        <dependency>
            <groupId>org.mybatis</groupId>
            <artifactId>mybatis-spring</artifactId>
            <version>1.3.1</version>
        </dependency>
        <dependency>
            <groupId>mysql</groupId>
            <artifactId>mysql-connector-java</artifactId>
            <version>5.1.9</version>
        </dependency>
        <dependency>
            <groupId>com.alibaba</groupId>
            <artifactId>druid</artifactId>
            <version>1.1.12</version>
        </dependency>
插件:
 		<resources>
            <resource>
                <directory>src/main/java</directory><!--所在的目录-->
                <includes><!--包括目录下的.properties,.xml 文件都会扫描到-->
                    <include>**/*.properties</include>
                    <include>**/*.xml</include>
                </includes>
                <filtering>false</filtering>
            </resource>
        </resources>
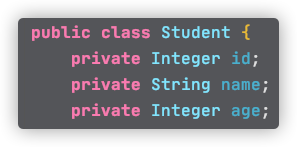
3、定义实体类 Student
4、定义 StudentDao 接口
public interface StudentDao {
    int addStudent(Student student);
    int updateStudent(Student student);
    int deleteStudentById(Integer id);

    Student queryStudentById(Integer id);
    List<Student> queryAllStudent();
}
5、定义映射文件 mapper
在 Dao 接口的包中创建 MyBatis 的映射文件 mapper,命名与接口名相同,本例为StudentDao.xml。mapper 中的 namespace 取值也为 Dao 接口的全限定性名。
<?xml version="1.0" encoding="UTF-8" ?>
<!DOCTYPE mapper
        PUBLIC "-//mybatis.org//DTD Mapper 3.0//EN"
        "http://mybatis.org/dtd/mybatis-3-mapper.dtd">
<mapper namespace="">
    <insert id="addStudent">
        insert into student(name,age) values (#{name},#{age})
    </insert>

    <update id="updateStudent">
        update from student set name = #{name},age=#{age} where id = #{id}
    </update>

    <delete id="deleteStudentById">
        delete from student where id = #{id}
    </delete>

    <select id="queryStudentById" resultType="com.b0kuwa.domain.Student">
        select id,name,age from student where id = #{id}
    </select>

    <select id="queryAllStudent" resultType="com.b0kuwa.domain.Student">
        select id,name,age from student
    </select>
</mapper>
6、定义 Service 接口和实现类
接口定义:
public interface StudentService {
    int addStudent(Student student);
    int updateStudent(Student student);
    int deleteStudentById(Integer id);

    Student queryStudentById(Integer id);
    List<Student> queryAllStudent();
}
实现类定义:
@Service(value = "studentService")
public class StudentServiceImpl implements StudentService {
    @Resource
    private StudentDao studentDao;

    @Override
    public int addStudent(Student student) {
        return studentDao.addStudent(student);
    }

    @Override
    public int updateStudent(Student student) {
        return studentDao.updateStudent(student);
    }

    @Override
    public int deleteStudentById(Integer id) {
        return studentDao.deleteStudentById(id);
    }

    @Override
    public Student queryStudentById(Integer id) {
        return studentDao.queryStudentById(id);
    }

    @Override
    public List<Student> queryAllStudent() {
        return studentDao.queryAllStudent();
    }
}
7、定义 MyBatis 主配置文件
在 src 下定义 MyBatis 的主配置文件,命名为 mybatis.xml。
这里有两点需要注意:
(1)主配置文件中不再需要数据源的配置了。因为数据源要交给 Spring 容器来管理了。
(2)这里对 mapper 映射文件的注册,使用<package/>标签,即只需给出 mapper 映射文件所在的包即可。因为 mapper 的名称与 Dao 接口名相同,可以使用这种简单注册方式。这种方式的好处是,若有多个映射文件,这里的配置也是不用改变的。当然,也可使用原来的<resource/>标签方式。
<?xml version="1.0" encoding="UTF-8" ?>
<!DOCTYPE configuration
        PUBLIC "-//mybatis.org//DTD Config 3.0//EN"
        "http://mybatis.org/dtd/mybatis-3-config.dtd">
<configuration>

    <settings>
        <setting name="logImpl" value="STDOUT_LOGGING"/>
    </settings>
    <!-- 别名 -->
    <typeAliases>
        <package name="com.b0kuwa.domain"/>
    </typeAliases>
    <!-- mapper文件 -->
    <mappers>
        <package name="com.b0kuwa.dao"/>
    </mappers>
</configuration>
8、修改 Spring 配置文件
1) 数据源的配置【掌握】
使用 JDBC 模板,首先需要配置好数据源,数据源直接以 Bean 的形式配置在 Spring 配置文件中。根据数据源的不同,其配置方式不同:
Druid 数据源 DruidDataSource
Druid 是阿里的开源数据库连接池。是 Java 语言中最好的数据库连接池。Druid 能
够提供强大的监控和扩展功能。Druid 与其他数据库连接池的最大区别是提供数据库的Druid官网 使用地址
配置连接池:
<bean id="dataSource" class="com.alibaba.druid.pool.DruidDataSource" init-method="init" destory-method="close">
	<!--基本属性 url、username、password-->
  <property name="url" value="${jdbc_url}"/>
  <property name="username" value="${jdbc_username}"/>
  <property name="password" value="${jdbc_password}"/>

  <!--配置初始化大小、最小、最大-->
  <property name="inititalSize" value="1"/>
  <property name="minIdle" value="1"/>
  <property name="maxActive" value="20"/>

  <!--配置获取连接的等待超时的时间-->
  <property name="maxWait" value="60000" />

  <!--配置间隔多久才进行一次检查,检测需要关闭的空闲连接,单位是毫秒-->
  <property name="timeBetweenEvictionRunsMillis" value="60000" />
</bean>
Spring 配置文件:
无需配置驱动,可以根据url检测驱动
    <bean id="dataSource" class="com.alibaba.druid.pool.DruidDataSource" init-method="init" destroy-method="close">
        <property name="url" value="${jdbc.url}"/>
        <property name="username" value="${jdbc.username}"/>
        <property name="password" value="${jdbc.password}"/>
    </bean>
2) 从属性文件读取数据库连接信息
为了便于维护,可以将数据库连接信息写入到属性文件中,使 Spring 配置文件从中读取数据。
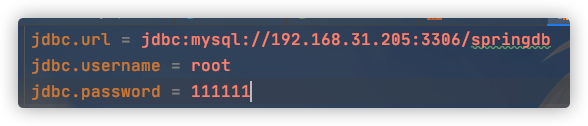
Spring 配置文件从属性文件中读取数据时,需要在的 value 属性中使用${ },将在属性文件中定义的 key 括起来,以引用指定属性的值。
该属性文件若要被 Spring 配置文件读取,其必须在配置文件中进行注册。使用<context>标签。
<context:property-placeholder/>方式【掌握】
该方式要求在 Spring 配置文件头部加入 spring-context.xsd 约束文件
<context:property-placeholder/>标签中有一个属性 location,用于指定属性文件的位置。

3) 注册 SqlSessionFactoryBean
    <!--注册sqlSessionFactory的bean-->
    <bean id="sqlSessionFactory" class="org.mybatis.spring.SqlSessionFactoryBean">
        <property name="dataSource" ref="dataSource"/>
        <!--指定mybatis的主配置文件-->
        <property name="configLocation" value="classpath:mybatis.xml"/>
    </bean>
4) 定义 Mapper 扫描配置器 MapperScannerConfigurer
    <!--注册Mapper扫描配置器-->
    <bean class="org.mybatis.spring.mapper.MapperScannerConfigurer">
        <!--指定基本扫描包。Dao接口包-->
        <property name="basePackage" value="com.b0kuwa.dao"/>
        <property name="sqlSessionFactoryBeanName" value="sqlSessionFactory"/>
    </bean>
9、向 Service 注入接口名
1)使用注解方式
在接口实现类上加上@Service注解,在spring配置文件中配置组件扫描器,指定service包


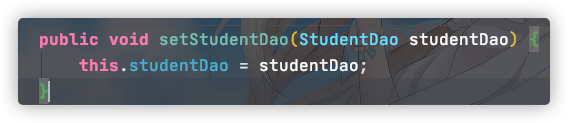
2)使用xml方式
在实现类中添加属性studentDao的set方法
spring配置文件中注册studentDao

10、Spring 配置文件全部配置
<?xml version="1.0" encoding="UTF-8"?>
<beans xmlns="http://www.springframework.org/schema/beans"
       xmlns:xsi="http://www.w3.org/2001/XMLSchema-instance"
       xmlns:context="http://www.springframework.org/schema/context"
       xsi:schemaLocation="http://www.springframework.org/schema/beans http://www.springframework.org/schema/beans/spring-beans.xsd http://www.springframework.org/schema/context https://www.springframework.org/schema/context/spring-context.xsd">

    <context:property-placeholder location="classpath:jdbc.properties"/>

    <bean id="dataSource" class="com.alibaba.druid.pool.DruidDataSource" init-method="init" destroy-method="close">
        <property name="url" value="${jdbc.url}"/>
        <property name="username" value="${jdbc.username}"/>
        <property name="password" value="${jdbc.password}"/>
    </bean>

    <!--注册sqlSessionFactory的bean-->
    <bean id="sqlSessionFactory" class="org.mybatis.spring.SqlSessionFactoryBean">
        <property name="dataSource" ref="dataSource"/>
        <!--指定mybatis的主配置文件-->
        <property name="configLocation" value="classpath:mybatis.xml"/>
    </bean>

    <!--注册Mapper扫描配置器-->
    <bean class="org.mybatis.spring.mapper.MapperScannerConfigurer">
        <!--指定基本扫描包。Dao接口包-->
        <property name="basePackage" value="com.b0kuwa.dao"/>
        <property name="sqlSessionFactoryBeanName" value="sqlSessionFactory"/>
    </bean>

<!--    <context:component-scan base-package="com.b0kuwa.service"/>-->
    <bean id="studentService" class="com.b0kuwa.service.impl.StudentServiceImpl">
        <property name="studentDao" ref="studentDao"/>
    </bean>
</beans>
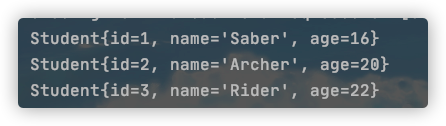
11、测试
向数据库添加几条数据
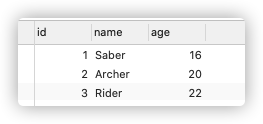
编写测试
    @Test
    public void test01() {
        ApplicationContext ac = new ClassPathXmlApplicationContext("applicationContext.xml");
        StudentService service = (StudentService) ac.getBean("studentService");
        List<Student> students = service.queryAllStudent();
        students.forEach(student -> System.out.println(student));
    }


 5万+
5万+


 被折叠的 条评论
为什么被折叠?
被折叠的 条评论
为什么被折叠?
 到【灌水乐园】发言


