


ListView在android的开发中使用较为频繁,在这篇文章中,我们将介绍ListView搭配适配器(BaseAdapter)的使用。
ListView就好像是一个装视图(View)的容器,其作用就是将多个相似的视图垂直的展示出来。
适配器(Adapter)可以将数据映射到视图上,是连接数据和视图的桥梁。android提供了多种适配器,其中BaseAdapter为通用适配器,其使用方便灵活,通用性高,所以在开发中使用较多。本篇文章的目的就是将上一篇中解析出来的数据用Listview展示出来。
大概步骤:
1、ListView子视图布局
2、重写适配器
3、设计主布局
4、用Activity将数据显示出来
1、item_emp.xml文件
<?xml version="1.0" encoding="utf-8"?>
<RelativeLayout xmlns:android="http://schemas.android.com/apk/res/android"
    android:layout_width="match_parent"
    android:layout_height="match_parent"
    >

    <TextView
        android:id="@+id/emp_name"
        android:layout_width="wrap_content"
        android:layout_height="wrap_content"
        android:layout_marginLeft="20dp"
	    android:layout_marginTop="20dp"
        android:textSize="30sp"
        />

    <TextView
        android:id="@+id/emp_age"
        android:layout_width="wrap_content"
        android:layout_height="wrap_content"
        android:layout_alignBottom="@+id/emp_name"
        android:layout_toRightOf="@+id/emp_name"
        android:layout_marginLeft="50dp"
        android:textSize="20sp"
        />

</RelativeLayout>
2、重写适配器EmpAdapter
import java.util.List;

import android.content.Context;
import android.view.LayoutInflater;
import android.view.View;
import android.view.ViewGroup;
import android.widget.BaseAdapter;
import android.widget.TextView;

/**
 * 当系统开始绘制ListView的时候,首先调用getCount()方法。
 * 得到它的返回值,即ListView的长度。然后系统调用getView()
 * 方法,根据这个长度逐一绘制ListView的每一行。也就是说,如果让
 * getCount()返回1,那么只显示一行。而getItem()和
 * getItemId()则在需要处理和取得Adapter中的数据时调用。
 *
 */

//继承BaseAdapter,重写BaseAdapter中的方法
public class EmpAdapter extends BaseAdapter
{
	private Context context;
	private List<Employee> empList;

	public EmpAdapter(Context context,List<Employee> empList)
	{
		this.context = context;
		this.empList = empList;
	}

	public void freshView(List<Employee> list)
	{
		this.empList = list;
		//刷新数据
		notifyDataSetChanged();
	}

	@Override
	public int getCount()
	{
		return empList == null ? 0 : empList.size();
	}

	@Override
	public Object getItem(int position)
	{
		return empList == null ? null : empList.get(position);
	}

	@Override
	public long getItemId(int position)
	{
		return position;
	}

	@Override
	public View getView(int position, View convertView, ViewGroup parent)
	{
		ViewHolder holder = null;
		if(convertView == null)
		{
			//ListView子视图布局
			convertView = LayoutInflater.from(context).inflate(R.layout.item_emp, null);
			holder = new ViewHolder();
			holder.emp_name = (TextView) convertView.findViewById(R.id.emp_name);
			holder.emp_age = (TextView) convertView.findViewById(R.id.emp_age);
			convertView.setTag(holder);
		}else{
			holder = (ViewHolder) convertView.getTag();
		}
		String empName = empList.get(position).getName();
		holder.emp_name.setText(empName);
		int age = empList.get(position).getAge();
		holder.emp_age.setText(String.valueOf(age));
		return convertView;
	}

	//一种优化的方法,避免系统重复的画一个视图
	class ViewHolder {
		public TextView emp_name;
		public TextView emp_age;
	}
}
3、主布局文件activity_main.xml
<RelativeLayout xmlns:android="http://schemas.android.com/apk/res/android"
    xmlns:tools="http://schemas.android.com/tools"
    android:layout_width="match_parent"
    android:layout_height="match_parent" >

    <TextView
        android:id="@+id/dep_name"
        android:layout_width="wrap_content"
        android:layout_height="wrap_content"
        android:layout_alignParentLeft="true"
        android:layout_marginLeft="20dp"
        android:textSize="40sp"
        android:text="部门:" />

    <TextView
        android:id="@+id/deptment"
        android:layout_width="wrap_content"
        android:layout_height="wrap_content"
        android:layout_toRightOf="@+id/dep_name"
        android:layout_alignBottom="@+id/dep_name"
        android:layout_marginLeft="30dp"
        android:textSize="40sp"
        />

    <TextView
        android:id="@+id/txt_emp_total"
        android:layout_width="wrap_content"
        android:layout_height="wrap_content"
        android:layout_alignLeft="@+id/dep_name"
        android:layout_below="@+id/dep_name"
        android:layout_marginTop="20dp"
        android:textSize="40sp"
        android:text="总人数:" />

    <TextView
        android:id="@+id/emp_total"
        android:layout_width="wrap_content"
        android:layout_height="wrap_content"
        android:layout_alignBottom="@+id/txt_emp_total"
        android:layout_toRightOf="@+id/txt_emp_total"
        android:layout_marginLeft="30dp"
        android:textSize="40sp"
        />

    <TextView
        android:id="@+id/emp_info"
        android:layout_width="wrap_content"
        android:layout_height="wrap_content"
        android:layout_alignLeft="@+id/txt_emp_total"
        android:layout_below="@+id/txt_emp_total"
        android:layout_marginTop="20dp"
        android:textSize="40sp"
        android:text="员工信息" />

    <ListView
        android:id="@+id/emp_list"
        android:layout_width="wrap_content"
        android:layout_height="wrap_content"
        android:layout_alignLeft="@+id/dep_name"
        android:layout_below="@+id/emp_info"
        android:layout_marginTop="20dp" >
    </ListView>

</RelativeLayout>
4、Activity代码
package com.example.test;

import android.app.Activity;
import android.content.Context;
import android.os.Bundle;
import android.os.Handler;
import android.os.Message;
import android.widget.ListView;
import android.widget.TextView;

public class MainActivity extends Activity
{
	private Context context;

	private TextView depName;// 部门名称
	private TextView depTotal;// 部门总人数
	private ListView empList;

	private DepartmentInfo depInfo;
	private EmpAdapter adapter;
	// 此处的json数据时我们的一个示例,为了看出效果,我们多加了几条数据
	String jsonString = "{\"department\": \"研发\"," + "\"total\": 30,"
			+ "\"employeeList\": [" + "{\"name\": \"张三\",\"age\": 24},"
			+ "{\"name\": \"李四\",\"age\": 25},"
			+ "{\"name\": \"李四\",\"age\": 25},"
			+ "{\"name\": \"李四\",\"age\": 25},"
			+ "{\"name\": \"李四\",\"age\": 25},"
			+ "{\"name\": \"李四\",\"age\": 25},"
			+ "{\"name\": \"李四\",\"age\": 25},"
			+ "{\"name\": \"李四\",\"age\": 25},"
			+ "{\"name\": \"李四\",\"age\": 25},"
			+ "{\"name\": \"李四\",\"age\": 25}]}";

	@Override
	protected void onCreate(Bundle savedInstanceState)
	{
		super.onCreate(savedInstanceState);
		// 设置布局
		setContentView(R.layout.activity_main);
		context = MainActivity.this;
		// 初始化视图
		initView();
		// 加载数据
		loadData();
	}

	private void initView()
	{
		depName = (TextView) findViewById(R.id.deptment);
		depTotal = (TextView) findViewById(R.id.emp_total);
		empList = (ListView) findViewById(R.id.emp_list);

		adapter = new EmpAdapter(context, null);
		empList.setAdapter(adapter);
	}

	private void loadData()
	{
		// 启动一个线程来加载数据
		new Thread()
		{

			@Override
			public void run()
			{
				// 解析json数据
				depInfo = JsonUtil.parseJson(jsonString);
			}
		}.start();
		// 发送消息通知数据加载完毕
		handler.sendEmptyMessage(0x101);
	}

	private Handler handler = new Handler()
	{
		@Override
		public void handleMessage(Message msg)
		{
			if (msg.what == 0x101)
			{
				depName.setText(depInfo.getDepName());
				depTotal.setText(String.valueOf(depInfo.getTotal()));
				// 刷新数据
				adapter.freshView(depInfo.getEmpList());
			}
			super.handleMessage(msg);
		}
	};

}
看看运行效果:
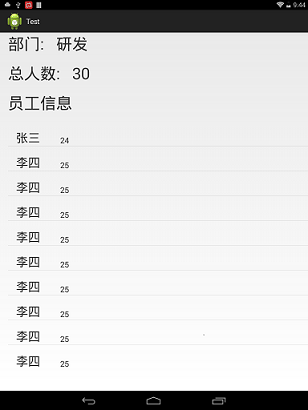
这布局设计得相当糟糕,继续努力……


 1578
1578

 被折叠的 条评论
为什么被折叠?
被折叠的 条评论
为什么被折叠?
 到【灌水乐园】发言


