


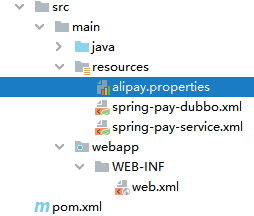
工程搭建
创建youxin_pay_interface的jar工程,依赖pojo
创建youxin_pay_service的war工程,除了项目依赖,需要加入支付的依赖
<!-- 支付宝支付所需类库包 -->
<dependency>
	<groupId>com.alipay.sdk</groupId>
	<artifactId>alipay-sdk-java</artifactId>
	<version>3.4.27.ALL</version>
</dependency>
配置sring-pay-service.xml
<?xml version="1.0" encoding="UTF-8"?>
<beans xmlns="http://www.springframework.org/schema/beans"
	   xmlns:xsi="http://www.w3.org/2001/XMLSchema-instance"
	   xmlns:context="http://www.springframework.org/schema/context"
	   xmlns:aop="http://www.springframework.org/schema/aop"
	   xmlns:tx="http://www.springframework.org/schema/tx"
	   xsi:schemaLocation="http://www.springframework.org/schema/beans
    		http://www.springframework.org/schema/beans/spring-beans.xsd
    		http://www.springframework.org/schema/context
    		http://www.springframework.org/schema/context/spring-context.xsd
    		http://www.springframework.org/schema/aop
    		http://www.springframework.org/schema/aop/spring-aop.xsd
    		http://www.springframework.org/schema/tx
    		http://www.springframework.org/schema/tx/spring-tx.xsd">

	<context:component-scan base-package="com.youxin"/>

	<!-- 创建AlipayClient -->
	<bean id="payClient" class="com.alipay.api.DefaultAlipayClient">
		<constructor-arg name="serverUrl" value="${serverUrl}"/>
		<constructor-arg name="appId" value="${appId}"/>
		<constructor-arg name="privateKey" value="${privateKey}"/>
		<constructor-arg name="alipayPublicKey" value="${alipayPulicKey}"/>
		<constructor-arg name="format" value="${format}"/>
		<constructor-arg name="charset" value="${charset}"/>
		<constructor-arg name="signType" value="${signType}"/>
	</bean>
</beans>
配置web.xml
<?xml version="1.0" encoding="UTF-8"?>
<web-app xmlns:xsi="http://www.w3.org/2001/XMLSchema-instance"
         xmlns="http://xmlns.jcp.org/xml/ns/javaee"
         xsi:schemaLocation="http://xmlns.jcp.org/xml/ns/javaee http://xmlns.jcp.org/xml/ns/javaee/web-app_3_1.xsd"
         id="WebApp_ID" version="3.1">

  <!-- spring监听 -->
  <listener>
    <listener-class>org.springframework.web.context.ContextLoaderListener</listener-class>
  </listener>

  <!-- spring配置文件初始化 -->
  <context-param>
    <param-name>contextConfigLocation</param-name>
    <param-value>classpath*:spring-*.xml</param-value>
  </context-param>

</web-app>
配置alipay.properties
serverUrl=https://openapi.alipay.com/gateway.do
appId=*******
privateKey=生成的应用私钥
alipayPulicKey=支付宝公钥
format=json
charset=utf-8
signType=RSA2
注意
在spring的配置文件中加载alipay.properties(我们已经设置依赖了common层导入所有properties)
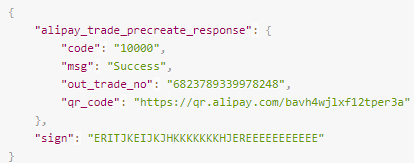
向支付宝发起预支付,前端接收预支付返回信息生成付款二维码
Map用来存储预支付响应信息,如果发起预支付成功,将订单号和支付总金额以及二维码码串返回给前端页面

响应结果示例
service层代码
@Autowired
private AlipayClient alipayClient;

public Map createNative(String out_trade_no, String total_fee) {
    Map<String, String> map = new HashMap<String, String>();
    // 创建预下单请求对象
    AlipayTradePrecreateRequest request = new AlipayTradePrecreateRequest();
    // 设置业务参数
    request.setBizContent("{\"out_trade_no\":\"" + out_trade_no + "\","
            + "\"total_amount\":\"" + total_fee + "\","
            + "\"subject\":\"在线支付\","
            + "\"timeout_express\":\"90m\"}");
    // 发出预下单业务请求
    try {
        AlipayTradePrecreateResponse response = alipayClient.execute(request);
        // 从相应对象读取相应结果
        String code = response.getCode();
        System.out.println("支付宝接口响应码:" + code);
        // 全部的响应结果
        String body = response.getBody();
        System.out.println("支付宝返回结果:" + body);

        if (code.equals("10000")) {
            map.put("qrcode", response.getQrCode());
            map.put("out_trade_no", response.getOutTradeNo());
            map.put("total_fee", total_fee);


            System.out.println("返回qrcode:" + response.getQrCode());
            System.out.println("返回out_trade_no:" + response.getOutTradeNo());
            System.out.println("返回total_fee:" + total_fee);
        } else {
            System.out.println("预下单接口调用失败:" + body);
        }
    } catch (AlipayApiException e) {
        e.printStackTrace();
    }
    return map;
}
检测支付状态
实现思路:
通过AlipayClient实现对交易查询接口(alipay.trade.query)的调用。阿里支付api
交易查询接口请求关键参数:

响应关键参数

service层
public Map queryPayStatus(String out_trade_no) {
    Map<String, String> map = new HashMap<String, String>();
    AlipayTradeQueryRequest request = new AlipayTradeQueryRequest();
    // 设置业务参数
    request.setBizContent("{\"out_trade_no\":\"" + out_trade_no + "\","
            + "\"trade_no\":\"\"}");

    // 发出请求
    try {
        AlipayTradeQueryResponse response = alipayClient.execute(request);
        String code = response.getCode();

        System.out.println("查询交易状态--返回值1:" + code);
        System.out.println("查询交易状态--返回值2:" + response.getBody());

        if (code.equals("10000")) {
            map.put("out_trade_no", out_trade_no);
            map.put("tradestatus", response.getTradeStatus());
        }
    } catch (AlipayApiException e) {
        e.printStackTrace();
    }
    return map;
}
controller层
先调用service层的方法去查询支付状态,service层会将查询出来的结果封装进map集合返回,controller拿到集合中交易状态,怼它进行判断
支付状态的查询如果是等待买家付款就需要一直查询支付状态,通过循环的方式实现
/*
查询支付状态
*/
public Result queryPayStatus(String out_trade_no){
Result result = null;
int x = 0;
while (true) {
Map map = new HashMap();
try {
map = payService.queryPayStatus(out_trade_no);
} catch (Exception e) {
e.printStackTrace();
}
String tradestatus = (String) map.get("tradestatus");
if (tradestatus!=null && tradestatus.equals("TRADE_CLOSED") ){
result = new Result(false,"未付款交易超时关闭,或支付完成后全额退款");
break;
}
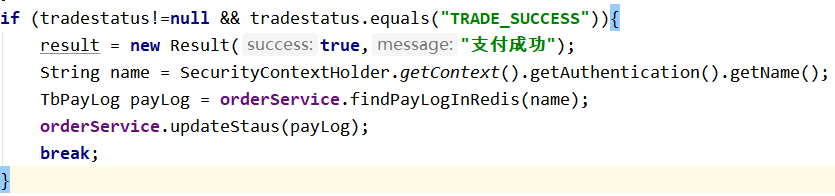
if (tradestatus!=null && tradestatus.equals("TRADE_SUCCESS")){
result = new Result(true,"支付成功");
break;
}
if (tradestatus!=null && tradestatus.equals("TRADE_FINISHED")){
result = new Result(false,"交易结束,不可退款");
break;
}
//时间间隔三秒再去循环校验支付状态
try {
Thread.sleep(3000);
} catch (InterruptedException e) {
e.printStackTrace();
}
// 定义一个过期时间,可以参考登录信息的过期时间
// 为了测试,可以设置30秒的过期时间,即 x 约 10次,实际时可以设置和用户登录过期时间
x++;
if(x>10){
result = new Result(false,"二维码已失效!");
break;
}
}
return result;
}
支付日志
(1)系统中无法查询到支付记录
(2)支付后订单状态没有改变
实现思路:
(1)在用户下订单时就向支付日志表添加一条记录,信息包括支付总金额、订单ID(多个)、用户ID、下单时间等信息,支付状态为0(未支付)
(2)生成的支付日志对象放入redis中,以用户ID作为key,这样在生成支付二维码时就可以从redis中提取支付日志对象中的金额和订单号。
(3)当用户支付成功后,修改支付日志的支付状态为1(已支付),并记录支付宝传递给我们的交易流水号。根据订单ID(多个)修改订单的状态为2(已付款)。
在创建的订单同时创建支付日志


支付控制层从redis中获取订单号和总金额生成支付二维码


监听支付状态的同时,如果支付成功,更新支付日志和订单状态


 8008
8008


 被折叠的 条评论
为什么被折叠?
被折叠的 条评论
为什么被折叠?
 到【灌水乐园】发言


