


谈起Tomcat的诞生,最早可以追溯到1995年。近20年来,Tomcat始终是使用最广泛的Web服务器,由于其使用Java语言开发,所以广为Java程序员所熟悉。很多人早期的J2EE项目,由程序员自己实现Jsp页面或者Servlet接受请求,后来借助Struts1、Struts2、spring等中间件后,实际也是利用Filter或者Servlet处理请求,大家肯定要问了,这些Servlet处理的请求来自哪里?Tomcat作为Web服务器是怎样将HTTP请求交给Servlet的呢?
本文就Tomcat对HTTP的请求处理细节进行分析。
提示:阅读本文前,请确保首先理解了《Tomcat7.0源码分析——生命周期管理》中的内容。
Connector的初始化
根据《Tomcat7.0源码分析——生命周期管理》一文的内容,我们知道Tomcat中有很多容器,包括Server、Service、Connector等。其中Connector正是与HTTP请求处理相关的容器。Service是Server的子容器,而Connector又是Service的子容器。那么这三个容器的初始化顺序为:Server->Service->Connector。Connector的实现分为以下几种:
- Http Connector:基于HTTP协议,负责建立HTTP连接。它又分为BIO Http Connector与NIO Http Connector两种,后者提供非阻塞IO与长连接Comet支持。
- AJP Connector:基于AJP协议,AJP是专门设计用于Tomcat与HTTP服务器通信定制的协议,能提供较高的通信速度和效率。如与Apache服务器集成时,采用这个协议。
- APR HTTP Connector:用C实现,通过JNI调用的。主要提升对静态资源(如HTML、图片、CSS、JS等)的访问性能。现在这个库已独立出来可用在任何项目中。由于APR性能较前两类有很大提升,所以目前是Tomcat的默认Connector。现在我们直接来看Connector的initInternal方法吧,见代码清单1。
- @Override
- protected void initInternal() throws LifecycleException {
- super.initInternal();
- // Initialize adapter
- adapter = new CoyoteAdapter(this);
- protocolHandler.setAdapter(adapter);
- IntrospectionUtils.setProperty(protocolHandler, "jkHome",
- System.getProperty("catalina.base"));
- onameProtocolHandler = register(protocolHandler,
- createObjectNameKeyProperties("ProtocolHandler"));
- mapperListener.setDomain(getDomain());
- onameMapper = register(mapperListener,
- createObjectNameKeyProperties("Mapper"));
- }
代码清单1说明了Connector的初始化步骤如下:
步骤一 构造网络协议处理的CoyoteAdapter
代码清单1构造了CoyoteAdapter对象,并且将其设置为ProtocolHandler的Adapter。ProtocolHandler是做什么的呢?Tomcat处理HTTP请求,需要有一个ServerSocket监听网络端口来完成任务。接口ProtocolHandler被设计成控制网络端口监听组件运行,负责组件的生命周期控制,这个接口实际并没有定义网络端口监听功能的规范,而是用于负责维护组件的生命周期。从ProtocolHandler的名字来看,它应该是网络协议的处理者,但它实际不负责这个功能,而是将其交给org.apache.coyote.Adapter来完成,这么设计估计是为了方便维护和拓展新功能。Http11Protocol是ProtocolHandler接口的一个实现(是Connector的默认处理协议),被设计用来处理HTTP1.1网络协议的请求,通过该类可以完成在某个网络端口上面的监听,同时以HTTP1.1的协议来解析请求内容,然后将请求传递到Connector所寄居的Container容器pipeline流水工作线上处理。此处的ProtocolHandler是何时生成的呢?还记得《Tomcat7.0源码分析——SERVER.XML文件的加载与解析》一文中的Digester和Rule吗?Digester在解析到标签的时候,会执行startElement方法,startElement中会调用Rule的begin(String namespace, String name, Attributes attributes)方法,Connector对应的Rule包括ConnectorCreateRule,ConnectorCreateRule的begin方法的实现见代码清单2。
代码清单2
- @Override
- public void begin(String namespace, String name, Attributes attributes)
- throws Exception {
- Service svc = (Service)digester.peek();
- Executor ex = null;
- if ( attributes.getValue("executor")!=null ) {
- ex = svc.getExecutor(attributes.getValue("executor"));
- }
- Connector con = new Connector(attributes.getValue("protocol"));
- if ( ex != null ) _setExecutor(con,ex);
- digester.push(con);
- }
- <Connector port="8080" protocol="HTTP/1.1"
- connectionTimeout="20000"
- redirectPort="8443" />
- <!-- Define an AJP 1.3 Connector on port 8009 -->
- <Connector port="8009" protocol="AJP/1.3" redirectPort="8443" />
我们看看Connector的构造器实现,见代码清单3。
代码清单3
- public Connector(String protocol) {
- setProtocol(protocol);
- // Instantiate protocol handler
- try {
- Class<?> clazz = Class.forName(protocolHandlerClassName);
- this.protocolHandler = (ProtocolHandler) clazz.newInstance();
- } catch (Exception e) {
- log.error
- (sm.getString
- ("coyoteConnector.protocolHandlerInstantiationFailed", e));
- }
- }
setProtocol方法(见代码清单4)根据protocol参数的不同,调用setProtocolHandlerClassName方法(见代码清单5)设置protocolHandlerClassName属性。以HTTP/1.1为例,由于默认情况下Apr不可用,所以protocolHandlerClassName会被设置为org.apache.coyote.http11.Http11Protocol,那么反射生成的protocolHandler就是Http11Protocol实例。Tomcat默认还会配置协议是AJP/1.3的Connector,那么此Connector的protocolHandler就是org.apache.coyote.ajp.AjpProtocol。
代码清单4
- /**
- * Set the Coyote protocol which will be used by the connector.
- *
- * @param protocol The Coyote protocol name
- */
- public void setProtocol(String protocol) {
- if (AprLifecycleListener.isAprAvailable()) {
- if ("HTTP/1.1".equals(protocol)) {
- setProtocolHandlerClassName
- ("org.apache.coyote.http11.Http11AprProtocol");
- } else if ("AJP/1.3".equals(protocol)) {
- setProtocolHandlerClassName
- ("org.apache.coyote.ajp.AjpAprProtocol");
- } else if (protocol != null) {
- setProtocolHandlerClassName(protocol);
- } else {
- setProtocolHandlerClassName
- ("org.apache.coyote.http11.Http11AprProtocol");
- }
- } else {
- if ("HTTP/1.1".equals(protocol)) {
- setProtocolHandlerClassName
- ("org.apache.coyote.http11.Http11Protocol");
- } else if ("AJP/1.3".equals(protocol)) {
- setProtocolHandlerClassName
- ("org.apache.coyote.ajp.AjpProtocol");
- } else if (protocol != null) {
- setProtocolHandlerClassName(protocol);
- }
- }
- }
代码清单5
- public void setProtocolHandlerClassName(String protocolHandlerClassName) {
- this.protocolHandlerClassName = protocolHandlerClassName;
- }
除此之外,ProtocolHandler还有其它实现,如图1所示。
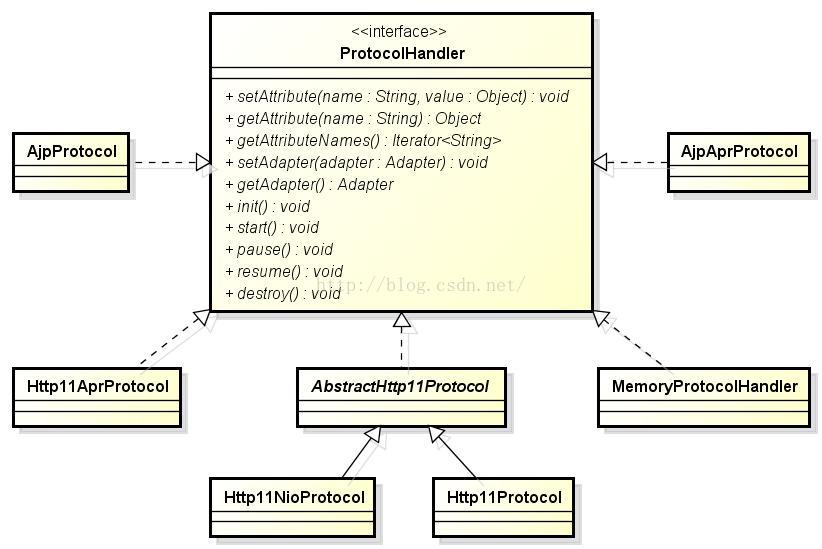
图1 ProtocolHandler类继承体系
图1中有关ProtocolHandler的实现类都在org.apache.coyote包中 。前面所说的BIO Http Connector实际就是Http11Protocol,NIO Http Connector实际就是Http11NioProtocol,AJP Connector包括AjpProtocol和AjpAprProtocol,APR HTTP Connector包括AjpAprProtocol、Http11AprProtocol,此外还有一个MemoryProtocolHandler(这个是做什么的,目前没搞清楚,有知道的同学告诉我下啊!)。
步骤二 将ProtocolHandler、MapperListener注册到JMX
BIO Http Connector的ProtocolHandler(即Http11Protocol)的JMX注册名为Catalina:type=ProtocolHandler,port=8080。BIO Http Connector的MapperListener的注册名为Catalina:type=Mapper,port=8080。AJP Connector的ProtocolHandler(即AjpProtocol)的JMX注册名为Catalina:type=ProtocolHandler,port=8009。AJP Connector的MapperListener的注册名为Catalina:type=Mapper,port=8009。有关Tomcat中JMX注册的内容,请阅读《Tomcat7.0源码分析——生命周期管理》一文。
Connector的启动
根据《Tomcat7.0源码分析——生命周期管理》一文的内容,我们知道Tomcat中有很多容器。ProtocolHandler的初始化稍微有些特殊,Server、Service、Connector这三个容器的初始化顺序为:Server->Service->Connector。值得注意的是,ProtocolHandler作为Connector的子容器,其初始化过程并不是由Connector的initInternal方法调用的,而是与启动过程一道被Connector的startInternal方法所调用。由于本文的目的是分析请求,所以直接从Connector的startInternal方法(见代码清单6)开始。
代码清单6
- /**
- * Begin processing requests via this Connector.
- *
- * @exception LifecycleException if a fatal startup error occurs
- */
- @Override
- protected void startInternal() throws LifecycleException {
- setState(LifecycleState.STARTING);
- // Protocol handlers do not follow Lifecycle conventions.
- // protocolHandler.init() needs to wait until the connector.start()
- try {
- protocolHandler.init();
- } catch (Exception e) {
- throw new LifecycleException
- (sm.getString
- ("coyoteConnector.protocolHandlerInitializationFailed", e));
- }
- try {
- protocolHandler.start();
- } catch (Exception e) {
- String errPrefix = "";
- if(this.service != null) {
- errPrefix += "service.getName(): \"" + this.service.getName() + "\"; ";
- }
- throw new LifecycleException
- (errPrefix + " " + sm.getString
- ("coyoteConnector.protocolHandlerStartFailed", e));
- }
- // MapperListener doesn't follow Lifecycle conventions either gja
- mapperListener.init();
- }
代码清单6说明了Connector的startInternal方法的执行顺序如下:
- 将Connector容器的状态更改为启动中(LifecycleState.STARTING);
- 初始化ProtocolHandler;
- 启动ProtocolHandler;
- 初始化MapperListener。
初始化ProtocolHandler
简单起见,我们以Http11Protocol为例剖析ProtocolHandler的init方法,其实现见代码清单7。
代码清单7
- @Override
- public void init() throws Exception {
- ((JIoEndpoint)endpoint).setName(getName());
- ((JIoEndpoint)endpoint).setHandler(cHandler);
- // Verify the validity of the configured socket factory
- try {
- if (isSSLEnabled()) {
- sslImplementation =
- SSLImplementation.getInstance(sslImplementationName);
- socketFactory = sslImplementation.getServerSocketFactory();
- ((JIoEndpoint)endpoint).setServerSocketFactory(socketFactory);
- } else if (socketFactoryName != null) {
- socketFactory = (ServerSocketFactory) Class.forName(socketFactoryName).newInstance();
- ((JIoEndpoint)endpoint).setServerSocketFactory(socketFactory);
- }
- } catch (Exception ex) {
- log.error(sm.getString("http11protocol.socketfactory.initerror"),
- ex);
- throw ex;
- }
- if (socketFactory!=null) {
- Iterator<String> attE = attributes.keySet().iterator();
- while( attE.hasNext() ) {
- String key = attE.next();
- Object v=attributes.get(key);
- socketFactory.setAttribute(key, v);
- }
- }
- try {
- endpoint.init();
- } catch (Exception ex) {
- log.error(sm.getString("http11protocol.endpoint.initerror"), ex);
- throw ex;
- }
- if (log.isInfoEnabled())
- log.info(sm.getString("http11protocol.init", getName()));
- }
从代码清单7看到,Http11Protocol的初始化步骤如下:
步骤一 设置JIoEndpoint的名称
JIoEndpoint的名称默认为http-8080,这里的JIoEndpoint是在调用Http11Protocol的构造器时创建的,Http11Protocol的构造器中还设置了socket的延迟关闭选项soLingerOn、socket的延时关闭秒数soLingerTime、socket连接超时时间soTimeout、提高socket性能的tcpNoDelay等选项,见代码清单8。
代码清单8
- public Http11Protocol() {
- endpoint = new JIoEndpoint();
- setSoLinger(Constants.DEFAULT_CONNECTION_LINGER);
- setSoTimeout(Constants.DEFAULT_CONNECTION_TIMEOUT);
- //setServerSoTimeout(Constants.DEFAULT_SERVER_SOCKET_TIMEOUT);
- setTcpNoDelay(Constants.DEFAULT_TCP_NO_DELAY);
- }
步骤二 设置JIoEndpoint的Handler
JIoEndpoint的handler被设置为cHandler,此cHandler的定义如下:
- protected Http11ConnectionHandler cHandler = new Http11ConnectionHandler(this);
步骤三 配置ServerSocketFactory
从代码清单7看到,生成ServerSocketFactory有三种方式:
- 如果在server.xml中配置Connector时指定了SSLEnabled="true"的属性,那么创建带有SSL(Secure Sockets Layer 安全套接层)的ServerSocketFactory;
- 如果Http11Protocol指定了socketFactoryName,则使用socketFactoryName反射生成ServerSocketFactory实例;
- 如果不满足以上2个条件,那么JIoEndpoint的init方法(见代码清单9)将创建ServerSocketFactory。当SSLEnabled="true"时,JIoEndpoint的init方法还会给ServerSocketFactory设置一些SSL相关的属性。最后使用此ServerSocketFactory创建serverSocket。此外,acceptorThreadCount属性用于指定接受连接的线程数,可以通过给Connector设置acceptorThreadCount属性进行调整,默认值为1。
- @Override
- public void init()
- throws Exception {
- if (initialized)
- return;
- // Initialize thread count defaults for acceptor
- if (acceptorThreadCount == 0) {
- acceptorThreadCount = 1;
- }
- if (serverSocketFactory == null) {
- serverSocketFactory = ServerSocketFactory.getDefault();
- }
- if (isSSLEnabled()) {
- serverSocketFactory.setAttribute(SSL_ATTR_ALGORITHM,
- getAlgorithm());
- serverSocketFactory.setAttribute(SSL_ATTR_CLIENT_AUTH,
- getClientAuth());
- serverSocketFactory.setAttribute(SSL_ATTR_KEYSTORE_FILE,
- getKeystoreFile());
- serverSocketFactory.setAttribute(SSL_ATTR_KEYSTORE_PASS,
- getKeystorePass());
- serverSocketFactory.setAttribute(SSL_ATTR_KEYSTORE_TYPE,
- getKeystoreType());
- serverSocketFactory.setAttribute(SSL_ATTR_KEYSTORE_PROVIDER,
- getKeystoreProvider());
- serverSocketFactory.setAttribute(SSL_ATTR_SSL_PROTOCOL,
- getSslProtocol());
- serverSocketFactory.setAttribute(SSL_ATTR_CIPHERS,
- getCiphers());
- serverSocketFactory.setAttribute(SSL_ATTR_KEY_ALIAS,
- getKeyAlias());
- serverSocketFactory.setAttribute(SSL_ATTR_KEY_PASS,
- getKeyPass());
- serverSocketFactory.setAttribute(SSL_ATTR_TRUSTSTORE_FILE,
- getTruststoreFile());
- serverSocketFactory.setAttribute(SSL_ATTR_TRUSTSTORE_PASS,
- getTruststorePass());
- serverSocketFactory.setAttribute(SSL_ATTR_TRUSTSTORE_TYPE,
- getTruststoreType());
- serverSocketFactory.setAttribute(SSL_ATTR_TRUSTSTORE_PROVIDER,
- getTruststoreProvider());
- serverSocketFactory.setAttribute(SSL_ATTR_TRUSTSTORE_ALGORITHM,
- getTruststoreAlgorithm());
- serverSocketFactory.setAttribute(SSL_ATTR_CRL_FILE,
- getCrlFile());
- serverSocketFactory.setAttribute(SSL_ATTR_TRUST_MAX_CERT_LENGTH,
- getTrustMaxCertLength());
- serverSocketFactory.setAttribute(SSL_ATTR_SESSION_CACHE_SIZE,
- getSessionCacheSize());
- serverSocketFactory.setAttribute(SSL_ATTR_SESSION_TIMEOUT,
- getSessionTimeout());
- serverSocketFactory.setAttribute(SSL_ATTR_ALLOW_UNSAFE_RENEG,
- getAllowUnsafeLegacyRenegotiation());
- }
- if (serverSocket == null) {
- try {
- if (getAddress() == null) {
- serverSocket = serverSocketFactory.createSocket(getPort(), getBacklog());
- } else {
- serverSocket = serverSocketFactory.createSocket(getPort(), getBacklog(), getAddress());
- }
- } catch (BindException orig) {
- String msg;
- if (getAddress() == null)
- msg = orig.getMessage() + " <null>:" + getPort();
- else
- msg = orig.getMessage() + " " +
- getAddress().toString() + ":" + getPort();
- BindException be = new BindException(msg);
- be.initCause(orig);
- throw be;
- }
- }
- //if( serverTimeout >= 0 )
- // serverSocket.setSoTimeout( serverTimeout );
- initialized = true;
- }
启动ProtocolHandler
我们继续以Http11Protocol为例,剖析ProtocolHandler的start方法,其实现见代码清单10。
代码清单10
- @Override
- public void start() throws Exception {
- if (this.domain != null) {
- try {
- tpOname = new ObjectName
- (domain + ":" + "type=ThreadPool,name=" + getName());
- Registry.getRegistry(null, null)
- .registerComponent(endpoint, tpOname, null );
- } catch (Exception e) {
- log.error("Can't register endpoint");
- }
- rgOname=new ObjectName
- (domain + ":type=GlobalRequestProcessor,name=" + getName());
- Registry.getRegistry(null, null).registerComponent
- ( cHandler.global, rgOname, null );
- }
- try {
- endpoint.start();
- } catch (Exception ex) {
- log.error(sm.getString("http11protocol.endpoint.starterror"), ex);
- throw ex;
- }
- if (log.isInfoEnabled())
- log.info(sm.getString("http11protocol.start", getName()));
- }
从代码清单10可以知道JIoEndpoint以Catalina:type=ThreadPool,name=http-8080注册到JMX,cHandler.global(Http11ConnectionHandler的对象属性,类型为RequestGroupInfo)以Catalina:type=GlobalRequestProcessor,name=http-8080注册到JMX。最后调用JIoEndpoint的start方法(见代码清单11)接受请求的创建线程池并创建一定数量的接收请求线程。
代码清单11
- @Override
- public void start() throws Exception {
- // Initialize socket if not done before
- if (!initialized) {
- init();
- }
- if (!running) {
- running = true;
- paused = false;
- // Create worker collection
- if (getExecutor() == null) {
- createExecutor();
- }
- // Start acceptor threads
- for (int i = 0; i < acceptorThreadCount; i++) {
- Thread acceptorThread = new Thread(new Acceptor(), getName() + "-Acceptor-" + i);
- acceptorThread.setPriority(threadPriority);
- acceptorThread.setDaemon(getDaemon());
- acceptorThread.start();
- }
- }
- }
从代码清单11看出JIoEndpoint的start方法的执行步骤如下:
步骤一 对JIoEndpoint做初始化检查
这一步实际就是判断是否已经初始化(即initialized是否为true),如果没有初始化则需要调用JIoEndpoint的init方法进行初始化。
步骤二 创建线程池与任务队列
如果JIoEndpoint尚未处于运行中(即running等于true),才会创建线程池和任务队列。如果尚未创建线程池(即调用getExecutor方法等于null),则需要调用createExecutor方法(见代码清单12)创建线程池和任务队列TaskQueue。
代码清单12
- public void createExecutor() {
- internalExecutor = true;
- TaskQueue taskqueue = new TaskQueue();
- TaskThreadFactory tf = new TaskThreadFactory(getName() + "-exec-", daemon, getThreadPriority());
- executor = new ThreadPoolExecutor(getMinSpareThreads(), getMaxThreads(), 60, TimeUnit.SECONDS,taskqueue, tf);
- taskqueue.setParent( (ThreadPoolExecutor) executor);
- }
步骤三 创建接收请线程
如果JIoEndpoint尚未处于运行中(即running等于true),才会创建接收请求线程。从代码清单11可以看出接收请求线程的数量主要由acceptorThreadCount控制,代码清单9已经告诉我们acceptorThreadCount的默认值为1,但是我们可以通过给Connector增加acceptorThreadCount属性来修改接收请求线程的数量。这些接收请求线程的主要工作由Acceptor完成,Acceptor的实质是一个Runnable,见代码清单13。
代码清单13
- /**
- * Server socket acceptor thread.
- */
- protected class Acceptor implements Runnable {
- /**
- * The background thread that listens for incoming TCP/IP connections and
- * hands them off to an appropriate processor. gja
- */
- public void run() {
- // Loop until we receive a shutdown command
- while (running) {
- // Loop if endpoint is paused
- while (paused) {
- try {
- Thread.sleep(1000);
- } catch (InterruptedException e) {
- // Ignore
- }
- }
- // Accept the next incoming connection from the server socket
- try {
- Socket socket = serverSocketFactory.acceptSocket(serverSocket);
- serverSocketFactory.initSocket(socket);
- // Hand this socket off to an appropriate processor
- if (!processSocket(socket)) {
- // Close socket right away
- try {
- socket.close();
- } catch (IOException e) {
- // Ignore
- }
- }
- }catch ( IOException x ) {
- if ( running ) log.error(sm.getString("endpoint.accept.fail"), x);
- } catch (Throwable t) {
- log.error(sm.getString("endpoint.accept.fail"), t);
- }
- // The processor will recycle itself when it finishes
- }
- }
- }
初始化MapperListener
MapperListener的init方法用于初始化,见代码清单14。
代码清单14
- /**
- * Initialize associated mapper.
- */
- public void init() {
- // Find any components that have already been initialized since the
- // MBean listener won't be notified as those components will have
- // already registered their MBeans jiaan
- findDefaultHost();
- Engine engine = (Engine) connector.getService().getContainer();
- engine.addContainerListener(this);
- Container[] conHosts = engine.findChildren();
- for (Container conHost : conHosts) {
- Host host = (Host) conHost;
- if (!LifecycleState.NEW.equals(host.getState())) {
- host.addLifecycleListener(this);
- // Registering the host will register the context and wrappers
- registerHost(host);
- }
- }
- }
从代码清单14看到MapperListener的初始化步骤如下:
步骤一 查找默认Host
StandardService的子容器包括:StandardEngine、Connector和Executor。MapperListener本身会持有Connector,所以可以通过各个容器的父子关系,找到Connector的同级容器StandardEngine。StandardHost是StandardEngine的子容器,Engine和Host的默认配置如下:
- <Engine name="Catalina" defaultHost="localhost">
- <Realm className="org.apache.catalina.realm.UserDatabaseRealm"
- resourceName="UserDatabase"/>
- <Host name="localhost" appBase="webapps"
- unpackWARs="true" autoDeploy="true">
- <Valve className="org.apache.catalina.valves.AccessLogValve" directory="logs"
- prefix="localhost_access_log." suffix=".txt"
- pattern="%h %l %u %t "%r" %s %b" resolveHosts="false"/>
- </Host>
- </Engine>
findDefaultHost方法(见代码清单15)可以获取上面配置中的默认Host,Engine元素的defaultHost属性值必须要与配置的某个Host元素的name属性值相同。如果defaultHost的属性值配置无误,则会添加为MapperListener的Mapper对象属性的defaultHostName。
代码清单15
- private void findDefaultHost() {
- Engine engine = (Engine) connector.getService().getContainer();
- String defaultHost = engine.getDefaultHost();
- boolean found = false;
- if (defaultHost != null && defaultHost.length() >0) {
- Container[] containers = engine.findChildren();
- for (Container container : containers) {
- Host host = (Host) container;
- if (defaultHost.equalsIgnoreCase(host.getName())) {
- found = true;
- break;
- }
- String[] aliases = host.findAliases();
- for (String alias : aliases) {
- if (defaultHost.equalsIgnoreCase(alias)) {
- found = true;
- break;
- }
- }
- }
- }
- if(found) {
- mapper.setDefaultHostName(defaultHost);
- } else {
- log.warn(sm.getString("mapperListener.unknownDefaultHost",
- defaultHost));
- }
- }
步骤二 将Host及其子容器Context,Context的子容器Wrapper注册到MapperListener的Mapper对象
Mapper的数据结构,见代码清单16。
代码清单16
- /**
- * Array containing the virtual hosts definitions.
- */
- protected Host[] hosts = new Host[0];
- /**
- * Default host name.
- */
- protected String defaultHostName = null;
- /**
- * Context associated with this wrapper, used for wrapper mapping.
- */
- protected Context context = new Context();
- protected static abstract class MapElement {
- public String name = null;
- public Object object = null;
- }
- protected static final class Host
- extends MapElement {
- public ContextList contextList = null;
- }
- protected static final class ContextList {
- public Context[] contexts = new Context[0];
- public int nesting = 0;
- }
- protected static final class Context
- extends MapElement {
- public String path = null;
- public String[] welcomeResources = new String[0];
- public javax.naming.Context resources = null;
- public Wrapper defaultWrapper = null;
- public Wrapper[] exactWrappers = new Wrapper[0];
- public Wrapper[] wildcardWrappers = new Wrapper[0];
- public Wrapper[] extensionWrappers = new Wrapper[0];
- public int nesting = 0;
- }
- protected static class Wrapper
- extends MapElement {
- public String path = null;
- public boolean jspWildCard = false;
- }
根据代码清单16,我们知道Mapper中维护着一个Host数组,每个Host中有一个ContextList,这个ContextList中维护着一个Context数组。每个Context维护着一个defaultWrapper,三个Wrapper数组(exactWrappers、wildcardWrappers、extensionWrappers)。下面对Host、Context及Wrapper进行功能上的介绍:
- Host:代表一个虚拟主机,各Host的name不能相同,appBase代表各虚拟主机的应用发布位置;
- Context:代表一个应用,Context可以根据应用的/WEB-INF/web.xml文件中定义的servlet来处理请求。一个Host下可以有多个Context;
- Wrapper: 代表一个Servlet或者jsp,它负责管理一个 Servlet,包括的 Servlet 的装载、初始化、执行以及资源回收。
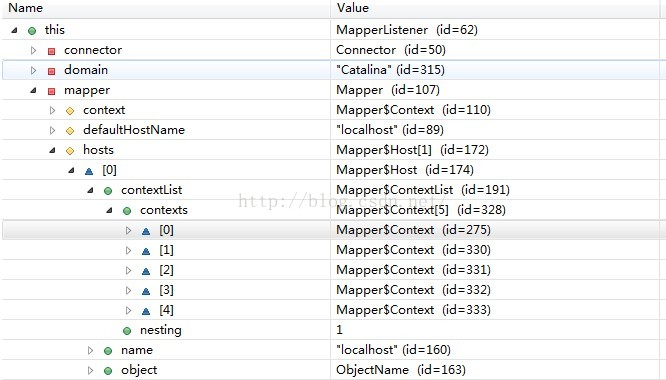
图2 注册到Mapper中的Host及其Context子容器
图2说明Host内一共5个Context,由于我的Tomcat是从svn拉下来的,所以webapps目录下的.svn文件夹也是一个Context,除了这个天外来客,我将其它与请求有关的容器整理后用图3来展示。

图3 我本地的Host、Context及Wrapper
至此,Tomcat中为请求处理的准备工作已经完成。有关请求的处理过程请继续阅读《Tomcat源码分析——请求原理分析(中)》一文。
后记:个人总结整理的《深入理解Spark:核心思想与源码分析》一书现在已经正式出版上市,目前京东、当当、天猫等网站均有销售,欢迎感兴趣的同学购买。


 3万+
3万+


 被折叠的 条评论
为什么被折叠?
被折叠的 条评论
为什么被折叠?
 到【灌水乐园】发言


