


源码:http://download.csdn.net/detail/biboheart/6018681
经过一天的学习、编码、测试,终于把strtus2文件上传功能的实例完成。小小的庆功下。
环境:
system:win8专业版
IDE:eclipse juno
JDK:7U17
ExtJS:4.1.0
Strtus2:2.3.14
(源码将会上传,这里描述下主要代码片段)
页面效果图:
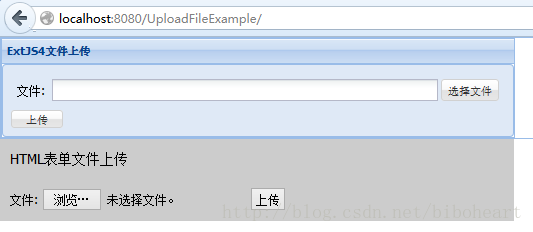
这是firefox浏览器中的运行效果,IE有点区别。这里是文件上传功能,页面效果与功能没什么影响。
为什么有两个表单?因为在看了网上一些文件上传的文章,ExtJS4和HTML表单两种方式的解决方案不太一样,而我这里两个上传按钮所接受的url是一样的。也就是页面中选ExtJS4或者是普通的HTML在上传文件中,服务器端的Struts2配置和代码都可以是一样的。
ExtJS代码(view):
Ext.define('AM.view.UploadForm',{
	extend:'Ext.panel.Panel',
	alias:'widget.uploadForm',
	initComponent: function() {
		Ext.apply(this, {
			height: 100,
			width: 514,
			title: 'ExtJS4文件上传',
			layout: {
				type: 'fit'
			},
			items: [{
				xtype: 'form',
				frame: true,
				bodyPadding: 10,
				id:'usermanage-addprisoner-form',
				items: [{
					xtype: 'filefield',
					name:'file',
					fieldLabel: '文件',
					labelWidth:30,
					id:'picPath',
					allowbBlank:false,
					buttonText: '选择文件',
					anchor: '100%'
				}],
				dockedItems: [{
					xtype: 'panel',
					frame: true,
					layout: {
						padding: '0 10',
						type:'auto'
					},
					dock: 'bottom',
					items: [{
						xtype: 'button',
						text: '上传',
						id:'addFile',
						padding:'0 10'
					}]
				}]
			}],
        });
		this.callParent(arguments);
	}
});Ext.define('AM.controller.UploadFile', {
extend: 'Ext.app.Controller',
views: [
'UploadForm'
],
init:function(){
this.control({
'uploadForm button[id=addFile]':{
click:addFile
}
});
}
});
function addFile(o){
var form = Ext.getCmp("usermanage-addprisoner-form").getForm();
if(form.isValid()){
form.submit({
url:'/UploadFileExample/uploadFile',
method:'POST',
waitMsg:'正在上传',
success:function(form, action){
var data = Ext.JSON.decode(action.response.responseText);
alert(data.message);
},
failure : function() {
var data = Ext.JSON.decode(action.response.responseText);
alert(data.message);
}
});
};
};<div style="background:#ccc;padding:10px;width:514px;font-size:14px;">
<span>HTML表单文件上传</span>
</div>
<div style="background:#ccc;padding:10px;width:514px">
<form action="/UploadFileExample/uploadFile" enctype="multipart/form-data" method="post">
文件:
<input type="file" name="file">
<input type="submit" value="上传"/>
</form>
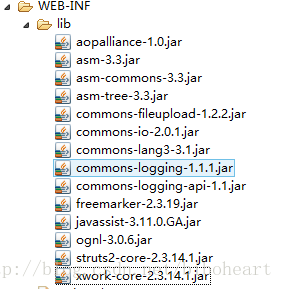
</div>引入包:
struts.xml(action中有两种上传文件的方法,只要换一下method的方法名就可以测试另一种,当然,两种方法的结果是一样的。)
<package name="upload" namespace="/" extends="struts-default">
	<action name="uploadFile" class="org.biboheart.uploadFile.UploadAction" method="uploadFileIO">
	</action>
</package>public class UploadAction extends ActionSupport{
private static final long serialVersionUID = 1L;
private File file;
private String fileFileName; //文件名称
private String fileContentType; //文件类型
private boolean success;
public String execute() throws Exception {
return SUCCESS;
}
public void responseHtmlText(String text){
HttpServletResponse response = ServletActionContext.getResponse();
response.setContentType("text/html;charset=UTF8");
try {
response.getWriter().write(text);
} catch (IOException e) {
return;
}
}
public void responseJson(String jsonString){
HttpServletResponse response = ServletActionContext.getResponse();
response.setContentType("text/json;charset=UTF8");
try {
response.getWriter().write(jsonString);
} catch (IOException e) {
return;
}
}
public void uploadFileUtils(){
String uploadPath = ServletActionContext.getServletContext().getRealPath("/upload");
if(file == null){
return;
}
File savefile = new File(new File(uploadPath), fileFileName);
if (!savefile.getParentFile().exists()){
savefile.getParentFile().mkdirs();
}
try {
FileUtils.copyFile(file, savefile);
} catch (IOException e) {
System.out.println("保存文件失败");
responseHtmlText("{success:false,message:'保存文件失败'}");
return;
}
responseHtmlText("{success:true,message:'文件上传成功'}");
}
@SuppressWarnings("resource")
public void uploadFileIO(){
InputStream is = null;
OutputStream os = null;
//基于myFile创建一个文件输入流
try {
is = new FileInputStream(file);
} catch (FileNotFoundException e) {
is = null;
System.out.println("创建文件失败");
responseHtmlText("{success:false,message:'创建文件失败'}");
return;
}
//设置上传文件目录
String uploadPath = ServletActionContext.getServletContext().getRealPath("/upload");
System.out.println(uploadPath);
//设置目标文件
File savefile = new File(uploadPath, this.getFileFileName());
if (!savefile.getParentFile().exists()){
savefile.getParentFile().mkdirs();
}
//创建一个输出流
try {
os = new FileOutputStream(savefile);
} catch (FileNotFoundException e) {
os = null;
System.out.println("创建输出流失败");
responseHtmlText("{success:false,message:'创建输出流失败'}");
return;
}
//设置缓存
byte[] buffer = new byte[1024];
int length = 0;
//读取文件输出到toFile文件中
try {
while ((length = is.read(buffer)) > 0) {
os.write(buffer, 0, length);
}
} catch (IOException e) {
System.out.println("读取文件失败");
responseHtmlText("{success:false,message:'读取文件失败'}");
return;
}
System.out.println("上传文件名" + fileFileName);
System.out.println("上传文件类型" + fileContentType);
if(is != null){
try {
is.close();
} catch (IOException e) {
System.out.println("关闭输入流失败");
}
}
if(os != null){
try {
os.close();
} catch (IOException e) {
System.out.println("关闭输出流失败");
}
}
responseHtmlText("{success:true,message:'文件上传成功'}");
}
……省略了get set方法
}与许多ExtJS4文件上传的文章不太一样,看了些,都是要在xml中配置成返回json。我这里是把json格式的字符串返回给ExtJS。结果是一样的。不知道为什么ExtJS非得要json。既然非要,那我给他就是。改struts.xml为json的配置,个人不太喜欢,文中的方式也可以返回json。主要是代码统一性觉得这样比较好。


 94
94


 被折叠的 条评论
为什么被折叠?
被折叠的 条评论
为什么被折叠?
 到【灌水乐园】发言


