


前言
接近年尾,继续为我的网站作战。今天记录一篇关于今天搭建springmvc的文章,关于springmvc的搭建步骤。
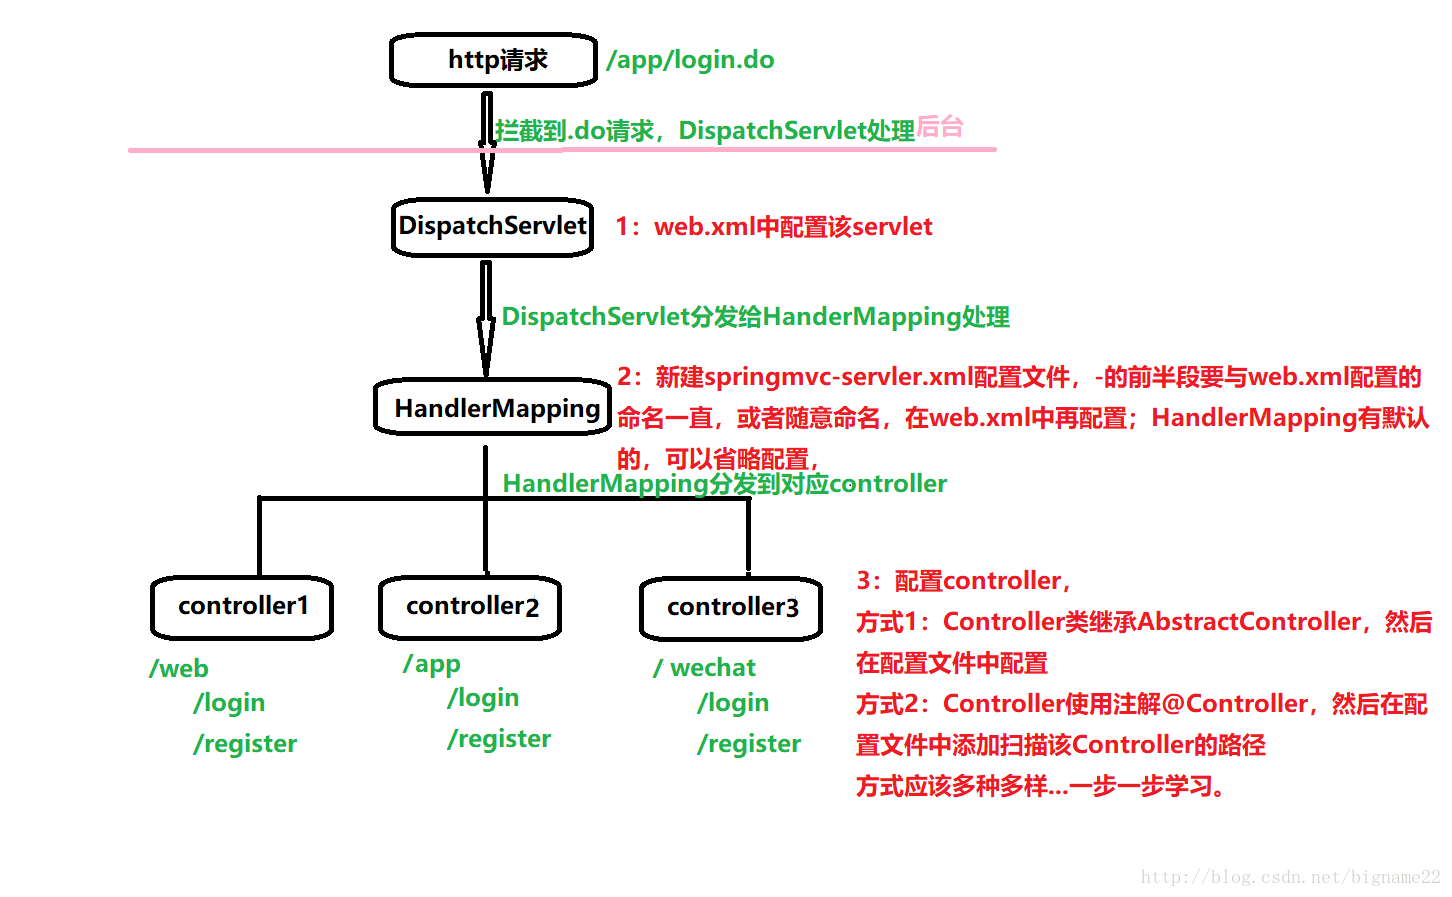
springmvc大致流程
图是自己画的,有总比没有强。
SpringMVC基础搭建步骤
1:引入jar包

2:配置web.xml
- 声明DispatchServlet,监听请求
<?xml version="1.0" encoding="UTF-8"?>
<web-app xmlns:xsi="http://www.w3.org/2001/XMLSchema-instance" xmlns="http://xmlns.jcp.org/xml/ns/javaee" xsi:schemaLocation="http://xmlns.jcp.org/xml/ns/javaee http://xmlns.jcp.org/xml/ns/javaee/web-app_3_1.xsd" id="WebApp_ID" version="3.1">
  <display-name>SpringMVCDemo01</display-name>
  <welcome-file-list>
    <welcome-file>index.html</welcome-file>
    <welcome-file>index.htm</welcome-file>
    <welcome-file>/view/index.jsp</welcome-file>
    <welcome-file>default.html</welcome-file>
    <welcome-file>default.htm</welcome-file>
    <welcome-file>default.jsp</welcome-file>
  </welcome-file-list>

  <!-- 配置SpringMVC -->
  <!-- 前端控制器 -->
  <servlet>
    <servlet-name>springmvc</servlet-name>
    <servlet-class>org.springframework.web.servlet.DispatcherServlet</servlet-class>
    <!-- 加载/WEB-INF/[servlet-name]-servlet.xml -->
    <load-on-startup>1</load-on-startup>
  </servlet>
  <servlet-mapping>
    <servlet-name>springmvc</servlet-name>
    <url-pattern>*.do</url-pattern>
  </servlet-mapping>


</web-app>
3:创建Controller:
import org.springframework.stereotype.Controller;
import org.springframework.web.bind.annotation.RequestMapping;
@Controller
@RequestMapping(value="/app")
public class LoginController{
     @RequestMapping(value="/welcome")  //welcome要访问的url地址
        public  String  hello(){
            System.out.println("hello,springmvc");
            return "hello";  //hello是逻辑视图名,和后缀名组合一起构成视图名  /web-inf/view/hello.jsp,
        }
}
4:新建springmvc-servler.xml并配置
- 添加扫描路径(Controller位置)
<?xml version="1.0" encoding="UTF-8"?>
<beans xmlns="http://www.springframework.org/schema/beans"
    xmlns:xsi="http://www.w3.org/2001/XMLSchema-instance" xmlns:p="http://www.springframework.org/schema/p"
    xmlns:mvc="http://www.springframework.org/schema/mvc" xmlns:context="http://www.springframework.org/schema/context"
    xmlns:util="http://www.springframework.org/schema/util"
    xsi:schemaLocation="http://www.springframework.org/schema/beans http://www.springframework.org/schema/beans/spring-beans-3.0.xsd
            http://www.springframework.org/schema/context http://www.springframework.org/schema/context/spring-context-3.0.xsd
            http://www.springframework.org/schema/mvc http://www.springframework.org/schema/mvc/spring-mvc-3.0.xsd
            http://www.springframework.org/schema/util http://www.springframework.org/schema/util/spring-util-3.0.xsd">
    <!-- 使用注解方式完成映射 -->
    <!-- 让扫描spring扫描这个包下所有的类,让标注spring注解的类生效 -->
    <context:component-scan base-package="com.bigname.controller" />
    <!-- 开启注解 -->
    <!-- <mvc:annotation-driven />-->
    <!-- 视图解析器 如果不需要返回页面也可以不配置视图解析器-->
    <bean
        class="org.springframework.web.servlet.view.InternalResourceViewResolver">
        <property name="prefix" value="/view/" />
        <property name="suffix" value=".jsp"></property>
    </bean>
</beans>
访问地址:
http://localhost:8201/SpringMVCDemo01/app/welcome.do
搭建步骤很简单,但使用越简单,说明框架为我们处理的事情越多。后面的日子会尝试理解其从(发起请求-响应请求)这个过程,SpringMVC为我们所做的事情。


 151
151

 被折叠的 条评论
为什么被折叠?
被折叠的 条评论
为什么被折叠?
 到【灌水乐园】发言


