


1. Spring的技术核心。
Spring 是一个开源的:控制反转(Inversion of control )IOC ,依赖注入(Dependency Injection )和面向切面(Aop)的框架,它主要的目的是简化企业的开发。
2. 控制反转
所谓控制反转就是:应用本身不负责依赖对象的创建与维护,依赖对象的创建与维护是有外部容器负责的。这样控制权就有应用转向了外部容器,控制权的转移就是所谓的控制反转。
3. 依赖注入
所谓依赖注入就是指: 在运行期 由外部容器动态的将依赖对象注入到组件中。
4. 为什么要使用Spring 呢
<a>可以降低组件之间的耦合度,实现软件各层之间的解耦;
Control----àService----àDAO
<b>使用Spring 容器可以使用它提供的众多服务:事务管理服务,JMS服务,Spring Core服务,持久化服务,其它......
事务管理: 不需要手工控制事物
<c>容器提供单利模式支持;
<d>容器提供了AOP技术,利用它很容易实现如:权限拦截,运行期监控等功能。
<e>容器提供了很多的辅助类,使用这些类能够加快应用的开发,如: Jdbc Template,
HibernateTemplate 。
<f>Spring对主流的应用框架提供了支持如: Hibernate ,JPA , Struts.等。
5. 实例化Spring 容器
两种方式
A : 在类路径下寻找配置文件来实例化Spring容器。ApplicationContext继承sessionfactory,所以不用sessionfactory
ApplicationContext ctx = new ClassPathXmlApplicationContext(“config-path”);
如果是两个以上:
ApplicationContext ac = new ClassPathXmlApplicationContext(new String[]{"applicationContext.xml","dao.xml"});
或者用通配符:
ApplicationContext ac = new ClassPathXmlApplicationContext("classpath:/*.xml");
B:在文件系统路径下寻找配置文件来实例化Spring 容器;
ApplicationContext ctx = new FileSystemXmlApplicationContext(“d:\\bean.xml”);
注: 第二种方式通常在本地测试时用,因为每个应用的配置在不同机器上会不同。
Spring 的配置文件可以通过String 类型的数组配置多个。
然后就可以通过
| OrderService service = (OrderService)ctx.getBean("personService"); |
6. dom4j读解析xml文件
| public class ItcastClassPathXmlApplicationContext { private List<BeanDefinition> beanDefines = new ArrayList<BeanDefinition>(); public ItcastApplicationContext(String filename){ init(filename); } private void init(String filename){ SAXReader saxReader = new SAXReader(); Document document=null; try{ URL xmlpath = this.getClass().getClassLoader().getResource(filename); document = saxReader.read(xmlpath); Map<String,String> nsMap = new HashMap<String,String>(); nsMap.put("ns","http://www.springframework.org/schema/beans");//加入命名空间 XPath xsub = document.createXPath("//ns:beans/ns:bean");//创建beans/bean查询路径 xsub.setNamespaceURIs(nsMap);//设置命名空间 List<Element> beans = xsub.selectNodes(document);//获取文档下所有bean节点 for(Element element: beans){ String id = element.attributeValue("id");//获取id属性值 String clazz = element.attributeValue("class"); //获取class属性值 BeanDefinition beanDefine = new BeanDefinition(id, clazz); beanDefines.add(beanDefine); } }catch(Exception e){ e.printStackTrace(); } } |
7. Spring配置文件中bean 的属性
Bean 可以有id , name..... 其中id 时唯一的,不可以包含特殊字符。而name可以包含特殊字符。
8. 常用实例化bean的方法
使用构造方法来实例化bean <bean id=”bean-name” class=”类路径”>通过默认的构造方法来实例化bean对象;
其它不常用的不介绍
9. 每次通过Spring容器来获得的bean是同一个对象吗
bean的属性scope=”prototype”,可以让每次实例化的bean对象不同
默认容器启动就会实例化bean, bean的属性lazy-init=”true”改变这种情况
进行全局设置:<beans default-lazy-init=”true”>.......</beans>.
10. Spring中的其它配置
<bean init-method=”方法名称”> </bean>这样会在bean实例化之后执行初始化方法。
既然有初始化方法,那么Spring 也会有销毁的方法。可以这样指定:
<bean destroy-method=”方法名”></bean>
我们可以通过正常的方式来关闭Spring 容器:
AbstractApplicationContext ctx = new ClassPathXmlApplicationContext();
Ctx.close(); //关闭容器
11. Spring中依赖注入的几种方式
基本类型的注入方式:
<bean id=”bean-name” class=”classPath”>
<property name=”atttibute-name” value=”value1”></property>//set方式
<constructor-arg index=”0”type=”java.lang.String” value=”xxxxx”>//构造方方式,index=”0”是构造方法的第一个参数,也可以根据type指定参数
</constructor-arg>
</bean>
注入其它bean:
方式1: 通过属性,设置Setter()方法来注入;这个属性一般式接口形式的。
<bean id=”bean-name1” class=”classpath”></bean>
<bean id=”bean-name2” class=”classPath”>
<property name=”name1” ref=” ”bean-name1”/>//对象的引用
</bean>
方式 2:使用内部bean 但是该bean不能被其它bean使用;
<bean id=”bean-name1” class=”classpath”></bean>
<property name=”name1”>
<bean id=”name2” class=”classPath”></bean>//产生一个新的对象
</property>
</bean>
12. 如何为注入集合类型对象(不重要)
Set List Map Peoperty
<bean id=”” ...>
<property name=”list”>
<list>
<value>1</value>
</lsit>
</property>
</bean>
set和list没区别
<bean id=”” ...>
<property name=”map”>
<map>
<entry key="a" value="1"/>
</map>
</property>
</bean>
13. 用注解的方式进行依赖注入
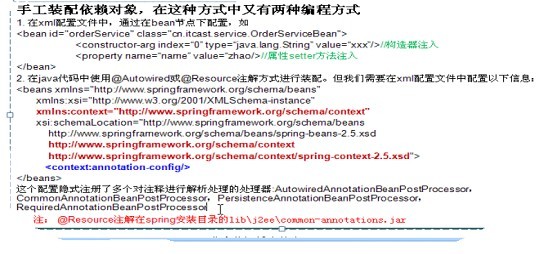
需要引入命名空间,和如果要想出现提示信息还要添加schema文件。在上图中有详细的说明。
14. 在spring中使用注解进行IOC
然后在bean.xml中写入
<aop:aspectj-autoproxy/> <!—和建立代理有关-->
15. 注入方式

@Autowired:默认是byType,配合Qualifier可以指定name
@Resource:默认byName,找不到byType
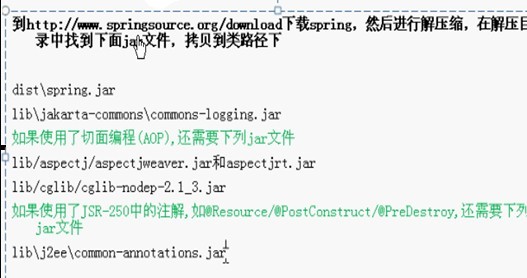
@resource需要导入spring->lib->j2ee->common-annotaion.jar
异常处理一般在struts这层处理,spring很少处理异常
指定默认扫描方式:
<benan id=”bean-name” class=”class-path” autowire=”default”>
autowire取值如下:byType; byName; constructor; Autaodetect 16.通过classpath自动扫描的方式把组件注入到spring容器中管理;
注册解析注解的解析器;
<context:annotation-config />
注册注解的解析器同样也包括上面的范围,故有下面的配置时上面的配置可以不要;
<context:component-scan base-package="wto.bean" />
这种方法也可以通过注解来设定初始化方法,销毁方法,也可以指定bean的名称。
@Servic 业务层组件
@Controller 控制层组件
@Repositiory 数据访问层组件 以上三种组件目前还没有区别可以随便用。
@Component 泛指组件 当组件不好归类的时候我们可以使用这个注解进行标注。
@Scope 设置bean的模式是(单利)single 还是proptoto(原型)
以上注解都是标注在类上的
下面的注解是标注在方法上的:
@PostConstruct 设定初始化方法
@PreDestroy 设定销毁的方法
16. 在spring中使用AOP(面向切面编程)
动态代理:被代理对象要组合到代理类.代理类要实现invacationhandler. 用proxy.newInstance()返回的对象.但是hibernate中的动态代理是直接操作的二级制码,spring也类似,所以需要引入cglib相关包
17.AOP中的一些概念:Aspect(切面),joinpoint(连接点),Pointcut(切入点)Advicce(通知)Target(目标对象),Weave(织入),Introduction(引入)
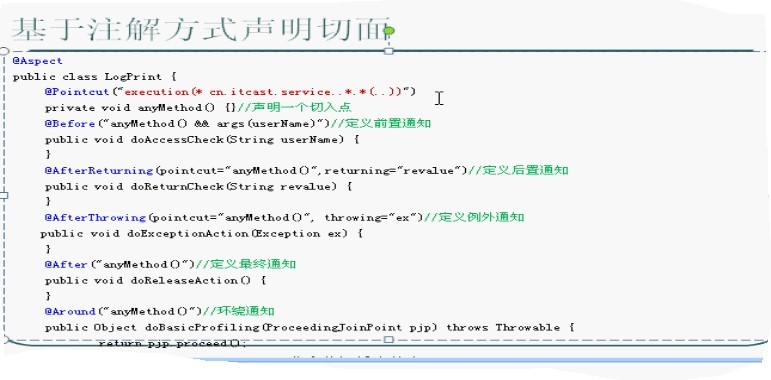
18.基于注解方式声明切面,但是AOP用xml好,IOC用annotation好
19.Spring对数据库的支持
hibernate对数据库的支持DPCP,需要导入common-dbcp.jar;common-pool.jar
| <bean id=" myDateSource > class="org.apache.commons.dbcp.BasicDataSource" destroy-method="close"> <property name="dirverClassName" value="com.mysql.jdbc.Driver"/> <property name="url" value="jdbc:mysql://localhost:3306/spring/> <property name="username" value="root"/> <property name="password" value="root"/> </bean> |
| <bean id="mySessionFactory" class="org.springframework.orm.hibernate3. AnnotationSessionFactoryBean > <--用注解必须是这个接口而不是LocalSessionFactory--> <property name="dateSource ref="myDateSource"/> <property name="mappingResources"> <list> <value>product.hbm.xml</value> </list> <property name="hibernateProperties> <value> hibernate.dialect=org.hibernate.dialect.HSQLDialect </value> </property>
</bean> |
可以用占位符和property文件配合使用
| <bean class="org.springframework.beans.factory.config.PropertyPlaceholderConfigurer"> <property name="locations"> <value>classpath:jdbc.perperties</value> </property> </bean> <bean id="dateSource" destroy-mothod="close"> <property name="dirverClassName" value="${jdbc.driverClassName}/> <property name="url" value="${jdbc.url}/> <property name="username" value="${jdbc.username}/> <property name="password" value="${jdbc.password}/> </bean> |
jdbc.properties
| jdbc.driverClassName=com.mysql.jdbc.Driver jdbc.url=jdbc:mysql://localhost:3306/spring jdbc.username=root jdbc.password=root |
JDBC+spring整合开发的时候就可以用其实还可以,用如下的方法
| <bean id="txtManager" class="org.springframework.jdbc.datesource.DateSourceTransactionManager> <property name="dateSource" ref="dateSource"/> </bean> |
补充:属性文件还可以用下面方式赋值
| <property name="adminEmails"> <props> <prop key"adminstrator">adminstrator@example.org</prop> <prop key="support"> support@example</prop> </props> </property> |
20 . Spring支持事务管理
首先修改配置,和加入相应的schema
| <tx:annotaion-driven transaction-manager="txtManager"> <bean id="txManager" class="org.springframework.orm.hibernate3.HibernateTrasactionManager> <property name="sessionFatory ref="sessionFactory"/> </bean> |
使用@Transactional
| @Transactional public void add(User user){ userDAO.save(user); Log log = new Log(); Log.setMsg("a user saved!"); LogDAO.save(log); } |
现在假如手动throw new RuntimeException("testerror");事务就会回滚了
propagation:是衍生,繁殖,就是事务的传播方式;
默认是REQUESTED,还有其他值,这个做了解
MANDTROY,NESTED,NEVER,NOT_SUPPORTED,REQUESTES_NEW,SUPPORTS


 被折叠的 条评论
为什么被折叠?
被折叠的 条评论
为什么被折叠?
 到【灌水乐园】发言


