


Web要解决的问题:
- 导入静态资源(image,css,js)
- 首页
- jsp,模板引擎Thymeleaf
- 配置扩展SpringMVC
- 增删改查业务编写
- 拦截器
- 国际化
配置扩展SpringMVC
SpringBoot默认配置
SpringBoot对SpringMVC做了哪些配置,包括如何扩展,如何定制?
官方文档
Spring MVC Auto-configuration
// Spring Boot为Spring MVC提供了自动配置,它可以很好地与大多数应用程序一起工作。
Spring Boot provides auto-configuration for Spring MVC that works well with most applications.
// 自动配置在Spring默认设置的基础上添加了以下功能:
The auto-configuration adds the following features on top of Spring’s defaults:
// 包含视图解析器
Inclusion of ContentNegotiatingViewResolver and BeanNameViewResolver beans.
// 支持静态资源文件夹的路径,以及webjars
Support for serving static resources, including support for WebJars
// 自动注册了Converter:
// 转换器,这就是我们网页提交数据到后台自动封装成为对象的东西,比如把"1"字符串自动转换为int类型
// Formatter:【格式化器,比如页面给我们了一个2019-8-10,它会给我们自动格式化为Date对象】
Automatic registration of Converter, GenericConverter, and Formatter beans.
// HttpMessageConverters
// SpringMVC用来转换Http请求和响应的的,比如我们要把一个User对象转换为JSON字符串,可以去看官网文档解释;
Support for HttpMessageConverters (covered later in this document).
// 定义错误代码生成规则
Automatic registration of MessageCodesResolver (covered later in this document).
// 首页定制
Static index.html support.
// 图标定制
Custom Favicon support (covered later in this document).
// 初始化数据绑定器:帮我们把请求数据绑定到JavaBean中!
Automatic use of a ConfigurableWebBindingInitializer bean (covered later in this document).

/*
如果您希望保留Spring Boot MVC功能,并且希望添加其他MVC配置(拦截器、格式化程序、视图控制器和其他功能),则可以添加自己的@configuration类,类型为webmvcconfiguer,但不添加@EnableWebMvc。如果希望提供RequestMappingHandlerMapping、RequestMappingHandlerAdapter或ExceptionHandlerExceptionResolver的自定义实例,则可以声明WebMVCregistrationAdapter实例来提供此类组件。
*/
If you want to keep Spring Boot MVC features and you want to add additional MVC configuration
(interceptors, formatters, view controllers, and other features), you can add your own
@Configuration class of type WebMvcConfigurer but without @EnableWebMvc. If you wish to provide
custom instances of RequestMappingHandlerMapping, RequestMappingHandlerAdapter, or
ExceptionHandlerExceptionResolver, you can declare a WebMvcRegistrationsAdapter instance to provide such components.

// 如果您想完全控制Spring MVC,可以添加自己的@Configuration,并用@EnableWebMvc进行注释。
If you want to take complete control of Spring MVC, you can add your own @Configuration annotated with @EnableWebMvc.
ContentNegotiatingViewResolver 内容协商视图解析器
SpringBoot自动配置了ViewResolver,就是我们之前学习的SpringMVC的视图解析器;即根据方法的返回值取得视图对象(View),然后由视图对象决定如何渲染(转发,重定向)。
我们去看看这里的源码:我们找到 WebMvcAutoConfiguration , 然后搜索ContentNegotiatingViewResolver。找到如下方法!
		@Bean
		@ConditionalOnBean(ViewResolver.class)
		@ConditionalOnMissingBean(name = "viewResolver", value = ContentNegotiatingViewResolver.class)
		public ContentNegotiatingViewResolver viewResolver(BeanFactory beanFactory) {
			ContentNegotiatingViewResolver resolver = new ContentNegotiatingViewResolver();
			resolver.setContentNegotiationManager(beanFactory.getBean(ContentNegotiationManager.class));
			// ContentNegotiatingViewResolver uses all the other view resolvers to locate
			// a view so it should have a high precedence
            // ContentNegotiatingViewResolver使用所有其他视图解析器来定位视图,因此它应该具有较高的优先级
			resolver.setOrder(Ordered.HIGHEST_PRECEDENCE);
			return resolver;
		}
对应的解析视图的代码
	@Override
	@Nullable//注解说明:@Nullable 即参数可为null
	public View resolveViewName(String viewName, Locale locale) throws Exception {
		RequestAttributes attrs = RequestContextHolder.getRequestAttributes();
		Assert.state(attrs instanceof ServletRequestAttributes, "No current ServletRequestAttributes");
		List<MediaType> requestedMediaTypes = getMediaTypes(((ServletRequestAttributes) attrs).getRequest());
		if (requestedMediaTypes != null) {
            // 获取候选的视图对象
			List<View> candidateViews = getCandidateViews(viewName, locale, requestedMediaTypes);
            // 选择一个最适合的视图对象,然后把这个对象返回
			View bestView = getBestView(candidateViews, requestedMediaTypes, attrs);
			if (bestView != null) {
				return bestView;
			}
		}

		String mediaTypeInfo = logger.isDebugEnabled() && requestedMediaTypes != null ?
				" given " + requestedMediaTypes.toString() : "";

		if (this.useNotAcceptableStatusCode) {
			if (logger.isDebugEnabled()) {
				logger.debug("Using 406 NOT_ACCEPTABLE" + mediaTypeInfo);
			}
			return NOT_ACCEPTABLE_VIEW;
		}
		else {
			logger.debug("View remains unresolved" + mediaTypeInfo);
			return null;
		}
	}
getCandidateViews中看到他是把所有的视图解析器拿来,进行while循环,挨个解析!
Iterator var5 = this.viewResolvers.iterator();结论:ContentNegotiatingViewResolver 这个视图解析器就是用来组合所有的视图解析器的
有个属性viewResolvers,看看它是在哪里进行赋值的!
	@Override
	protected void initServletContext(ServletContext servletContext) {
    // 这里它是从beanFactory工具中获取容器中的所有视图解析器
    // ViewRescolver.class 把所有的视图解析器来组合的
		Collection<ViewResolver> matchingBeans =
				BeanFactoryUtils.beansOfTypeIncludingAncestors(obtainApplicationContext(), ViewResolver.class).values();
		if (this.viewResolvers == null) {
			this.viewResolvers = new ArrayList<>(matchingBeans.size());
			for (ViewResolver viewResolver : matchingBeans) {
				if (this != viewResolver) {
					this.viewResolvers.add(viewResolver);
				}
			}
		}
}
由此可见是在容器中找视图解析器,那么可以猜想,我们可以自己实现一个视图解析器。
1、自定义一个视图解析器
//如果想自定义一些定制化(想要)的功能,只需要写一个组件,然后将它交给springboot,springboot会自动装配。

//扩展spring mvc DispatcherServlet
@Configuration
public class MyMVCConfig implements WebMvcConfigurer {
    //public interface ViewResolver实现了视图解析器接口的类,我们就可以把它看做视图解析器

    //注册到容器中
    @Bean
    public ViewResolver myViewResolver(){
        return new MyViewResolver();
    }

    //自定义了一个自己的视图解析器
    public static class MyViewResolver implements ViewResolver{
        @Override
        public View resolveViewName(String viewName, Locale locale) throws Exception {
            return null;
        }
    }

}
2、查看自定义的视图解析器是否起作用
给DispatcherServlet 中的 doDispatch方法加个断点进行调试一下,因为所有的请求都会走到这个方法中。

3、启动项目,随便访问一个页面,看一下Debug信息,找到this变量
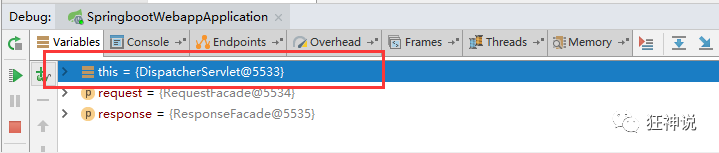
找到视图解析器,可以看到自定义的视图解析器存在;

结论:如果想自定义一些定制化(想要)的功能,只需要写一个组件,然后将它交给springboot,springboot会自动装配。
转换器(Converter)和格式化器(Formatter)
源代码:
		@Bean
		@Override
		public FormattingConversionService mvcConversionService() {
			Format format = this.mvcProperties.getFormat();
			WebConversionService conversionService = new WebConversionService(new DateTimeFormatters()
					.dateFormat(format.getDate()).timeFormat(format.getTime()).dateTimeFormat(format.getDateTime()));
			addFormatters(conversionService);
			return conversionService;
		}
可以看到在Properties文件中,那么就可以自己配置它!如果配置了自己的格式化方式,就会注册到Bean中生效。
我们可以在配置文件中配置日期格式化的规则:
# 自定义配置日期格式化
spring.mvc.format.date-time=yyyy-MM-dd HH:mm:ss
修改SpringBoot的默认配置
SpringBoot的核心便是自动装配,大量的自动配置,原理都是一样的,通过这个WebMVC的自动配置原理分析,应该通过源码探究,得出结论。
SpringBoot的底层,大量用到了这些设计细节思想,所以,要多阅读源码,得出结论。
SpringBoot在自动配置很多组件的时候,先看容器中有没有用户自己配置的(即用户自己配置的@Bean),如果有就用用户配置的,如果没有就用自动默认配置的;
如果有些组件可以存在多个,比如视图解析器,就将用户配置的和自己默认配置的组合起来!
扩展使用SpringMVC 官方文档如下:
If you want to keep Spring Boot MVC features and you want to add additional MVC configuration (interceptors, formatters, view controllers, and other features), you can add your own @Configuration class of type WebMvcConfigurer but without @EnableWebMvc. If you wish to provide custom instances of RequestMappingHandlerMapping, RequestMappingHandlerAdapter, or ExceptionHandlerExceptionResolver, you can declare a WebMvcRegistrationsAdapter instance to provide such components.
所以,我们要做的就是编写一个@Configuration注解类,并且类型要为WebMvcConfigurer,一定不能标注@EnableWebMvc注解。
新建config.MyMVCConfig
package com.qqa.config;


//扩展springmvc配置

import org.springframework.context.annotation.Configuration;
import org.springframework.web.servlet.config.annotation.EnableWebMvc;
import org.springframework.web.servlet.config.annotation.ViewControllerRegistry;
import org.springframework.web.servlet.config.annotation.WebMvcConfigurer;

import java.util.Locale;


//扩展spring mvc DispatcherServlet
//如果想要扩展spring mvc,官方w文档建议写一个Configuration
@Configuration
//@EnableWebMvc
// 此注解导入了一个类
// DelegatingWebMvcConfiguration:从容器中获取了所有的WebMvcConfigurer
// WebAutoConfiguration中有一个@ConditionalOnMissingBean(WebMvcConfigurationSupport.class)
// 而@EnableWebMvc导入了它,那么该自动配置不生效,默认功能失效:@Import(DelegatingWebMvcConfiguration.class)
public class MyMVCConfig1 implements WebMvcConfigurer {
    //视图跳转,直接访问
    @Override
    public void addViewControllers(ViewControllerRegistry registry) {
        registry.addViewController("/qqa").setViewName("test");
    }
}
结论:扩展SpringMVC,就按照官方推荐的来,既保留SpringBoot所有默认的自动配置,也能用我们扩展的配置!
全面接管SpringMVC
官方文档:
If you want to take complete control of Spring MVC
you can add your own @Configuration annotated with @EnableWebMvc.
全面接管就是不用SpringBoot对SpringMVC的自动配置,所有的东西都是自己去配置!
只需在自己的配置类中加一个@EnableWebMvc注解即可。
国际化
纯SpringMVC实现:链接
SpringBoot实现:
准备工作:
先在IDEA中统一设置properties的编码问题!

配置文件编写
1、在resources资源目录下新建一个i18n目录,存放国际化配置文件
2、新建一个login.properties文件、login_zh_CN.properties;IDEA会自动识别我们要做国际化操作,文件夹发生变化!
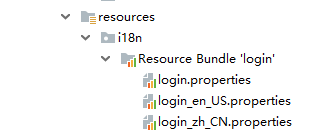
3、可以在上面新建一个文件;

4、该视图我们点击 + 号可以直接添加属性到三个文件。

配置文件生效探究
查看一下SpringBoot对国际化的自动配置!这里又涉及到一个类:MessageSourceAutoConfiguration。该类里面有一个方法,可以发现SpringBoot已经自动配置好了,管理国际化资源文件的组件 ResourceBundleMessageSource。
// 获取 properties 传递过来的值进行判断
@Bean
public MessageSource messageSource(MessageSourceProperties properties) {
    ResourceBundleMessageSource messageSource = new ResourceBundleMessageSource();
    if (StringUtils.hasText(properties.getBasename())) {
        // 设置国际化文件的基础名(去掉语言国家代码的)
        messageSource.setBasenames(
            StringUtils.commaDelimitedListToStringArray(
                                       StringUtils.trimAllWhitespace(properties.getBasename())));
    }
    if (properties.getEncoding() != null) {
        messageSource.setDefaultEncoding(properties.getEncoding().name());
    }
    messageSource.setFallbackToSystemLocale(properties.isFallbackToSystemLocale());
    Duration cacheDuration = properties.getCacheDuration();
    if (cacheDuration != null) {
        messageSource.setCacheMillis(cacheDuration.toMillis());
    }
    messageSource.setAlwaysUseMessageFormat(properties.isAlwaysUseMessageFormat());
    messageSource.setUseCodeAsDefaultMessage(properties.isUseCodeAsDefaultMessage());
    return messageSource;
}
文件放在了i18n目录下,所以要配置一下路径:
# 配置文件的真实位置
spring.messages.basename=i18n.login
配置国际化解析
在Spring中有一个国际化的Locale (区域信息)对象,里面有一个叫做LocaleResolver (获取区域信息对象)的解析器!
在WebMvcAutoConfiguration中,查看一下!看到SpringBoot默认配置:
@Bean
@ConditionalOnMissingBean
@ConditionalOnProperty(prefix = "spring.mvc", name = "locale")
public LocaleResolver localeResolver() {
    // 容器中没有就自己配,有的话就用用户配置的
    if (this.mvcProperties.getLocaleResolver() == WebMvcProperties.LocaleResolver.FIXED) {
        return new FixedLocaleResolver(this.mvcProperties.getLocale());
    }
    // 接收头国际化分解
    AcceptHeaderLocaleResolver localeResolver = new AcceptHeaderLocaleResolver();
    localeResolver.setDefaultLocale(this.mvcProperties.getLocale());
    return localeResolver;
}
AcceptHeaderLocaleResolver 类中有一个方法:
public Locale resolveLocale(HttpServletRequest request) {
    Locale defaultLocale = this.getDefaultLocale();
    // 默认的就是根据请求头带来的区域信息获取Locale进行国际化
    if (defaultLocale != null && request.getHeader("Accept-Language") == null) {
        return defaultLocale;
    } else {
        Locale requestLocale = request.getLocale();
        List<Locale> supportedLocales = this.getSupportedLocales();
        if (!supportedLocales.isEmpty() && !supportedLocales.contains(requestLocale)) {
            Locale supportedLocale = this.findSupportedLocale(request, supportedLocales);
            if (supportedLocale != null) {
                return supportedLocale;
            } else {
                return defaultLocale != null ? defaultLocale : requestLocale;
            }
        } else {
            return requestLocale;
        }
    }
}
现在想点击链接让国际化生效,就需要让自己的Locale生效!进而要自己写一个LocaleResolver,我们可以在请求链接上携带区域信息。
    <a class="btn btn-sm" th:href="@{/index.html(l='zh_CN')}">中文</a>
    <a class="btn btn-sm" th:href="@{/index.html(l='en_US')}">English</a>
自定义的ocaleResolver类!
public class MyLocaleResolver implements LocaleResolver {
    //解析请求
    @Override
    public Locale resolveLocale(HttpServletRequest request) {
        //获取请求中的语言参数
        String language = request.getParameter("l");
        //如果没有就使用默认
        Locale aDefault = Locale.getDefault();
        //如果不为空,表明请求连接携带了国际化参数
        if(!StringUtils.isEmpty(language)){
            //zh_CN
            String[] split = language.split("_");
            //国家_地区
            Locale locale = new Locale(split[0], split[1]);
            return locale;
        }
        return aDefault;
    }

    @Override
    public void setLocale(HttpServletRequest request, HttpServletResponse response, Locale locale) {

    }
}
为了让自定义区域化信息生效,需要自己再配置一下这个组件,在自己的MyMVCConofig下注册bean。
    //只要这样,自定义的国际化组件就生效了!
    @Bean
    public LocaleResolver localeResolver(){
        return new MyLocaleResolver();
    }
拦截器
实现登录拦截
自定义拦截器类,要实现HandlerInterceptor类
public class LoginHandlerInterceptor implements HandlerInterceptor {

    @Override
    public boolean preHandle(HttpServletRequest request, HttpServletResponse response, Object handler) throws Exception {

        //登录成功后,应该有用户的session

        Object loginUser = request.getSession().getAttribute("loginUser");
        if(loginUser == null){
            request.setAttribute("msg","请您先登录!");
            request.getRequestDispatcher("/index.html").forward(request,response);
            return false;
        }else {
            return true;
        }
    }

    @Override
    public void postHandle(HttpServletRequest request, HttpServletResponse response, Object handler, ModelAndView modelAndView) throws Exception {

    }

    @Override
    public void afterCompletion(HttpServletRequest request, HttpServletResponse response, Object handler, Exception ex) throws Exception {

    }
}
然后在MyMVCConfig类中添加该组件(与配置视图解析器类似)
    @Override
    public void addInterceptors(InterceptorRegistry registry) {
        registry.addInterceptor(new LoginHandlerInterceptor())
                .addPathPatterns("/**")
                //排除的映射
                .excludePathPatterns("/index.html","/","/user/login","/bootstrap/**");
    }


 684
684


 被折叠的 条评论
为什么被折叠?
被折叠的 条评论
为什么被折叠?
 到【灌水乐园】发言


