


众所周知,ConstraintLayout布局已经出来很久了,但是因为实际工作的原因,对于ConstraintLayout布局的应用还是比较少的。今天仔细研究一下做个记录,方便以后更好的使用。
ConstraintLayout又可称之为约束布局,是Android Studio2.2新增的功能,也是google重点推荐使用的。以前创建XML默认的布局都是LinearLayout,现在则变为了ConstraintLayout。
- ContraintLayout的各种属性:
1.1、ContraintLayout的Relative positioning属性包括以下:
layout_constraintLeft_toLeftOf
layout_constraintLeft_toRightOf
layout_constraintRight_toLeftOf
layout_constraintRight_toRightOf
layout_constraintTop_toTopOf
layout_constraintTop_toBottomOf
layout_constraintBottom_toTopOf
layout_constraintBottom_toBottomOf
layout_constraintStart_toEndOf
layout_constraintStart_toStartOf
layout_constraintEnd_toStartOf
layout_constraintEnd_toEndOf
layout_constraintBaseline_toBaselineOf
这些属性都需要其他view的id,或者parent来作为参数。
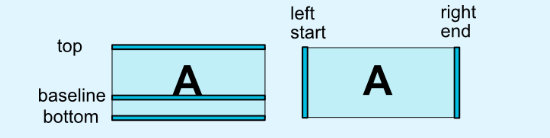
constraintxxx的表示该View自身约束的边,toxxxOf则表示参数中那个View的边。贴一个官网的图示说明left、right、top、bottom、start、end的位置:
baseline的属性是指view内容的底部对齐,如下面的代码与图示:
    <TextView
        android:id="@+id/tv1"
        android:layout_width="80dp"
        android:layout_height="50dp"
        android:background="@android:color/holo_green_dark"
        android:gravity="center_vertical|right"
        android:text="text1" />

    <TextView
        android:id="@+id/tv2"
        android:layout_width="50dp"
        android:layout_height="30dp"
        android:background="@android:color/holo_blue_light"
        android:text="text2"
        android:textAllCaps="false"
        android:textSize="10sp"
        app:layout_constraintBaseline_toBaselineOf="@id/tv1"
        app:layout_constraintLeft_toRightOf="@id/tv1" />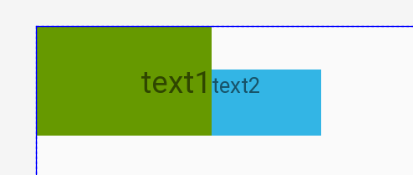
1.2、ConstraintLayout的margin属性:
layout_marginStart
layout_marginBottom
layout_marginTop
layout_marginEnd
layout_marginLeft
layout_marginRight
这个没什么好说的,就是我们平常使用的来设置相对于view的left、right、top、bottom的margin值。再来一张图能更清晰的说明这些属性的作用:
<Button
        android:id="@+id/btn1"
        android:layout_width="100dp"
        android:layout_height="50dp"
        android:layout_marginTop="30dp"
        android:text="btn1"
        app:layout_constraintStart_toStartOf="parent"
        app:layout_constraintTop_toBottomOf="@id/tv1" />

<Button
        android:id="@+id/btn2"
        android:layout_width="80dp"
        android:layout_height="30dp"
        android:layout_marginLeft="50dp"
        android:text="btn2"
        android:textSize="8sp"
        app:layout_constraintBaseline_toBaselineOf="@id/btn1"
        app:layout_constraintLeft_toRightOf="@id/btn1"
        app:layout_constraintTop_toBottomOf="@id/tv2" />
1.3、ConstraintLayout的goneMargin属性:
goneMargin属性就是在margin属性的前面添上gone,其他跟margin属性都一样。
goneMargin就是在设置该属性的view的对应方向上的view gone掉的时候,距离该方向的距离。如下图所示,给btn3设置layout_goneMarginLeft=”50dp”当btn2执行gone代码后,btn3距离左边btn1的距离是30dp。
1.4、bias属性
在ConstraintLayout中要使View居中,一般采用下面的属性来进行设置:
app:layout_constraintLeft_toLeftOf="parent"
app:layout_constraintRight_toRightOf="parent"
bias属性可以使View在居中的同时设置偏移到某个方向,
app:layout_constraintHorizontal_bias=""
app:layout_constraintVertical_bias=""
bias的属性值的区间范围是0-1,0.5就是居中。小于0.5就是偏左或者偏上,反之则是偏右或者偏下。如图所示:
<Button
    android:id="@+id/btn4"
    android:text="btn4"
    android:layout_width="wrap_content"
    app:layout_constraintTop_toBottomOf="@id/btn1"
    app:layout_constraintLeft_toLeftOf="parent"
    app:layout_constraintRight_toRightOf="parent"
    app:layout_constraintHorizontal_bias="0.68"
    android:layout_height="wrap_content" />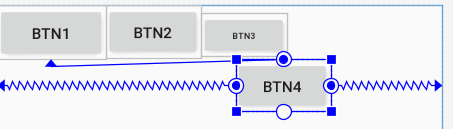
1.5、圆形定位(Add in 1.1)
app:layout_constraintCircle="@id/btn4"
app:layout_constraintCircleAngle="270"
app:layout_constraintCircleRadius="50dp"
涉及属性为以上三个,第一个属性是以目标view的圆心作为该view的定位圆心,第二个属性是相对于圆心的角度,取值为0-360,笔者测试设置正负值都取正值,而且在xml文件中不能设置float值,但是在代码中可以设置float值。目标view的正上方是0/360度,顺时针旋转。第三个属性是该view圆心到目标view圆心的距离。以下是图示:
<Button
    android:id="@+id/btn5"
    android:text="btn5"
    app:layout_constraintCircle="@id/btn4"
    app:layout_constraintCircleAngle="256"
    app:layout_constraintCircleRadius="100dp"
    android:layout_width="wrap_content"
    android:layout_height="wrap_content" />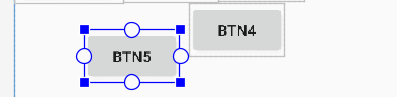
ConstraintLayout.LayoutParams layoutParams = (ConstraintLayout.LayoutParams) mBtn5.getLayoutParams();
layoutParams.circleAngle=235.8f;
mBtn5.setLayoutParams(layoutParams);
1.6、Dimensions constraints(尺寸约束)
wrap_content:enforcing constraints(强制约束)
官方给出的解释如下:
If a dimension is set to WRAP_CONTENT, in versions before 1.1 they will be treated as a literal dimension -- meaning, constraints will not limit the resulting dimension. While in general this is enough (and faster), in some situations, you might want to use WRAP_CONTENT, yet keep enforcing constraints to limit the resulting dimension. In that case, you can add one of the corresponding attribute:
当尺寸设置为wrap_content时,在1.1版本以前会使约束的结果失效。也许你想要的是在设置wrap_content时使原本的约束也生效,这时候就要用到下面这两个属性:
app:layout_constrainedHeight="true|false"
app:layout_constrainedWidth="true|false"
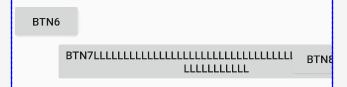
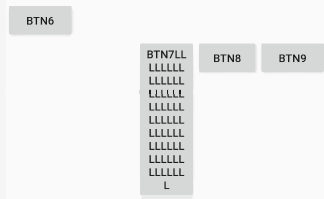
可以看到btn7在内容短的情况下能够正常约束,但是我们将内容一直增长,位于btn6右边的约束将会失效。这时候加上layout_constrainedWidth="true"属性,就不会使该约束失效。以下是有该属性与没有该属性的对比图和相关代码:
<Button
    android:id="@+id/btn6"
    android:layout_width="wrap_content"
    android:layout_height="wrap_content"
    android:text="btn6"
    app:layout_constraintTop_toBottomOf="@id/btn5" />

<Button
    android:id="@+id/btn7"
    android:layout_width="wrap_content"
    android:layout_height="wrap_content"
    app:layout_constrainedWidth="true"
    android:text="btn7lllllllllllllllllllllllllllllllllllllllllllllllllllllllll"
    app:layout_constraintLeft_toRightOf="@id/btn6"
    app:layout_constraintRight_toRightOf="@id/btn8"
    app:layout_constraintTop_toBottomOf="@id/btn6" />

<Button
    android:id="@+id/btn8"
    android:layout_width="80dp"
    android:layout_height="wrap_content"
    android:text="btn8"
    app:layout_constraintRight_toLeftOf="@id/btn9"
    app:layout_constraintLeft_toRightOf="@id/btn7"
    app:layout_constraintTop_toBottomOf="@id/btn6" />

<Button
    android:id="@+id/btn9"
    android:layout_width="wrap_content"
    android:layout_height="wrap_content"
    android:text="btn9"
    app:layout_constraintRight_toRightOf="parent"
    app:layout_constraintLeft_toRightOf="@id/btn8"
    app:layout_constraintTop_toBottomOf="@id/btn6" />
MATCH_CONSTRAINT dimensions(Added in 1.1)
当尺寸设置为MATCH_CONSTRAINT(即为0)时,控件大小默认占用所有可用空间。这时候就可以通过以下几种属性来设置控件的大小
layout_constraintWidth_default
layout_constraintHeight_default
layout_constraintWidth_min
layout_constraintWidth_max
layout_constraintHeight_min
layout_constraintHeight_max
layout_constraintHeight_percent
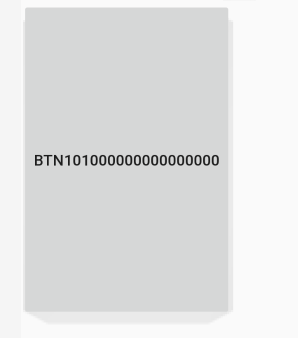
layout_constraintWidth_percent以下是相关图示与代码:

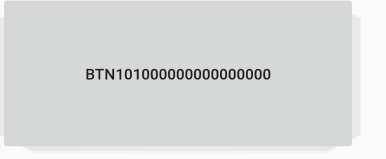
<Button
android:id="@+id/btn10"
android:text="btn101000000000000000"
app:layout_constraintTop_toBottomOf="@id/btn8"
app:layout_constraintWidth_max="150dp"
app:layout_constraintWidth_min="100dp"
app:layout_constraintHeight_max="50dp"
app:layout_constraintHeight_min="50dp"
android:layout_width="0dp"
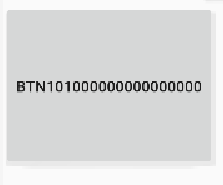
android:layout_height="0dp" />百分比的示例:
<Button
    android:id="@+id/btn10"
    android:text="btn101000000000000000"
    app:layout_constraintTop_toBottomOf="@id/btn8"
    app:layout_constraintHeight_default="percent"
    app:layout_constraintWidth_default="percent"
    app:layout_constraintHeight_percent="0.2"
    app:layout_constraintWidth_percent="0.8"
    android:layout_width="0dp"
    android:layout_height="0dp" />
2.Ratio(比例约束)
要求宽或高至少一边设置为0dp,比例约束的属性为:
layout_constraintDimensionRatio
有两种写法:app:layout_constraintDimensionRatio="2:3",app:layout_constraintDimensionRatio="H/W(大小写随意),2:3",数字为float类型。h在前表示宽高比,w在前表示高宽比。两种写法的图示如下:
2:3 w,4.5:5.8
3.链
链在单个轴(水平或者竖直)中提供了类似于组的行为。另外一个轴可以单独约束
一组控件通过双向链接链接在一起,那么他们被认为是一个链。
链由链的第一个控件上的属性控制。即链头控制,水平方向最左边,竖直方向最上边的第一个控件即为链头(head)
在链头中设置下面两个属性可以起到控制整个链的效果:
layout_constraintHorizontal_chainStyle=
layout_constraintVertical_chainStyle
该属性包含三种值:
spread、spread_inside、packed
下图是关于这三种属性的官方示例图:

spread_inside属性 配合weighted属性的图示与代码:
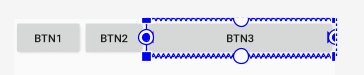
<Button
    android:id="@+id/btn1"
    android:layout_width="wrap_content"
    android:layout_height="wrap_content"
    android:text="btn1"
    app:layout_constraintHorizontal_chainStyle="spread_inside"
    app:layout_constraintLeft_toLeftOf="parent"
    app:layout_constraintRight_toLeftOf="@id/btn2" />

<Button
    android:id="@+id/btn2"
    android:layout_width="0dp"
    android:layout_height="wrap_content"
    app:layout_constraintHorizontal_weight="1"
    android:text="btn2"
    app:layout_constraintLeft_toRightOf="@id/btn1"
    app:layout_constraintRight_toLeftOf="@id/btn3" />

<Button
    android:id="@+id/btn3"
    android:layout_width="0dp"
    android:layout_height="wrap_content"
    android:text="btn3"
    app:layout_constraintHorizontal_weight="3"
    app:layout_constraintLeft_toRightOf="@id/btn2"
    app:layout_constraintRight_toRightOf="parent" />
packed属性配合bias属性的图示与代码

<Button
    android:id="@+id/btn1"
    android:layout_width="wrap_content"
    android:layout_height="wrap_content"
    android:text="btn1"
    app:layout_constraintHorizontal_bias="0.2"
    app:layout_constraintHorizontal_chainStyle="packed"
    app:layout_constraintLeft_toLeftOf="parent"
    app:layout_constraintRight_toLeftOf="@id/btn2" />

<Button
    android:id="@+id/btn2"
    android:layout_width="wrap_content"
    android:layout_height="wrap_content"
    android:text="btn2"
    app:layout_constraintLeft_toRightOf="@id/btn1"
    app:layout_constraintRight_toLeftOf="@id/btn3" />

<Button
    android:id="@+id/btn3"
    android:layout_width="wrap_content"
    android:layout_height="wrap_content"
    android:text="btn3"
    app:layout_constraintLeft_toRightOf="@id/btn2"
    app:layout_constraintRight_toRightOf="parent" />
4.总结
写了这么多,ConstraintLayout大部分的属性都已经做了示范,我们还需要在实际工作的多多练习才能灵活自如的使用它,更好的运用于自己的项目中。
本文参考文章:https://blog.csdn.net/singwhatiwanna/article/details/96472681
https://www.jianshu.com/p/a74557359882
https://developer.android.google.cn/reference/android/support/constraint/ConstraintLayout
作者简介:就职于甜橙金融信息技术部,负责翼支付android客户端开发工作,喜欢研究新的技术,不断学习,不断提升。


 279
279


 被折叠的 条评论
为什么被折叠?
被折叠的 条评论
为什么被折叠?
 到【灌水乐园】发言


