


1. 配置:
(1)最简单的java配置法:
public class Test {
            public static void main(String[] args) {
                ConnectionFactory connectionFactory = new CachingConnectionFactory();
                ((CachingConnectionFactory)connectionFactory).setUsername("guest");
                ((CachingConnectionFactory)connectionFactory).setPassword("guest");
                ((CachingConnectionFactory)connectionFactory).setHost("127.0.0.1");

                AmqpAdmin admin = new RabbitAdmin(connectionFactory);
                admin.declareQueue(new Queue("myqueue"));
                AmqpTemplate template = new RabbitTemplate(connectionFactory);
                template.convertAndSend("myqueue", "foo");
                String foo = (String) template.receiveAndConvert("myqueue");
                System.out.println(foo);
            }
        }
(2)使用springxml的配置方法:
private static void xmlConfig() {
            ApplicationContext context =  new GenericXmlApplicationContext("classpath:/rabbit-context.xml");
            AmqpTemplate template = context.getBean(AmqpTemplate.class);
            template.convertAndSend("myqueue", "foo");//routingKey, message
            String foo = (String) template.receiveAndConvert("myqueue");
            System.out.println(foo);
        }
xml配置:
<beans xmlns="http://www.springframework.org/schema/beans"
               xmlns:xsi="http://www.w3.org/2001/XMLSchema-instance"
               xmlns:rabbit="http://www.springframework.org/schema/rabbit"
               xsi:schemaLocation="http://www.springframework.org/schema/rabbit
                   http://www.springframework.org/schema/rabbit/spring-rabbit.xsd
                   http://www.springframework.org/schema/beans
                   http://www.springframework.org/schema/beans/spring-beans.xsd">

            <rabbit:connection-factory id="connectionFactory"/>

            <rabbit:template id="amqpTemplate" connection-factory="connectionFactory"/>

            <rabbit:admin connection-factory="connectionFactory"/>

            <rabbit:queue name="myqueue"/>

            <bean id="connectionFactory"
                  class="org.springframework.amqp.rabbit.connection.CachingConnectionFactory">
                <constructor-arg value="127.0.0.1"/>
                <property name="username" value="guest"/>
                <property name="password" value="guest"/>
            </bean>
        </beans>
(3)使用Java Configuration配置方法:
private static void configurationJava() {
            ApplicationContext context = new AnnotationConfigApplicationContext(RabbitConfiguration.class);
            AmqpTemplate template = context.getBean(AmqpTemplate.class);
            template.convertAndSend("myqueue", "foo");
            String foo = (String) template.receiveAndConvert("myqueue");
            System.out.println(foo);
        }
configuration配置类:
 package com.cisco.estore.configuration;

        import org.springframework.amqp.core.AmqpAdmin;
        import org.springframework.amqp.core.Queue;
        import org.springframework.amqp.rabbit.connection.CachingConnectionFactory;
        import org.springframework.amqp.rabbit.connection.ConnectionFactory;
        import org.springframework.amqp.rabbit.core.RabbitAdmin;
        import org.springframework.amqp.rabbit.core.RabbitTemplate;
        import org.springframework.context.annotation.Bean;
        import org.springframework.context.annotation.Configuration;

        @Configuration
        public class RabbitConfiguration {

            @Bean
            public ConnectionFactory connectionFactory() {
                CachingConnectionFactory cachingConnectionFactory = new CachingConnectionFactory("127.0.0.1");
                cachingConnectionFactory.setUsername("guest");
                cachingConnectionFactory.setPassword("guest");
                return cachingConnectionFactory;
            }

            @Bean
            public AmqpAdmin amqpAdmin() {
                return new RabbitAdmin(connectionFactory());
            }

            @Bean
            public RabbitTemplate rabbitTemplate() {
                return new RabbitTemplate(connectionFactory());
            }

            @Bean
            public Queue myQueue() {
               return new Queue("myqueue");
            }
        }
2. 基础概念:
(1)目的:
组件解耦,Queue可以均摊分给不同消费者
(2)概念
A. ConnectionFactory、Connection、Channel都是RabbitMQ对外提供的API中最基本的对象。
• Connection是RabbitMQ的socket链接,它封装了socket协议相关部分逻辑。
• ConnectionFactory为Connection的制造工厂。
• Channel是我们与RabbitMQ打交道的最重要的一个接口,我们大部分的业务操作是在Channel这个接口中完成的,包括定义Queue、定义Exchange、绑定Queue与Exchange、发布消息等。
B. Exchange
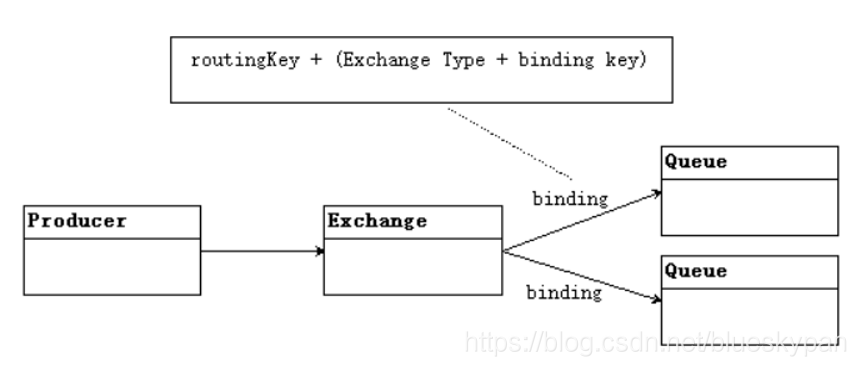
C. Exchange Type
有fanout、direct、topic、headers这四种类型
Fanout: 所有发到Exchange的消息路由到所有与它绑定的Queue
Direct: 把消息路由到binding key和routing key完全匹配的Queue中
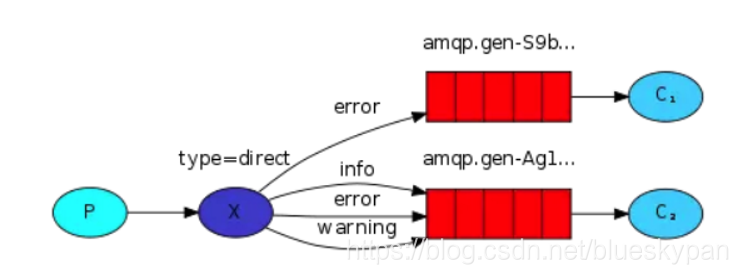
如果routingkey=error发送到exchange,消息会发到queue1和queue2。如果routingkey=info则只会发送到Queue2
Topic:
• routing key为一个句点号“. ”分隔的字符串(我们将被句点号“. ”分隔开的每一段独立的字符串称为一个单词),如“stock.usd.nyse”、“nyse.vmw”、“quick.orange.rabbit”
• binding key与routing key一样也是句点号“. ”分隔的字符串
• binding key中可以存在两种特殊字符“*”与“#”,用于做模糊匹配,其中“*”用于匹配一个单词,“#”用于匹配多个单词(可以是零个)

以上图中的配置为例,routingKey=”quick.orange.rabbit”的消息会同时路由到Q1与Q2,routingKey=”lazy.orange.fox”的消息会路由到Q1,routingKey=”lazy.brown.fox”的消息会路由到Q2,routingKey=”lazy.pink.rabbit”的消息会路由到Q2(只会投递给Q2一次,虽然这个routingKey与Q2的两个bindingKey都匹配);routingKey=”quick.brown.fox”、routingKey=”orange”、routingKey=”quick.orange.male.rabbit”的消息将会被丢弃,因为它们没有匹配任何bindingKey。
回执机制:
○ 客户端发送请求(消息)时,在消息的属性(MessageProperties,在AMQP协议中定义了14中properties,这些属性会随着消息一起发送)中设置两个值replyTo(一个Queue名称,用于告诉服务器处理完成后将通知我的消息发送到这个Queue中)和correlationId(此次请求的标识号,服务器处理完成后需要将此属性返还,客户端将根据这个id了解哪条请求被成功执行了或执行失败)
○ 服务器端收到消息并处理
○ 服务器端处理完消息后,将生成一条应答消息到replyTo指定的Queue,同时带上correlationId属性
○ 客户端之前已订阅replyTo指定的Queue,从中收到服务器的应答消息后,根据其中的correlationId属性分析哪条请求被执行了,根据执行结果进行后续业务处理。


 173
173


 被折叠的 条评论
为什么被折叠?
被折叠的 条评论
为什么被折叠?
 到【灌水乐园】发言


