


6. CUDA Basic
1. 为什么学习TensorRT需要学习CUDA编程
-
TensorRT是一个深度学习推理加速库,是由NVIDIA开发的。TensorRT可以用于加速训练好的深度学习模型在NVIDIA GPU上的推理,从而提高深度学习应用的响应速度和吞吐量。
-
由于TensorRT需要在GPU上进行计算,因此了解CUDA编程是非常必要的。CUDA是NVIDIA开发的并行计算平台和编程模型,可以让开发者利用GPU的并行计算能力加速应用程序的计算,包括深度学习应用程序。在使用TensorRT对深度学习模型进行推理时,需要使用CUDA编程技术来编写和优化TensorRT代码,以最大程度地发挥GPU的计算能力和TensorRT的性能优势。因此,学习CUDA编程对于学习和使用TensorRT是非常重要的。
2. 先验知识:
- nvidia-smi: 显示显卡驱动版本和此驱动最高支持的CUDA驱动版本
(base) ubuntu@VM-16-12-ubuntu:~/Github/DL_Deploy/6.CUDA_Basic/cuda-driver-api$ nvidia-smi
Sat Mar  4 17:10:27 2023
+-----------------------------------------------------------------------------+
| NVIDIA-SMI 470.82.01    Driver Version: 470.82.01    CUDA Version: 11.4     |
|-------------------------------+----------------------+----------------------+
| GPU  Name        Persistence-M| Bus-Id        Disp.A | Volatile Uncorr. ECC |
| Fan  Temp  Perf  Pwr:Usage/Cap|         Memory-Usage | GPU-Util  Compute M. |
|                               |                      |               MIG M. |
|===============================+======================+======================|
|   0  Tesla T4            On   | 00000000:00:08.0 Off |                    0 |
| N/A   26C    P8     9W /  70W |      0MiB / 15109MiB |      0%      Default |
|                               |                      |                  N/A |
+-------------------------------+----------------------+----------------------+

+-----------------------------------------------------------------------------+
| Processes:                                                                  |
|  GPU   GI   CI        PID   Type   Process name                  GPU Memory |
|        ID   ID                                                   Usage      |
|=============================================================================|
|  No running processes found                                                 |
+-----------------------------------------------------------------------------+
- 驱动版本是470.82.01,它支持的CUDA版本为11.4
3. 为什么要学习Driver-API?
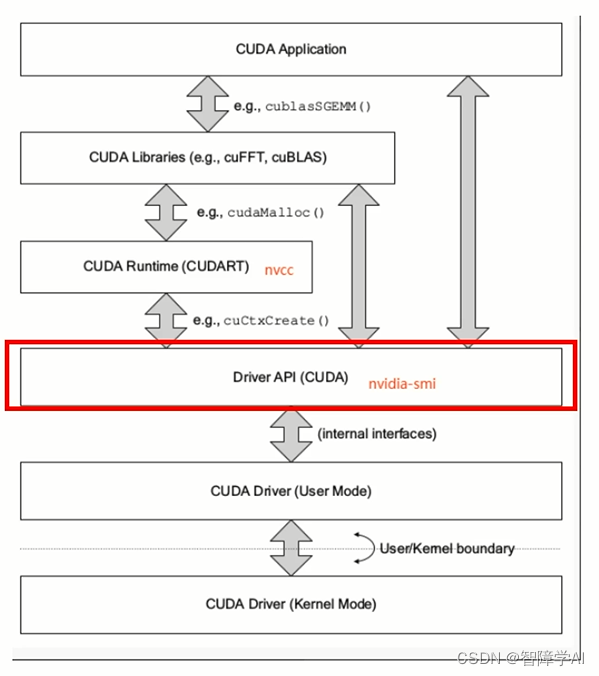
- 从图上可以看到, Driver API演变成Runtime API, 学习底层的API有利于理解Runtime API,有利于遇到了问题排查,根据作者大大说是因为他因为理解不够浪费了一周的时间
- CUDA Driver对应于cuda.h和libcuda.so文件
- 主要知识点是Context的管理机制,以及CUDA系列接口的开发习惯(错误检查方法),还有内存模型
- 知道其的存在就行了
3. CUDA驱动API-初始化: cuInit
https://docs.nvidia.com/cuda/archive/11.2.0/cuda-driver-api/group__CUDA__INITIALIZE.html
- cuInit的意义是,初始化驱动API,如果不执行,则所有API都将返回错误,全局执行一次即可
- 没有对应的cuDestroy,不需要释放,程序销毁自动释放
- 源码 返回值是一个CUresult类型的
CUresult CUDAAPI cuInit(unsigned int Flags);
4. cuInit案例完整代码
-
这段代码主要使用了CUDA的驱动API,通过调用cuInit()函数初始化CUDA驱动,然后调用cuDriverGetVersion()函数获取当前CUDA驱动的版本,最后使用cuDeviceGetName()函数获取当前设备的名称。
-
同时,这段代码还使用了CUresult类型来接收一些可能的错误代码,比如CUresult::CUDA_SUCCESS表示成功执行了对应的CUDA API函数。当API函数执行失败时,我们可以使用cuGetErrorString()函数获取错误代码的字符串描述。
-
这段代码可以帮助我们了解CUDA驱动API的基本用法,并在调试CUDA程序时验证CUDA驱动和设备是否正常工作。
// CUDA驱动头文件cuda.h
#include <cuda.h>

#include <stdio.h> // 因为要使用printf
#include <string.h>
int main(){

    /*
    cuInit(int flags), 这里的flags目前必须给0;
        对于cuda的所有函数,必须先调用cuInit,否则其他API都会返回CUDA_ERROR_NOT_INITIALIZED
        https://docs.nvidia.com/cuda/archive/11.2.0/cuda-driver-api/group__CUDA__INITIALIZE.html
     */
    CUresult code=cuInit(0);  //CUresult 类型:用于接收一些可能的错误代码
    if(code != CUresult::CUDA_SUCCESS){
        const char* err_message = nullptr;
        cuGetErrorString(code, &err_message);    // 获取错误代码的字符串描述
        // cuGetErrorName (code, &err_message);  // 也可以直接获取错误代码的字符串
        printf("Initialize failed. code = %d, message = %s\n", code, err_message);
        return -1;
    }

    /*
    测试获取当前cuda驱动的版本
    显卡、CUDA、CUDA Toolkit

        1. 显卡驱动版本,比如:Driver Version: 460.84
        2. CUDA驱动版本:比如:CUDA Version: 11.2
        3. CUDA Toolkit版本:比如自行下载时选择的10.2、11.2等;这与前两个不是一回事, CUDA Toolkit的每个版本都需要最低版本的CUDA驱动程序

        三者版本之间有依赖关系, 可参照https://docs.nvidia.com/cuda/cuda-toolkit-release-notes/index.html
        nvidia-smi显示的是显卡驱动版本和此驱动最高支持的CUDA驱动版本

     */


    int driver_version = 0;
    code = cuDriverGetVersion(&driver_version);  // 获取驱动版本
    printf("CUDA Driver version is %d\n", driver_version); // 若driver_version为11020指的是11.2

    // 测试获取当前设备信息
    char device_name[100]; // char 数组
    CUdevice device = 0;
    code = cuDeviceGetName(device_name, sizeof(device_name), device);  // 获取设备名称、型号如:Tesla V100-SXM2-32GB // 数组名device_name当作指针
    printf("Device %d name is %s\n", device, device_name);
    return 0;
}
5. CuInit案例解析
5.1 字符串的复习
const char *err_message = nullptr;       // const修饰指针指向的内存,保护报错信息不被修改
cuGetErrorName(code, &err_message);      // 也可以直接获取错误代码的字符串
cuGetErrorString(code, &err_message);    // 获取错误代码的字符串描述
- 上面两个函数是用于获取错误信息,通过查看源码知道传入的参数是CUresult类型的error, 一个 char 类型的指针变量的地址。 这段代码不仅更改了err_message指针的指向,还返回了一个CUresult类型的返回值
CUresult CUDAAPI cuGetErrorString(CUresult error, const char **pStr);
CUresult CUDAAPI cuGetErrorString(CUresult error, const char **pStr);
- 为什么要使用一个指向指针的指针作为参数呢?
- 这是因为 cuGetErrorName 函数需要修改指针变量的指向,使其指向表示错误信息的字符串。因此,需要传递指针变量的地址,这样函数才能修改这个指针变量的值。如果直接传递指针变量本身,那么函数只能修改这个指针变量指向的内存空间,而不能修改这个指针变量本身的值。
- 因此,我们需要使用指向指针的指针,这样函数就可以通过修改指针变量的指向,使其指向表示错误信息的字符串。如果直接使用一个指针变量作为参数,则函数无法修改这个指针变量的值,也就无法返回表示错误信息的字符串。
- 下面是一个更改的案例
#include <iostream>
#include <cstring>

using namespace std;

void modifyString(const char** ptr) {
    *ptr = "AAA";
}

// 这个*ptr对应外面的err_message
int main() {
    const char* err_message = "Hello!";
    cout << "Before modification: " << err_message << endl;
    modifyString(&err_message);
    cout << "After modification: " << err_message << endl;
    return 0;
}
5.2 CUresult
- CUresult是CUDA Driver API中的一个枚举类型,表示CUDA函数返回的错误码。函数返回值的类型都是CUresult,表示执行结果的状态。这些状态码都是整数值,可以用cuGetErrorString()函数和cuGetErrorName()函数将其转换为对应的字符串表示和名称。
- 源码
typedef enum cudaError_enum {
    /**
     * The API call returned with no errors. In the case of query calls, this
     * also means that the operation being queried is complete (see
     * ::cuEventQuery() and ::cuStreamQuery()).
     */
    CUDA_SUCCESS                              = 0,

    /**
     * This indicates that one or more of the parameters passed to the API call
     * is not within an acceptable range of values.
     */
    CUDA_ERROR_INVALID_VALUE                  = 1,

    /**
     * The API call failed because it was unable to allocate enough memory to
     * perform the requested operation.
     */
    CUDA_ERROR_OUT_OF_MEMORY                  = 2,

    /**
     * This indicates that the CUDA driver has not been initialized with
     * ::cuInit() or that initialization has failed.
     */
    CUDA_ERROR_NOT_INITIALIZED                = 3,.......}
- 所以if (code != CUresult::CUDA_SUCCESS) 也可以写成if (code != 0)
5.3 CUresult CUDAAPI cuDriverGetVersion(int *driverVersion);
- 通过阅读源码知道他需要一个为指向int的指针参数,但是这个不需要用CuInit初始化输出返回的CUresult是0也就是CUDA_SUCCESS
- 因为它是用来获取 CUDA 驱动程序的版本信息的,不需要与 CUDA 运行时系统交互
5.4 CUresult CUDAAPI cuDeviceGetName(char *name, int len, CUdevice dev);
- namae 是一个char的指针,第二个是这个name的长度,第三个是CUdevice device
- typedef int CUdevice; 就是int
5.5 不带Cuinit的整体
#include <cuda.h>  // CUDA 驱动的头文件
#include <stdio.h> // 因为要使用printf
#include <string>
int main()
{
    // CUresult code = cuInit(0);
    // if (code != CUresult::CUDA_SUCCESS)
    // {
    //     const char *err_message = nullptr;
    //     cuGetErrorName(code, &err_message);      // 也可以直接获取错误代码的字符串
    //     cuGetErrorString(code, &err_message);    // 获取错误代码的字符串描述
    // }

    // 获取CUDA驱动版本
    int driver_version = 0;
    auto code1 = cuDriverGetVersion(&driver_version);
    printf("CUDA Driver version is %d\n", driver_version);
    printf("cuDriverGetVersion code is: %d\n", code1);

    // 获取当前设备信息
    char device_name[100];      // char 数组
    CUdevice device = 0;        // typedef int CUdevice;
    auto code2 = cuDeviceGetName(device_name, sizeof(device_name), device);
    printf("device: %d is %s\n", device, device_name);
    printf("cuDeviceGetName code is: %d\n", code2);
    return 0;
}
Compile CXX src/main.cpp
Link workspace/pro
CUDA Driver version is 11040
cuDriverGetVersion code is: 0
device: 0 is ����
cuDeviceGetName code is: 3
5.6 带Cuinit的整体结构
#include <cuda.h>  // CUDA 驱动的头文件
#include <stdio.h> // 因为要使用printf
#include <string>
int main()
{
    CUresult code = cuInit(0);
    if (code != CUresult::CUDA_SUCCESS)
    {
        const char *err_message = nullptr;
        cuGetErrorName(code, &err_message);      // 也可以直接获取错误代码的字符串
        cuGetErrorString(code, &err_message);    // 获取错误代码的字符串描述
    }

    // 获取CUDA驱动版本
    int driver_version = 0;
    auto code1 = cuDriverGetVersion(&driver_version);
    printf("CUDA Driver version is %d\n", driver_version);
    printf("cuDriverGetVersion code is: %d\n", code1);

    // 获取当前设备信息
    char device_name[100];      // char 数组
    CUdevice device = 0;        // typedef int CUdevice;
    auto code2 = cuDeviceGetName(device_name, sizeof(device_name), device);
    printf("device: %d is %s\n", device, device_name);
    printf("cuDeviceGetName code is: %d\n", code2);
    return 0;
}
Compile depends C++ src/main.cpp
Compile CXX src/main.cpp
Link workspace/pro
CUDA Driver version is 11040
cuDriverGetVersion code is: 0
device: 0 is Tesla T4
cuDeviceGetName code is: 0


 被折叠的 条评论
为什么被折叠?
被折叠的 条评论
为什么被折叠?
 到【灌水乐园】发言


