


一、概述
Groovy是一种基础JVM(Java虚拟机)的敏捷开发语言,他结合了Python、Ruby和Smalltalk的特性,Groovy代码能够于Java代码很好的结合,也能用于扩展现有代码。由于其运行在JVM的特性,Groovy可以使用其他Java语言编写法的库。
一个简单的打印例子,演示下Groovy和Java的差异:
//java写法
class FuncITFeiniu{
    public static void mian(String[] args){
        println("Hello World!");
    }
}
//groovy写法 文件名:chapter01.groovy
println("Hello World!");

//执行
groovy chapter01.groovy
groovy chapter01
二、安装 - window10
1、下载
需要提到的是,groovy运行依赖JDK,所以我们需要先安装JDK再安装groovy。
JDK下载地址:https://www.oracle.com/java/technologies/downloads/
groovy下载地址:http://www.groovy-lang.org/download.html
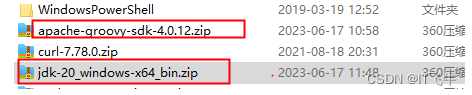
下载下来是这样的两个zip包,apache-groovy-sdk-4.0.12.zip 和 jdk-20_windows-x64_bin.zip。如下图:
这里我们都选择的*.zip安装包,也可以选择msi或exe自动化安装。
2、配置环境变量
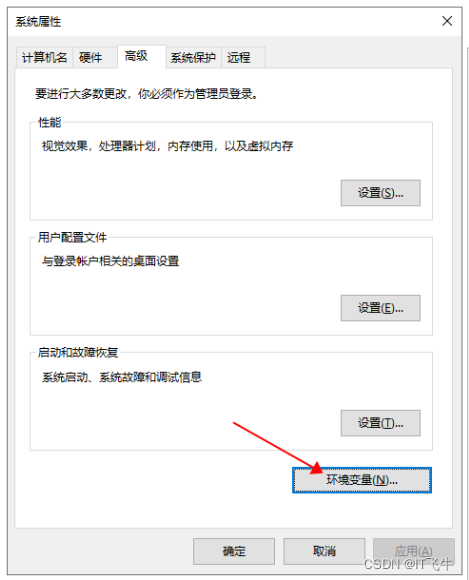
将上述两个包解压,然后我们打开【环境变量】。
-
配置
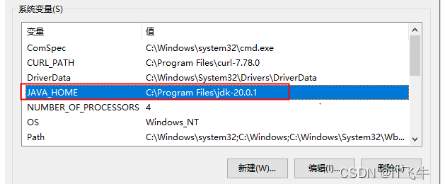
JAVA_HOME系统变量
-
在
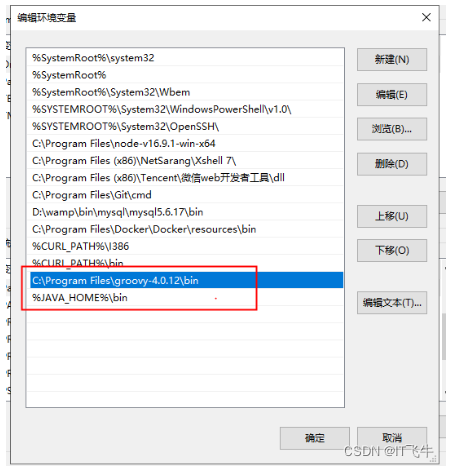
PATH中,添加JDK命令行,%JAVA_HOME%\bin -
在
PATH中,添加groovy命令行,C:\Program Files\groovy-4.0.12\bin
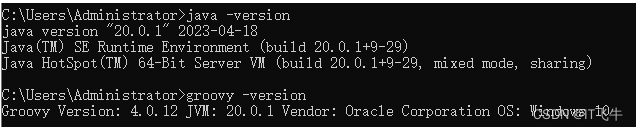
到这里就已经安装完成,我们打开cmd命令行工具,验证下是否安装成功,分别输入java -version和groovy -version,看看是否能否正常打印版本号,如果正常打印,安装就已经成功。
三、默认引入
默认情况下,Groovy 在代码中包括以下库,因此您不需要显式导入它们。
import java.lang.*
import java.util.*
import java.io.*
import java.net.*

import groovy.lang.*
import groovy.util.*

import java.math.BigInteger
import java.math.BigDecimal
四、数据类型
1、内置数据类型
Groovy提供多种内置数据类型。以下是在Groovy中定义的数据类型的列表
- byte -这是用来表示字节值。例如2。
- short -这是用来表示一个短整型。例如10。
- int -这是用来表示整数。例如1234。
- long -这是用来表示一个长整型。例如10000090。
- float -这是用来表示32位浮点数。例如12.34。
- double -这是用来表示64位浮点数,这些数字是有时可能需要的更长的十进制数表示。例如12.3456565。
- char -这定义了单个字符文字。例如“A”。
- Boolean -这表示一个布尔值,可以是true或false。
- String -这些是以字符串的形式表示的文本。例如,“Hello World”。
数值类型允许的取值范围:
| byte | -128到127 | -2^7 ~ +2^7 |
|---|---|---|
| short | -32,768到32,767 | -2^15 ~ +2^15 |
| int | -2,147,483,648到2,147,483,647 | -2^31 ~ +2^31 |
| long | -9,223,372,036,854,775,808到+9,223,372,036,854,775,807 | -2^63 ~ +2^63 |
| float | 1.40129846432481707e-45到3.40282346638528860e + 38 | -2^127 ~ +2^127 |
| double | 4.94065645841246544e-324d 到1.79769313486231570e + 308d | -2^255 ~ +2^255 |
class Example {
   static void main(String[] args) {
      //整型
      int x = 5;
      //长整型
      long y = 100L;

      //单精度型
      float a = 10.56f;

      //双精度型
      double b = 10.5e40;

      //不可变的任意精度的有符号整数数字
      BigInteger bi = 30g;

      //不可变的任意精度的有符号十进制数
      BigDecimal bd = 3.5g;

      println(x);
      println(y);
      println(a);
      println(b);
      println(bi);
      println(bd);
   }
}
//打印内容:
//5
//100
//10.56
//1.05E41
//30
//3.5
2、动态变量
如果是使用内置变量类型定义的变量,一经定义,后面是不可以更改变量类型的。但是Groovy也提供了类似javascript中的any定义任意变量类型的关键字def。
class Example {
   static void main(String[] args) {
      def _Name = 1;
      _Name="it飞牛";
      println(_Name);
   }
}
//打印如下:
it飞牛
五、运算符
1、算术运算符
| 运算符 | 描述 | 例子 |
|---|---|---|
| + | 两个操作数的加法 | 1 + 2 将得到 3 |
| - | 第一第二操作数相减 | 2 - 1 将得到 1 |
| * | 两个操作数的乘法 | 2 * 2 将得到4 |
| / | 两个操作数的除法 | 3/2 将得到 1.5 |
| % | 取模运算 | 3%2 将得到 1 |
| ++ | 自增运算,在自身值的基础上加1 | INT X = 5;X ++;X 将得到 6 |
| – | 自减运算,在自身值的基础上减1 | INT X = 5;X - -;X 将得到 4 |
2、关系运算符
| 运算符 | 描述 | 例子 |
|---|---|---|
| == | 测试两个对象之间是否相等 | 2 == 2 将得到 true |
| != | 测试两个对象之间是否不等 | 3 != 2 将得到 true |
| < | 检查是否左边的对象是小于右边的对象。 | 2 < 3 将得到 true |
| <= | 检查是否向左对象是小于或等于右边的对象 | 2 <= 3 将得到 true |
| > | 检查是否左边的对象比右边的对象大。 | 3 > 2 将得到 true |
| >= | 检查是否向左对象大于或等于右边的对象。 | 3>= 2 将得到 true |
3、逻辑运算符
| 运算符 | 描述 | 例子 |
|---|---|---|
| && | 这是逻辑“与”运算 | true && true 得到 true |
| || | 这是逻辑“或”运算 | true || true 得到 true |
| ! | 这是逻辑“非”运算 | !true 得到 false |
4、位运算符
| 运算符 | 描述 |
|---|---|
| & | 这是位“与”运算 |
| | | 这是按位“或”运算 |
| ^ | 这是按位“异或”或异或运算符 |
| 〜 | 这是按位反运算符 |
5、赋值运算符
| 运算符 | 描述 | 例子 |
|---|---|---|
| += | A += B 等价于 A = A+B | DEF A = 5A += 3输出将是8 |
| -= | A -= B 等价于 A = A-B | DEF A = 5A -= 3输出将是2 |
| *= | A = B 等价于 A= AB | DEF A = 5A *= 3输出将是15 |
| /= | A /= B 等价于 A = A/B | DEF A = 6A /= 3输出将是2 |
| (%)= | A (%)= B 等价于 A = A % B | DEF A = 5A %= 3输出将是2 |
6、范围运算符
Groovy支持范围的概念,并在..符号的帮助下提供范围运算符的符号。
class Example {
   static void main(String[] args) {
      def range = 5..10;
      println(range);
      println(range.get(2));
   }
}
//打印如下:
5..10
6
7
8
9
10
六、循环
1、while语句
class Example {
   static void main(String[] args) {
      int count = 0;

      while(count<5) {
         println(count);
         count++;
      }
   }
}
2、for语句
class Example {
   static void main(String[] args) {

      for(int i = 0;i<5;i++) {
         println(i);
      }

   }
}
3、for-in语句
class Example {
   static void main(String[] args) {
      int[] array = [0,1,2,3];

      for(int i in array) {
         println(i);
      }
   }
}
4、循环控制语句
| 序号 | 语句和描述 |
|---|---|
| 1 | break语句break语句用于改变循环和switch语句内的控制流。 |
| 2 | continue语句continue语句补充了break语句。它的使用仅限于while和for循环。 |
5、each
data.each{item->
  println(item)
};
七、条件语句
1、if语句
class Example {
   static void main(String[] args) {
      // Initializing a local variable
      int a = 2

      //Check for the boolean condition
      if (a<100) {
         //If the condition is true print the following statement
         println("The value is less than 100");
      }
   }
}
2、if / else语句
class Example {
   static void main(String[] args) {
      // Initializing a local variable
      int a = 2

      //Check for the boolean condition
      if (a<100) {
         //If the condition is true print the following statement
         println("The value is less than 100");
      } else {
         //If the condition is false print the following statement
         println("The value is greater than 100");
      }
   }
}
3、Switch语句
class Example {
   static void main(String[] args) {
      //initializing a local variable
      int a = 2

      //Evaluating the expression value
      switch(a) {
         //There is case statement defined for 4 cases
         // Each case statement section has a break condition to exit the loop

         case 1:
            println("The value of a is One");
            break;
         case 2:
            println("The value of a is Two");
            break;
         case 3:
            println("The value of a is Three");
            break;
         case 4:
            println("The value of a is Four");
            break;
         default:
            println("The value is unknown");
            break;
      }
   }
}
八、方法
class Example {
   static def DisplayName() {
      println("This is how methods work in groovy");
      println("This is an example of a simple method");
   }

   static void main(String[] args) {
      DisplayName();
   }
}
参数和返回值
- 支持传入多个,以
,号分割,并配以类型关键字。 - 支持设置默认值
- 返回值可以是基础类型、def、void
案例1:
class Example {
   static int sum(int a,int b = 5) {
      int c = a+b;
      return c;
   }

   static void main(String[] args) {
      println(sum(6));
   }
}
//打印:
//11
案例2:
class Example {
   static int x = 100;

   public static int getX() {
      int lx = 200;
      println(lx);
      return x;
   }

   static void main(String[] args) {
      println getX()
   }
}
//打印:
//200
//100
案例3:
class Example {
   int x = 100;

   public int getX() {
      this.x = 200;
      return x;
   }

   static void main(String[] args) {
      Example ex = new Example();
      println(ex.getX());
   }
}
//打印:
//200
九、文件I/O
Groovy在使用I / O时提供了许多辅助方法,Groovy提供了更简单的类来为文件提供以下功能。
- 读取文件
- 写入文件
- 遍历文件树
- 读取和写入数据对象到文件
除此之外,您始终可以使用下面列出的用于文件I / O操作的标准Java类。
- java.io.File
- java.io.InputStream
- java.io.OutputStream
- java.io.Reader
- java.io.Writer
读取文件
import java.io.File
class Example {
   static void main(String[] args) {
      new File("./Example.txt").eachLine {
         line -> println "line : $line";
      }
   }
}
//同目录下存在Example.txt文件,内容如下:
line : Example1
line : Example2

//执行上述代码后,控制台打印如下:
line : line : Example1
line : line : Example2
读取文件的内容到字符串
class Example {
   static void main(String[] args) {
      File file = new File("E:/Example.txt")
      println file.text
   }
}
//打印:
line : Example1
line : Example2
写入文件
import java.io.File
class Example {
   static void main(String[] args) {
      new File('./Example.txt').withWriter('utf-8') {
         writer -> writer.writeLine 'Hello World'
      }
   }
}
//执行后,Example.txt中的内容会被替换为:Hello World
获取文件的大小
class Example {
   static void main(String[] args) {
      File file = new File("E:/Example.txt")
      println "The file ${file.absolutePath} has ${file.length()} bytes"
   }
}
//打印:
//The file D:\学习\groovy\Code\groovy-project\.\Example.txt has 13 bytes
测试文件是否是目录
class Example {
   static void main(String[] args) {
      def file = new File('./')
      println "File? ${file.isFile()}"
      println "Directory? ${file.isDirectory()}"
   }
}
//打印:
//File? false
//Directory? true
创建目录
class Example {
   static void main(String[] args) {
      def file = new File('./Directory')
      file.mkdir()
   }
}
//执行完成后,会在当前目录下新建一个 Directory 目录
删除文件
class Example {
   static void main(String[] args) {
      def file = new File('./Example.txt')
      file.delete()
   }
}
//执行完成后,会把当前目录下的./Example.txt文件删除
复制文件
class Example {
   static void main(String[] args) {
      def src = new File("./Example.txt")
      def dst = new File("./Example1.txt")
      dst << src.text
   }
}
//将创建文件Example1.txt,并将文件Example.txt的所有内容复制到此文件。
获取目录内容
class Example {

   static void main(String[] args) {
      def rootFiles = new File('test').listRoots()
      rootFiles.each {
         file -> println file.absolutePath
      }
   }

}
//打印:
C:\
D:\
G:\
new File()入参也可以是某个指定的目录,那么会把目录下的文件和文件夹都打印出来。例如:
D:\学习\groovy\Code\groovy-project\.\Directory
D:\学习\groovy\Code\groovy-project\.\Example.groovy
D:\学习\groovy\Code\groovy-project\.\Example.txt
D:\学习\groovy\Code\groovy-project\.\Example1.txt
如果要递归显示目录及其子目录中的所有文件,则可以使用File类的eachFileRecurse函数。以下示例显示如何完成此操作。
十、字符串
字符串可以用单引号''、""、"''"括起来。此外,由三重引号括起来的Groovy字符串可以跨越多行。
如下:
class Example {

   static void main(String[] args) {
      String a = 'Hello Single'
      String b = 'Hello Double'
      String c = """Hello Triple
      Multiple lines"""

      println(a)
      println(b)
      println(c)
   }

}

//打印:
Hello Single
Hello Double
Hello Triple
      Multiple lines
字符串索引
class Example {
   static void main(String[] args) {
      String sample = "Hello world";
      println(sample[4]); // Print the 5 character in the string

      //Print the 1st character in the string starting from the back
      println(sample[-1]);
      println(sample[1..2]);//Prints a string starting from Index 1 to 2
      println(sample[4..2]);//Prints a string starting from Index 4 back to 2

   }
}
//打印:
o
d
el
oll
字符串转换成数字
def num1="500000.01"
BigDecimal num11=num1.toBigDecimal()//转化成浮点,
//toFloat() 不要使用,存在失去精度的风险

def num2="500000"
def num22=num2.toInteger()//转化成整数
log.info(num11);
log.info(num22);
//打印:
//500000.01
//500000
十一、范围
范围是指定值序列的速记。一些范例文字的例子 -
- 1…10 - 包含范围的示例
- 1 … <10 - 独占范围的示例
- ‘a’…‘x’ - 范围也可以由字符组成
- 10…1 - 范围也可以按降序排列
- ‘x’…‘a’ - 范围也可以由字符组成并按降序排列。
def list1 = 1..10
def list2 = 1..<10
def list3 = 'a'..'x'
def list4 = 10..1
def list5 = 'x'..'a'

println list1.size()
println list2.size()
println list3.size()
println list4.size()
println list5.size()
//打印:
10
9
24
10
24
十二、数组
groovy 列表使用索引操作符 [] 索引。列表索引从 0 开始,指第一个元素。
groovy 中的一个列表中的数据可以是任意类型。这 java 下集合列表有些不同,java 下的列表是同种类型的数据集合。
List.reverse() 可以实现列表反转。调用 List.sort() 可以实现列表排序。
def list1 = []
def list2 = [1,2,3,4]
list2.add(12)
list2.add(12)
println list1.size()
println list2.size()
//打印:
0
6
1、搜索-find
class Example {

   static void main(String[] args) {
      def list = [1, 2, 3, 1, 2, 3];

      //find:返回第一个符合条件的项
      def find = list.find({
         item ->
            {
                  item == 1
            }
      })
      println(find); // 1

      //findAll:返回所有符合条件的项
      def findA = list.findAll({
         item ->
            {
                  item == 1
            }
      })
      println(findA); //[1,1]

      //findIndexOf:返回满足条件的第一个元素的下标值。
      def index = list.findIndexOf({
         item ->
            {
                  item == 1
            }
      })
      println(index); //   0

   }

}
2、排序-sort、reverse
class Example {

   static void main(String[] args) {
      def list = [1, 2, 3, 1, 2, 3];

      //sort-正序排序
      def list1=list.sort();
      println(list1);

      //sort-倒叙排序
      def list2=list.sort({
         a, b -> a - b ? -1 : 1
      });
      println(list2);

      // reverse:将原list倒序,返回一个新的list
      def list3=list.reverse();
      println(list3);
   }

}
//打印:
[1, 1, 2, 2, 3, 3]
[3, 3, 2, 2, 1, 1]
[1, 1, 2, 2, 3, 3]
3、返回新数组-collect、tail
class Example {

   static void main(String[] args) {
      def list = [1, 2, 3, 1, 2, 3];

      //collect:返回一个新的list,他可以接受一个闭包参数或者无参。类似js中map。it是闭包中自带的隐式变量;
      def doCollect = list.collect({
         return it - 1;
      })
      println(doCollect)

      // tail:返回一个新的list,它包含list中的所有的元素(除了第一个元素)
      def doTail=list.tail();
      println(doTail)

      // 一个累积的过程方法(有点像js的reduce),传入inject方法中的ini作为sum的初始值,在遍历collection的过程中,将处理结果(“$sum $elem”)保存到sum中。
      def doInject=list.inject("ini") {
         sum, elem -> "$elem $sum"
      }
      println(doInject)
   }

}

// 打印:
// [0, 1, 2, 0, 1, 2]
// [2, 3, 1, 2, 3]
// 3 2 1 3 2 1 ini
4、遍历
each、eachWithIndex
class Example {

   static void main(String[] args) {
      def list = [1, 2, 3, 1, 2, 3];

      //each:普通的迭代遍历
      list.each({
         it -> println(it)
      })

      //eachWithIndex:他的作用和each一样,但是他要传入一个闭包,有两个参数,一个是值,一个是索引。
      list.eachWithIndex { int entry, int i ->
         {
            println( "${entry}--${i}")
         }
      }
   }

}

// 打印:
// 1
// 2
// 3
// 1
// 2
// 3
// 1--0
// 2--1
// 3--2
// 1--3
// 2--4
// 3--5
every、any、first、last、max、min、count、unique
class Example {

   static void main(String[] args) {
      def list = [1, 2, 3, 1, 2, 3];

      //every:接收一个闭包,返回为一个布尔值,当所有条件都满足时才返回true
      def flag1=list.every({
         it -> it>0
      })
      println(flag1);

      //any:和every用法一样,只要有一个为true,则返回true
      def flag2=list.any({
         it -> it>0
      })
      println(flag2);

      //返回第一个数据
      println(list.first());
      //返回最后一个数据
      println(list.last());
      //返回最大值
      println(list.max());
      //返回最小值
      println(list.min());
      //返回总和
      println(list.sum());
      //返回某项出现的次数
      println(list.count(3));
      //返回去重后的数组
      println(list.unique());
   }

}

// 打印:
// true
// true
// 1
// 3
// 3
// 1
// 12
// 2
// [1, 2, 3]
5、分组
class Example {

   static void main(String[] args) {
      def items = [[name:"tony", age:4], [name:"tony", age: 5], [name:"alan", age:16]]
      def groups = items.groupBy {it.name}
      println(groups);
   }

}

// 打印:
// [tony:[[name:tony, age:4], [name:tony, age:5]], alan:[[name:alan, age:16]]]
6、包含
class Example {

   static void main(String[] args) {
      def list = [1, 2, 3, 1, 2, 3];
      def list2 = [1, 2, 3,4];

      println(list.containsAll(list2));
      println(list2.containsAll(list));
   }

}

// 打印:
// false
// true
7、合并
def array1 = [1, 2, 3]
def array2 = [4, 5, 6]
def mergedArray = array1 + array2
println mergedArray // 输出: [1, 2, 3, 4, 5, 6]
8、获取两个数组的差异项
def array1 = [1, 2, 3, 4, 5]
def array2 = [3, 4, 5, 6, 7]

def difference = array1.minus(array2)

println difference // 输出: [1, 2]
十三、映射
映射(也称为关联数组,字典,表和散列)是对象引用的无序集合。Map集合中的元素由键值访问。 Map中使用的键可以是任何类。当我们插入到Map集合中时,需要两个值:键和值。
以下是一些映射的例子
- [‘TopicName’:‘Lists’,‘TopicName’:‘Maps’] - 具有TopicName作为键的键值对的集合及其相应的值。
- [:] - 空映射。
class Example {
   static void main(String[] args) {
      def mp = ["TopicName" : "Maps", "TopicDescription" : "Methods in Maps"]
      println(mp.get("TopicName"));
      println(mp.get("Topic"));
   }
}
十四、日期和时间
class Example {

   static void main(String[] args) {
      Date date = new Date()

      println(date.toString())   //Mon Jun 19 13:15:20 CST 2023
      println(date.getDateString()) //2023/6/19
      println(date.dateTimeString)  //2023/6/19 13:15:20
      // 格式化时间
      println(date.format('yyyy-MM-dd HH:mm:ss'))  //2023-06-19 13:15:20

      // after 测试此日期是否在指定日期之后
      Date oldDate = new Date('05/11/2015')
      Date newDate = new Date('05/12/2022')
      Date latestDate = new Date()

      println(oldDate.after(newDate))  //false
      println(latestDate.after(newDate))  //true

      // equals 比较两个日期的相等性。当且仅当参数不为null时,结果为true,并且是表示与该对象时间相同的时间点(毫秒)的Date对象
      println(oldDate.equals(newDate)) //false
      println(latestDate.equals(newDate)) //false

      // 返回自此Date对象表示的1970年1月1日,00:00:00 GMT以来的毫秒数
      println(oldDate.getTime()) //1431273600000
   }

}
// Date.getTime() 获取时间戳
// Date.setTime(long time) 返回时间戳
十五、正则表达式
Groovy使用~”pattern” 来支持正则表达式,它将使用给定的模式字符串创建一个编译好的Java Pattern 对象。Groovy也支持 =~(创建一个Matcher)和 ==~ (返回boolean,是否给定的字符串匹配这个pattern)操作符。
定义正则可以使用 ~+字符串、/正则表达式/ 这两种方式来定义一个正则表达式,具体如下:
class Example {

   static void main(String[] args) {
      def reg1 = ~'he*llo'
      def reg2 = /he*llo/
      println "reg1 type is ${reg1.class}"
      println "reg2 type is ${reg2.class}"
      println 'hello'.matches(reg1)
      println 'hello'.matches(reg2)
   }

}
//打印
reg1 type is class java.util.regex.Pattern
reg2 type is class java.lang.String
true
true
注意:上述例子中的~ 和= 之间有一个空格, 因为Groovy中存在=~ 操作符号, 这个操作符为查询操作符, 使用在字符串之后, 要求接一个正则表达式, 返回的是一个java.util.regex.Matcher 对象. 还有一个操作符==~ 也比较容易混淆,这个操作符为匹配操作符, 后面跟一个正则表达式, 返回的类型为Boolean 类型。
def val1 = "hello" =~ "he*llo"
println val1.class
println val1.matches()

def val1 = "hello" ==~ "he*llo"
println val1.class
println val1

//打印:
class java.util.regex.Matcher
true
class java.lang.Boolean
true
匹配字符串
class Example {

   static void main(String[] args) {
      def reg = ~/h(el)(lo)/
      def str = 'hello world hello nihao'
      def matcher = str =~ reg
      println 'first matched substring'
      println matcher[0]
      println matcher[0][0]
      println matcher[0][1]
      println matcher[0][2]
      println 'second matched substring'
      println matcher[0]
      println matcher[0][0]
      println matcher[0][1]
      println matcher[0][2]
   }

}
//打印
first matched substring
[hello, el, lo]
hello
el
lo
second matched substring
[hello, el, lo]
hello
el
lo
十六、异常处理
class Example {
   static void main(String[] args) {
      try {
         def arr = new int[3];
         arr[5] = 5;
      }catch(ArrayIndexOutOfBoundsException ex) {
         println("Catching the Array out of Bounds exception");
      }catch(Exception ex) {
         println("Catching the exception");
      }finally {
         println("The final block");
      }

      println("Let's move on after the exception");
   }
}

//打印
Catching the Array out of Bounds exception
The final block
Let's move on after the exception
十七、面向对象
1、类
class Example {
   static void main(String[] args) {
      Student st = new Student();
      st.StudentID = 1;

      st.Marks1 = 10;
      st.name="Joe";

      println(st.name);
      println(st.DisplayMarks());
   }
}

abstract class Person {
   public String name;
   public Person() { }
   abstract void DisplayMarks();
}

class Student extends Person {
   int StudentID
   int Marks1;

   public Student() {
      super();
   }

   void DisplayMarks() {
      println(Marks1);
   }
}
//打印
Joe
10
2、接口
class Example {
   static void main(String[] args) {
      Student st = new Student();
      st.StudentID = 1;
      st.Marks1 = 10;
      println(st.DisplayMarks());
   }
}

interface Marks {
   void DisplayMarks();
}

class Student implements Marks {
   int StudentID
   int Marks1;

   void DisplayMarks() {
      println(Marks1);
   }
}
//打印
10
十八、泛型
1、类
class Example {
   static void main(String[] args) {
      // Creating a generic List collection
      ListType<String> lststr = new ListType<>();
      lststr.set("First String");
      println(lststr.get());

      ListType<Integer> lstint = new ListType<>();
      lstint.set(1);
      println(lstint.get());
   }
}

public class ListType<T> {
   private T localt;

   public T get() {
      return this.localt;
   }

   public void set(T plocal) {
      this.localt = plocal;
   }
}
//打印
First String
1
2、集合的通用
可以对集合类(如List类)进行一般化,以便只有该类型的集合在应用程序中被接受。
class Example {
   static void main(String[] args) {
      // Creating a generic List collection
      List<String> list = new ArrayList<String>();
      list.add("First String");
      list.add("Second String");
      list.add("Third String");

      for(String str : list) {
         println(str);
      }
   }
}
十九、特征
使用trait关键字定义 trait。然后可以使用 implement 关键字以类似于接口的方式实现 trait。
class Example {
   static void main(String[] args) {
      Student st = new Student();
      st.StudentID = 1;
      st.Marks1 = 10;
      println(st.DisplayMarks());
   }
}

trait Marks {
   void DisplayMarks() {
      println("Display Marks");
   }
}

class Student implements Marks {
   int StudentID
   int Marks1;
}
实现接口
class Example {
   static void main(String[] args) {
      Student st = new Student();
      st.StudentID = 1;
      st.Marks1 = 10;

      println(st.DisplayMarks());
      println(st.DisplayTotal());
   }
}

interface Total {
   void DisplayTotal()
}

trait Marks implements Total {
   void DisplayMarks() {
      println("Display Marks");
   }

   void DisplayTotal() {
      println("Display Total");
   }
}

class Student implements Marks {
   int StudentID
   int Marks1;
}

//打印
Display Marks
Display Total
二十、闭包
- 闭包可以接收入参
- 闭包可以引用外部变量
class Example {
   static void main(String[] args) {
      def str1 = "Hello";
      def clos = {param -> println "${str1} ${param}"}
      clos.call("World");

      // We are now changing the value of the String str1 which is referenced in the closure
      str1 = "Welcome";
      clos.call("World");
   }
}

//打印
Hello World
Welcome World
it是闭包中提供的隐式变量。当闭包没有显式声明的参数时可用。当闭包与诸如removeIf的收集方法一起使用时,it将指向当前的迭代项.
List<Integer> integers = [1, 2, 3]
for(Integer it: integers) {print(it)}


 364
364


 被折叠的 条评论
为什么被折叠?
被折叠的 条评论
为什么被折叠?
 到【灌水乐园】发言


