


欢迎访问我的GitHub
这里分类和汇总了欣宸的全部原创(含配套源码):https://github.com/zq2599/blog_demos
关于《prometheus实战》
- 《prometheus实战》是欣宸原创的系列文章,旨在通过实战操作来熟悉和掌握prometheus常规技能
本篇概览
- 本文是《prometheus实战》的开篇,咱们先把环境搭好,为后面的学习做好准备
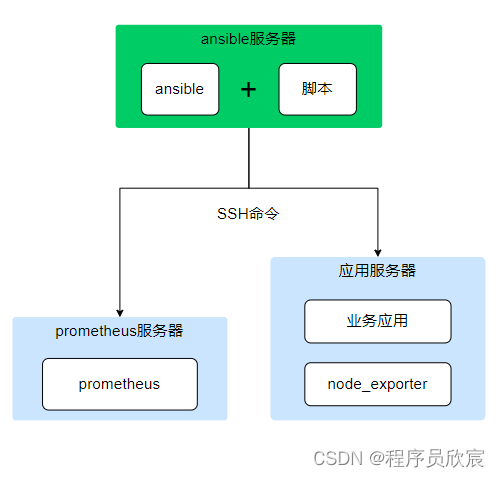
- 为了简化操作,咱们就把环境规划得简单一些,如下图,准备两台Linux电脑(或者虚拟机),一台只部署prometheus,另一台是应用服务器,运行着各种业务应用(例如web服务),再部署node_exporter服务,prometheus从node_exporter取得数据,以实现对应用服务器的监控

环境信息
- 以下是系列实战涉及的各个环境参数,可以作为参考
- 操作系统:ubuntu 22.04 LTS
- prometheus:2.37.7
- node_exporter:1.5.0
- ansible:2.10.8
使用ansible安装
- 为了让整个部署过程简单化、标准化,接下来使用ansible完成部署工作,这样只要备好了ansible脚本就能反复多次安装,并且每次的结果都是一致的,减少手动操作,也降低了出错的可能性
- 由于ansible是远程安装,需要在一台电脑上独立运行,于是整个环境变成了由三台电脑组成,如下图所示,ansible电脑通过ssh命令远程操作,再prometheus服务器上完成prometheus安装,在应用服务器上完成node_exporter安装
- 因此今天的实战一共用到三台电脑(或者三个虚拟机),它们的信息如下所示
| hostname | 身份 | IP地址 |
|---|---|---|
| ansible | ansible执行主机 | 192.168.25.130 |
| prometheus | prometheus服务器(部署了prometheus) | 192.168.25.129 |
| working001 | 应用服务器(部署了node_exporter) | 192.168.25.128 |
- 部署完成后,ansible电脑就不再用到了
梳理整个部署过程
-
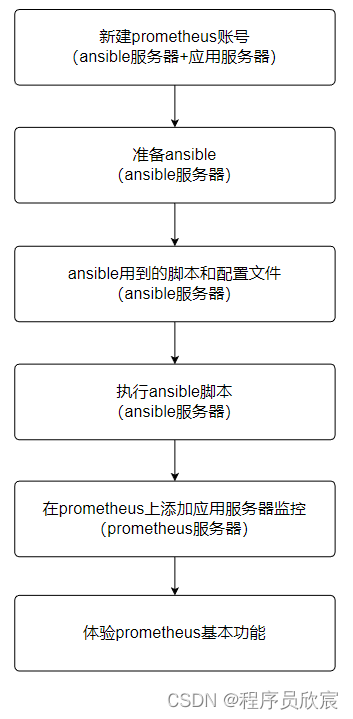
这里提前梳理接下来要做的事情,如下图,一共分为六步
-
接下来逐步完成上述操作
新建prometheus账号(prometheus服务器、应用服务器)
- 在prometheus服务器和应用服务器上都新建prometheus账号,避免使用root,这样可以降低安全风险
- ssh登录prometheus服务器,执行以下三步操作
- 第一步,新建名为prometheus的用户和用户组,并且指定默认shell类型为bash
groupadd prometheus \
&& useradd -d /home/prometheus -g prometheus -m prometheus \
&& usermod -s /bin/bash prometheus
- 第二步,用passwd命令给prometheus账号设置密码,我这里设置的是888888
- 第三步,打开sudo配置文件/etc/sudoers,新增一行,如下图红色箭头所示(保存的时候要加感叹号强制写入),这样prometheus用户就能执行sudo命令,并且不需要输入密码

- ssh登录应用服务器,将上述操作同样再做一次
- 如此,prometheus服务器和应用服务器上都有了prometheus账号,接下来的远程操作都用这个账号进行
准备ansible(ansible电脑)
- ssh登录ansible服务器,执行以下命令即可完ansible部署
sudo apt-get install -y ansible sshpass
- 另外,本文不会讨论太多关于ansible技术的细节,只保证够用即可,如果您对ansible感兴趣,可以参考《ansible2.4安装和体验》
编写ansible用到的配置和脚本(ansible电脑)
- 这一章节是本篇的重点,部署哪些东西,执行哪些设置,全都体现在ansible脚本中,共有两个配置文件和三个脚本,用表格列出其具体功能
| 文件名 | 类别 | 作用 |
|---|---|---|
| hosts | 配置文件 | prometheus服务器和应用服务器的IP地址、账号、密码等配置 |
| ansible.cfg | 配置文件 | ansible的配置信息,如hosts文件位置、超时设置等 |
| vars.yml | 配置文件 | 脚本中用到的参数信息,例如prometheus下载地址、版本号等 |
| common_setup.yml | 脚本文件 | 通用的设置脚本,如apt更新、设置时区等 |
| install_prometheus.yml | 脚本文件 | 部署prometheus的脚本,用在prometheus服务器 |
| install_node_exporter.yml | 脚本文件 | 部署node_exporter的脚本,用在应用服务器 |
- ssh登录ansible电脑,新建文件夹playbooks,上述五个文件都放在此文件夹内
- 接下来详细介绍每个文件的内容,如果您不想写,可以按照文末的地址直接下载它们
- 新增远程账号配置文件hosts,内容如下
[prometheus-group]
prometheus ansible_host=192.168.25.129 ansible_port=22 ansible_user=prometheus ansible_password=888888
working001 ansible_host=192.168.25.128 ansible_port=22 ansible_user=prometheus ansible_password=888888
- 新增ansible配置文件ansible.cfg,内容如下
[defaults]
inventory = ~/playbooks/hosts
host_key_checking = False
timeout = 30
- 所有可能修改的参数都集中到配置文件vars.yml中
prometheus_user_home: /home/prometheus
prometheus_base_path: '{{prometheus_user_home}}/prometheus'
prometheus_url: https://github.com/prometheus/prometheus/releases/download
prometheus_version: 2.37.7
prometheus_deploy_path: '{{prometheus_base_path}}/prometheus-{{prometheus_version}}.linux-amd64'

node_exporter_base_path: '{{prometheus_user_home}}/node_exporter'
node_exporter_url: https://github.com/prometheus/node_exporter/releases/download
node_exporter_version: 1.5.0
node_exporter_deploy_path: '{{node_exporter_base_path}}/node_exporter-{{node_exporter_version}}.linux-amd64'
- 然后是第一个脚本common_setup.yml,这个脚本同时在prometheus服务器和应用服务器执行,如下,可见hosts字段的值并非某个机器,而是组名prometheus-group,这样就会同时在该组下所有机器上执行此脚本
- name: 部署前的准备工作(通用)
  hosts: prometheus-group
  gather_facts: True
  vars_files:
  - vars.yml
  tasks:
  - name: update apt
    apt:
      update_cache: yes
      cache_valid_time: 86400
    become: yes

  - name: get timelocal
    shell: ls -l /etc/localtime | awk '{print $11}'
    register: timelocal

  - name: delete loacltime
    shell: rm -f /etc/localtime
    when: timelocal.stdout != "/usr/share/zoneinfo/Asia/Shanghai"
    become: yes

  - name: create asia time
    shell: ln -s /usr/share/zoneinfo/Asia/Shanghai /etc/localtime
    when: timelocal.stdout != "/usr/share/zoneinfo/Asia/Shanghai"
    become: yes

  - name: 安装时钟同步工具
    apt:
      name: ntpdate
      state: present
    become: yes

  - name: 同步时钟
    command: ntpdate ntp.aliyun.com
    become: yes
- 接下来是最重要的部署脚本install_prometheus.yml,此脚本在prometheus上完成的工作有:下载prometheus安装包、解压部署、创建systemd的service配置文件,以service方式启动prometheus等操作
- name: 部署prometheus
  hosts: prometheus
  gather_facts: False
  vars_files:
  - vars.yml
  tasks:
  - name: 停止残留的prometheus
    ignore_errors: yes
    systemd:
      name: prometheus
      state: stopped
    become: yes

  - name: 清理可能的prometheus service残留文件
    file:
      path: /etc/systemd/system/prometheus.service
      state: absent
    become: yes

  - name: 清理可能的prometheus残留文件夹
    file:
      path: '{{prometheus_base_path}}'
      state: absent

  - name: 新建部署文件夹
    file:
      path: '{{prometheus_base_path}}'
      state: directory
      mode: '0755'

  - name: 下载并解压文件prometheus-{{prometheus_version}}.linux-amd64.tar.gz
    ansible.builtin.unarchive:
      src: '{{prometheus_url}}/v{{prometheus_version}}/prometheus-{{prometheus_version}}.linux-amd64.tar.gz'
      dest: '{{prometheus_base_path}}'
      remote_src: yes

  - name: 生成systemd的service文件
    shell: |
      tee /etc/systemd/system/prometheus.service <<-'EOF'
      [Unit]
      Description=Prometheus Server
      Documentation=https://prometheus.io/docs/introduction/overview/
      After=network-online.target
      [Service]
      User=prometheus
      Restart=on-failure
      #Change this line if you download the
      #Prometheus on different path user
      ExecStart={{prometheus_deploy_path}}/prometheus --config.file={{prometheus_deploy_path}}/prometheus.yml --storage.tsdb.path={{prometheus_base_path}}/data
      [Install]
      WantedBy=multi-user.target

      EOF
    become: yes

  - name: 刷新服务配置
    systemd:
      daemon_reload: true
    become: yes

  - name: 将prometheus服务设置为自启动
    systemd:
      name: prometheus
      enabled: true
      masked: no
    become: yes

  - name: 启动prometheus
    systemd:
      state: started
      name: prometheus
    become: yes
- 最后是部署node_exporter的脚本install_node_exporter.yml,用于在应用服务器部署node_exporter服务,prometheus可以通过此服务提供的web接口取得应用服务器的各项指标参数
- name: 部署node_exporter
  hosts: working001
  gather_facts: False
  vars_files:
  - vars.yml
  tasks:
  - name: 停止残留的node_exporter
    ignore_errors: yes
    systemd:
      name: node_exporter
      state: stopped
    become: yes

  - name: 清理可能的node_exporter service残留文件
    file:
      path: /etc/systemd/system/node_exporter.service
      state: absent
    become: yes

  - name: 清理可能的node_exporter残留文件夹
    file:
      path: '{{node_exporter_base_path}}'
      state: absent

  - name: 新建部署文件夹
    file:
      path: '{{node_exporter_base_path}}'
      state: directory
      mode: '0755'

  - name: 下载并解压文件node_exporter-{{node_exporter_version}}.linux-amd64.tar.gz
    ansible.builtin.unarchive:
      src: '{{node_exporter_url}}/v{{node_exporter_version}}/node_exporter-{{node_exporter_version}}.linux-amd64.tar.gz'
      dest: '{{node_exporter_base_path}}'
      remote_src: yes

  - name: 生成systemd的service文件
    shell: |
      tee /etc/systemd/system/node_exporter.service <<-'EOF'
      [Unit]
      Description=Node exporter Server
      Documentation=https://prometheus.io/docs/introduction/overview/
      After=network-online.target
      [Service]
      User=prometheus
      Restart=on-failure
      ExecStart={{node_exporter_deploy_path}}/node_exporter --web.listen-address=:9100
      [Install]
      WantedBy=multi-user.target

      EOF
    become: yes

  - name: 刷新服务配置
    systemd:
      daemon_reload: true
    become: yes

  - name: 将node_exporter服务设置为自启动
    systemd:
      name: node_exporter
      enabled: true
      masked: no
    become: yes

  - name: 启动node_exporter
    systemd:
      state: started
      name: node_exporter
    become: yes
- 至此,脚本已经全部写好了,接下来就是执行这些脚本,完成部署
执行ansible脚本(ansible电脑)
- 共三个ansible脚本,执行顺序是:公共、prometheus、node_exporter,因此依次执行以下三个命令即可(SSH登录ansible,进入playbook目录)
# 公共脚本,prometheus服务器和应用服务器都会执行
ansible-playbook common_setup.yml

# 部署node_exporter脚本,prometheus服务器和应用服务器都会执行
ansible-playbook install_prometheus.yml

# 部署node_exporter脚本,prometheus服务器和应用服务器都会执行
ansible-playbook install_node_exporter.yml
- 上述三个脚本执行完毕后,prometheus和node_exporter都被设置为systemd服务,并且已成功启动
检查服务部署情况
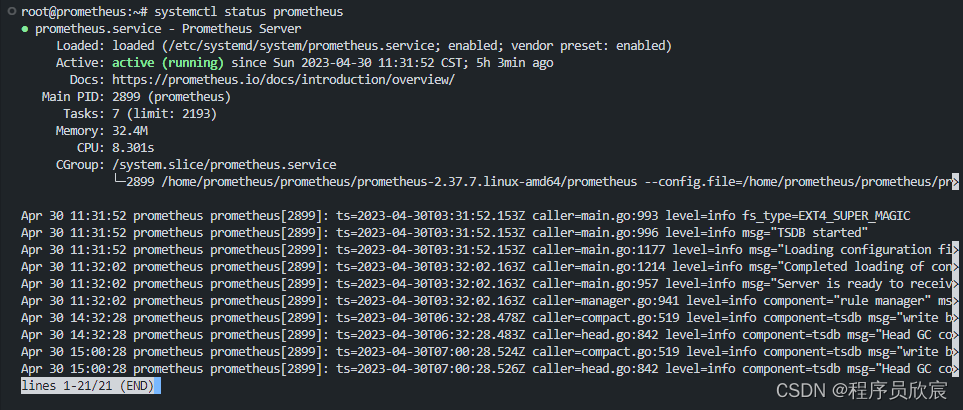
- 登录prometheus服务器,执行命令systemctl status prometheus查看服务情况,如下图,服务处于正常运行状态
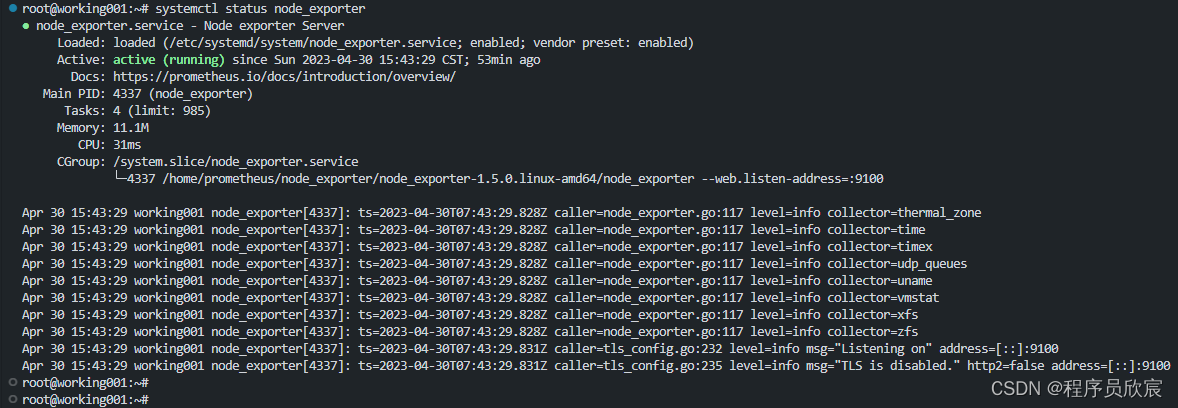
- 登录应用服务器,执行命令systemctl status node_exporter查看服务情况,如下图,服务处于正常运行状态
- 目前两个服务都启动成功了,不过还有个问题:prometheus用的是官方的默认配置,并没有监控应用服务器,因此要修改配置,使之从应用服务器采取监控数据
配置prometheus,添加监控任务
- ssh登录prometheus服务器,修改配置文件/home/prometheus/prometheus/prometheus-2.37.7.linux-amd64/prometheus.yml,添加一个监控任务,在文件尾部增加以下内容(注意,抓取间隔时间必须大于抓取超时时间)
   # 新增任务,从应用服务器采集数据
  - job_name: "node-resource-working001"
    # 抓取时间间隔
    scrape_interval: 15s
    # 抓取超时时间
    scrape_timeout: 10s
    # 抓取地址
    static_configs:
      - targets: ["192.168.25.128:9100"]
- 以prometheus账号的身份执行以下命令,重启服务
systemctl restart prometheus
-
至此,所有服务都启动完毕,用浏览器打开地址http://192.168.25.129:9090/,会展示prometheus的功能页面,如下图

-
再打开http://192.168.25.129:9090/targets,查看是否监控到应用服务器,如下图,已顺利获取到

-
至此,ansible部署prometheus完成,接下来的系列文章会有更多实战一路相伴,帮组咱们一同学习和掌握prometheus
问题备忘
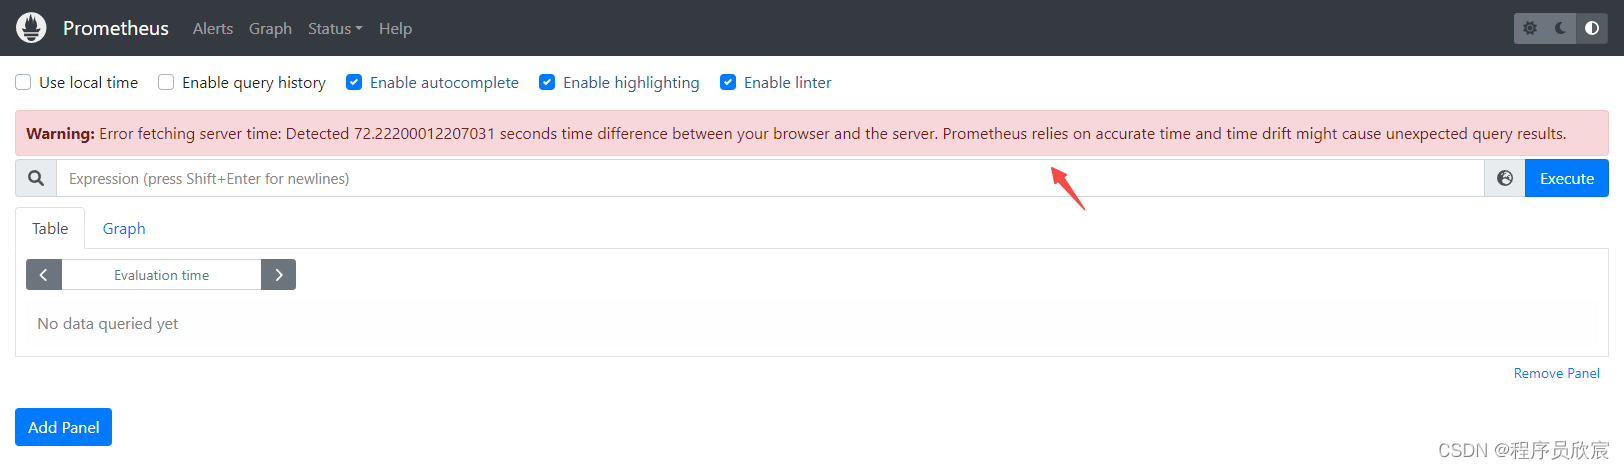
- 打开网页的时候如果遇到以下错误,注意检查prometheus服务器和浏览器所在电脑的时间是否一致,确保一致后问题就会消失
Warning: Error fetching server time: Detected 72.22200012207031 seconds time difference between your browser and the server. Prometheus relies on accurate time and time drift might cause unexpected query results.
- 如下图:
脚本下载
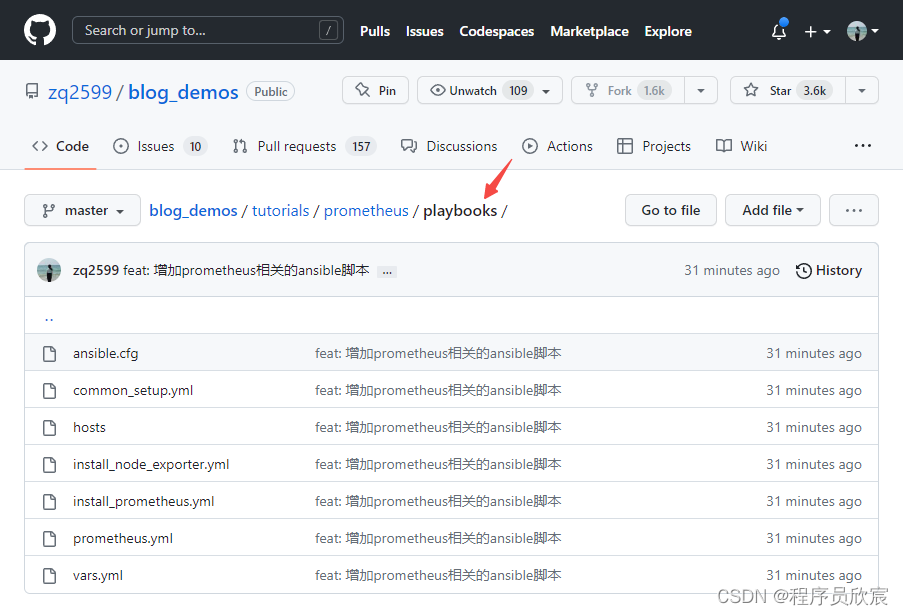
- 本篇涉及的所有配置文件和脚本文件都能在下面这个仓库下载:
| 名称 | 链接 | 备注 |
|---|---|---|
| 项目主页 | https://github.com/zq2599/blog_demos | 该项目在GitHub上的主页 |
| git仓库地址(https) | https://github.com/zq2599/blog_demos.git | 该项目源码的仓库地址,https协议 |
| git仓库地址(ssh) | git@github.com:zq2599/blog_demos.git | 该项目源码的仓库地址,ssh协议 |
- 这个git项目中有多个文件夹,本篇的文件在tutorials/prometheus/playbooks/文件夹下,如下图红框所示:


 143
143

 被折叠的 条评论
为什么被折叠?
被折叠的 条评论
为什么被折叠?
 到【灌水乐园】发言


