


本文英文版地址:https://examples.javacodegeeks.com/enterprise-java/apache-solr/solr-dataimporthandler-example/
在Dataimporthandler的这个例子中,我们将讨论如何使用Dataimporthandler从数据库导入和索引数据。我们还将讨论从关系数据库导入数据所需的各种配置。 许多搜索应用将要索引的内容存储在结构化数据存储中,例如关系数据库。 除了数据库,DIH可以用于索引来自RSS和ATOM订阅源,电子邮件存储库和结构化XML的内容。
为了演示数据库的导入功能,我们将使用Solr服务器附带的样例hsql数据库。
这个例子的首选环境是solr-5.0.0。在开始Solr安装之前,请确保已安装JDK并已正确设置Java_Home。
1.安装Apache Solr
首先,让我们从以下位置下载最新版本的Apache Solr:
http://lucene.apache.org/solr/downloads.html
Apache Solr已经经历了从4.xx到5.0.0的各种更改,因此如果您有不同版本的Solr,则需要下载5.xx版本以遵循此示例。
下载Solr zip文件后,将其解压缩到文件夹中。 提取的文件夹将如下所示:
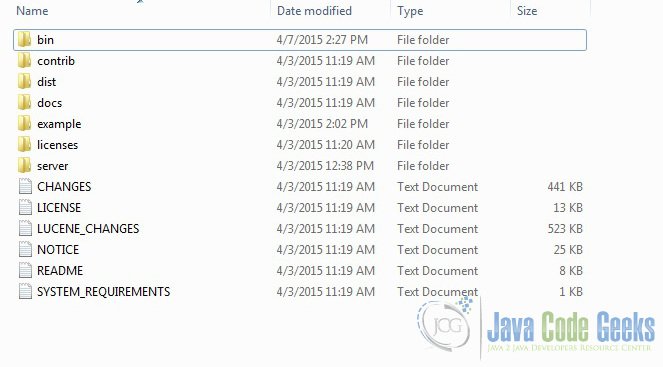
Solr文件夹
bin文件夹包含用于启动和停止服务器的脚本。 example文件夹包含几个示例文件。 我们将使用其中一个来演示Solr如何对数据进行索引。server文件夹包含用于写入所有Solr日志的logs文件夹。在索引期间检查日志中的任何错误将有所帮助。 服务器下的solr文件夹包含不同的集合或核心。 每个核/集合的配置和数据存储在相应的核/集合文件夹中。
Apache Solr附带了一个内置的Jetty服务器。 但在我们启动solr实例之前,我们必须验证JAVA_HOME是否在机器上设置。
我们可以使用命令行脚本启动服务器。 让我们从命令提示符转到bin目录并发出以下命令:
solr start
这将在默认端口8983下启动Solr服务器。
我们现在可以在浏览器中打开以下URL,并验证我们的Solr实例正在运行。 solr管理工具的具体细节超出了示例的范围。
http://localhost:8983/solr/
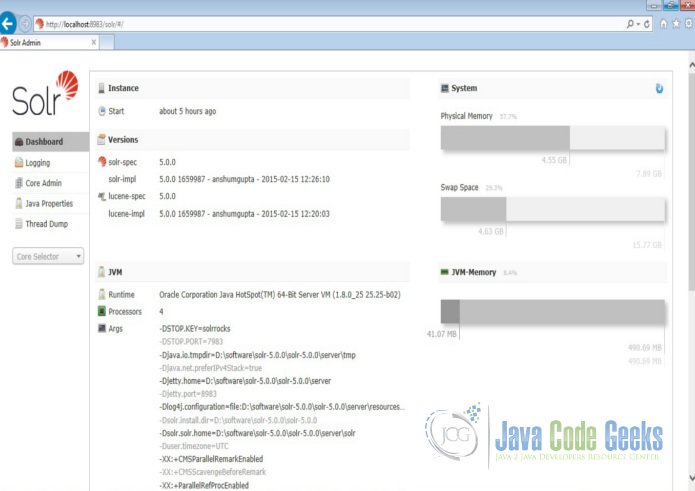
Solr管理控制台
2.创建Solr核心
当Solr服务器在独立模式下启动时,配置称为核心,当在SolrCloud模式下启动时,配置称为集合。在这个例子中,我们将讨论独立的服务器和核心。 我们将暂停SolrCloud讨论以供日后使用。
首先,我们需要创建一个用于索引数据的Core。 Solr create命令有以下选项:
- -c <name> - 要创建的核心或集合的名称(必需)。
- -d <confdir> - 配置目录,在SolrCloud模式下有用。
- -n <configName> - 配置名称。 此默认值与核心或集合的名称相同。
- -p <port> - 要向其发送create命令的本地Solr实例的端口;默认情况下,脚本尝试通过查找正在运行的Solr实例来检测端口。
- -s <shards> - 将集合拆分为的分片数,默认值为1。
- -rf <replicas> - 集合中每个文档的副本数。默认值为1。
在本例中,我们将使用-c参数作为核心名称,使用-d参数作为配置目录。 对于所有其他参数,我们使用默认设置。
现在在命令窗口中导航solr-5.0.0\bin文件夹,并发出以下命令:
solr create -c jcg -d basic_configs
我们可以在命令窗口中看到以下输出。
1 | <span class="notranslate"onmouseover="_tipon(this)"onmouseout="_tipoff()"><span class="google-src-text"style="direction: ltr; text-align: left">Creating new core'jcg' using command:</span>使用命令创建新核心'jcg':</span> |
2 | <span class="notranslate"onmouseover="_tipon(this)"onmouseout="_tipoff()"><span class="google-src-text"style="direction: ltr; text-align: left">http://localhost:8983/solr/admin/cores?action=CREATE&name=jcg&instanceDir=jcg</span> http:// localhost:8983 / solr / admin / cores?action = CREATE&name = jcg&instanceDir = jcg</span> |
3 |
4 | <span class="notranslate"onmouseover="_tipon(this)"onmouseout="_tipoff()"><span class="google-src-text"style="direction: ltr; text-align: left">{</span> {</span> |
5 | <span class="notranslate"onmouseover="_tipon(this)"onmouseout="_tipoff()"><span class="google-src-text"style="direction: ltr; text-align: left">"responseHeader":{</span> “responseHeader”:{</span> |
6 | <span class="notranslate"onmouseover="_tipon(this)"onmouseout="_tipoff()"><span class="google-src-text"style="direction: ltr; text-align: left">"status":0,</span> “status”:0,</span> |
7 | <span class="notranslate"onmouseover="_tipon(this)"onmouseout="_tipoff()"><span class="google-src-text"style="direction: ltr; text-align: left">"QTime":663},</span> “QTime”:663},</span> |
8 | <span class="notranslate"onmouseover="_tipon(this)"onmouseout="_tipoff()"><span class="google-src-text"style="direction: ltr; text-align: left">"core":"jcg"}</span> “core”:“jcg”}</span> |
现在我们导航到以下URL,我们可以看到jcg core被填充在核心选择器中。 您还可以查看核心的统计信息。
http://localhost:8983/solr
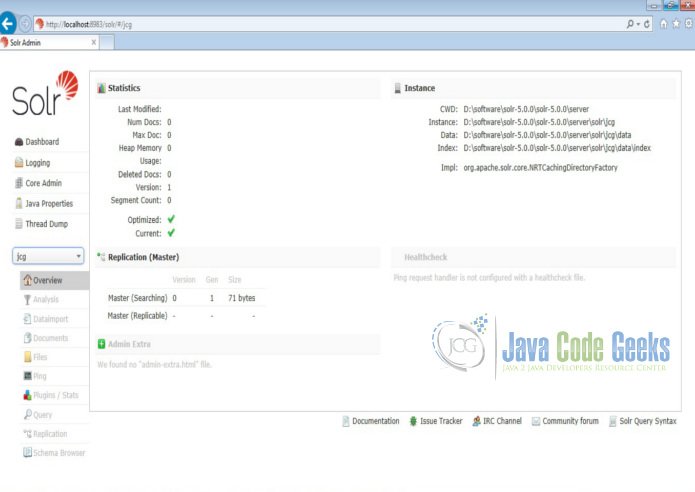
Solr jcg core
3.配置Dataimporthandler
当使用Dataimporthandler时,我们需要处理多种配置。 配置跨三个不同的文件
- solrconfig.xml
- db-data-config.xml
- schema.xml
我们将在这里讨论所有的配置步骤。
3.1配置必需的库
要使用Dataimporthandler和hsql数据库,我们需要首先加载它们各自的库。 因此,可以在文件夹server\solr\jcg\conf下配置solrconfig.xml以加载必需的库。 将以下配置添加到文件:
solrconfig.xml
1 | <spanclass="notranslate"onmouseover="_tipon(this)"onmouseout="_tipoff()"><spanclass="google-src-text"style="direction: ltr; text-align: left"><luceneMatchVersion>5.0.0</luceneMatchVersion></span> <luceneMatchVersion> 5.0.0 </luceneMatchVersion></span> |
2 | <spanclass="notranslate"onmouseover="_tipon(this)"onmouseout="_tipoff()"><spanclass="google-src-text"style="direction: ltr; text-align: left"><libdir="${solr.install.dir:../../../..}/dist/"regex="solr-dataimporthandler-.*\.jar"/></span> <libdir =“$ {solr.install.dir:../../../ ..} / dist /”regex =“solr-dataimporthandler - 。* \。jar”/></span> |
3 | <spanclass="notranslate"onmouseover="_tipon(this)"onmouseout="_tipoff()"><spanclass="google-src-text"style="direction: ltr; text-align: left"><libdir="${solr.install.dir:../../../..}/contrib/extraction/lib"regex=".*\.jar"/></span> <libdir =“$ {solr.install.dir:../../../ ..} / contrib / extract / lib”regex =“。* \。jar”/></span> |
现在,将hsqldb * .jar从路径example \ example-DIH \ solr \ db \ lib复制到contrib \ extract \ lib
3.2配置requestHandler
Dataimporthandler必须通过requestHandler标签在solrconfig.xml中注册。配置中唯一必需的参数是指定DIH配置文件位置的config参数。 配置文件包含数据源的规范,如何获取数据,要提取的数据以及如何处理它以生成要发布到索引的Solr文档。
solrconfig.xml
1 | <spanclass="notranslate"onmouseover="_tipon(this)"onmouseout="_tipoff()"><spanclass="google-src-text"style="direction: ltr; text-align: left"><requestHandlername="/dataimport"class="solr.DataImportHandler"></span> <requestHandlername =“/ dataimport”class =“solr.DataImportHandler”></span> |
2 | <spanclass="notranslate"onmouseover="_tipon(this)"onmouseout="_tipoff()"><spanclass="google-src-text"style="direction: ltr; text-align: left"><lstname="defaults"></span> <lstname =“defaults”></span> |
3 | <spanclass="notranslate"onmouseover="_tipon(this)"onmouseout="_tipoff()"><spanclass="google-src-text"style="direction: ltr; text-align: left"><strname="config">db-data-config.xml</str></span> <str name =“config”> db-data-config.xml </str></span> |
4 | <spanclass="notranslate"onmouseover="_tipon(this)"onmouseout="_tipoff()"><spanclass="google-src-text"style="direction: ltr; text-align: left"></lst></span> </ lst></span> |
5 | <spanclass="notranslate"onmouseover="_tipon(this)"onmouseout="_tipoff()"><spanclass="google-src-text"style="direction: ltr; text-align: left"></requestHandler></span> </ requestHandler></span> |
6 |
7 | <spanclass="notranslate"onmouseover="_tipon(this)"onmouseout="_tipoff()"><spanclass="google-src-text"style="direction: ltr; text-align: left"><!-- SearchHandler</span> <! - SearchHandler</span> |
3.3配置db-data-config.xml
现在,在文件夹server\solr\jcg\conf下创建一个名为db-data-config.xml的文件。使用以下内容填充文件。
db-data-config.xml
1 | <spanclass="notranslate"onmouseover="_tipon(this)"onmouseout="_tipoff()"><spanclass="google-src-text"style="direction: ltr; text-align: left"><dataConfig></span> <dataConfig></span> |
2 | <spanclass="notranslate"onmouseover="_tipon(this)"onmouseout="_tipoff()"><spanclass="google-src-text"style="direction: ltr; text-align: left"><dataSourcedriver="org.hsqldb.jdbcDriver"url="jdbc:hsqldb:${solr.install.dir}/example/example-DIH/hsqldb/ex"user="sa"/></span> <dataSourcedriver =“org.hsqldb.jdbcDriver”url =“jdbc:hsqldb:$ {solr.install.dir} / example / example-DIH / hsqldb / ex”user =“sa”/></span> |
3 | <spanclass="notranslate"onmouseover="_tipon(this)"onmouseout="_tipoff()"><spanclass="google-src-text"style="direction: ltr; text-align: left"><document></span> <document></span> |
4 | <spanclass="notranslate"onmouseover="_tipon(this)"onmouseout="_tipoff()"><spanclass="google-src-text"style="direction: ltr; text-align: left"><entityname="item"query="select id, NAME, price, manu from item"></span> <entityname =“item”query =“select item,NAME,price,manu from item”></span> |
5 | <spanclass="notranslate"onmouseover="_tipon(this)"onmouseout="_tipoff()"><spanclass="google-src-text"style="direction: ltr; text-align: left"><fieldcolumn="NAME"name="name"/></span> <fieldcolumn =“NAME”name =“name”/></span> |
6 | <spanclass="notranslate"onmouseover="_tipon(this)"onmouseout="_tipoff()"><spanclass="google-src-text"style="direction: ltr; text-align: left"></entity></span> </ entity></span> |
7 | <spanclass="notranslate"onmouseover="_tipon(this)"onmouseout="_tipoff()"><spanclass="google-src-text"style="direction: ltr; text-align: left"></document></span> </ document></span> |
8 | <spanclass="notranslate"onmouseover="_tipon(this)"onmouseout="_tipoff()"><spanclass="google-src-text"style="direction: ltr; text-align: left"></dataConfig></span> </ dataConfig></span> |
在上面的查询中,我们只选择了id, NAME, price and manu字段用于从表item中建立索引。字段元素可用于将字段从数据库重命名为我们要在Solr索引中引用的名称。
3.4配置schema.xml
现在,我们必须在Solr模式中添加数据类型,相对于我们从实体item的hsql数据库检索的数据类型。现在编辑schema.xml文件并添加以下内容:
schema.xml
1 | <spanclass="notranslate"onmouseover="_tipon(this)"onmouseout="_tipoff()"><spanclass="google-src-text"style="direction: ltr; text-align: left"><!-- Only remove the "id" field if you have a very good reason to.</span> <! - 如果你有很好的理由,只删除“id”字段。</span> <span class="notranslate" onmouseover="_tipon(this)" onmouseout="_tipoff()"><span class="google-src-text" style="direction: ltr; text-align: left">While not strictly</span>虽然不严格</span> |
2 | <span class="notranslate" onmouseover="_tipon(this)" onmouseout="_tipoff()"><span class="google-src-text" style="direction: ltr; text-align: left">required, it is highly recommended.</span>需要,强烈推荐。</span> <span class="notranslate" onmouseover="_tipon(this)" onmouseout="_tipoff()"><span class="google-src-text" style="direction: ltr; text-align: left">A <uniqueKey> is present in almost all Solr</span> <uniqueKey>存在于几乎所有Solr中</span> |
3 | <span class="notranslate" onmouseover="_tipon(this)" onmouseout="_tipoff()"><span class="google-src-text" style="direction: ltr; text-align: left">installations.</span>安装。</span> <span class="notranslate" onmouseover="_tipon(this)" onmouseout="_tipoff()"><span class="google-src-text" style="direction: ltr; text-align: left">See the <uniqueKey> declaration below where <uniqueKey> is set to "id".</span>请参见下面的<uniqueKey>声明,其中<uniqueKey>设置为“id”。</span> |
4 | <span class="notranslate" onmouseover="_tipon(this)" onmouseout="_tipoff()"><span class="google-src-text" style="direction: ltr; text-align: left">--></span> - ></span> |
5 | <spanclass="notranslate"onmouseover="_tipon(this)"onmouseout="_tipoff()"><spanclass="google-src-text"style="direction: ltr; text-align: left"><fieldname="id"type="string"indexed="true"stored="true"required="true"multiValued="false"/></span> <fieldname =“id”type =“string”indexed =“true”stored =“true”required =“true”multiValued =“false”</span> |
6 | <spanclass="notranslate"onmouseover="_tipon(this)"onmouseout="_tipoff()"><spanclass="google-src-text"style="direction: ltr; text-align: left"><fieldname="name"type="text_general"indexed="true"stored="true"/></span> <fieldname =“name”type =“text_general”indexed =“true”stored =“true”/></span> |
7 | <spanclass="notranslate"onmouseover="_tipon(this)"onmouseout="_tipoff()"><spanclass="google-src-text"style="direction: ltr; text-align: left"><fieldname="price"type="float"indexed="true"stored="true"/></span> <fieldname =“price”type =“float”indexed =“true”stored =“true”/></span> |
8 | <spanclass="notranslate"onmouseover="_tipon(this)"onmouseout="_tipoff()"><spanclass="google-src-text"style="direction: ltr; text-align: left"><fieldname="manu"type="text_general"indexed="true"stored="true"omitNorms="true"/></span> <fieldname =“manu”type =“text_general”indexed =“true”stored =“true”omitNorms =“true”/></span> |
由于我们更改了配置文件,我们必须重新启动Solr实例来加载新的配置。 让我们发出以下命令。
solr stop -all
solr start
4.通过控制台完全导入
现在我们将启动管理控制台并完成数据的完全导入。 打开以下URL并单击执行按钮。
http://localhost:8983/solr/#/jcg/dataimport//dataimport
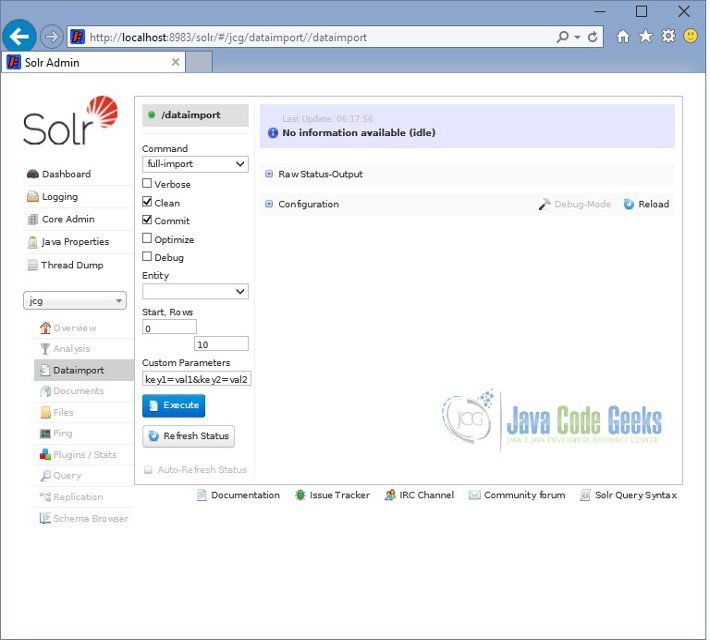
Solr完全导入
几秒钟后刷新页面,我们可以看到索引完成状态。
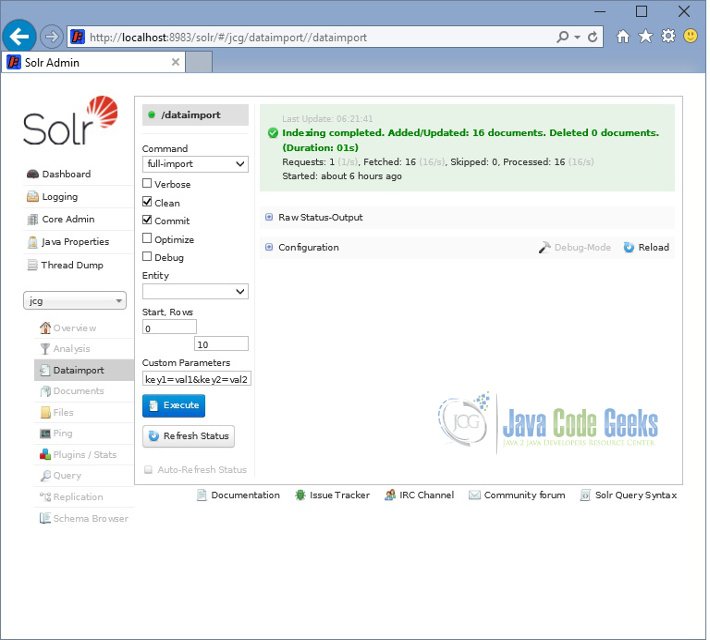
Solr索引状态
现在打开以下URL并单击执行查询按钮。 我们可以看到索引数据。
http://localhost:8983/solr/#/jcg/query
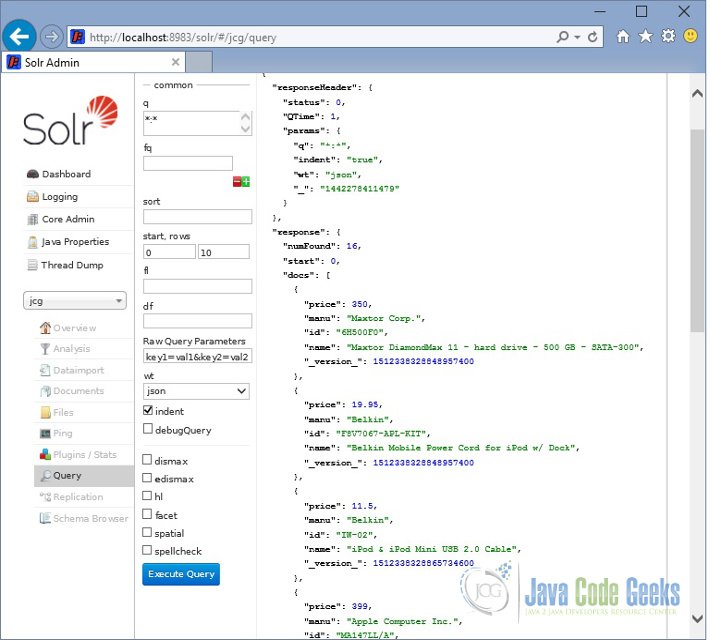
DIH查询
5.添加新列到索引
现在我们将看到如何向索引添加另一列。 我们将获取与每个项目相关联的功能。 为此,我们将编辑db-data-config.xml并添加以下突出显示的行。
01 | <spanclass="notranslate"onmouseover="_tipon(this)"onmouseout="_tipoff()"><spanclass="google-src-text"style="direction: ltr; text-align: left"><dataConfig></span> <dataConfig></span> |
02 | <spanclass="notranslate"onmouseover="_tipon(this)"onmouseout="_tipoff()"><spanclass="google-src-text"style="direction: ltr; text-align: left"><dataSourcedriver="org.hsqldb.jdbcDriver"url="jdbc:hsqldb:${solr.install.dir}/example/example-DIH/hsqldb/ex"user="sa"/></span> <dataSourcedriver =“org.hsqldb.jdbcDriver”url =“jdbc:hsqldb:$ {solr.install.dir} / example / example-DIH / hsqldb / ex”user =“sa”/></span> |
03 | <spanclass="notranslate"onmouseover="_tipon(this)"onmouseout="_tipoff()"><spanclass="google-src-text"style="direction: ltr; text-align: left"><document></span> <document></span> |
04 | <spanclass="notranslate"onmouseover="_tipon(this)"onmouseout="_tipoff()"><spanclass="google-src-text"style="direction: ltr; text-align: left"><entityname="item"query="select id, NAME, price from item"</span> <entityname =“item”query =“select id,NAME,price from item”</span> |
05 | <spanclass="notranslate"onmouseover="_tipon(this)"onmouseout="_tipoff()"><spanclass="google-src-text"style="direction: ltr; text-align: left">deltaQuery="select id from item where last_modified > '${dataimporter.last_index_time}'"></span> deltaQuery =“select item from item where last_modified>'$ {dataimporter.last_index_time}'”></span> |
06 | <spanclass="notranslate"onmouseover="_tipon(this)"onmouseout="_tipoff()"><spanclass="google-src-text"style="direction: ltr; text-align: left"><fieldcolumn="NAME"name="name"/></span> <fieldcolumn =“NAME”name =“name”/></span> |
07 | <spanclass="notranslate"onmouseover="_tipon(this)"onmouseout="_tipoff()"><spanclass="google-src-text"style="direction: ltr; text-align: left"><entityname="feature"</span> <entityname =“feature”</span> |
08 | <spanclass="notranslate"onmouseover="_tipon(this)"onmouseout="_tipoff()"><spanclass="google-src-text"style="direction: ltr; text-align: left">query="select DESCRIPTION from FEATURE where ITEM_ID='${item.ID}'"></span> query =“select FEATURE,其中ITEM_ID ='$ {item.ID}'”></span> |
09 | <spanclass="notranslate"onmouseover="_tipon(this)"onmouseout="_tipoff()"><spanclass="google-src-text"style="direction: ltr; text-align: left"><fieldname="features"column="DESCRIPTION"/></span> <fieldname =“features”column =“DESCRIPTION”/></span> |
10 | <spanclass="notranslate"onmouseover="_tipon(this)"onmouseout="_tipoff()"><spanclass="google-src-text"style="direction: ltr; text-align: left"></entity></span> </ entity></span> |
11 | <spanclass="notranslate"onmouseover="_tipon(this)"onmouseout="_tipoff()"><spanclass="google-src-text"style="direction: ltr; text-align: left"></entity></span> </ entity></span> |
12 | <spanclass="notranslate"onmouseover="_tipon(this)"onmouseout="_tipoff()"><spanclass="google-src-text"style="direction: ltr; text-align: left"></document></span> </ document></span> |
13 | <spanclass="notranslate"onmouseover="_tipon(this)"onmouseout="_tipoff()"><spanclass="google-src-text"style="direction: ltr; text-align: left"></dataConfig></span> </ dataConfig></span> |
现在修改schema.xml以配置新添加的字段。
1 | <spanclass="notranslate"onmouseover="_tipon(this)"onmouseout="_tipoff()"><spanclass="google-src-text"style="direction: ltr; text-align: left"><!-- Only remove the "id" field if you have a very good reason to.</span> <! - 如果你有很好的理由,只删除“id”字段。</span> <span class="notranslate" onmouseover="_tipon(this)" onmouseout="_tipoff()"><span class="google-src-text" style="direction: ltr; text-align: left">While not strictly</span>虽然不严格</span> |
2 | <span class="notranslate" onmouseover="_tipon(this)" onmouseout="_tipoff()"><span class="google-src-text" style="direction: ltr; text-align: left">required, it is highly recommended.</span>需要,强烈推荐。</span> <span class="notranslate" onmouseover="_tipon(this)" onmouseout="_tipoff()"><span class="google-src-text" style="direction: ltr; text-align: left">A <uniqueKey> is present in almost all Solr</span> <uniqueKey>存在于几乎所有Solr中</span> |
3 | <span class="notranslate" onmouseover="_tipon(this)" onmouseout="_tipoff()"><span class="google-src-text" style="direction: ltr; text-align: left">installations.</span>安装。</span> <span class="notranslate" onmouseover="_tipon(this)" onmouseout="_tipoff()"><span class="google-src-text" style="direction: ltr; text-align: left">See the <uniqueKey> declaration below where <uniqueKey> is set to "id".</span>请参见下面的<uniqueKey>声明,其中<uniqueKey>设置为“id”。</span> |
4 | <span class="notranslate" onmouseover="_tipon(this)" onmouseout="_tipoff()"><span class="google-src-text" style="direction: ltr; text-align: left">--></span> - ></span> |
5 | <spanclass="notranslate"onmouseover="_tipon(this)"onmouseout="_tipoff()"><spanclass="google-src-text"style="direction: ltr; text-align: left"><fieldname="id"type="string"indexed="true"stored="true"required="true"multiValued="false"/></span> <fieldname =“id”type =“string”indexed =“true”stored =“true”required =“true”multiValued =“false”</span> |
6 | <spanclass="notranslate"onmouseover="_tipon(this)"onmouseout="_tipoff()"><spanclass="google-src-text"style="direction: ltr; text-align: left"><fieldname="name"type="text_general"indexed="true"stored="true"/></span> <fieldname =“name”type =“text_general”indexed =“true”stored =“true”/></span> |
7 | <spanclass="notranslate"onmouseover="_tipon(this)"onmouseout="_tipoff()"><spanclass="google-src-text"style="direction: ltr; text-align: left"><fieldname="price"type="float"indexed="true"stored="true"/></span> <fieldname =“price”type =“float”indexed =“true”stored =“true”/></span> |
8 | <spanclass="notranslate"onmouseover="_tipon(this)"onmouseout="_tipoff()"><spanclass="google-src-text"style="direction: ltr; text-align: left"><fieldname="manu"type="text_general"indexed="true"stored="true"omitNorms="true"/></span> <fieldname =“manu”type =“text_general”indexed =“true”stored =“true”omitNorms =“true”/></span> |
9 | <spanclass="notranslate"onmouseover="_tipon(this)"onmouseout="_tipoff()"><spanclass="google-src-text"style="direction: ltr; text-align: left"><fieldname="features"type="text_general"indexed="true"stored="true"multiValued="true"/></span> <fieldname =“features”type =“text_general”indexed =“true”stored =“true”multiValued =“true”/></span> |
由于我们更改了配置文件,我们必须重新启动Solr实例来加载新的配置。 让我们发出以下命令。
solr stop -all
solr start
现在我们再做一个完全进口。 打开以下URL并单击执行查询按钮。我们可以看到添加到每个项的功能。
http://localhost:8983/solr/#/jcg/query
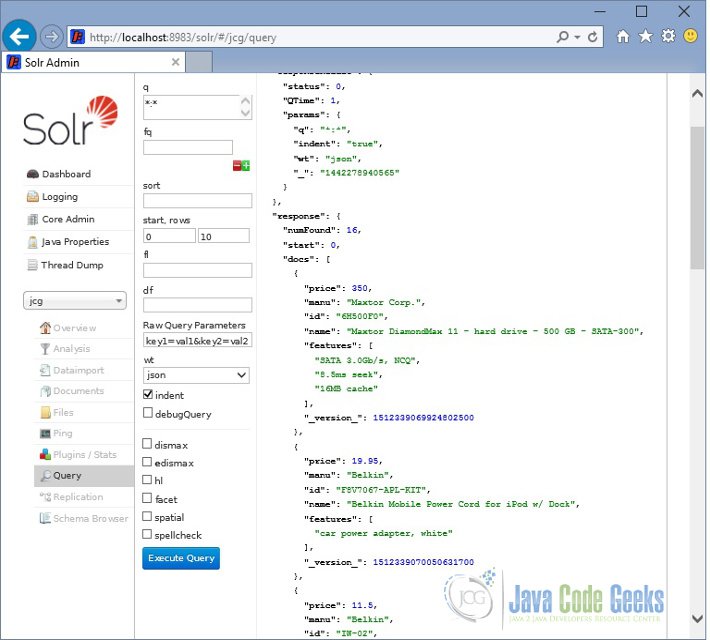
DIH查询2
6.下载配置
这是Dataimporthandler的一个例子。


 948
948

 被折叠的 条评论
为什么被折叠?
被折叠的 条评论
为什么被折叠?
 到【灌水乐园】发言


