


Getting started with the Keras Sequential model - Examples
翻译原文:https://keras.io/getting-started/sequential-model-guide/#examples
此链接examples folder将会提供一些应用例子,在这些例子中涉及到如下的真实数据集dataset:
· CIPAR10 少量图像分类:CNN模型
· IMDB 电影评论情感分类:LSTM模型
· 路透社新闻专线主题分类:MLP多层感知器模型
· MNIST 手写数字分类:MLP & CNN
· 字符级的文本生成:LSTM
等等
多层感知器MLP用于多分类任务
import keras
from keras.models import Sequential
from keras.layers import Dense, Dropout, Activation
from keras.optimizers import SGD

# 产生numpy数据
import numpy as np
x_train = np.random.random((1000, 20))
y_train = np.random.randint(10, size=(1000, 1))
y_one_hot_train = keras.utils.to_categorical(y_train, num_classes=10)
x_test = np.random.random((100, 20))
y_test = np.random.randint(10, size=(100, 1))
y_one_hot_test = keras.utils.to_categorical(y_test, num_classes=10)

# 构建全连接网络模型
model = Sequential()
model.add(Dense(64, input_shape=(20, ), activation='relu'))
model.add(Dropout(0.5))
model.add(Dense(64, activation='relu'))
model.add(Dropout(0.5))
model.add(Dense(10, activation='softmax'))

# 编译模型
sgd = SGD(lr=0.01, momentum=0.9, decay=1e-6, nesterov=True)
model.compile(optimizer=sgd,
              loss=keras.losses.categorical_crossentropy,
              metrics=['accuracy'])

# 训练模型
model.fit(x_train, y_one_hot_train, epochs=20, batch_size=128)

# 验证模型
test_score = model.evaluate(x_test, y_one_hot_test, batch_size=128)
print("test_acc: ", test_score[1])
MLP用于二分类任务
import numpy as np
from keras.layers import Dense, Dropout
from keras.models import Sequential

# 产生numpy数据
x_train = np.random.random((1000, 20))
y_train = np.random.randint(2, size=(1000, 1))
x_test = np.random.random((100, 20))
y_test = np.random.randint(2, size=(100, 1))

# 构建模型
model = Sequential()
model.add(Dense(64, input_dim=20, activation='relu'))
model.add(Dropout(0.5))
model.add(Dense(64, activation='relu'))
model.add(Dropout(0.5))
model.add(Dense(1, activation='sigmoid'))

# 编译模型
model.compile(optimizer=keras.optimizers.Adam(),
              loss=keras.losses.binary_crossentropy,
              metrics=['accuracy'])

# 训练模型
model.fit(x_train, y_train, epochs=20, batch_size=128)

# 验证模型
(test_loss, test_acc) = model.evaluate(x_test, y_test)
print('test_acc: ', test_acc)
类似于VGG的卷积网络
import numpy as np
import keras
from keras.models import Sequential
from keras.layers import Dense, Dropout, Flatten
from keras.layers import Conv2D, MaxPooling2D
from keras.optimizers import Adam

# 产生numpy数据
x_train = np.random.random((100, 100, 100, 3))
y_train = np.random.randint(10, size=(100, 1))
y_one_hot_train = keras.utils.to_categorical(y_train, num_classes=10)
x_test = np.random.random((20, 100, 100, 3))
y_test = np.random.randint(10, size=(20, 1))
y_one_hot_test = keras.utils.to_categorical(y_test, num_classes=10)

# 构建模型
model = Sequential()
model.add(Conv2D(32, (3,3), input_shape=(100, 100, 3), activation='relu'))
model.add(Conv2D(32, (3,3), activation='relu'))
model.add(MaxPooling2D(pool_size=(2,2)))
model.add(Dropout(0.25))

model.add(Conv2D(64, (3,3), activation='relu'))
model.add(Conv2D(64, (3,3), activation='relu'))
model.add(MaxPooling2D(pool_size=(2,2)))
model.add(Dropout(0.25))

model.add(Flatten())
model.add(Dense(256, activation='relu'))
model.add(Dropout(0.5))
model.add(Dense(10, activation='softmax'))

adam = Adam(lr=0.01, decay=1e-6)
model.compile(optimizer=adam,
              loss=keras.losses.categorical_crossentropy,
              metrics=['accuracy'])

model.fit(x_train, y_one_hot_train, epochs=10, batch_size=32)
(test_loss, test_acc) = model.evaluate(x_test, y_one_hot_test)
print('test_acc: ', test_acc)
LSTM用于序列分类: many to one
from keras.models import Sequential
from keras.layers import Dense, Dropout
from keras.layers import Embedding, LSTM
from keras.engine.input_layer import Input

# 词嵌入的词汇数
vocab_len = 1024
# 词嵌入的特征数
emb_dim = 256

# 创建numpy数据 - 模拟文本情感识别数据
max_len = 10 #最长句子长度
x_train = np.random.randint(1000, size=(100, max_len))
y_train = np.random.randint(2, size=(100, 1))
x_test = np.random.randint(1000, size=(10, max_len))
y_test = np.random.randint(2, size=(10, 1))

# 构建模型
model = Sequential()
model.add(Embedding(vocab_len, emb_dim, input_length=max_len))
model.add(LSTM(128))
model.add(Dropout(0.5))
model.add(Dense(1, activation='sigmoid'))

# 编译模型
model.compile(optimizer=keras.optimizers.Adam(),
              loss=keras.losses.binary_crossentropy,
              metrics=['accuracy'])

# 训练模型
model.fit(x_train, y_train, batch_size=16, epochs=10)

# 验证模型
test_loss, test_acc = model.evaluate(x_test, y_test)
print(test_acc)

# 预测模型
x_pred = np.random.randint(1000, size=(1, max_len))
y_pred = model.predict(x_pred)
if y_pred >= 0.5:
    y_pred = 1
else:
    y_pred = 0
print('y_pred: ', y_pred)
不用embedding
from keras.models import Sequential
from keras.layers import Dense, Dropout
from keras.layers import Embedding, LSTM
from keras.engine.input_layer import Input

# 序列长度
seq_length = 64
# 通道数
n_channels = 100

# 创造numpy序列数据
x_train = np.random.random((100, seq_length, n_channels))
y_train = np.random.randint(2, size=(100, 1))
x_test = np.random.random((10, seq_length, n_channels))
y_test = np.random.randint(2, size=(10, 1))

# 构建模型
model = Sequential()
model.add(LSTM(256, input_shape=(seq_length, n_channels)))
model.add(Dropout(0.5))
model.add(Dense(1, activation='sigmoid'))

# 编译模型
model.compile(optimizer=keras.optimizers.Adam(),
              loss=keras.losses.binary_crossentropy,
              metrics=['accuracy'])

# 训练模型
model.fit(x_train, y_train, batch_size=16, epochs=10)

# 验证模型
test_loss, test_acc = model.evaluate(x_test, y_test)
print(test_acc)

# 预测模型
x_pred = x_train = np.random.random((1, seq_length, n_channels))
y_pred = model.predict(x_pred)
if y_pred >= 0.5:
    y_pred = 1
else:
    y_pred = 0
print('y_pred: ', y_pred)
1D卷积网络用于序列分类:many to one
from keras.models import Sequential
from keras.layers import Dense, Dropout
from keras.layers import Embedding
from keras.layers import Conv1D, GlobalAveragePooling1D, MaxPooling1D

# 序列长度
seq_length = 64
# 通道数
n_channels = 100

# 创造numpy序列数据
x_train = np.random.random((100, seq_length, n_channels))
y_train = np.random.randint(2, size=(100, 1))
x_test = np.random.random((10, seq_length, n_channels))
y_test = np.random.randint(2, size=(10, 1))

# 构建模型
model = Sequential()
model.add(Conv1D(64, 3, activation='relu', input_shape=(seq_length, n_channels)))
model.add(Conv1D(64, 3, activation='relu'))
model.add(MaxPooling1D(3))
model.add(Conv1D(128, 3, activation='relu'))
model.add(Conv1D(128, 3, activation='relu'))
model.add(GlobalAveragePooling1D())
model.add(Dropout(0.5))
model.add(Dense(1, activation='sigmoid'))

# 编译模型
model.compile(optimizer=keras.optimizers.Adam(),
              loss=keras.losses.binary_crossentropy,
              metrics=['accuracy'])

# 训练模型
model.fit(x_train, y_train, epochs=100, batch_size=16)

# 验证模型
(test_lose, test_acc) = model.evaluate(x_test, y_test)
print(test_acc)
堆叠的LSTM用于序列分类 many to one
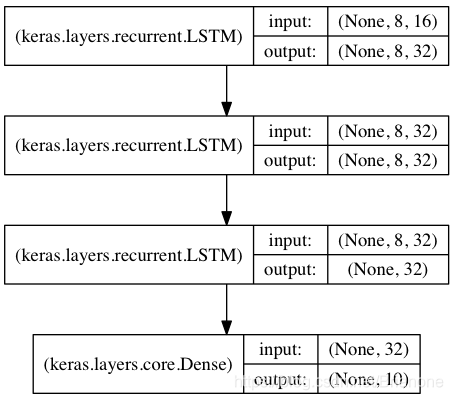
图中共堆叠了三层LSTM层,前两层LSTM的输出为全序列(return_sequences=True),最后一层LSTM只在最后一个时间步输出结果(默认)
from keras.models import Sequential
from keras.layers import Dense, LSTM

data_dim = 16 #特征数
timesteps = 8 #时间步数
num_classes = 10 #分类数

# 创造numpy数据
x_train = np.random.random((100, timesteps, data_dim))
y_train = np.random.randint(num_classes, size=(100, 1))
y_one_hot_train = keras.utils.to_categorical(y_train, num_classes=num_classes)
x_test = np.random.random((10, timesteps, data_dim))
y_test = np.random.randint(num_classes, size=(10, 1))
y_one_hot_test = keras.utils.to_categorical(y_test, num_classes=num_classes)

# 构建模型
model = Sequential()
model.add(LSTM(32, return_sequences=True,
               input_shape=(timesteps, data_dim)))
model.add(LSTM(32, return_sequences=True))
model.add(LSTM(32))
model.add(Dense(num_classes, activation='softmax'))

# 编译模型
model.compile(optimizer=keras.optimizers.Adam(),
              loss=keras.losses.categorical_crossentropy,
              metrics=['accuracy'])

# 训练并验证模型
model.fit(x_train, y_one_hot_train, epochs=100, batch_size=32,
          validation_data=(x_test, y_one_hot_test))
有状态的LSTM模型用于序列分类 many to one
有状态的LSTM模型与无状态的LSTM模型的区别可查看以下博客:Keras 之 LSTM 有状态模型(stateful LSTM)和无状态模型(stateless LSTM)
from keras.models import Sequential
from keras.layers import LSTM, Dense

data_dim = 16
timesteps = 8
num_classes = 10
batch_size = 32

# Generate dummy training data
x_train = np.random.random((batch_size * 10, timesteps, data_dim))
y_train = np.random.random((batch_size * 10, num_classes))

# Generate dummy validation data
x_val = np.random.random((batch_size * 3, timesteps, data_dim))
y_val = np.random.random((batch_size * 3, num_classes))

# 构建模型
model = Sequential()
model.add(LSTM(32, return_sequences=True, stateful=True,
               batch_input_shape=(batch_size, timesteps, data_dim)))
model.add(LSTM(32, return_sequences=True, stateful=True))
model.add(LSTM(32, stateful=True))
model.add(Dense(num_classes, activation='softmax'))

# 编译模型
model.compile(optimizer=keras.optimizers.Adam(),
              loss=keras.losses.categorical_crossentropy,
              metrics=['accuracy'])

# 训练模型
model.fit(x_train, y_train,
          batch_size=batch_size, epochs=5, shuffle=False,
          validation_data=(x_val, y_val))


 236
236


 被折叠的 条评论
为什么被折叠?
被折叠的 条评论
为什么被折叠?
 到【灌水乐园】发言


