


我们在学习二叉树的基本操作之前,需要先创建一颗二叉树,现在我们先手动创建出一颗二叉树并进行学习,等到二叉树的结构了解差不多时,我们在来研究二叉树真正的创建方式
1.手动创建二叉树
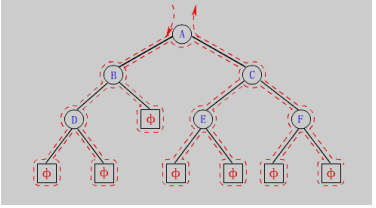
如何手动创建一颗二叉树呢,我们以上面这颗二叉树为例,通过观察我们发现这颗二叉树是由一个个节点连接起来的,每个节点包含值(val), 左指针,右指针,由此我们可以定义一个结构体变量
typedef char BTDataType;  //存储数据的类型
typedef struct BinaryTreeNode
{
	BTDataType data;
	struct BinaryTreeNode* left;
	struct BinaryTreeNode* right;
}BTNode;
接下来我们只需要创建结构体,并通过左右指针将他们手动连接起来即可。咱们直接上代码
#include <stdio.h>
#include <stdlib.h>
typedef char BTDataType;
typedef struct BinaryTreeNode
{
	BTDataType data;
	struct BinaryTreeNode* left;
	struct BinaryTreeNode* right;
}BTNode;
BTNode* BTNodeCreat(char ch)
{
	BTNode* node = (BTNode*)malloc(sizeof(BTNode));
	if (node == NULL)
	{
		printf("malloc fail\n");
		exit(-1);
	}
	node->data = ch;
	node->left = NULL;
	node->right = NULL;
	return node;
}
int main()
{
	BTNode* A = BTNodeCreat('A');
	BTNode* B = BTNodeCreat('B');
	BTNode* C = BTNodeCreat('C');
	BTNode* D = BTNodeCreat('D');
	BTNode* E = BTNodeCreat('E');
	BTNode* F = BTNodeCreat('F');
	A->left = B;
	A->right = C;
	B->left = D;
	C->left = E;
	C->right = F;
	return 0;
}
到这里,我们就轻松的将一颗二叉树手动创建出来了。
2.二叉树的遍历
二叉树有前序遍历,中序遍历,后续遍历,层序遍历四种遍历方式。
2.1前序便利
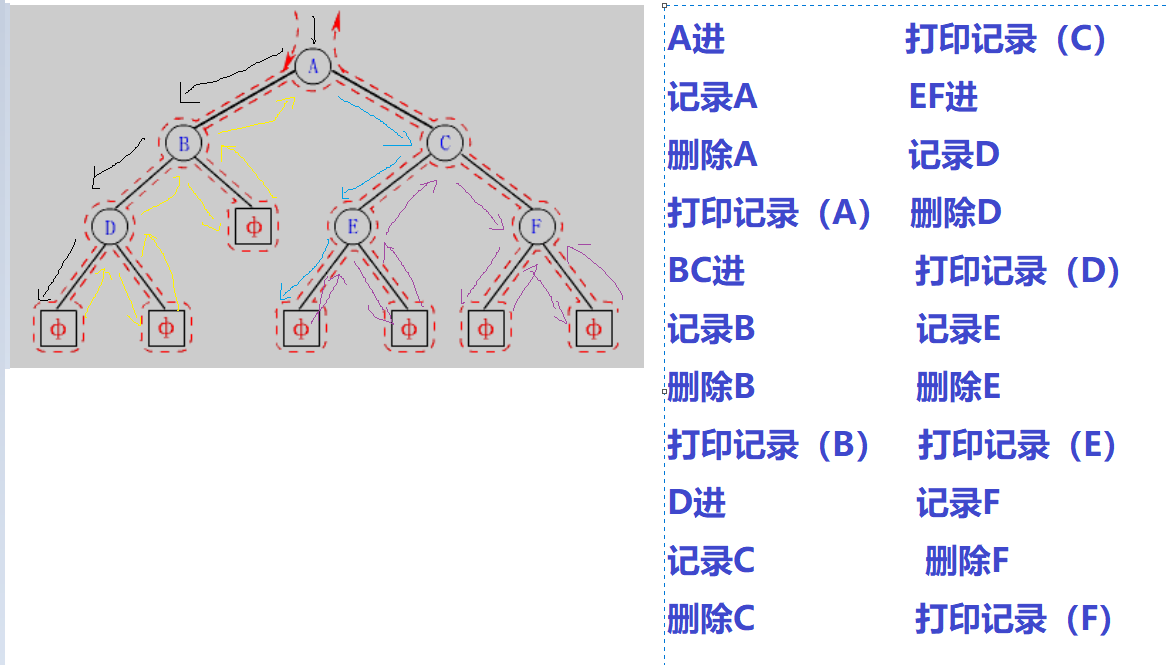
所谓前序遍历,就是先访问二叉树的根,再访问左子树,再访问右子树。即(根——左子树——右子树)
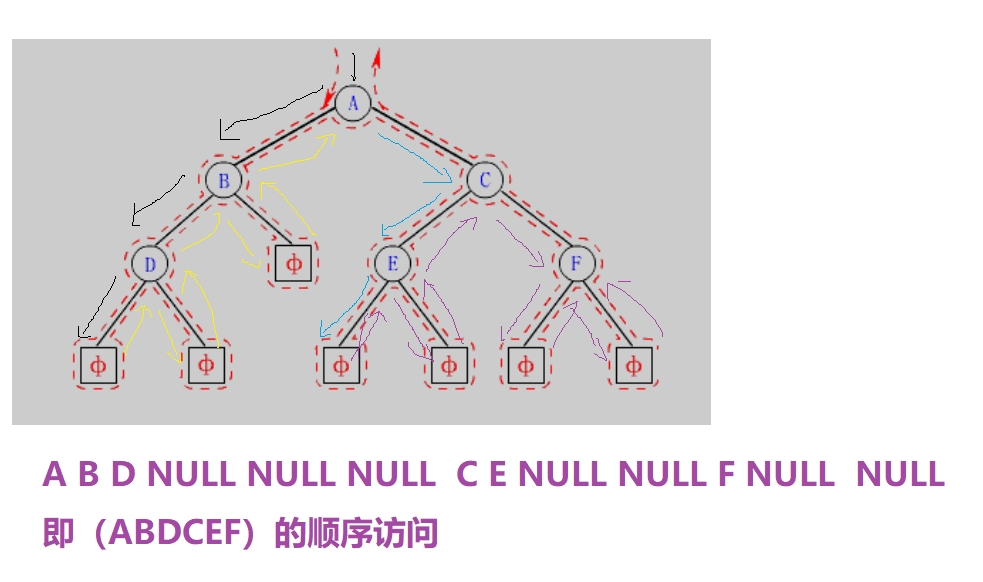
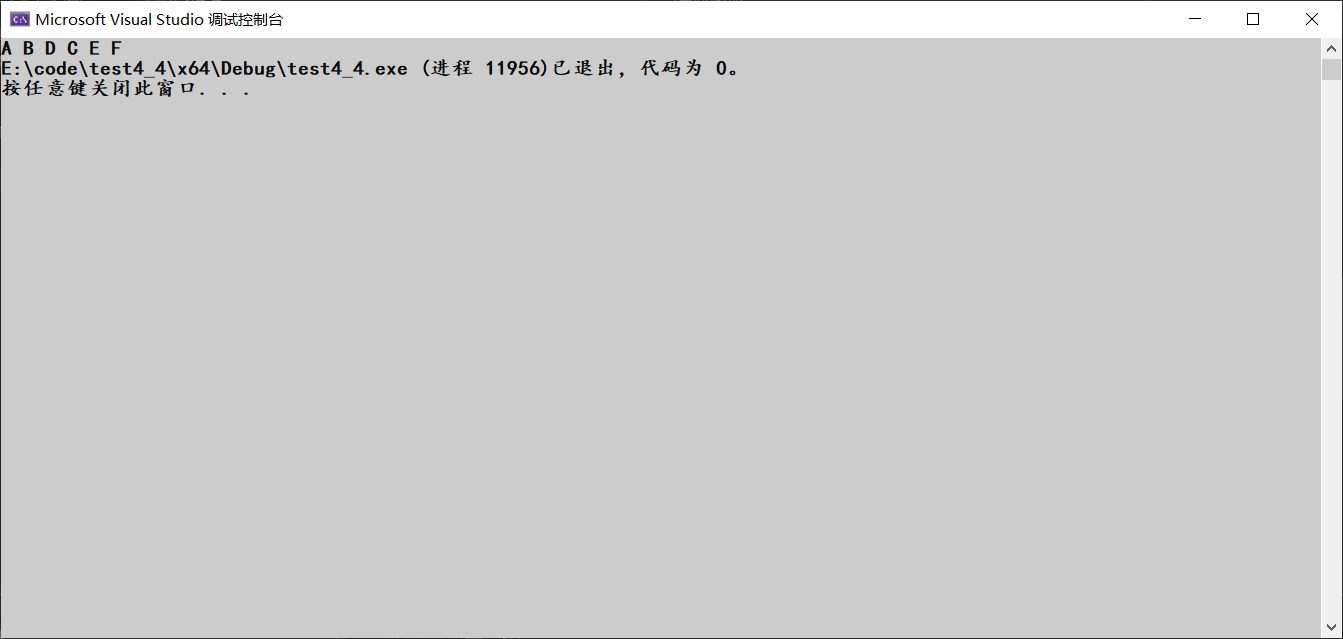
对于该图的前序访问如图所示。现在我们用代码将其实现
typedef char BTDataType;
typedef struct BinaryTreeNode
{
	BTDataType data;
	struct BinaryTreeNode* left;
	struct BinaryTreeNode* right;
}BTNode;
BTNode* BTNodeCreat(char ch)
{
	BTNode* node = (BTNode*)malloc(sizeof(BTNode));
	if (node == NULL)
	{
		printf("malloc fail\n");
		exit(-1);
	}
	node->data = ch;
	node->left = NULL;
	node->right = NULL;
	return node;
}
void PrevOrder(BTNode* root) //前序遍历
{
	if (root == NULL)//如果节点为空,就return
	{
		return;
	}
	else
	{
		printf("%c ", root->data);//不为空,将本节点的值打印,然后继续访问左子树右子树
		PrevOrder(root->left);
		PrevOrder(root->right);
	}

}
int main()
{
	BTNode* A = BTNodeCreat('A');
	BTNode* B = BTNodeCreat('B');
	BTNode* C = BTNodeCreat('C');
	BTNode* D = BTNodeCreat('D');
	BTNode* E = BTNodeCreat('E');
	BTNode* F = BTNodeCreat('F');
	A->left = B;
	A->right = C;
	B->left = D;
	C->left = E;
	C->right = F;
	PrevOrder(A);
	return 0;
}
2.2中序遍历,后续遍历
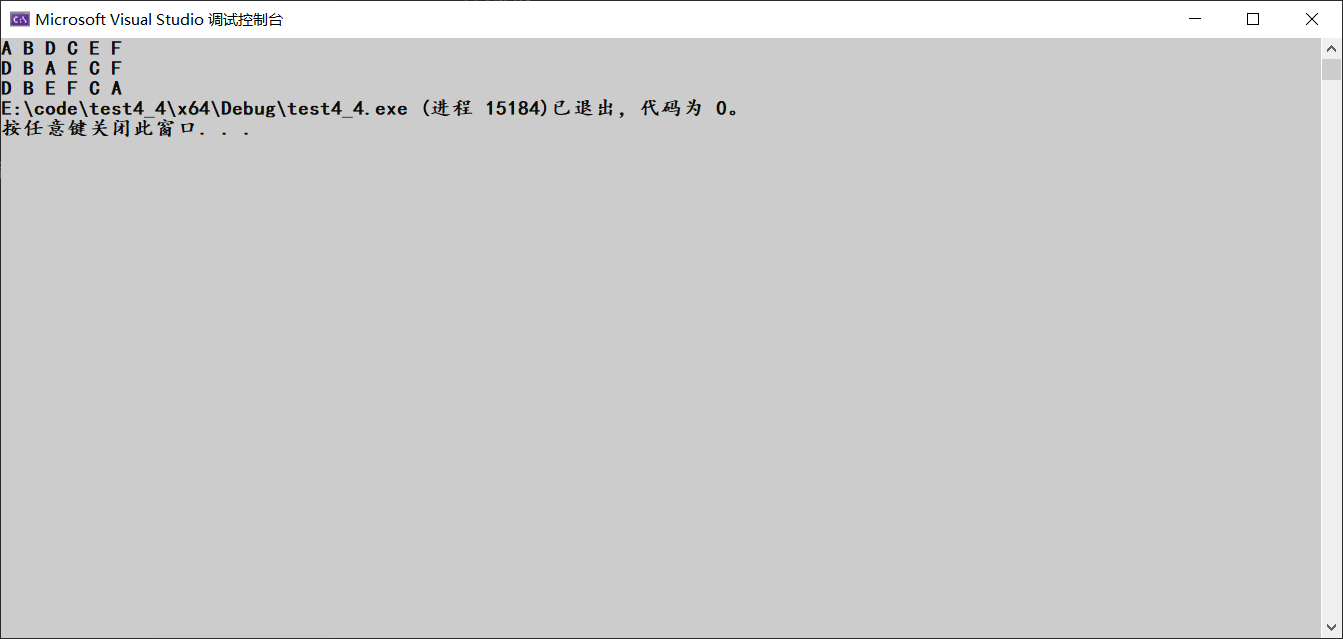
中序遍历和后续遍历都与前序遍历类似。
中序:左子树——根——右子树
后续:左子树——右子树——根
咱们直接上代码
void InOrder(BTNode* root)//中序
{
	if (root == NULL)//为空就return
	{
		return;
	}
	else
	{                           //不为空就左——根——右
		InOrder(root->left);
		printf("%c ", root->data);
		InOrder(root->right);
	}
}
void  PostOrder(BTNode* root)
{
	if (root == NULL)//为空就return
	{
		return;
	}
	else
	{
		PostOrder(root->left);//不为空就左——右——根
		PostOrder(root->right);
		printf("%c ", root->data);
	}
}
2.3层序遍历
所谓层序遍历,就是按照从左往右的顺序,依次访问第一层,第二层,第三层……
还是以该图为例,层序遍历的访问顺序就是 ABCDEF
想要实现层序遍历,我们需要借助队列。下面我先将之前写的队列添加到项目中
queue.h
#pragma once
#include <stdio.h>
#include <assert.h>
#include <stdbool.h>
#include <stdlib.h>
typedef struct BinaryTreeNode BTNode;
typedef BTNode* QDateType;
typedef struct QListNode
{
	QDateType data;
	struct QListNode* next;
}QNode;

typedef struct Queue
{
	QNode* head;
	QNode* tail;
}Queue;

void QueueInit(Queue* pq);//队列初始化
void QueuePush(Queue* pq, QDateType x);//入队
void QueuePop(Queue* pq);//出队
QDateType QueueFront(Queue* pq);//获取队列头元素
QDateType QueueBack(Queue* pq);//获取队列尾元素
size_t QueueSize(Queue* pq);//有效元素个数
bool QueueEmpty(Queue* pq);//检测队列是否为空
void QueueDestroy(Queue* pq);//销毁队列
queue.c
#include "queue.h"

void QueueInit(Queue* pq)
{
	assert(pq);
	pq->head = pq->tail = NULL;
}

void QueuePush(Queue* pq, QDateType x)
{
	assert(pq);
	QNode* newnode = (QNode*)malloc(sizeof(QNode));

	assert(newnode);
	newnode->data = x;
	newnode->next = NULL;

	if (pq->head == NULL)
	{
		pq->head = pq->tail = newnode;
	}
	else
	{
		pq->tail->next = newnode;
		pq->tail = newnode;
	}

}

void QueuePop(Queue* pq)
{
	assert(pq);
	assert(pq->head);
	QNode* next = pq->head->next;
	free(pq->head);
	pq->head = next;
}

QDateType QueueFront(Queue* pq)
{
	assert(pq);
	assert(pq->head);
	return pq->head->data;
}

QDateType QueueBack(Queue* pq)
{
	assert(pq);
	assert(pq->head);
	return pq->tail->data;
}

size_t QueueSize(Queue* pq)
{
	assert(pq);
	size_t sz = 0;
	QNode* cur = pq->head;
	while (cur)
	{
		cur = cur->next;
		sz++;
	}
	return sz;
}

bool QueueEmpty(Queue* pq)
{
	assert(pq);
	return pq->head == NULL;
}

void QueueDestroy(Queue* pq)
{
	assert(pq);
	QNode* cur = pq->head;
	while (cur)
	{
		QNode* next = cur->next;
		free(cur);
		cur = next;
	}
	pq->head = pq->tail = NULL;


}
下面我们就利用队列来实现层序遍历
首先我先把代码放在下面,然后在附上思路
#include "queue.h"
typedef char BTDataType;
typedef struct BinaryTreeNode
{
BTDataType data;
struct BinaryTreeNode* left;
struct BinaryTreeNode* right;
}BTNode;
BTNode* BTNodeCreat(BTDataType x)
{
BTNode* node = (BTNode*)malloc(sizeof(BTNode));
if (node == NULL)
{
printf("malloc fail\n");
exit(-1);
}
node->data = x;
node->left = NULL;
node->right = NULL;
return node;
}
void PrevOrder(BTNode* root)
{
if (root == NULL)
{
return;
}
else
{
printf("%c ", root->data);
PrevOrder(root->left);
PrevOrder(root->right);
}
}
void InOrder(BTNode* root)
{
if (root == NULL)
{
return;
}
else
{
InOrder(root->left);
printf("%c ", root->data);
InOrder(root->right);
}
}
void PostOrder(BTNode* root)
{
if (root == NULL)
{
return;
}
else
{
PostOrder(root->left);
PostOrder(root->right);
printf("%c ", root->data);
}
}
void TreeLeveOrder(BTNode* root)
{
Queue q;
QueueInit(&q);
QDateType m = root;
if (m)
{
QueuePush(&q, m);
}
while (!QueueEmpty(&q))
{
BTNode* front = QueueFront(&q);
QueuePop(&q);
printf("%c ", front->data);
if (front->left)
{
QueuePush(&q, front->left);
}
if (front->right)
{
QueuePush(&q, front->right);
}
}
printf("\n");
QueueDestroy(&q);
}
int main()
{
BTNode* A = BTNodeCreat('A');
BTNode* B = BTNodeCreat('B');
BTNode* C = BTNodeCreat('C');
BTNode* D = BTNodeCreat('D');
BTNode* E = BTNodeCreat('E');
BTNode* F = BTNodeCreat('F');
A->left = B;
A->right = C;
B->left = D;
C->left = E;
C->right = F;
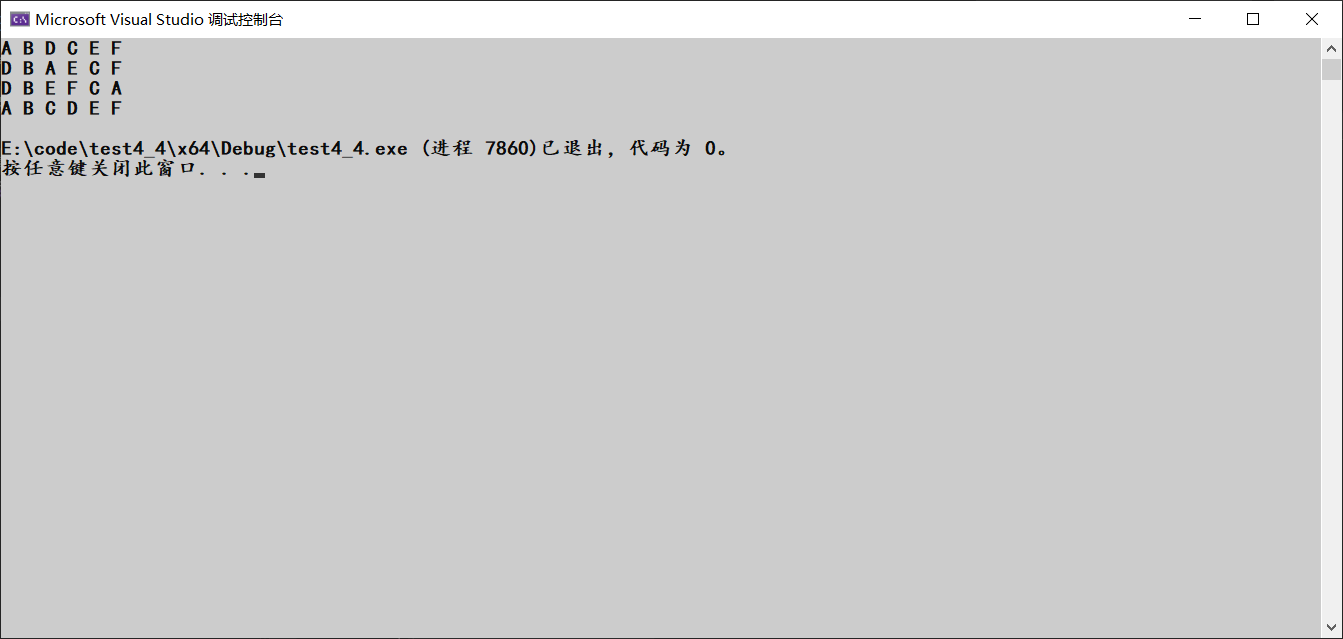
PrevOrder(A);
printf("\n");
InOrder(A);
printf("\n");
PostOrder(A);
printf("\n");
TreeLeveOrder(A);
return 0;
}
3.求二叉树的节点个数
int BinaryTreeSize(BTNode* root)
{
	if (root == NULL)
	{
		return 0;
	}
	return BinaryTreeSize(root->left) + BinaryTreeSize(root->right) + 1;

}
4.二叉树叶子节点个数
int BinaryTreeLeafSize(BTNode* root)
{
	if (root == NULL)
	{
		return 0;
	}
	if (root->left == NULL && root->right == NULL)
	{
		return 1;
	}
	return BinaryTreeLeafSize(root->left) + BinaryTreeLeafSize(root->right);
}
5.二叉树第k层节点个数
int BinaryTreeKSize(BTNode* root, int k)
{
	if (root == NULL)
	{
		return 0;
	}
	if (k == 1)
	{
		return 1;
	}
	return BinaryTreeKSize(root->left, k - 1) + BinaryTreeKSize(root->right, k - 1);
}
6二叉树查找值为x的节点
BTNode* BinaryTreeFind(BTNode* root, BTDataType x)
{
	if (root == NULL)
	{
		return NULL;
	}
	if (root->data == x)
	{
		return root;
	}
	BTNode* lret = BinaryTreeFind(root->left, x);
	if (lret)
	{
		return lret;
	}
	BTNode* rret = BinaryTreeFind(root->right, x);
	if (rret)
	{
		return rret;
	}

}
7.判断二叉树是否为完全二叉树
bool BinaryTreeComplete(BTNode* root)
{
	//思路就是我利用层序遍历,在第一次遇到空指针的地方停下来,如果是完全二叉树,那么后面应该全是空指针,
	//否则不是完全二叉树。
	Queue q;
	QueueInit(&q);
	if (root)
	{
		QueuePush(&q, root);
	}
	while (!QueueEmpty(&q))
	{
		BTNode* front = QueueFront(&q);
		QueuePop(&q);
		if (front == NULL)
		{
			break;
		}
		QueuePush(&q, front->left);
		QueuePush(&q, front->right);
	}//第一次遇到空指针的地方停下
	while (!QueueEmpty(&q))//检查第一个空指针后面的元素是否均为空指针
	{
		BTNode* front = QueueFront(&q);
		QueuePop(&q);
		if (front)
		{
			return false;
		}
	}
	QueueDestroy(&q);
	return true;
}
8.二叉树的销毁
void BinaryTreeDestroy(BTNode** pproot)
{
	//为什么传参传二级指针?
	//我们找一颗二叉树是通过他的根,而根(root)的类型是一级指针(BTNode*)
	//我们想要销毁二叉树,是想销毁这个一级指针所指向的空间,并且把这个一级指针制空。
	//如果传一级指针,形参只是实参的一份临时拷贝,虽然可以销毁这个根指向的空间,但是
	//无法把这个根制空,这个根会变成野指针,所以需要传二级指针
	if (*pproot == NULL)
	{
		return;
	}
	BinaryTreeDestroy(&(*pproot)->left);
	BinaryTreeDestroy(&(*pproot)->right);
	free(*pproot);
	*pproot = NULL;

}


 624
624


 被折叠的 条评论
为什么被折叠?
被折叠的 条评论
为什么被折叠?
 到【灌水乐园】发言


