


设置AWS账号
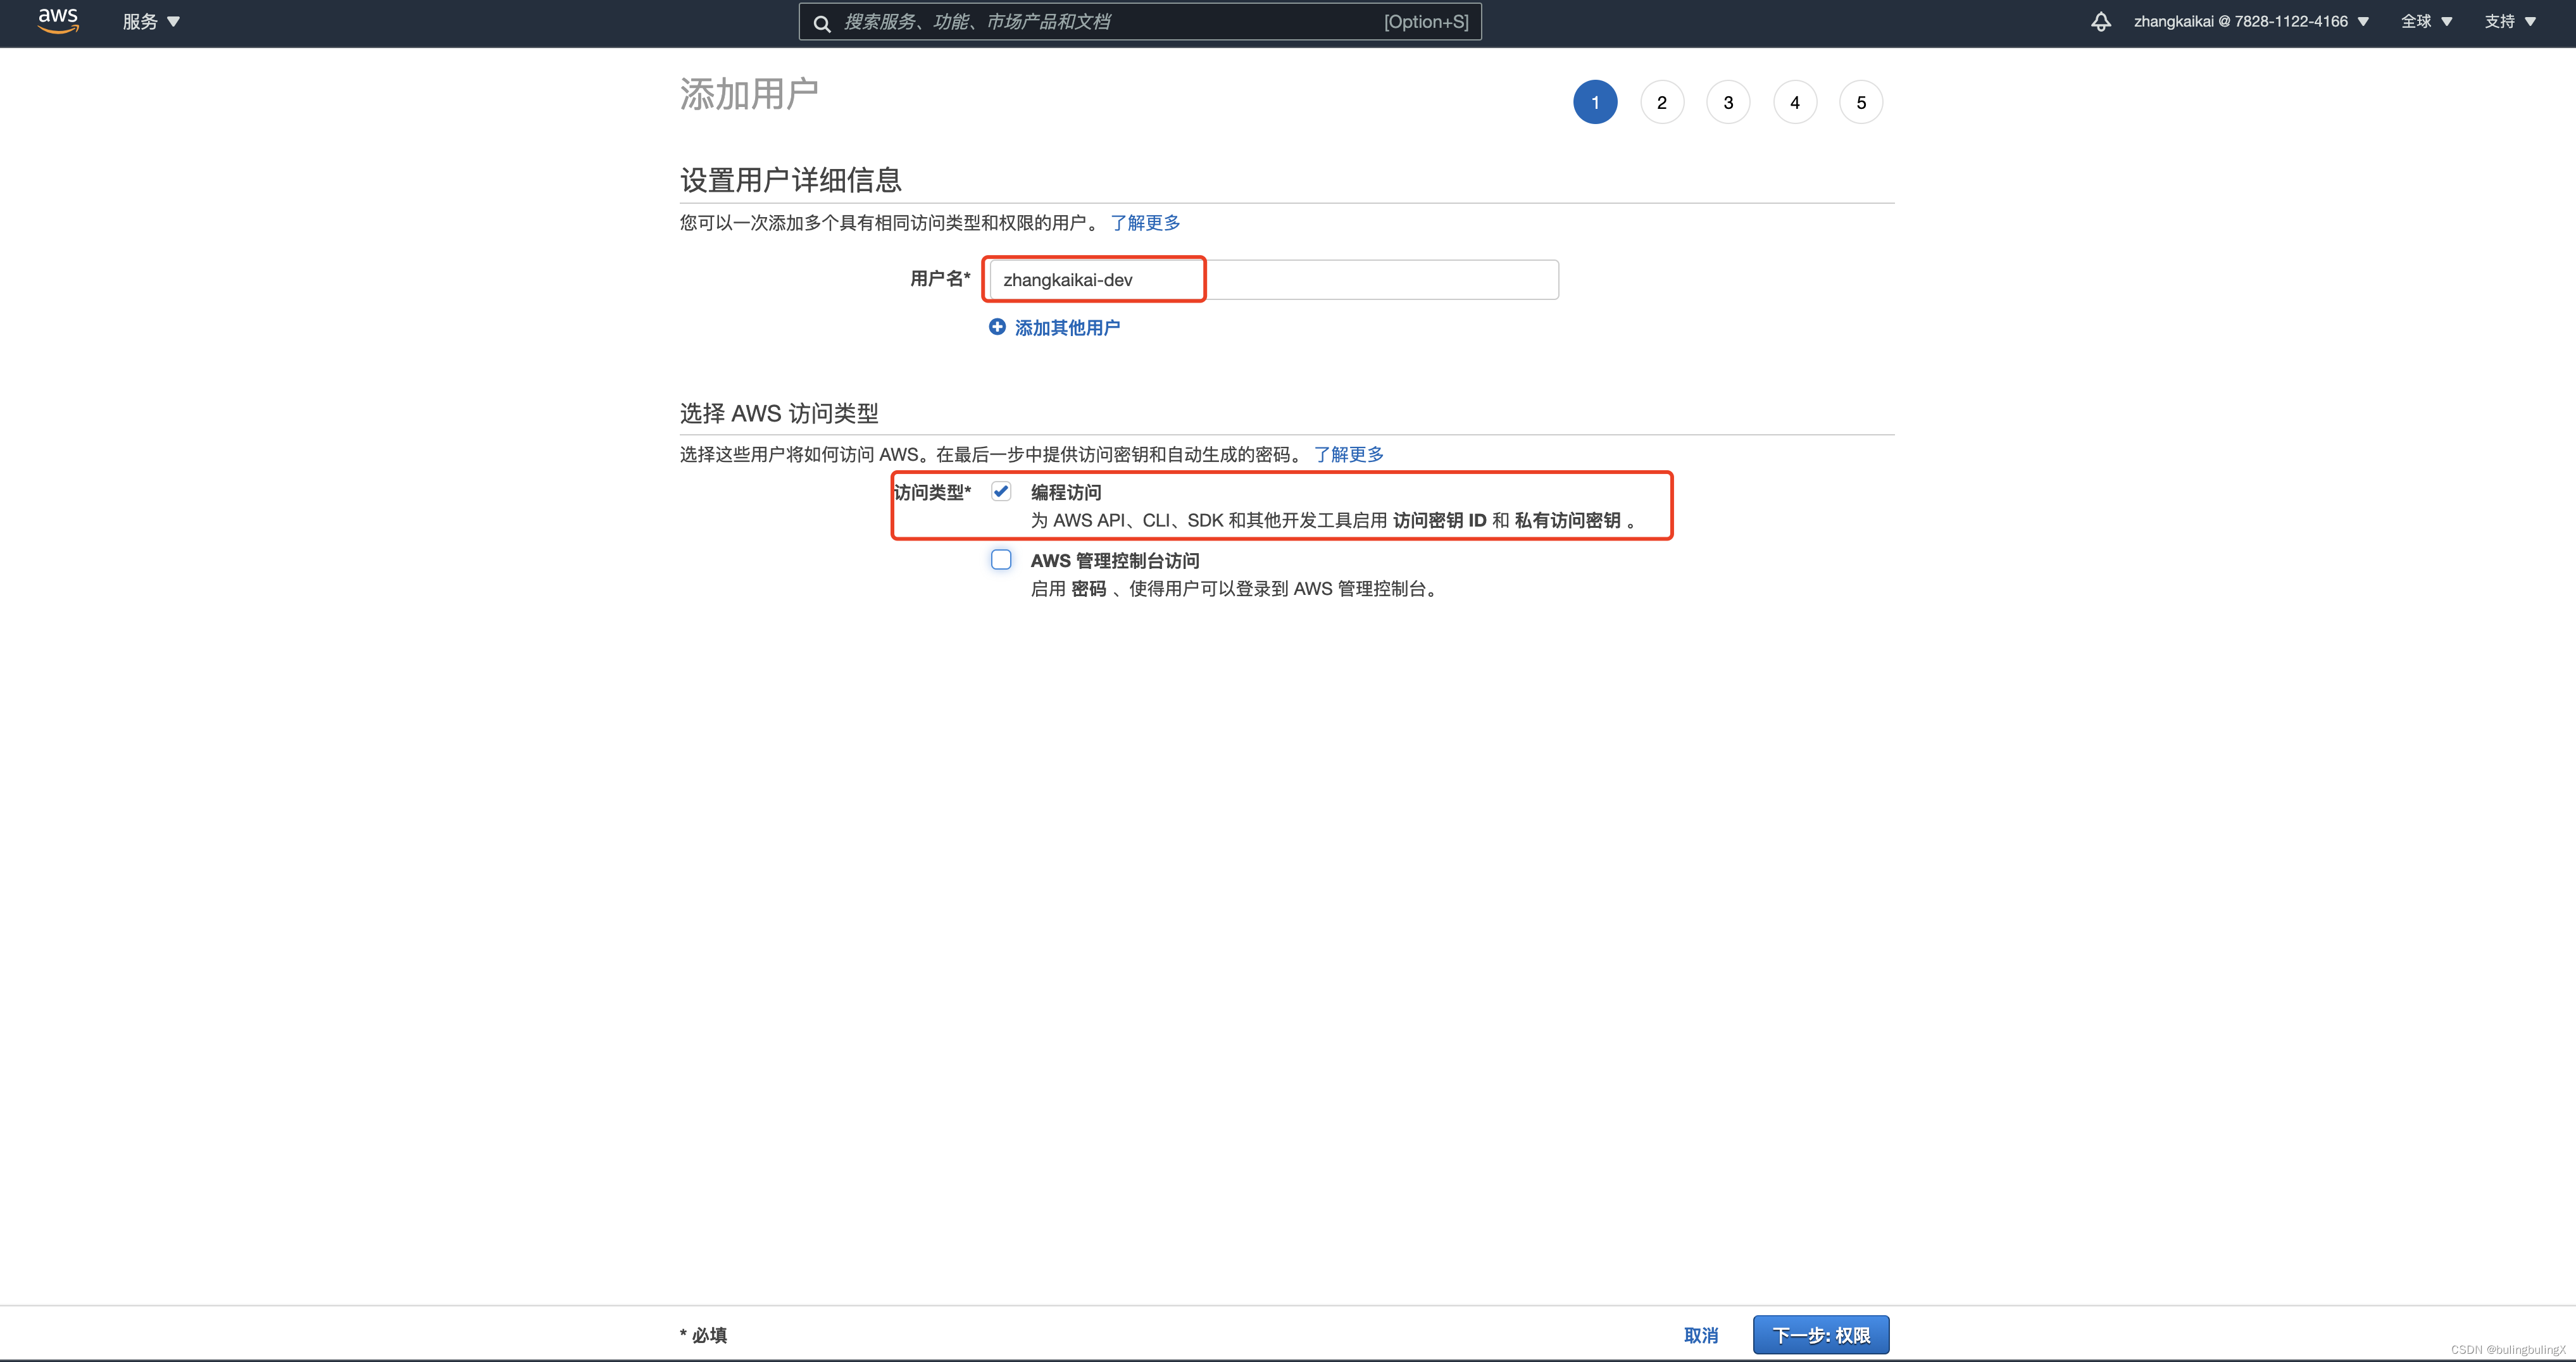
新建IAM用户,选定对应的策略
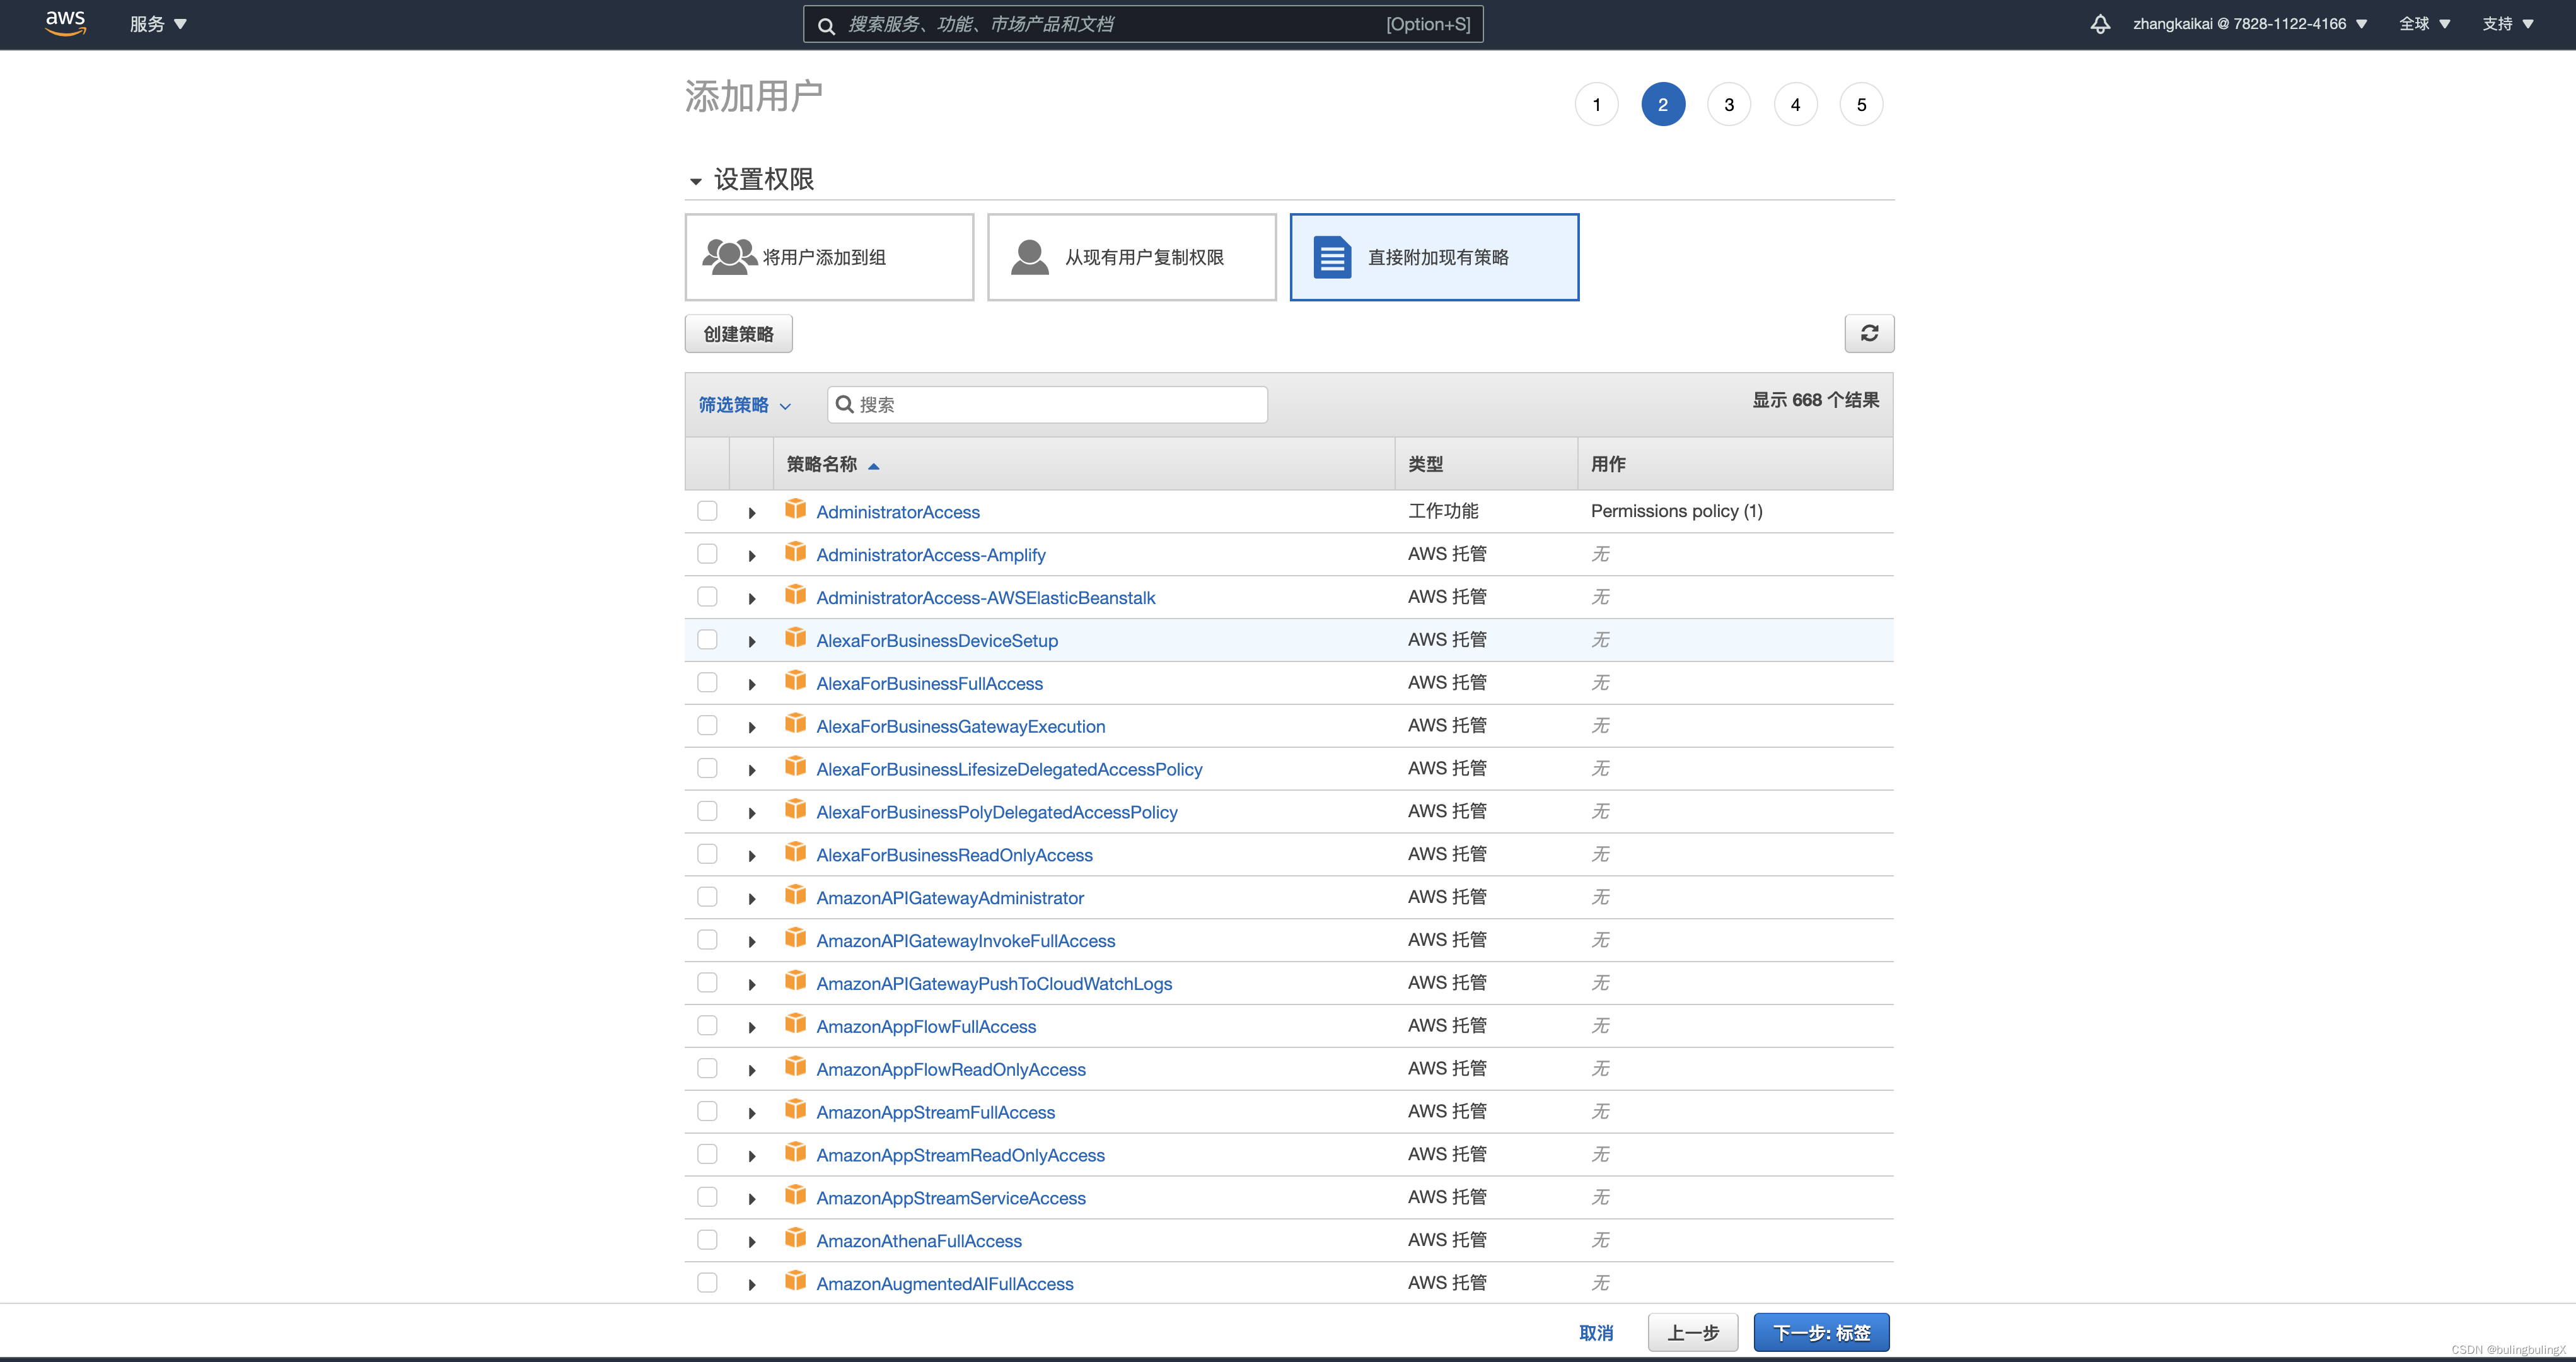
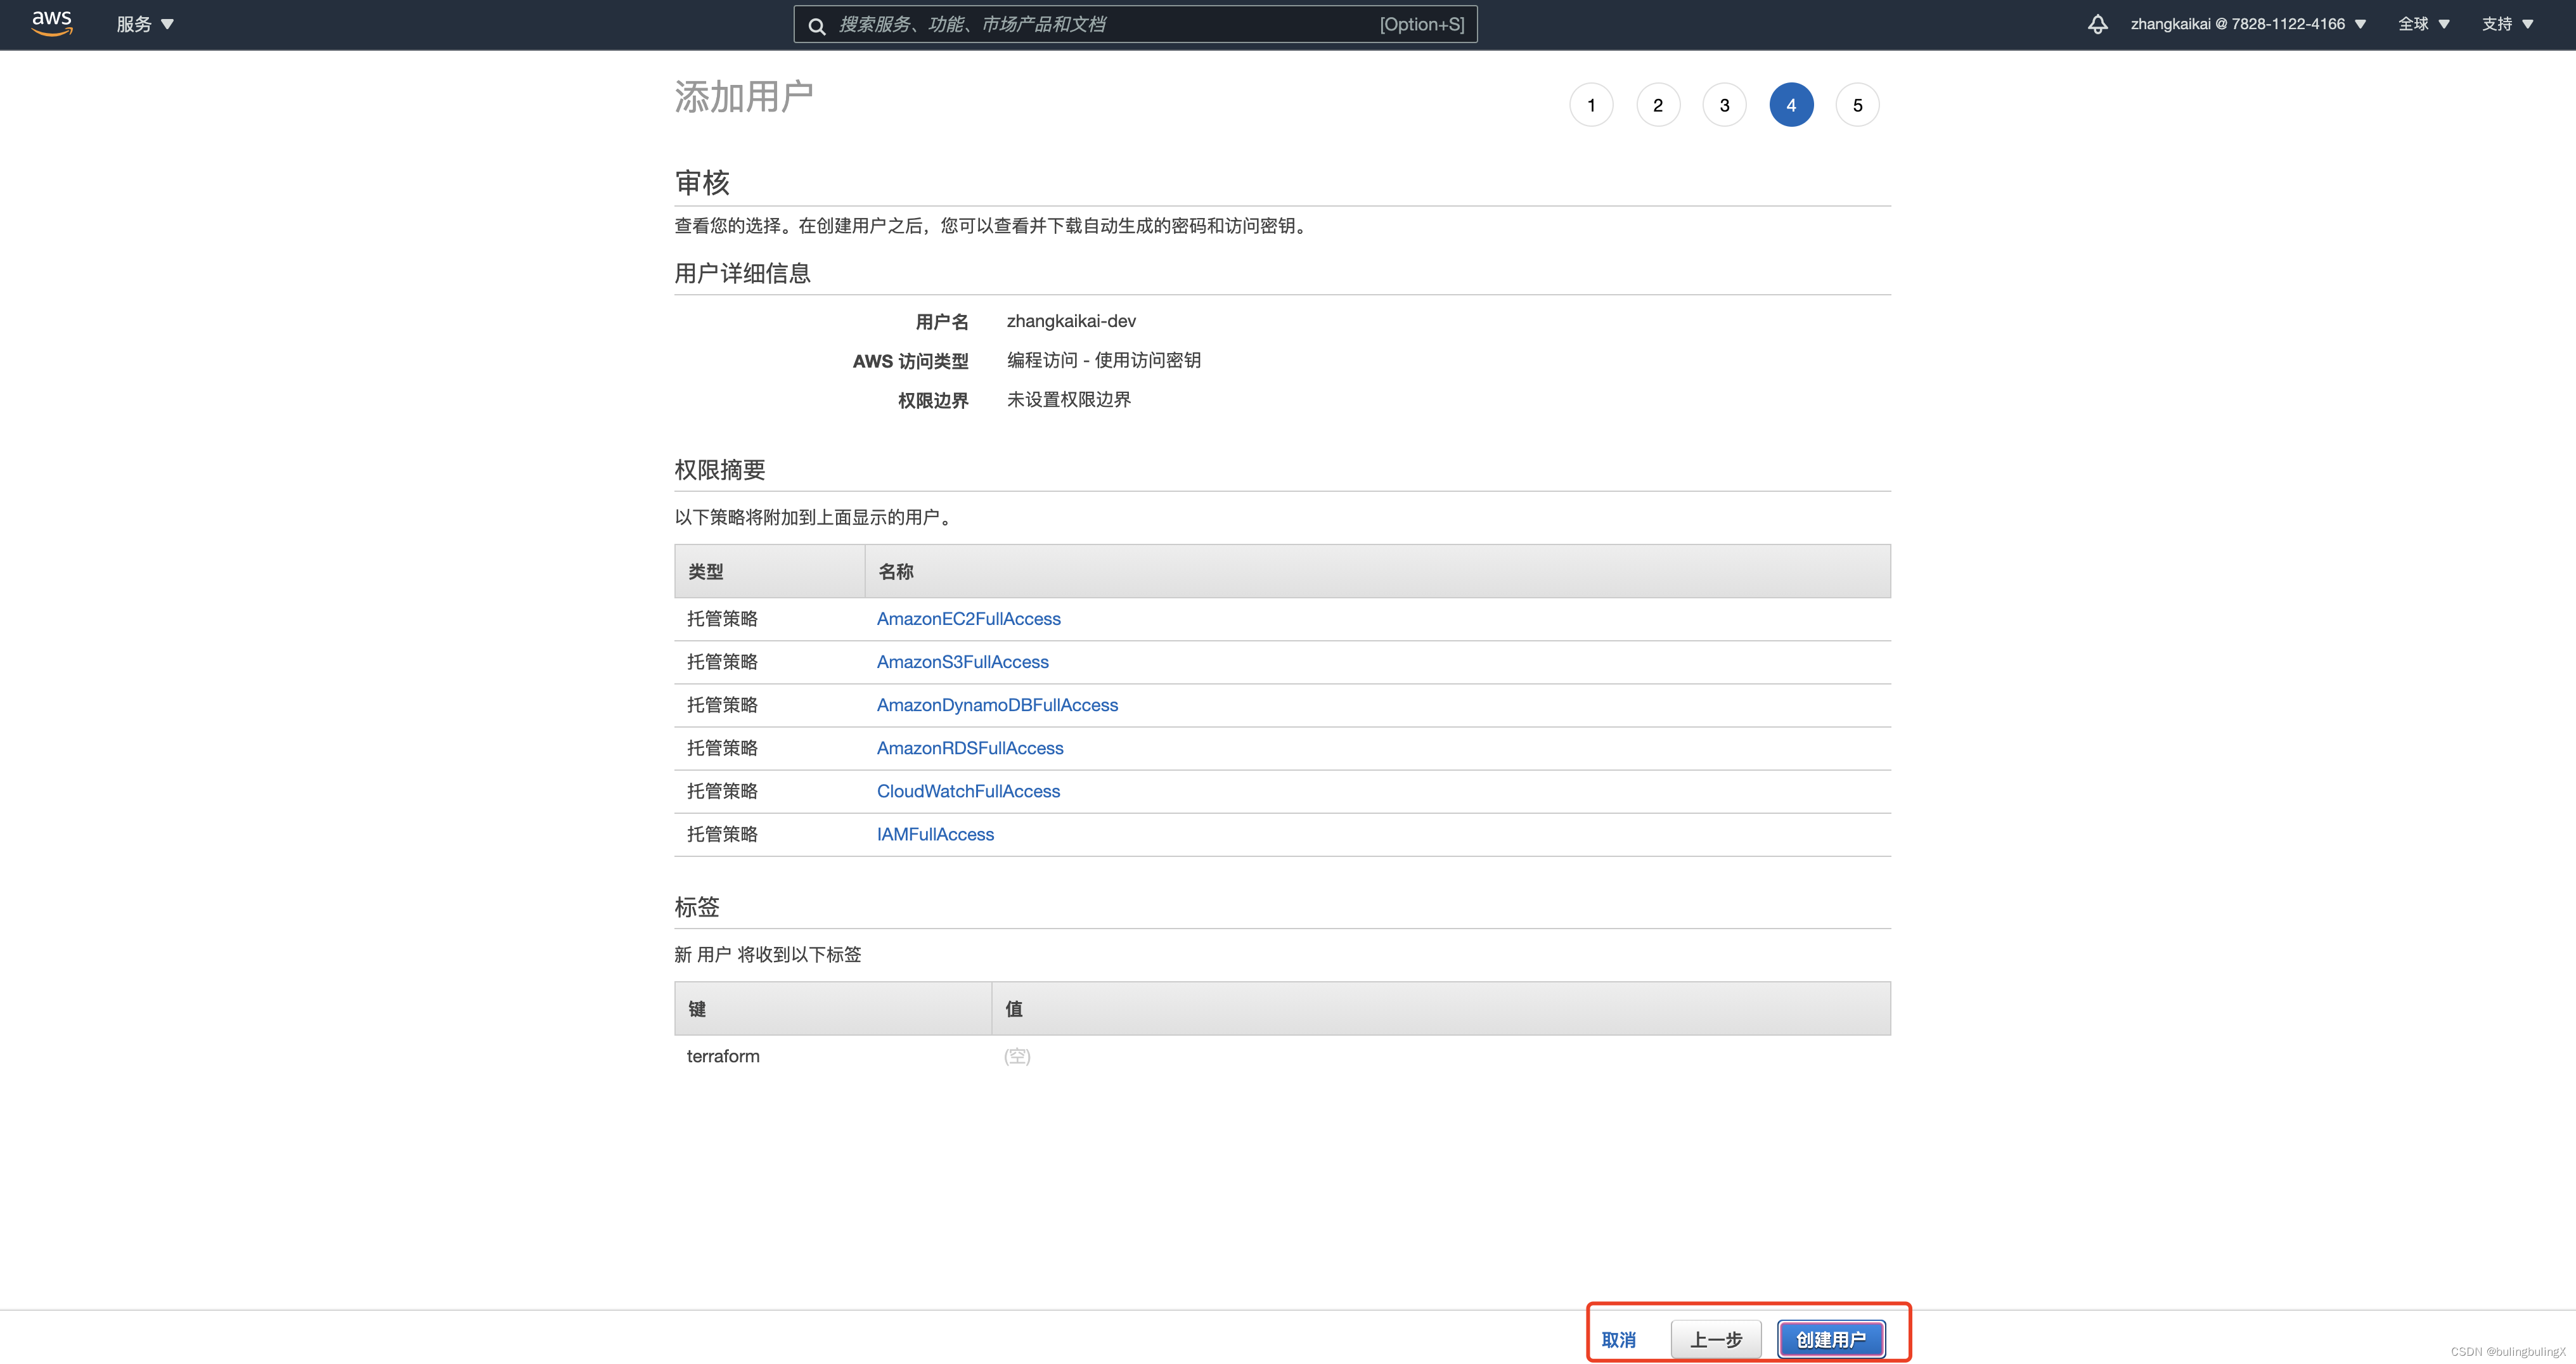
选择托管策略
- AmazonEC2FullAccess
- AmazonS3FullAccess
- AmazonDynamoDBFullAccess
- AmazonRDSFullAccess
- CloudWatchFullAccess
- IAMFullAccess
保存生成的ak/sk
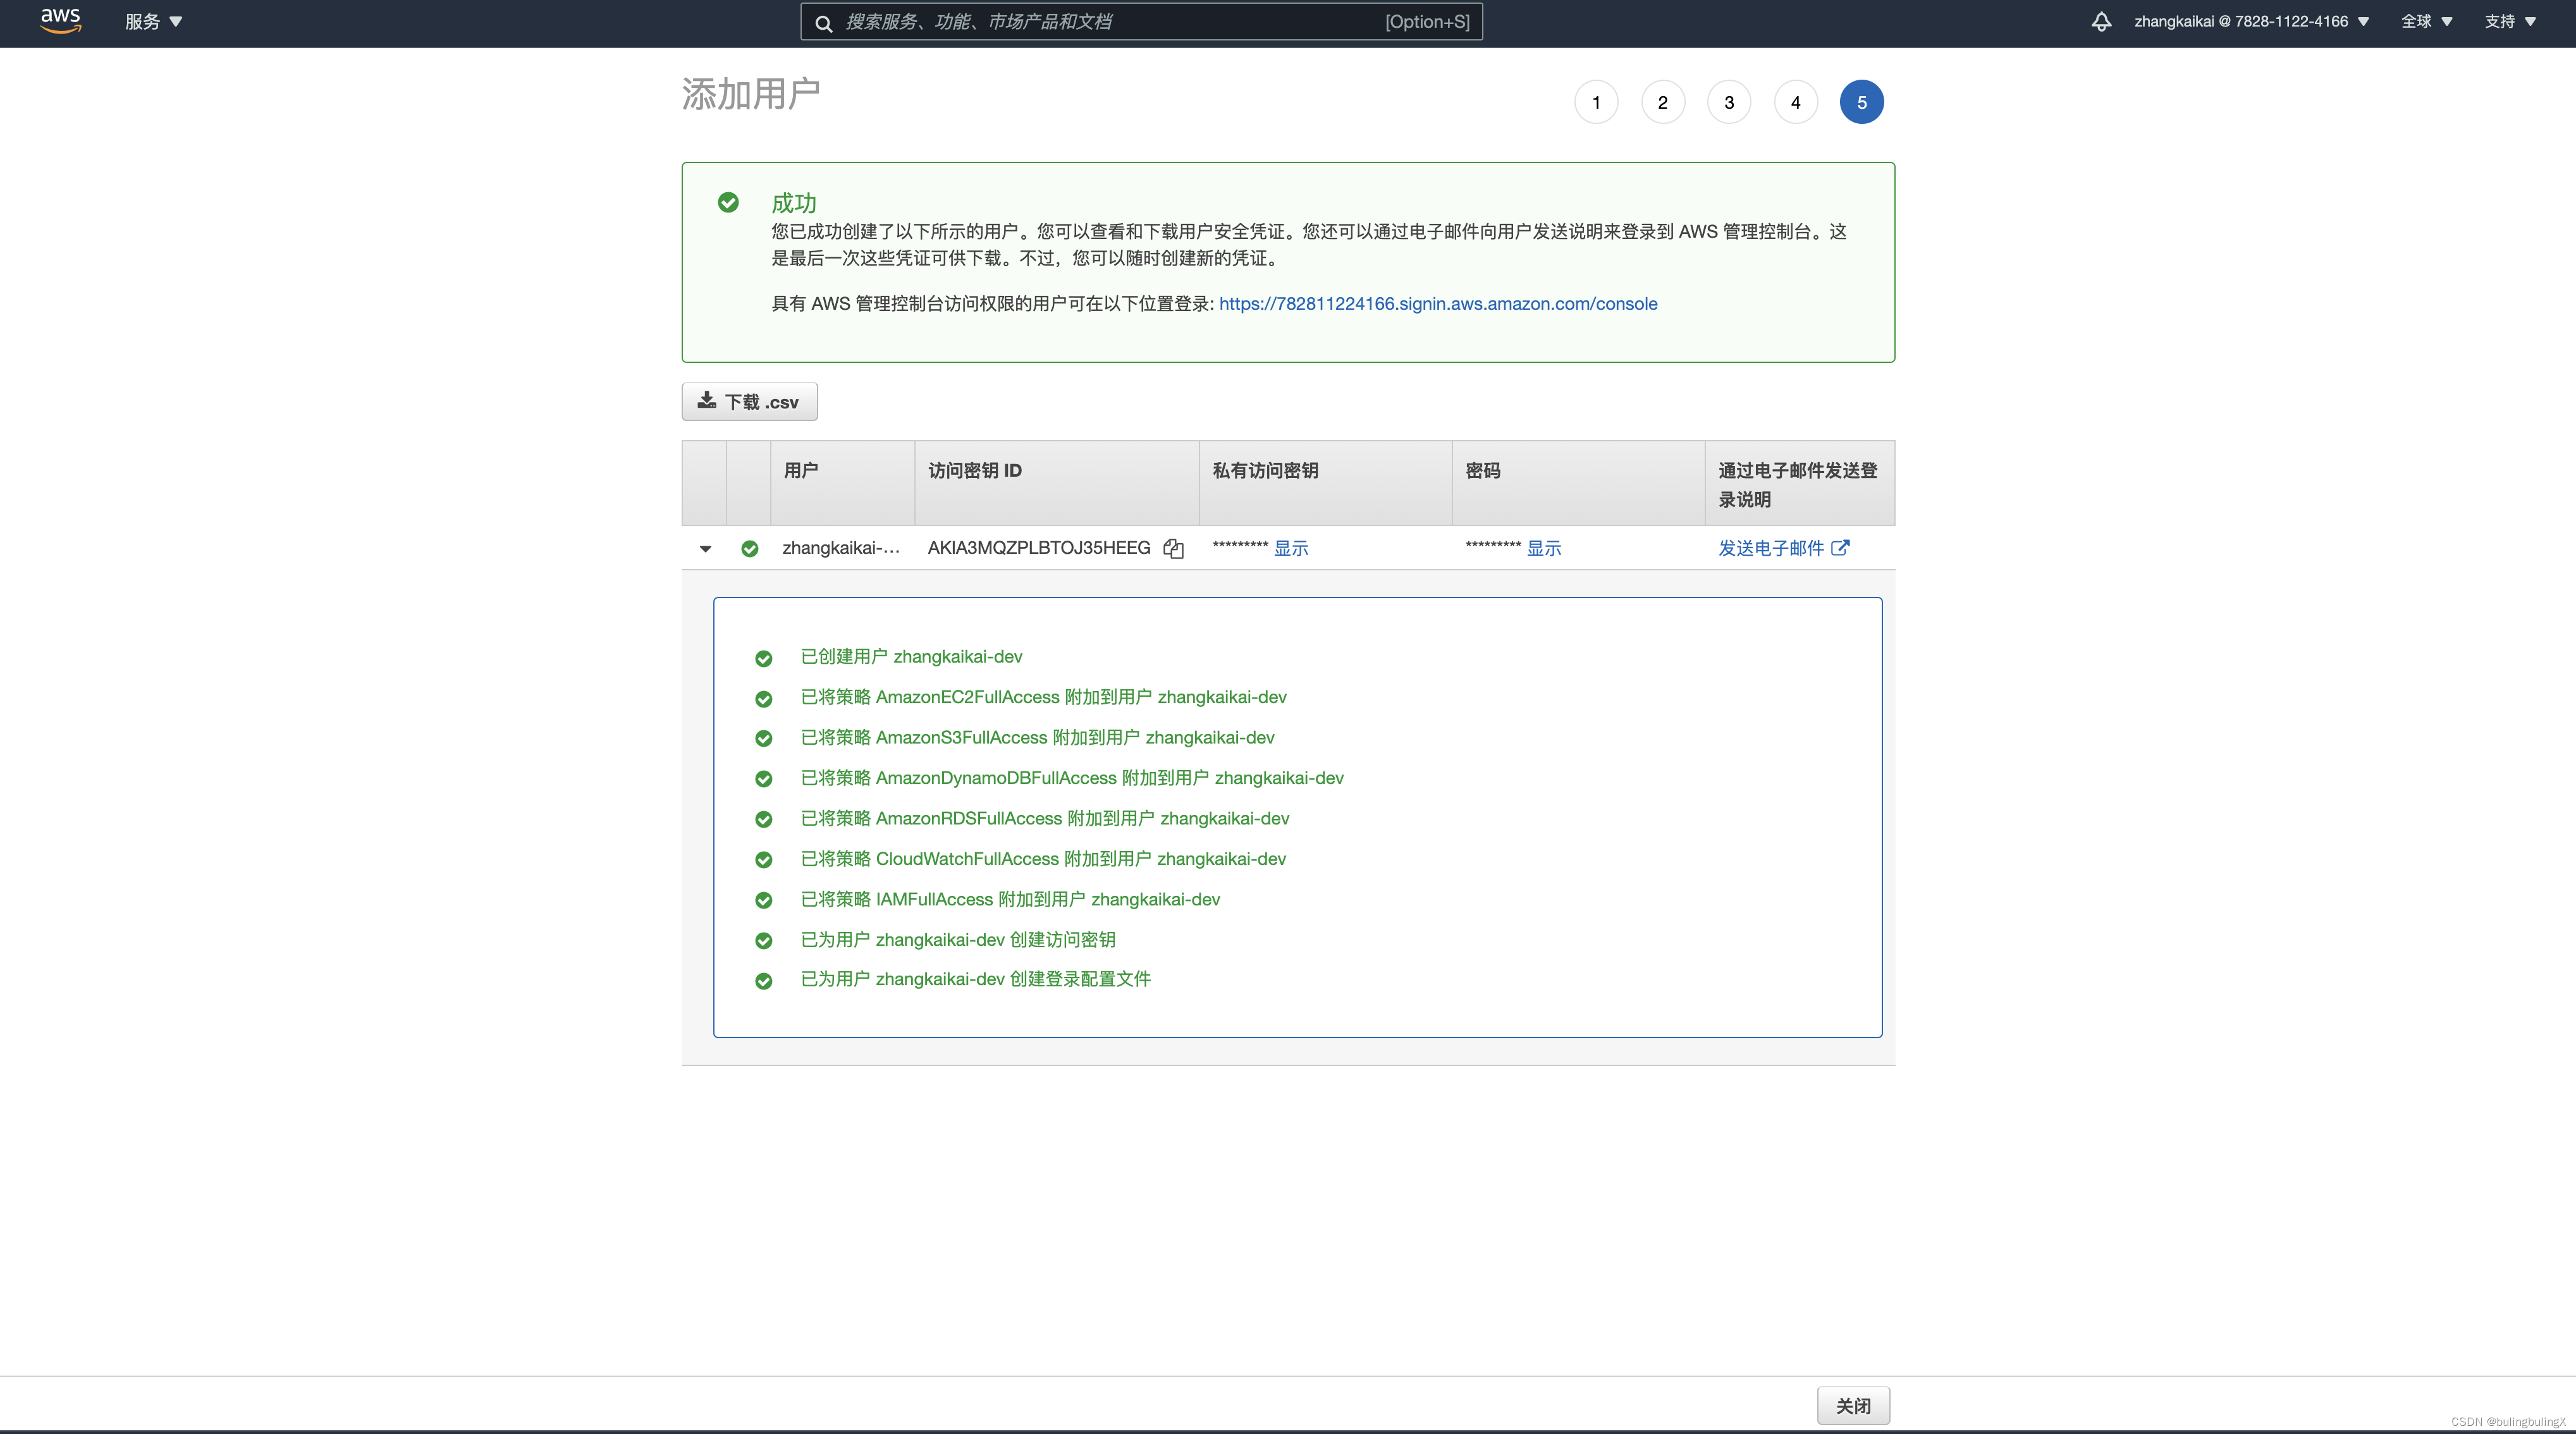
这样,zhangkaikai-dev账户就有了对应的EC2等资源的权限。
配置AWS账户
安装AWS CLI
然后开始配置账号
aws configure

配置过程将您的凭据存储~/.aws/credentials在 MacOS 和 Linux 或%UserProfile%.aws\credentialsWindows上的文件中 。
可以查看~/.aws/credentials,可以看到ak/sk已经被记录到对应的配置文件中

配置完成之后,开始尝试使用terraform来创建资源
安装Terraform
参考地址:Download Terraform - Terraform by HashiCorp
我这里使用的Mac Os,按照一下步骤安装
首先,安装 HashiCorp tap,它是我们所有 Homebrew 软件包的存储库
brew tap hashicorp/tap

注意:这会安装一个签名的二进制文件,并且会随着每个新的官方版本自动更新。
要更新到最新版本的 Terraform,请先更新 Homebrew。
$ brew update
然后,运行upgrade命令下载并使用最新的 Terraform 版本。
$ brew upgrade hashicorp/tap/terraform
验证安装
zhangkaikai@zhangkaikaideMacBook-Pro ~ terraform -helpUsage: terraform [global options] <subcommand> [args]The available commands for execution are listed below.The primary workflow commands are given first, followed byless common or more advanced commands.Main commands: init Prepare your working directory for other commands validate Check whether the configuration is valid plan Show changes required by the current configuration apply Create or update infrastructure destroy Destroy previously-created infrastructureAll other commands: console Try Terraform expressions at an interactive command prompt fmt Reformat your configuration in the standard style force-unlock Release a stuck lock on the current workspace get Install or upgrade remote Terraform modules graph Generate a Graphviz graph of the steps in an operation import Associate existing infrastructure with a Terraform resource login Obtain and save credentials for a remote host logout Remove locally-stored credentials for a remote host output Show output values from your root module providers Show the providers required for this configuration refresh Update the state to match remote systems show Show the current state or a saved plan state Advanced state management taint Mark a resource instance as not fully functional test Experimental support for module integration testing untaint Remove the 'tainted' state from a resource instance version Show the current Terraform version workspace Workspace managementGlobal options (use these before the subcommand, if any): -chdir=DIR Switch to a different working directory before executing the given subcommand. -help Show this help output, or the help for a specified subcommand. -version An alias for the "version" subcommand.
获取帮助信息
$ terraform -help planUsage: terraform [global options] plan [options] Generates a speculative execution plan, showing what actions Terraform would take to apply the current configuration. This command will not actually perform the planned actions. You can optionally save the plan to a file, which you can then pass to the "apply" command to perform exactly the actions described in the plan.Plan Customization Options: The following options customize how Terraform will produce its plan. You can also use these options when you run "terraform apply" without passing it a saved plan, in order to plan and apply in a single command. -destroy Select the "destroy" planning mode, which creates a plan to destroy all objects currently managed by this Terraform configuration instead of the usual behavior. -refresh-only Select the "refresh only" planning mode, which checks whether remote objects still match the outcome of the most recent Terraform apply but does not propose any actions to undo any changes made outside of Terraform. -refresh=false Skip checking for external changes to remote objects while creating the plan. This can potentially make planning faster, but at the expense of possibly planning against a stale record of the remote system state. -replace=resource Force replacement of a particular resource instance using its resource address. If the plan would've normally produced an update or no-op action for this instance, Terraform will plan to replace it instead. -target=resource Limit the planning operation to only the given module, resource, or resource instance and all of its dependencies. You can use this option multiple times to include more than one object. This is for exceptional use only. -var 'foo=bar' Set a value for one of the input variables in the root module of the configuration. Use this option more than once to set more than one variable. -var-file=filename Load variable values from the given file, in addition to the default files terraform.tfvars and *.auto.tfvars. Use this option more than once to include more than one variables file.Other Options: -compact-warnings If Terraform produces any warnings that are not accompanied by errors, shows them in a more compact form that includes only the summary messages. -detailed-exitcode Return detailed exit codes when the command exits. This will change the meaning of exit codes to: 0 - Succeeded, diff is empty (no changes) 1 - Errored 2 - Succeeded, there is a diff -input=true Ask for input for variables if not directly set. -lock=false Don't hold a state lock during the operation. This is dangerous if others might concurrently run commands against the same workspace. -lock-timeout=0s Duration to retry a state lock. -no-color If specified, output won't contain any color. -out=path Write a plan file to the given path. This can be used as input to the "apply" command. -parallelism=n Limit the number of concurrent operations. Defaults to 10. -state=statefile A legacy option used for the local backend only. See the local backend's documentation for more information.
安装补全命令
#zhstouch ~/.zshrc #bashtouch ~/.bashrc#安装补全命令terraform -install-autocomplete
这样本地的terraform安装完成
创建EC2实例
创建初始工程文件
mkdir learn-terraform-aws-instancecd learn-terraform-aws-instancetouch main.tf
然后写入内容
#terraform {# required_providers {# aws = {# source = "hashicorp/aws"# version = "~> 3.27"# }# } # required_version = ">= 0.14.9"#}provider "aws" { profile = "default" region = "us-east-2"}resource "aws_instance" "app_server" { ami = "ami-02de934ca4f3289e0" instance_type = "t2.micro" tags = { Name = "Zkk-ExampleAppServerInstance" }}
其中有几块需要说明一下
terraform
该terraform {}块包含 Terraform 设置,包括 Terraform 将用于供应您的基础设施的所需提供程序。对于每个提供者,该 source属性定义了一个可选的主机名、命名空间和提供者类型。默认情况下,Terraform从Terraform Registry安装提供程序。在此示例配置中,aws提供程序的源定义为hashicorp/aws,它是 的简写registry.terraform.io/hashicorp/aws。
您还可以为required_providers块中定义的每个提供程序设置版本约束 。该version属性是可选的,但我们建议使用它来约束提供程序版本,以便 Terraform 不会安装与您的配置不兼容的提供程序版本。如果未指定提供程序版本,Terraform 将在初始化期间自动下载最新版本。
这里我不使用terraform模块,让其默认
provider
这里告诉Terraform将使用AWS作为服务提供商,并且要将基础设置部署到对应配置的region的区域,这里是us-west-2 俄亥俄州。然后还可以选择对应的profile,这里指向的是一开始使用aws config配置的aws账号
resource
这里是指要创建的对应的资源,这个块一般的格式为
resource "<provider>_<TYPE>""NAME" { [CONFIG]}
其中provider是指上面提到的提供商的名字AWS
TYPE是指需要在该提供商中创建的资源,这里指instance
NAME是一个标识符,可以在整个Terraform脚本范围内通过这个标识符来引用该资源。
CONFIG就是指一个或者多个特定于该资源的参数或者参数组
例如这里是aws_instance,这个资源就是EC2,aws_instance资源支持很多不同的参数,但是只有两个参数是必须设置的。
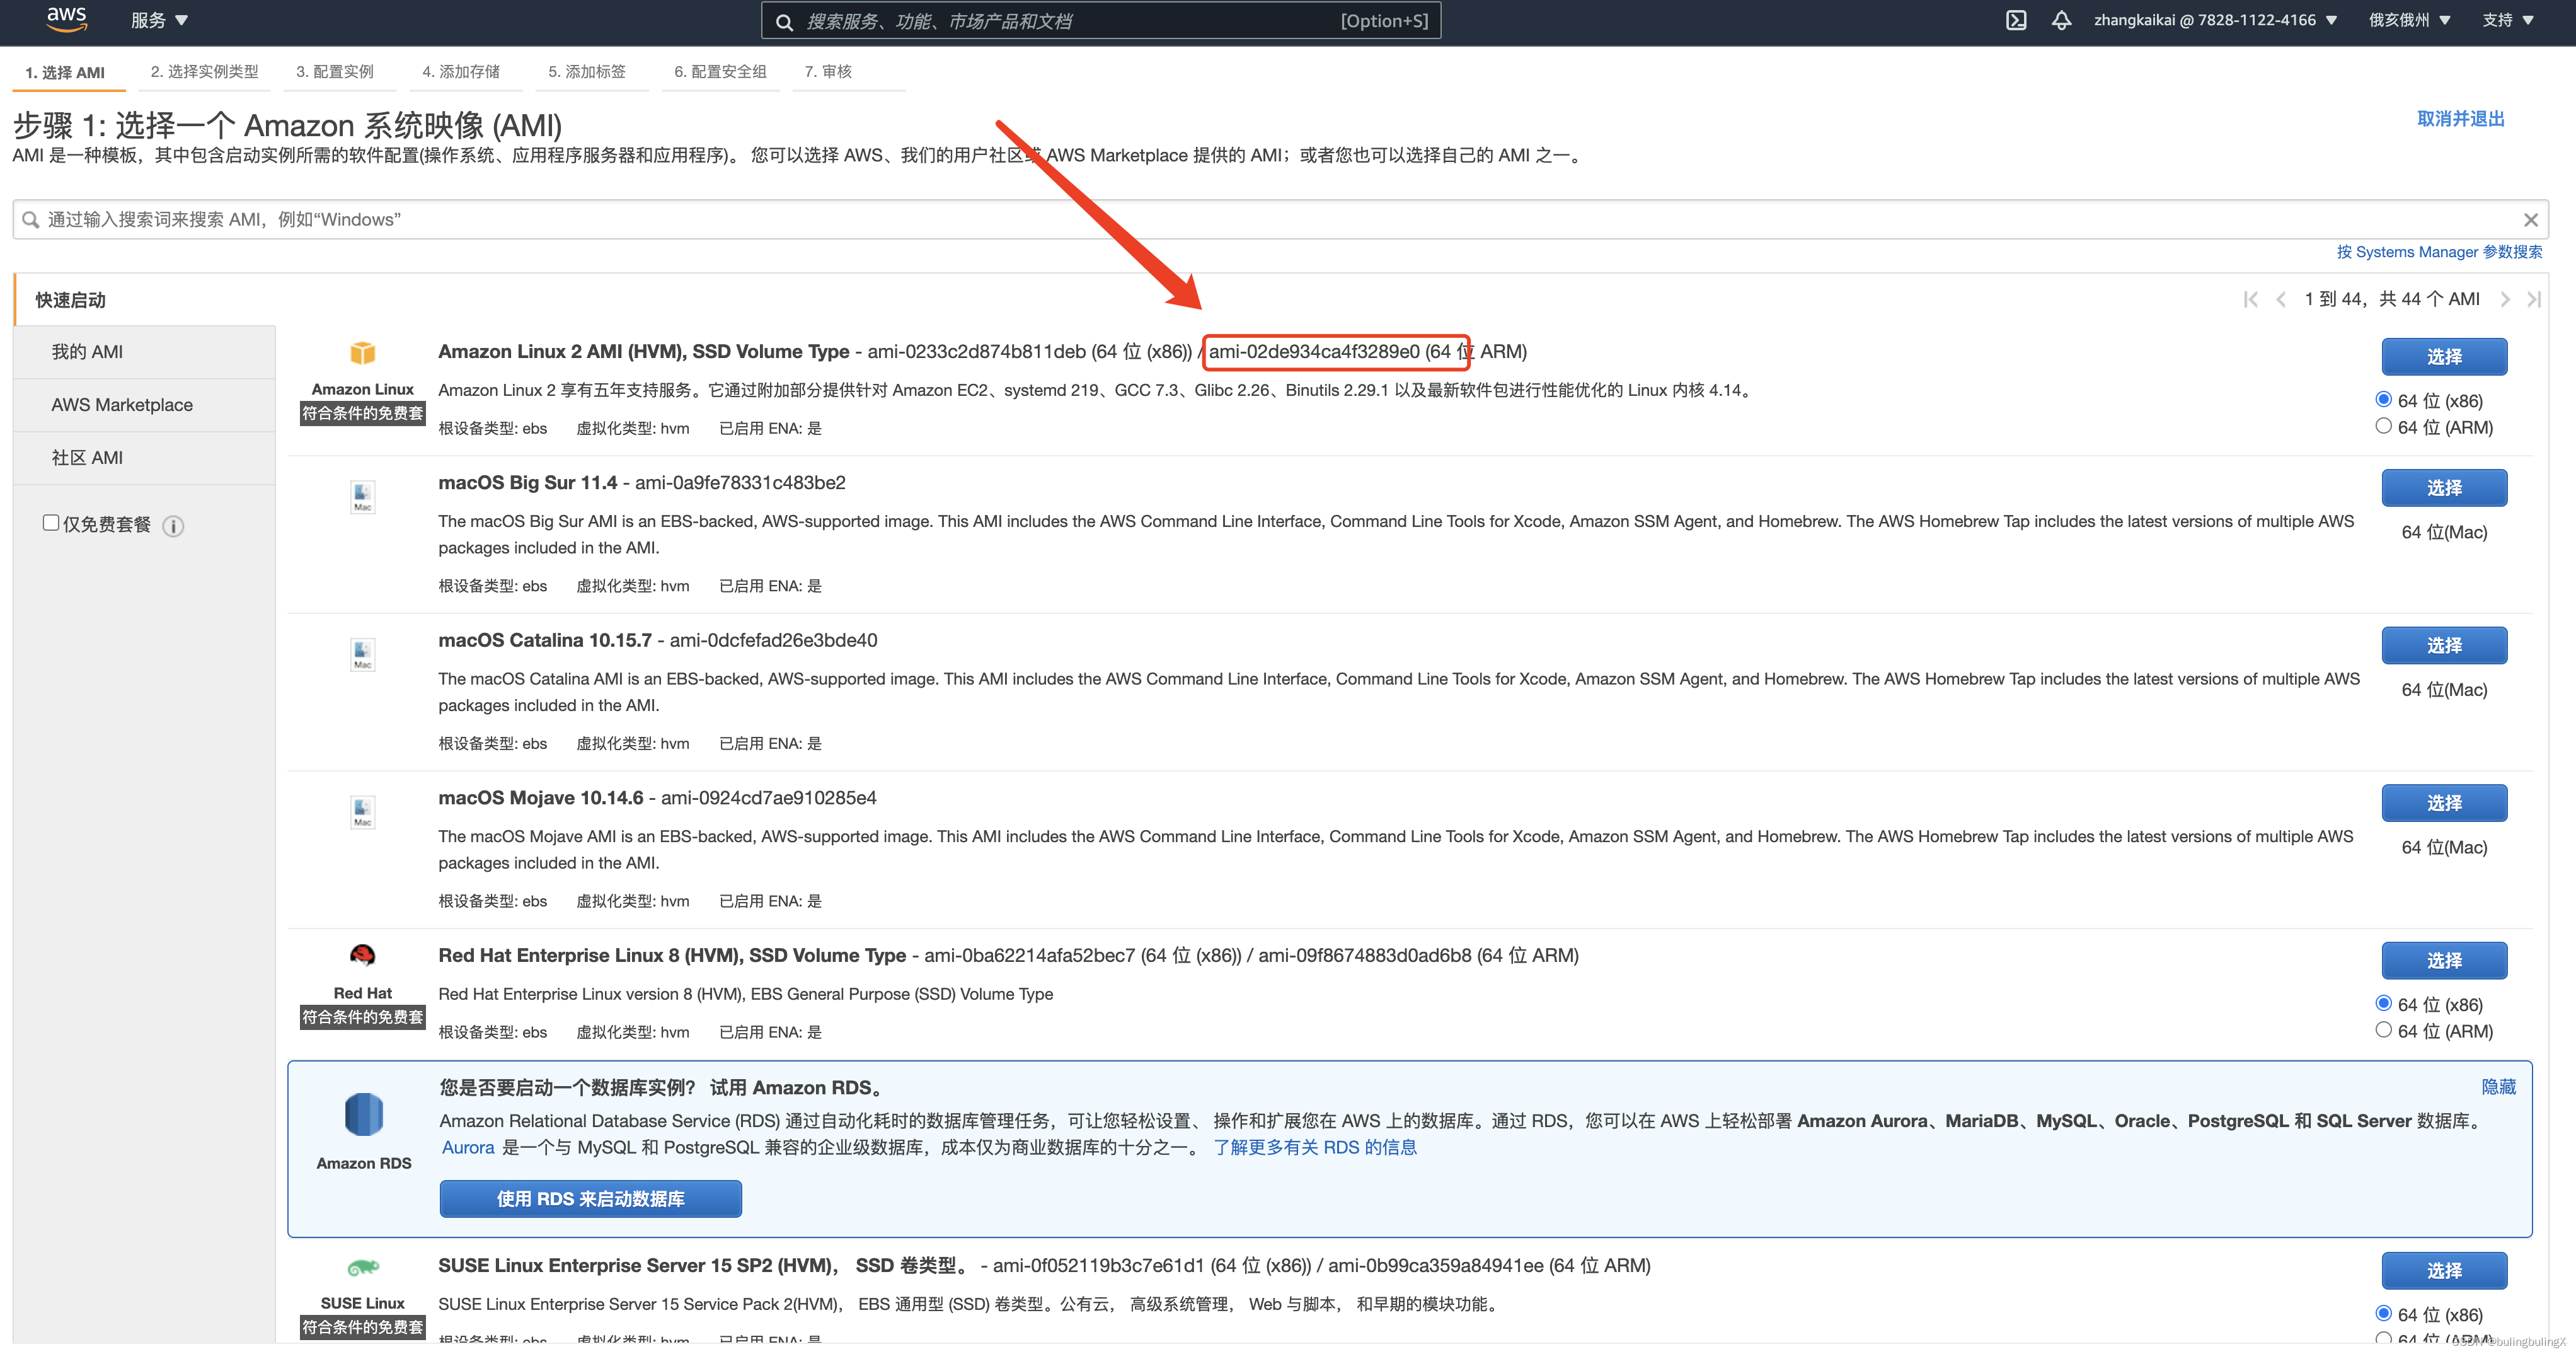
ami
:其中ami指的是EC2对应AMI ID,可以在AWS 控制台中看到对应的ami id
- instance_type
这里指所要启用的EC2的机型,这里指定的免费的机型t2.micro
然后后面加个tag,就相当于创建EC2过程中添加tag一样,这里是指EC2实例的名称
初始化目录
当你创建一个新的配置——或者从版本控制中检出一个现有的配置——你需要用terraform init.
初始化配置目录会下载并安装配置中定义的提供程序,在本例中为aws提供程序。
初始化目录。
terraform init

terraform可执行文件包含了Terraform的基本功能,但是不包含任何供服务提供商的代码,所以第一次使用Terraform的时候,需要初始化。Terraform 下载aws提供程序并将其安装在当前工作目录的隐藏子目录中,名为.terraform. 该 terraform init命令打印出安装了哪个版本的提供程序。Terraform 还会创建一个名为的锁定文件.terraform.lock.hcl,该文件指定使用的确切提供程序版本,以便您可以控制何时更新用于项目的提供程序

格式化并验证配置
我们建议在您的所有配置文件中使用一致的格式。该 terraform fmt命令会自动更新当前目录中的配置以提高可读性和一致性。
格式化您的配置。Terraform 将打印出它修改的文件的名称(如果有)。在这种情况下,您的配置文件已经正确格式化,因此 Terraform 不会返回任何文件名
terraform fmt
您还可以使用该terraform validate命令确保您的配置在语法上有效且内部一致。
验证您的配置。上面提供的示例配置是有效的,因此 Terraform 将返回成功消息。
$ terraform validateSuccess! The configuration is valid.

部署
先运行terraform plan命令
✘ zhangkaikai@zhangkaikaideMacBook-Pro ~/app/learn-terraform-aws-instance terraform planTerraform used the selected providers to generate the following execution plan. Resource actions are indicated with the following symbols: + createTerraform will perform the following actions: # aws_instance.zkk-ec2 will be created + resource "aws_instance" "zkk-ec2" { + ami = "ami-02de934ca4f3289e0" + arn = (known after apply) + associate_public_ip_address = (known after apply) + availability_zone = (known after apply) + cpu_core_count = (known after apply) + cpu_threads_per_core = (known after apply) + disable_api_termination = (known after apply) + ebs_optimized = (known after apply) + get_password_data = false + host_id = (known after apply) + id = (known after apply) + instance_initiated_shutdown_behavior = (known after apply) + instance_state = (known after apply) + instance_type = "t2.micro" + ipv6_address_count = (known after apply) + ipv6_addresses = (known after apply) + key_name = (known after apply) + monitoring = (known after apply) + outpost_arn = (known after apply) + password_data = (known after apply) + placement_group = (known after apply) + primary_network_interface_id = (known after apply) + private_dns = (known after apply) + private_ip = (known after apply) + public_dns = (known after apply) + public_ip = (known after apply) + secondary_private_ips = (known after apply) + security_groups = (known after apply) + source_dest_check = true + subnet_id = (known after apply) + tags = { + "Name" = "Zkk-ExampleAppServerInstance" } + tags_all = { + "Name" = "Zkk-ExampleAppServerInstance" } + tenancy = (known after apply) + user_data = (known after apply) + user_data_base64 = (known after apply) + vpc_security_group_ids = (known after apply) + capacity_reservation_specification { + capacity_reservation_preference = (known after apply) + capacity_reservation_target { + capacity_reservation_id = (known after apply) } } + ebs_block_device { + delete_on_termination = (known after apply) + device_name = (known after apply) + encrypted = (known after apply) + iops = (known after apply) + kms_key_id = (known after apply) + snapshot_id = (known after apply) + tags = (known after apply) + throughput = (known after apply) + volume_id = (known after apply) + volume_size = (known after apply) + volume_type = (known after apply) } + enclave_options { + enabled = (known after apply) } + ephemeral_block_device { + device_name = (known after apply) + no_device = (known after apply) + virtual_name = (known after apply) } + metadata_options { + http_endpoint = (known after apply) + http_put_response_hop_limit = (known after apply) + http_tokens = (known after apply) } + network_interface { + delete_on_termination = (known after apply) + device_index = (known after apply) + network_interface_id = (known after apply) } + root_block_device { + delete_on_termination = (known after apply) + device_name = (known after apply) + encrypted = (known after apply) + iops = (known after apply) + kms_key_id = (known after apply) + tags = (known after apply) + throughput = (known after apply) + volume_id = (known after apply) + volume_size = (known after apply) + volume_type = (known after apply) } }Plan: 1 to add, 0 to change, 0 to destroy.──────────────────────────────────────────────────────────────────────────────────────────────────────────────────────────────────────────────────────────────────────────────────────────Note: You didn't use the -out option to save this plan, so Terraform can't guarantee to take exactly these actions if you run "terraform apply" now.
plan命令可以让你在做任何实际更改之前,对Terroform将要执行的资源变动进行预览,以便代码在发布之前进行最后的检查。plan命令的输出,类似与Linux中的diff命令的输出,(+)代表新添加的内容,(-)代表减少的内容,(~)代表所有将被修改的内容。
可以很清楚的看到这次日志里说是aws_instance.zkk-ec2 will be created,所有的显示结果与预期的一样,所以就放心大胆的去执行apply命令
terraform apply

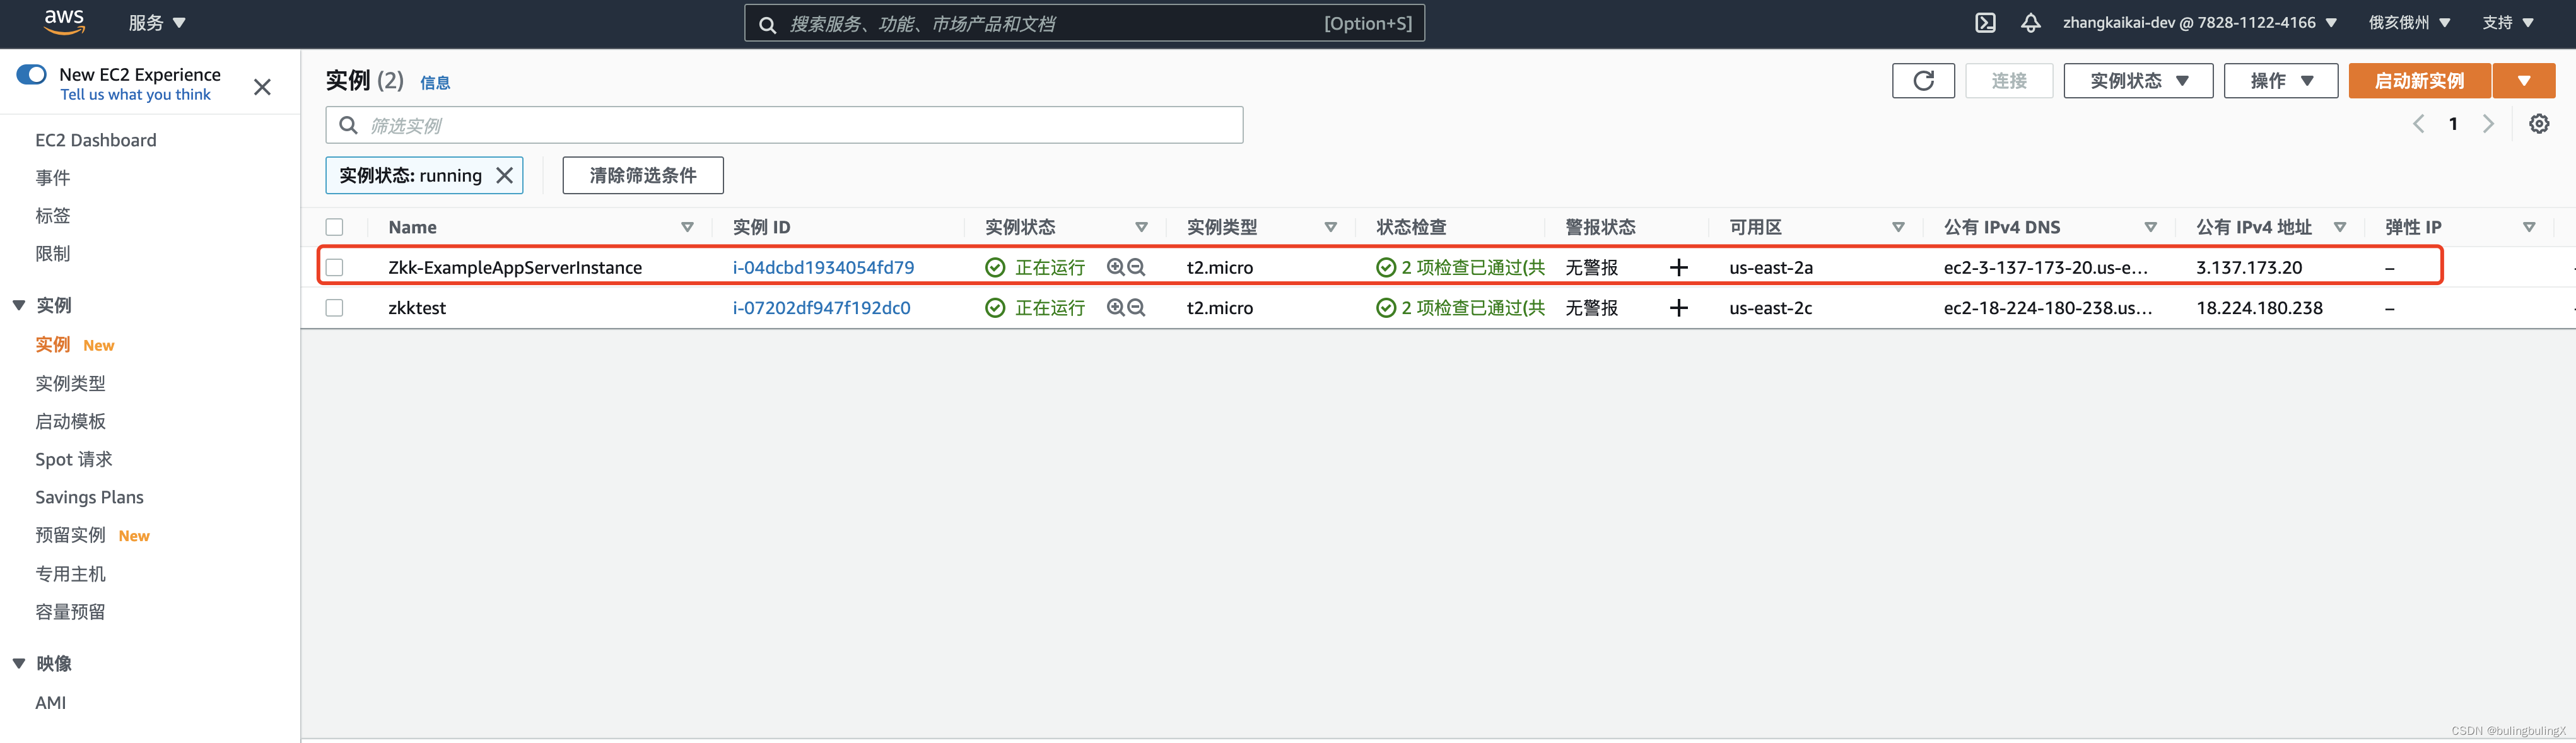
可以看到,apply命令会显示和plan命令一样的输出,并且要求确实是否继续执行,我输入了yes继续执行,等待脚本执行完成,去控制台查看,EC2启动成功
修改EC2实例
这个时候可以测试一下,修改一下tag名称,重新执行看会怎样
provider "aws" { profile = "default" region = "us-east-2"}resource "aws_instance" "app_server" { ami = "ami-02de934ca4f3289e0" instance_type = "t2.micro" tags = { Name = "Zkk-ExampleAppServerInstance2" }}
执行plan命令
zhangkaikai@zhangkaikaideMacBook-Pro ~/app/learn-terraform-aws-instance terraform planaws_instance.zkk-ec2: Refreshing state... [id=i-04dcbd1934054fd79]Note: Objects have changed outside of TerraformTerraform detected the following changes made outside of Terraform since the last "terraform apply": # aws_instance.zkk-ec2 has been changed ~ resource "aws_instance" "zkk-ec2" { + arn = "arn:aws:ec2:us-east-2:782811224166:instance/i-04dcbd1934054fd79" + associate_public_ip_address = true + availability_zone = "us-east-2a" + cpu_core_count = 1 + cpu_threads_per_core = 1 + disable_api_termination = false + ebs_optimized = false + hibernation = false id = "i-04dcbd1934054fd79" + instance_initiated_shutdown_behavior = "stop" + instance_state = "running" + ipv6_address_count = 0 + ipv6_addresses = [] + monitoring = false + primary_network_interface_id = "eni-0fc0af63d48f3555e" + private_dns = "ip-172-31-9-2.us-east-2.compute.internal" + private_ip = "172.31.9.2" + public_dns = "ec2-3-137-173-20.us-east-2.compute.amazonaws.com" + public_ip = "3.137.173.20" ~ security_groups = [ + "default", ] + subnet_id = "subnet-829c25e9" tags = { "Name" = "Zkk-ExampleAppServerInstance" } + tenancy = "default" ~ vpc_security_group_ids = [ + "sg-eff02998", ] # (6 unchanged attributes hidden) + capacity_reservation_specification { + capacity_reservation_preference = "open" } + credit_specification { + cpu_credits = "standard" } + enclave_options { + enabled = false } + metadata_options { + http_endpoint = "enabled" + http_put_response_hop_limit = 1 + http_tokens = "optional" } + root_block_device { + delete_on_termination = true + device_name = "/dev/xvda" + encrypted = false + iops = 100 + tags = {} + throughput = 0 + volume_id = "vol-017b664a22c19b870" + volume_size = 8 + volume_type = "gp2" } }Unless you have made equivalent changes to your configuration, or ignored the relevant attributes using ignore_changes, the following plan may include actions to undo or respond to thesechanges.─────────────────────────────────────────────────────────────────────────────────────────────────────────────────────────────────────────────────────────────────────────────────────────────────Terraform used the selected providers to generate the following execution plan. Resource actions are indicated with the following symbols:-/+ destroy and then create replacementTerraform will perform the following actions: # aws_instance.zkk-ec2 is tainted, so must be replaced-/+ resource "aws_instance" "zkk-ec2" { ~ arn = "arn:aws:ec2:us-east-2:782811224166:instance/i-04dcbd1934054fd79" -> (known after apply) ~ associate_public_ip_address = true -> (known after apply) ~ availability_zone = "us-east-2a" -> (known after apply) ~ cpu_core_count = 1 -> (known after apply) ~ cpu_threads_per_core = 1 -> (known after apply) ~ disable_api_termination = false -> (known after apply) ~ ebs_optimized = false -> (known after apply) - hibernation = false -> null + host_id = (known after apply) ~ id = "i-04dcbd1934054fd79" -> (known after apply) ~ instance_initiated_shutdown_behavior = "stop" -> (known after apply) ~ instance_state = "running" -> (known after apply) ~ ipv6_address_count = 0 -> (known after apply) ~ ipv6_addresses = [] -> (known after apply) + key_name = (known after apply) ~ monitoring = false -> (known after apply) + outpost_arn = (known after apply) + password_data = (known after apply) + placement_group = (known after apply) ~ primary_network_interface_id = "eni-0fc0af63d48f3555e" -> (known after apply) ~ private_dns = "ip-172-31-9-2.us-east-2.compute.internal" -> (known after apply) ~ private_ip = "172.31.9.2" -> (known after apply) ~ public_dns = "ec2-3-137-173-20.us-east-2.compute.amazonaws.com" -> (known after apply) ~ public_ip = "3.137.173.20" -> (known after apply) ~ secondary_private_ips = [] -> (known after apply) ~ security_groups = [ - "default", ] -> (known after apply) ~ subnet_id = "subnet-829c25e9" -> (known after apply) ~ tags = { ~ "Name" = "Zkk-ExampleAppServerInstance" -> "Zkk-ExampleAppServerInstance22" } ~ tags_all = { ~ "Name" = "Zkk-ExampleAppServerInstance" -> "Zkk-ExampleAppServerInstance22" } ~ tenancy = "default" -> (known after apply) + user_data = (known after apply) + user_data_base64 = (known after apply) ~ vpc_security_group_ids = [ - "sg-eff02998", ] -> (known after apply) # (4 unchanged attributes hidden) ~ capacity_reservation_specification { ~ capacity_reservation_preference = "open" -> (known after apply) + capacity_reservation_target { + capacity_reservation_id = (known after apply) } } - credit_specification { - cpu_credits = "standard" -> null } + ebs_block_device { + delete_on_termination = (known after apply) + device_name = (known after apply) + encrypted = (known after apply) + iops = (known after apply) + kms_key_id = (known after apply) + snapshot_id = (known after apply) + tags = (known after apply) + throughput = (known after apply) + volume_id = (known after apply) + volume_size = (known after apply) + volume_type = (known after apply) } ~ enclave_options { ~ enabled = false -> (known after apply) } + ephemeral_block_device { + device_name = (known after apply) + no_device = (known after apply) + virtual_name = (known after apply) } ~ metadata_options { ~ http_endpoint = "enabled" -> (known after apply) ~ http_put_response_hop_limit = 1 -> (known after apply) ~ http_tokens = "optional" -> (known after apply) } + network_interface { + delete_on_termination = (known after apply) + device_index = (known after apply) + network_interface_id = (known after apply) } ~ root_block_device { ~ delete_on_termination = true -> (known after apply) ~ device_name = "/dev/xvda" -> (known after apply) ~ encrypted = false -> (known after apply) ~ iops = 100 -> (known after apply) + kms_key_id = (known after apply) ~ tags = {} -> (known after apply) ~ throughput = 0 -> (known after apply) ~ volume_id = "vol-017b664a22c19b870" -> (known after apply) ~ volume_size = 8 -> (known after apply) ~ volume_type = "gp2" -> (known after apply) } }Plan: 1 to add, 0 to change, 1 to destroy.─────────────────────────────────────────────────────────────────────────────────────────────────────────────────────────────────────────────────────────────────────────────────────────────────Note: You didn't use the -out option to save this plan, so Terraform can't guarantee to take exactly these actions if you run "terraform apply" now
可以看到其中的更改项,将原先的ec2回收掉,然后创建一个新的。
执行apply命令
等待完成后,查看控制台,可以看到一个新的符合要求的实例就创建出来了
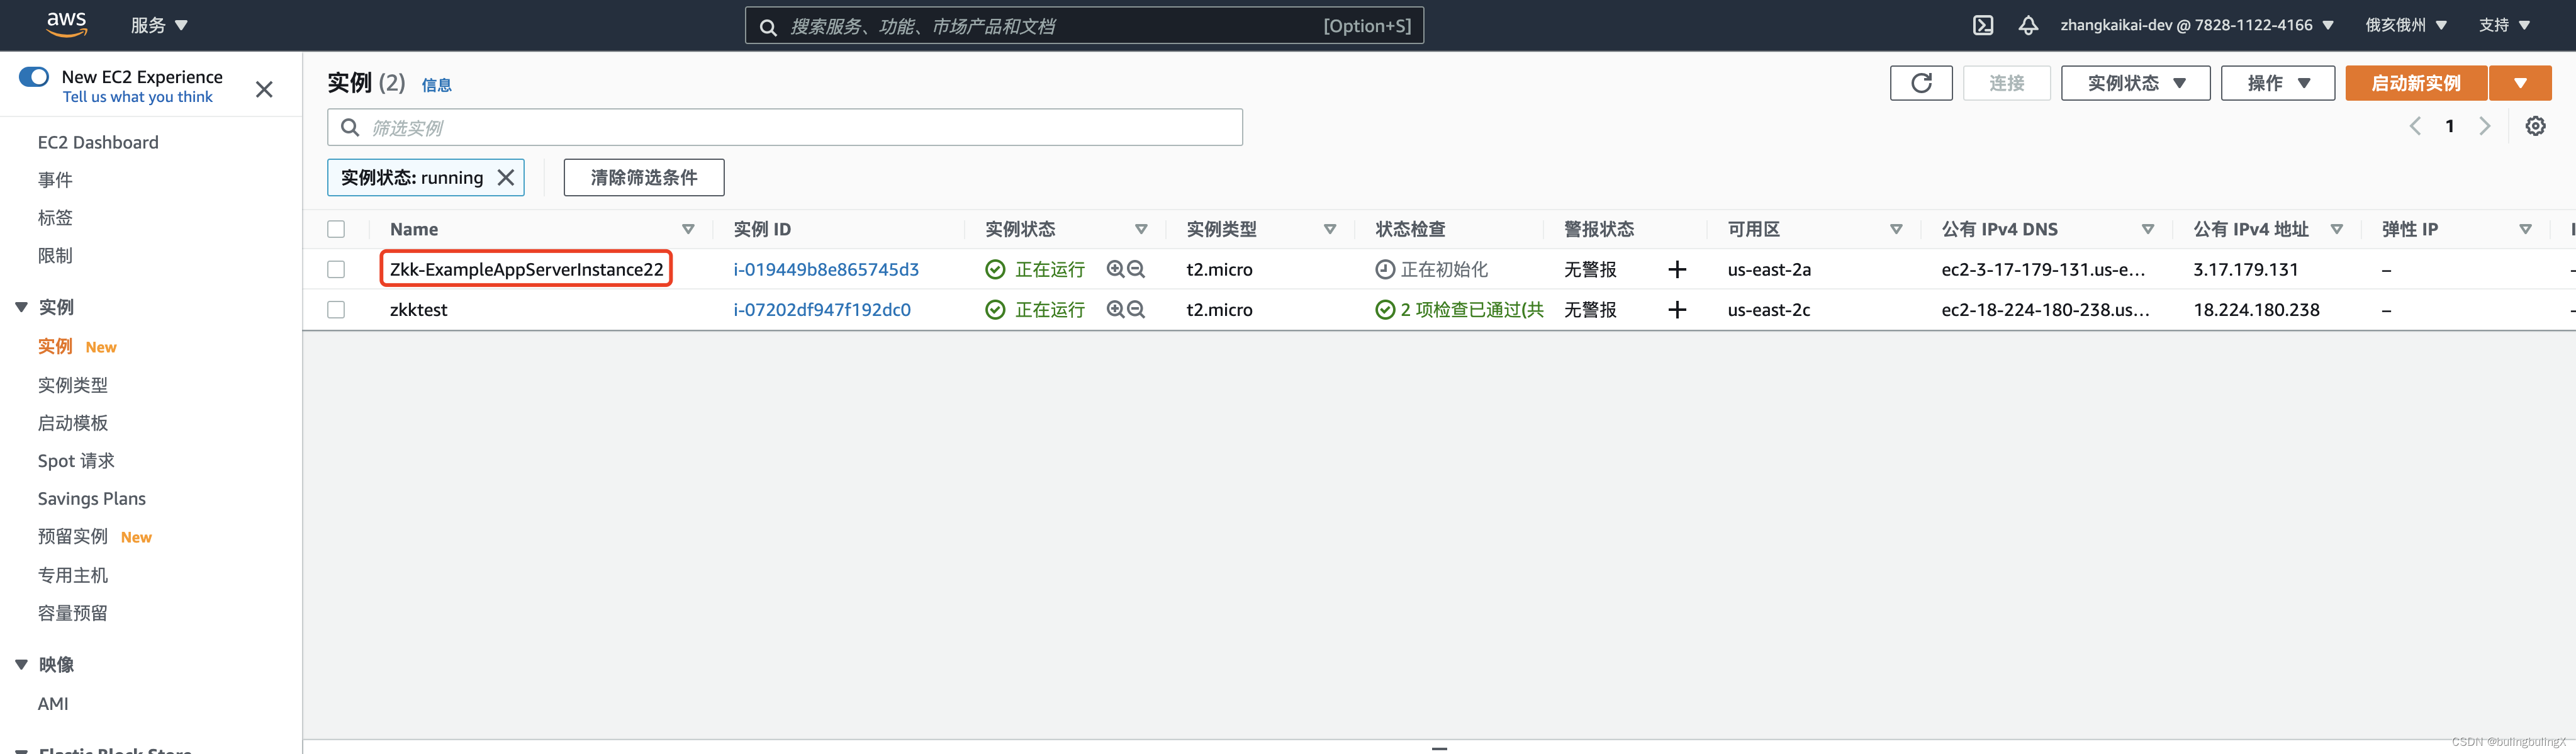
这样一台EC2机器就用Terraform创建成功了
回收EC2实例
一旦不再需要之前创建的基础实例,可能希望销毁它以减少安全风险和运营成本。除了构建和修改基础设施之外,Terraform 还可以破坏或重建它管理的基础设施。
使用terraform destroy命令可以终止由您的 Terraform 项目管理的资源。此命令与terraform apply相反,它终止在您的 Terraform 状态中指定的所有资源。它并没有破坏其他地方运行的资源不是由当前Terraform项目管理。
✘ zhangkaikai@zhangkaikaideMacBook-Pro ~/app/learn-terraform-aws-instance terraform destroyaws_instance.zkk-ec2: Refreshing state... [id=i-019449b8e865745d3]Note: Objects have changed outside of TerraformTerraform detected the following changes made outside of Terraform since the last "terraform apply": # aws_instance.zkk-ec2 has been changed ~ resource "aws_instance" "zkk-ec2" { + arn = "arn:aws:ec2:us-east-2:782811224166:instance/i-019449b8e865745d3" + associate_public_ip_address = true + availability_zone = "us-east-2a" + cpu_core_count = 1 + cpu_threads_per_core = 1 + disable_api_termination = false + ebs_optimized = false + hibernation = false id = "i-019449b8e865745d3" + instance_initiated_shutdown_behavior = "stop" + instance_state = "running" + ipv6_address_count = 0 + ipv6_addresses = [] + monitoring = false + primary_network_interface_id = "eni-056529831935c9b24" + private_dns = "ip-172-31-14-127.us-east-2.compute.internal" + private_ip = "172.31.14.127" + public_dns = "ec2-3-17-179-131.us-east-2.compute.amazonaws.com" + public_ip = "3.17.179.131" ~ security_groups = [ + "default", ] + subnet_id = "subnet-829c25e9" tags = { "Name" = "Zkk-ExampleAppServerInstance22" } + tenancy = "default" ~ vpc_security_group_ids = [ + "sg-eff02998", ] # (6 unchanged attributes hidden) + capacity_reservation_specification { + capacity_reservation_preference = "open" } + credit_specification { + cpu_credits = "standard" } + enclave_options { + enabled = false } + metadata_options { + http_endpoint = "enabled" + http_put_response_hop_limit = 1 + http_tokens = "optional" } + root_block_device { + delete_on_termination = true + device_name = "/dev/xvda" + encrypted = false + iops = 100 + tags = {} + throughput = 0 + volume_id = "vol-049e5670f68bb170a" + volume_size = 8 + volume_type = "gp2" } }Unless you have made equivalent changes to your configuration, or ignored the relevant attributes using ignore_changes, the following plan may include actions to undo or respond to thesechanges.─────────────────────────────────────────────────────────────────────────────────────────────────────────────────────────────────────────────────────────────────────────────────────────────────Terraform used the selected providers to generate the following execution plan. Resource actions are indicated with the following symbols: - destroyTerraform will perform the following actions: # aws_instance.zkk-ec2 will be destroyed - resource "aws_instance" "zkk-ec2" { - ami = "ami-0233c2d874b811deb" -> null - arn = "arn:aws:ec2:us-east-2:782811224166:instance/i-019449b8e865745d3" -> null - associate_public_ip_address = true -> null - availability_zone = "us-east-2a" -> null - cpu_core_count = 1 -> null - cpu_threads_per_core = 1 -> null - disable_api_termination = false -> null - ebs_optimized = false -> null - get_password_data = false -> null - hibernation = false -> null - id = "i-019449b8e865745d3" -> null - instance_initiated_shutdown_behavior = "stop" -> null - instance_state = "running" -> null - instance_type = "t2.micro" -> null - ipv6_address_count = 0 -> null - ipv6_addresses = [] -> null - monitoring = false -> null - primary_network_interface_id = "eni-056529831935c9b24" -> null - private_dns = "ip-172-31-14-127.us-east-2.compute.internal" -> null - private_ip = "172.31.14.127" -> null - public_dns = "ec2-3-17-179-131.us-east-2.compute.amazonaws.com" -> null - public_ip = "3.17.179.131" -> null - secondary_private_ips = [] -> null - security_groups = [ - "default", ] -> null - source_dest_check = true -> null - subnet_id = "subnet-829c25e9" -> null - tags = { - "Name" = "Zkk-ExampleAppServerInstance22" } -> null - tags_all = { - "Name" = "Zkk-ExampleAppServerInstance22" } -> null - tenancy = "default" -> null - vpc_security_group_ids = [ - "sg-eff02998", ] -> null - capacity_reservation_specification { - capacity_reservation_preference = "open" -> null } - credit_specification { - cpu_credits = "standard" -> null } - enclave_options { - enabled = false -> null } - metadata_options { - http_endpoint = "enabled" -> null - http_put_response_hop_limit = 1 -> null - http_tokens = "optional" -> null } - root_block_device { - delete_on_termination = true -> null - device_name = "/dev/xvda" -> null - encrypted = false -> null - iops = 100 -> null - tags = {} -> null - throughput = 0 -> null - volume_id = "vol-049e5670f68bb170a" -> null - volume_size = 8 -> null - volume_type = "gp2" -> null } }Plan: 0 to add, 0 to change, 1 to destroy.Do you really want to destroy all resources? Terraform will destroy all your managed infrastructure, as shown above. There is no undo. Only 'yes' will be accepted to confirm. Enter a value: yesaws_instance.zkk-ec2: Destroying... [id=i-019449b8e865745d3]aws_instance.zkk-ec2: Still destroying... [id=i-019449b8e865745d3, 10s elapsed]aws_instance.zkk-ec2: Still destroying... [id=i-019449b8e865745d3, 20s elapsed]aws_instance.zkk-ec2: Still destroying... [id=i-019449b8e865745d3, 30s elapsed]aws_instance.zkk-ec2: Still destroying... [id=i-019449b8e865745d3, 40s elapsed]aws_instance.zkk-ec2: Destruction complete after 46sDestroy complete! Resources: 1 destroyed.
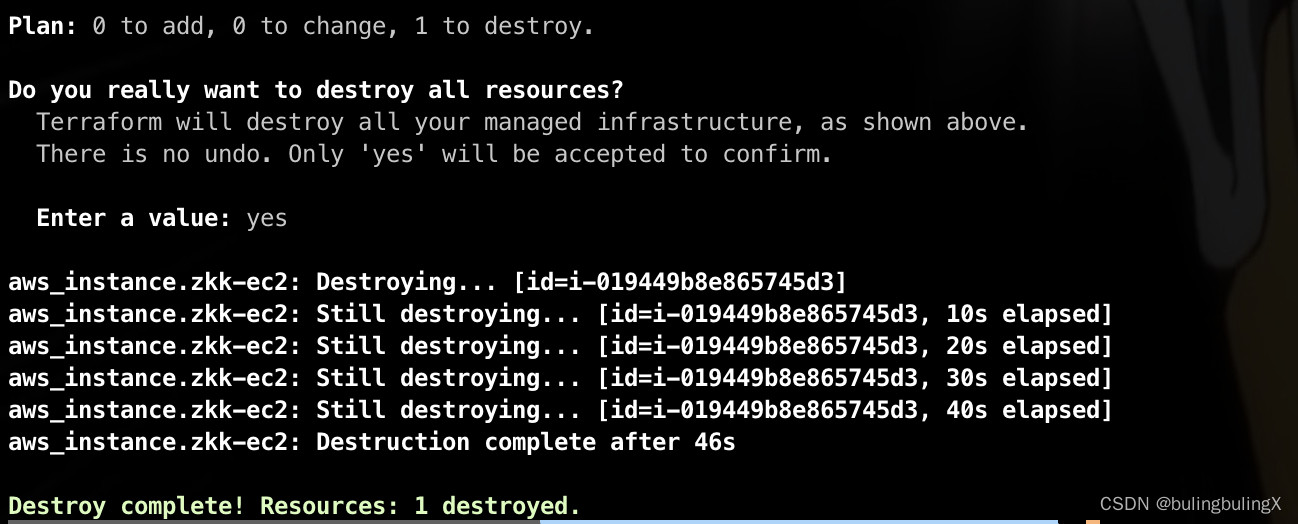
该-前缀表示该实例将被销毁。与 apply 一样,Terraform 显示其执行计划并在进行任何更改之前等待批准。输入yes执行此计划并销毁基础设施。
就像 apply一样,Terraform 决定销毁资源的顺序。在这种情况下,Terraform 识别出没有其他依赖项的单个实例,因此它销毁了该实例。在具有多个资源的更复杂的情况下,Terraform 将按照适当的顺序销毁它们以尊重依赖关系
然后前往控制台查看,可以看到实例已经被终止。


 400
400


 被折叠的 条评论
为什么被折叠?
被折叠的 条评论
为什么被折叠?
 到【灌水乐园】发言


