


 本文详细介绍了如何在iOS中使用UIAlertController创建警报对话框、带有输入框的对话框以及底部选择对话框,并展示了相应的代码示例。
UIAlertControlle时IOS的对话框控制器(警报控制器),简单使用方法如下:
步骤都一样,先是创建UIAlertController,然后创建UIAlertAction,再将UIAlertAction添加到UIAlertController中,最后显示对话框。
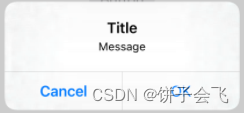
文本对话框:
		//创建控制器
        let alertController = UIAlertController(title: "Title", message: "Message", preferredStyle: .alert)
        //设置action
        let okAction = UIAlertAction(title: "OK", style: .default){
            (action) in
            print("click OK")
        }
        let cancelAction = UIAlertAction(title: "Cancel", style: .cancel, handler: nil)
        //添加action
        alertController.addAction(okAction)
        alertController.addAction(cancelAction)
        //显示对话框
        present(alertController, animated: true, completion: nil)
效果如图:
带输入框的对话框
		//创建控制器
        let alertController = UIAlertController(title: "Enter Text", message: nil, preferredStyle: .alert)
        //设置输入框
        alertController.addTextField { (textField) in
            textField.placeholder = "Enter text"
        }
        //设置action
        let cancelAction = UIAlertAction(title: "Cancel", style: .cancel, handler: nil)
        let submitAction = UIAlertAction(title: "Submit", style: .default) { (action) in
            if let text = alertController.textFields?.first?.text {
                print("Entered text: \(text)")
            }
        }
        //添加action
        alertController.addAction(cancelAction)
        alertController.addAction(submitAction)
        //显示对话框
        present(alertController, animated: true, completion: nil)
效果如图:

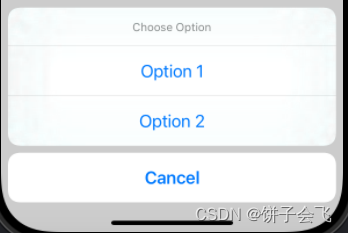
底部选择对话框
注意preferredStyle为.actionSheet
		//创建控制器
        let alertController = UIAlertController(title: "Choose Option", message: nil, preferredStyle: .actionSheet)
        //设置action
        let option1Action = UIAlertAction(title: "Option 1", style: .default) { (action) in
            print("Option 1 selected")
        }
        let option2Action = UIAlertAction(title: "Option 2", style: .default) { (action) in
            print("Option 2 selected")
        }
        let cancelAction = UIAlertAction(title: "Cancel", style: .cancel, handler: nil)
        //添加action
        alertController.addAction(option1Action)
        alertController.addAction(option2Action)
        alertController.addAction(cancelAction)
        //显示对话框
        present(alertController, animated: true, completion: nil)
效果如图:


 被折叠的 条评论
为什么被折叠?
被折叠的 条评论
为什么被折叠?
 到【灌水乐园】发言


