


请务必理解如下章节后阅读此章节:
压缩 js 代码可降低 js 文件大小,提高页面打开速度。在不利用 gulp 时我们需要通过各种工具手动完成压缩工作。
所有的 gulp 代码编写都可以看做是将规律转化为代码的过程。
规律
找到de >js/de> 目录下的所有 js 文件,压缩它们,将压缩后的文件存放在de >dist/js/de> 目录下。
gulp 代码
建议:你可以只阅读下面的代码与注释或同时阅读代码解释
gulp 的所有配置代码都写在de >gulpfile.jsde> 文件。
一、新建一个de >gulpfile.jsde> 文件
chapter2└── gulpfile.js
二、在de >gulpfile.jsde> 中编写代码
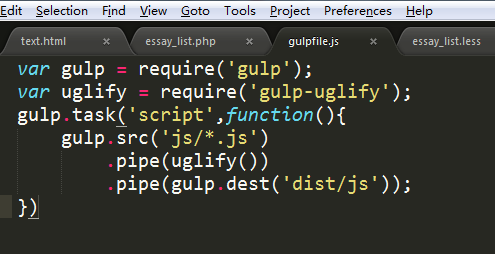
// 获取 gulpvar gulp = require('gulp')
de >require()de> 是 node (CommonJS)中获取模块的语法。
在 gulp 中你只需要理解de >require()de> 可以获取模块。
三、获取de >gulp-uglifyde> 组件
// 获取 uglify 模块(用于压缩 JS)var uglify = require('gulp-uglify')
// 获取 concat模块(用于合并 JS)var concat= require('gulp-concat')
四、创建压缩任务
// 压缩 js 文件// 在命令行使用 gulp script 启动此任务gulp.task('script', function() { // 1. 找到文件(想要控制合并js的顺序 gulp.src(['a.js', 'b.js', 'c.js']))
gulp.src('js/*.js') // 2. 压缩文件 .pipe(uglify())
// 3. 把以上的js的文件合并到main.js
.pipe(concat('main.js'))
// 3. 另存压缩后的文件 .pipe(gulp.dest('dist/js'))})
de >gulp.task(name, fn)de> - 定义任务,第一个参数是任务名,第二个参数是任务内容。
de >gulp.src(path)de> - 选择文件,传入参数是文件路径。
de >gulp.dest(path)de> - 输出文件
de >gulp.pipe()de> - 管道,你可以暂时将 pipe 理解为将操作加入执行队列
参考:gulp API文档
五、跳转至de >gulpfile.jsde> 所在目录
打开命令行使用de >cdde> 命令跳转至de >gulpfile.jsde> 文件所在目录。
例如我的de >gulpfile.jsde> 文件保存在de >C:\gulp-book\demo\chapter2\gulpfile.jsde>。
那么就需要在命令行输入
cd C:\gulp-book\demo\chapter2
Mac 用户可使用de >cd Documents/gulp-book/demo/chapter2/de> 跳转
六、使用命令行运行 script 任务
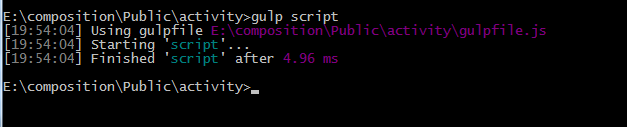
在控制台输入de >gulp 任务名de> 可运行任务,此处我们输入de >gulp scriptde> 回车。
注意:输入de >gulp scriptde> 后命令行将会提示错误信息
// 在命令行输入gulp scriptError: Cannot find module 'gulp-uglify' at Function.Module._resolveFilename (module.js:338:15) at Function.Module._load (module.js:280:25)
de >Cannot find module 'gulp-uglify'de> 没有找到de >gulp-uglifyde> 模块。
七、安装de >gulp-uglifyde> 模块
做项目大概用到的模块
npm install gulp-clean-css gulp-uglify gulp-concat gulp-rename --save-dev
npm install jshint gulp-jshint --save-dev
因为我们并没有安装de >gulp-uglifyde> 模块到本地,所以找不到此模块。
使用 npm 安装de >gulp-uglifyde> 到本地
npm install gulp-uglify
安装成功后你会看到如下信息:
gulp-uglify@1.1.0 node_modules/gulp-uglify├── deepmerge@0.2.7├── uglify-js@2.4.16 (uglify-to-browserify@1.0.2, async@0.2.10, source-map@0.1.34, optimist@0.3.7)├── vinyl-sourcemaps-apply@0.1.4 (source-map@0.1.43)├── through2@0.6.3 (xtend@4.0.0, readable-stream@1.0.33)└── gulp-util@3.0.4 (array-differ@1.0.0, beeper@1.0.0, array-uniq@1.0.2, object-assign@2.0.0, lodash._reinterpolate@3.0.0, lodash._reescape@3.0.0, lodash._reevaluate@3.0.0, replace-ext@0.0.1, minimist@1.1.1, chalk@1.0.0, lodash.template@3.3.2, vinyl@0.4.6, multipipe@0.1.2, dateformat@1.0.11)chapter2 $
在你的文件夹中会新增一个de >node_modulesde> 文件夹,这里面存放着 npm 安装的模块。
目录结构:
├── gulpfile.js└── node_modules
└── gulp-uglify
接着输入de >gulp scriptde> 执行任务
gulp script[13:34:57] Using gulpfile ~/Documents/code/gulp-book/demo/chapter2/gulpfile.js[13:34:57] Starting 'script'...[13:34:57] Finished 'script' after 6.13 ms
八、编写 js 文件
我们发现 gulp 没有进行任何压缩操作。因为没有js这个目录,也没有 js 目录下的de >.jsde> 后缀文件。
创建de >a.jsde> 文件,并编写如下内容
// a.jsfunction demo (msg) { alert('--------\r\n' + msg + '\r\n--------')}demo('Hi')
目录结构:
├── gulpfile.js├── js│ └── a.js└── node_modules
└── gulp-uglify
接着在命令行输入de >gulp scriptde> 执行任务
gulp 会在命令行当前目录下创建de >dist/js/de> 文件夹,并创建压缩后的de >a.jsde> 文件。
目录结构:
├── gulpfile.js├── js│ └── a.js├── dist│ └── js│ └── a.js└── node_modules
└── gulp-uglify
function demo(n){alert("--------\r\n"+n+"\r\n--------")}demo("Hi");
九、检测代码修改自动执行任务
de >js/a.jsde>一旦有修改 就必须重新在命令行输入de >gulp scriptde> ,这很麻烦。
可以使用de >gulp.watch(src, fn)de> 检测指定目录下文件的修改后执行任务。
在de >gulpfile.jsde> 中编写如下代码:
// 监听文件修改,当文件被修改则执行 script 任务gulp.watch('js/*.js', ['script']);
但是没有命令可以运行de >gulp.watch()de>,需要将de >gulp.watch()de> 包含在一个任务中。
// 在命令行使用 gulp auto 启动此任务gulp.task('auto', function () { // 监听文件修改,当文件被修改则执行 script 任务 gulp.watch('js/*.js', ['script'])})
接在在命令行输入de >gulp autode>,自动监听de >js/*.jsde> 文件的修改后压缩js。
$gulp auto[21:09:45] Using gulpfile ~/Documents/code/gulp-book/demo/chapter2/gulpfile.js[21:09:45] Starting 'auto'...[21:09:45] Finished 'auto' after 9.19 ms
此时修改de >js/a.jsde> 中的代码并保存。命令行将会出现提示,表示检测到文件修改并压缩文件。
[21:11:01] Starting 'script'...[21:11:01] Finished 'script' after 2.85 ms
至此,我们完成了 gulp 压缩 js 文件的自动化代码编写。
注意:使用de >gulp.watchde> 后你的命令行会进入“运行”状态,此时你不可以在命令行进行其他操作。可通过de >Ctrl + Cde> 停止 gulp。(Mac 中使用de >control + Cde>)
Mac 下使用de >control + Cde> 停止 gulp
十、使用 gulp.task('default', fn) 定义默认任务
增加如下代码
gulp.task('default', ['script', 'auto']);
此时你可以在命令行直接输入de >gulpde> +回车,运行de >scriptde> 和de >autode> 任务。
最终代码如下:
// 获取 gulpvar gulp = require('gulp')// 获取 uglify 模块(用于压缩 JS)var uglify = require('gulp-uglify')// 压缩 js 文件// 在命令行使用 gulp script 启动此任务gulp.task('script', function() { // 1. 找到文件 gulp.src('js/*.js') // 2. 压缩文件 .pipe(uglify())
// 3. 另存压缩后的文件 .pipe(gulp.dest('dist/js'))})// 在命令行使用 gulp auto 启动此任务gulp.task('auto', function () { // 监听文件修改,当文件被修改则执行 script 任务 gulp.watch('js/*.js', ['script'])})// 使用 gulp.task('default') 定义默认任务// 在命令行使用 gulp 启动 script 任务和 auto 任务gulp.task('default', ['script', 'auto'])
去除注释后,你会发现只需要 11 行代码就可以让 gulp 自动监听 js 文件的修改后压缩代码。但是还有还有一些性能问题和缺少容错性,将在后面的章节详细说明。
你可以访问gulp-uglify以查看更多用法。


 1132
1132


 被折叠的 条评论
为什么被折叠?
被折叠的 条评论
为什么被折叠?
 到【灌水乐园】发言


