


作者:吾乃韩小呆
链接:
https://www.jianshu.com/p/8e7b339d7a78
帝都几日降温,终于被撂倒了。but 只要一息尚存就得不断进步!于是,写出 《PopupWindow 使用详解》的第二篇 笔记,先奉上 第一篇链接: 《PopupWindow 使用详解(一) 中文API 文档 赠送 ListPopupWindow 中文 API》 。
https://www.jianshu.com/p/3a8dd7a4b41a
下面给大家展示一下制作的效果gif。
下面进行一个样式一个样式的肢解哈,对了,所有效果笔者都没有制作载入动画和退出动画。有需要的小伙伴可以通过 这个方法 public void setAnimationStyle(int animationStyle) 进行设置,也是很简单、很常用的。
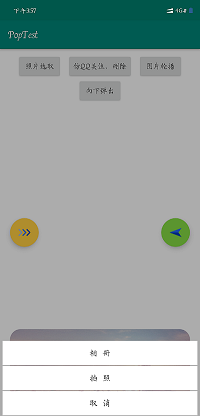
效果一、图片选取功能(带阴影)
1、布局设置
<?xml version="1.0" encoding="utf-8"?>
<LinearLayout xmlns:android="http://schemas.android.com/apk/res/android"
    android:id="@+id/ll_pic"
    android:layout_width="match_parent"
    android:layout_height="match_parent"
    android:background="@drawable/shape_pic_select"
    android:gravity="bottom"
    android:orientation="vertical">

    <LinearLayout
        android:layout_width="match_parent"
        android:layout_height="wrap_content"
        android:layout_marginStart="5dp"
        android:layout_marginEnd="5dp"
        android:orientation="vertical">

        <Button
            android:id="@+id/btn_pic_photo"
            android:layout_width="match_parent"
            android:layout_height="wrap_content"
            android:layout_marginBottom="1dp"
            android:background="#ffffff"
            android:text="相  册"
            android:textColor="#3c3c3c"
            android:textSize="16sp" />

        <Button
            android:id="@+id/btn_pic_camera"
            android:layout_width="match_parent"
            android:layout_height="wrap_content"
            android:layout_marginBottom="1dp"
            android:background="#ffffff"
            android:text="拍  照"
            android:textColor="#3c3c3c"
            android:textSize="16sp" />

        <Button
            android:id="@+id/btn_pic_cancel"
            android:layout_width="match_parent"
            android:layout_height="wrap_content"
            android:layout_marginBottom="1dp"
            android:background="#ffffff"
            android:text="取  消"
            android:textColor="#3c3c3c"
            android:textSize="16sp" />
    </LinearLayout>
</LinearLayout>
2、Java 逻辑代码
/**
     * 照片选择器
     */
    @SuppressLint("InflateParams")
    private void showPicSelect() {
        view = LayoutInflater.from(this).inflate(R.layout.item_pic_select, null, false);
        LinearLayout llPop = view.findViewById(R.id.ll_pic);
        Button btnCamera = view.findViewById(R.id.btn_pic_camera);
        Button btnPhoto = view.findViewById(R.id.btn_pic_photo);
        Button btnCancel = view.findViewById(R.id.btn_pic_cancel);

        btnCamera.setOnClickListener(this);
        btnPhoto.setOnClickListener(this);
        btnCancel.setOnClickListener(this);
        llPop.setOnClickListener(this);

        myPop = new PopupWindow(view, ViewGroup.LayoutParams.MATCH_PARENT, ViewGroup.LayoutParams.MATCH_PARENT);
        myPop.setBackgroundDrawable(new ColorDrawable());
        myPop.showAtLocation(rlMain, Gravity.BOTTOM, 0, 0);
    }

   @Override
    public void onBackPressed() {
        if (myPop.isShowing()) {
            myPop.dismiss();
        } else {
            super.onBackPressed();
        }
    }
3、实现思路
之前笔者看了看网上百度来的答案,实现阴影效果的思路大概是,当 PopupWindow 弹出时将 Activity 设置为半透明,但是这种思路的弊端是 Activity 透明了,你懂得,你可以在 A Activity 界面直接看到了 桌面或者是 B Activity 界面的东西,很蛋疼。
笔者的思路是:为 PopupWindow 设置一个半透明的背景色,然后监听这不背景 layout 的点击事件,和物理键的返回事件。否则会出现点击无效果的现象。具体逻辑如上。
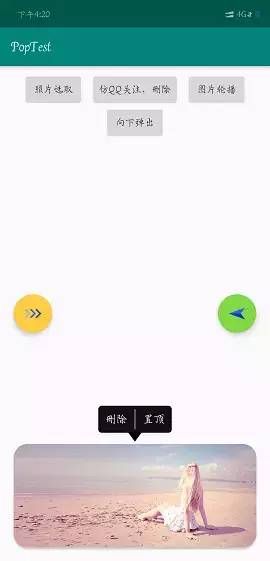
仿qq和微信的长按置顶删除功能
1、布局
<?xml version="1.0" encoding="utf-8"?>
<RelativeLayout xmlns:android="http://schemas.android.com/apk/res/android"
    xmlns:tools="http://schemas.android.com/tools"
    android:layout_width="match_parent"
    android:layout_height="match_parent">


    <LinearLayout
        android:id="@+id/ll_qq"
        android:layout_width="wrap_content"
        android:layout_height="wrap_content"
        android:layout_centerHorizontal="true"
        android:background="@drawable/shape_qq"
        android:orientation="horizontal"
        tools:ignore="UselessParent">

        <TextView
            android:id="@+id/tv_delete"
            android:layout_width="wrap_content"
            android:layout_height="wrap_content"
            android:padding="10dp"
            android:text="删除"
            android:textColor="#ffffff"
            android:textSize="16sp" />

        <View
            android:layout_width="2dp"
            android:layout_height="match_parent"
            android:layout_marginTop="5dp"
            android:layout_marginBottom="5dp"
            android:background="#666666" />

        <TextView
            android:id="@+id/tv_be_top"
            android:layout_width="wrap_content"
            android:layout_height="wrap_content"
            android:padding="10dp"
            android:text="置顶"
            android:textColor="#ffffff"
            android:textSize="16sp" />

    </LinearLayout>
    <ImageView
        android:id="@+id/iv_three"
        android:layout_width="wrap_content"
        android:layout_height="wrap_content"
        android:layout_below="@+id/ll_qq"
        android:layout_centerHorizontal="true"
        android:background="@null"
        android:layout_marginTop="-5dp"
        android:contentDescription="@string/app_name"
        android:src="@mipmap/ic_three" />
</RelativeLayout>
2、Java 逻辑
/**
 * 仿qq 产生水滴按钮
 */
@SuppressLint("InflateParams")
private void showQq() {
    view = LayoutInflater.from(this).inflate(R.layout.item_qq, null, false);
    TextView tvTop = view.findViewById(R.id.tv_be_top);
    TextView tvDelete = view.findViewById(R.id.tv_delete);
    tvDelete.setOnClickListener(this);
    tvTop.setOnClickListener(this);

    myPop = new PopupWindow(view, ViewGroup.LayoutParams.WRAP_CONTENT, ViewGroup.LayoutParams.WRAP_CONTENT);
    myPop.setBackgroundDrawable(new ColorDrawable());
    myPop.setOutsideTouchable(true);
    myPop.getContentView().measure(0, 0);
    myPop.showAsDropDown(cvMain, (cvMain.getWidth() - myPop.getContentView().getMeasuredWidth()) / 2,
            -(cvMain.getHeight() + myPop.getContentView().getMeasuredHeight()));
}
3、实现思路
这个其实没什么好说的,但是需要注意的两点是:
(1)、ui 一定要有的或者是自己会个ps 也行,仔细看笔者布局,有一个地方,设置 margin 属性居然用了 负值 否则无法保证 下面的shape 背景与三角标进行无缝衔接;
(2)、注意这个方法一定要设置即便是不设置值 public void setBackgroundDrawable(Drawable background) 否则会导致 public void setOutsideTouchable(boolean touchable) 这个方法不起作用,即出现点击 PopupWindow 外部区域无法隐藏 PopupWindow 的尴尬局面.
实现悬浮图片轮播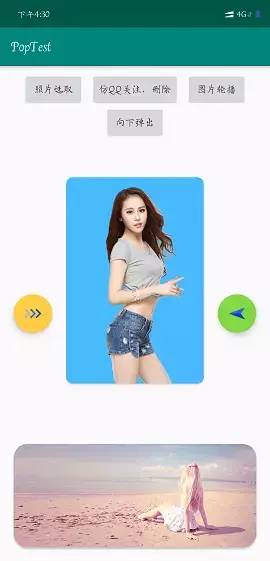
1、布局代码
<!--布局 1-->
<?xml version="1.0" encoding="utf-8"?>
<android.support.v7.widget.CardView xmlns:android="http://schemas.android.com/apk/res/android"
    xmlns:app="http://schemas.android.com/apk/res-auto"
    android:layout_width="wrap_content"
    android:layout_height="wrap_content"
    android:background="#00000000"
    app:cardCornerRadius="10dp">

    <android.support.v4.view.ViewPager
        android:id="@+id/vp_pop"
        android:layout_width="200dp"
        android:layout_height="300dp"
        android:background="#48BAFF" />

</android.support.v7.widget.CardView>

<!--布局 2-->
<?xml version="1.0" encoding="utf-8"?>
<LinearLayout xmlns:android="http://schemas.android.com/apk/res/android"
    android:layout_width="match_parent"
    android:layout_height="match_parent"
    android:gravity="center"
    android:orientation="vertical">

    <ImageView
        android:layout_width="200dp"
        android:layout_height="300dp"
        android:contentDescription="@string/app_name"
        android:src="@mipmap/pic_1" />
</LinearLayout>
2、Java 逻辑代码
/**
 * 轮播效果
 */
@SuppressLint("InflateParams")
private void showPager() {
    views = new ArrayList<>();
    view = LayoutInflater.from(this).inflate(R.layout.item_pager, null, false);
    ViewPager vpPop = view.findViewById(R.id.vp_pop);
    picView01 = LayoutInflater.from(this).inflate(R.layout.item_pop_vp_01, null, false);
    picView02 = LayoutInflater.from(this).inflate(R.layout.item_pop_vp_02, null, false);
    picView03 = LayoutInflater.from(this).inflate(R.layout.item_pop_vp_03, null, false);
    picView04 = LayoutInflater.from(this).inflate(R.layout.item_pop_vp_04, null, false);

    views.add(picView01);
    views.add(picView02);
    views.add(picView03);
    views.add(picView04);
    vpPop.setAdapter(new MyPopAdapter());

    myPop = new PopupWindow(view, ViewGroup.LayoutParams.WRAP_CONTENT, ViewGroup.LayoutParams.WRAP_CONTENT);
    myPop.setOutsideTouchable(true);
    //悬浮效果
    myPop.setElevation(5);
    myPop.setBackgroundDrawable(new ColorDrawable(0x00ffffff));
    myPop.showAtLocation(rlMain, Gravity.CENTER, 0, 0);
}


/**
 * 配置  adapter
 */
class MyPopAdapter extends PagerAdapter {

    @Override
    public int getCount() {
        return views.size();
    }

    @Override
    public boolean isViewFromObject(@NonNull View view, @NonNull Object o) {
        return view == o;
    }

    @NonNull
    @Override
    public Object instantiateItem(@NonNull ViewGroup container, int position) {
        container.addView(views.get(position));
        return views.get(position);
    }

    @Override
    public void destroyItem(@NonNull ViewGroup container, int position, @NonNull Object object) {
        container.removeView(views.get(position));
    }
}


@Override
protected void onDestroy() {
    super.onDestroy();
    if (views != null) {
        views.remove(picView01);
        views.remove(picView02);
        views.remove(picView03);
        views.remove(picView04);
    }
    if (myPop.isShowing()) {
        myPop.dismiss();
    }
}
3、实现思路及注意事项
首先,加载图片需要进行相关处理,比如说用过Picasso 或者是 Glide 等框架,当然了也可将进行自己压缩;
其次,由于为了突出美观,笔者用了一个 CardView 可以设置圆角,但是 CardView 的阴影属性失效了,为了凸显层次感可以设置 PopupWindow 的这个方法public void setElevation(float elevation) 该方法可以是你感觉出一种悬浮的效果;
最后,没用的 view 需要进行清理,否则会留在内存哦。
向下弹出水滴效果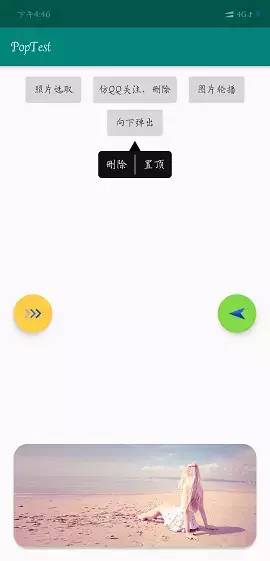
1、布局源码
<?xml version="1.0" encoding="utf-8"?>
<RelativeLayout xmlns:android="http://schemas.android.com/apk/res/android"
    android:layout_width="wrap_content"
    android:layout_height="wrap_content">

    <ImageView
        android:layout_width="wrap_content"
        android:layout_height="wrap_content"
        android:layout_alignBottom="@+id/iv_beauty"
        android:layout_toEndOf="@+id/iv_beauty"
        android:src="@mipmap/ic_right" />

    <ImageView
        android:id="@+id/iv_beauty"
        android:layout_width="150dp"
        android:layout_height="200dp"
        android:background="#669"
        android:src="@mipmap/pic_5" />
</RelativeLayout>
2、Java 逻辑
/**
 * 向下弹出
 */
@SuppressLint("InflateParams")
private void showDown() {
    view = LayoutInflater.from(this).inflate(R.layout.item_anywhere, null, false);

    myPop = new PopupWindow(view, ViewGroup.LayoutParams.WRAP_CONTENT, ViewGroup.LayoutParams.WRAP_CONTENT);
    myPop.setBackgroundDrawable(new ColorDrawable());
    myPop.setOutsideTouchable(true);
    myPop.getContentView().measure(0, 0);
    myPop.showAsDropDown(btnPopDown, -((myPop.getContentView().getMeasuredWidth() - btnPopDown.getWidth()) / 2), 0);
}
3、注意事项
这个没什么可说的了,和 上面 小标题二 相同 ,具体查看上方即可。
实现屏幕右侧向左弹出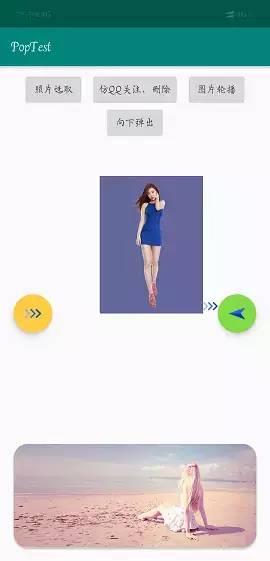
1、布局代码
<?xml version="1.0" encoding="utf-8"?>
<RelativeLayout xmlns:android="http://schemas.android.com/apk/res/android"
    android:layout_width="wrap_content"
    android:layout_height="wrap_content">

    <ImageView
        android:layout_width="wrap_content"
        android:layout_height="wrap_content"
        android:layout_alignBottom="@+id/iv_beauty"
        android:layout_toEndOf="@+id/iv_beauty"
        android:src="@mipmap/ic_right" />

    <ImageView
        android:id="@+id/iv_beauty"
        android:layout_width="150dp"
        android:layout_height="200dp"
        android:background="#669"
        android:src="@mipmap/pic_5" />
</RelativeLayout>
2、Java 逻辑代码
/**
 * 向左弹出
 */
@SuppressLint("InflateParams")
private void showStart() {
    view = LayoutInflater.from(this).inflate(R.layout.item_pop_start, null, false);

    myPop = new PopupWindow(view, ViewGroup.LayoutParams.WRAP_CONTENT, ViewGroup.LayoutParams.WRAP_CONTENT);
    myPop.setBackgroundDrawable(new ColorDrawable());
    myPop.setOutsideTouchable(true);
    myPop.getContentView().measure(0, 0);
    myPop.showAsDropDown(fabStart, -(myPop.getContentView().getMeasuredWidth()), -(fabStart.getHeight() / 2 + myPop.getContentView().getMeasuredHeight()));
}
3、注意事项
这里比较复杂的 就是 PopupWindow 的锚点位置 为 其寄生的 控件的 左下角,而 Popwindow 的起始点为 左上角,但是 PopupWindow 默认不超出界面。这就导致了 PopupWindow 明明在 控件则左侧,但是却无法到达自己的想要位置。
所以 对于该现象,我们只能 在计算偏移量的时候 需要向左 移动 (控件长度+PopupWindow的长度 +其他长度)
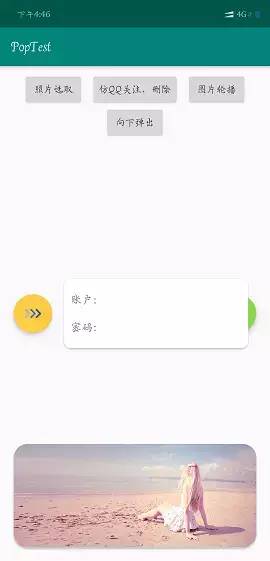
实现需要获取焦点的控件使用
1、布局代码
<?xml version="1.0" encoding="utf-8"?>
<android.support.v7.widget.CardView xmlns:android="http://schemas.android.com/apk/res/android"
    xmlns:app="http://schemas.android.com/apk/res-auto"
    xmlns:tools="http://schemas.android.com/tools"
    android:layout_width="wrap_content"
    android:layout_height="wrap_content"
    android:background="#00000000"
    app:cardCornerRadius="10dp">

    <RelativeLayout
        android:layout_width="wrap_content"
        android:layout_height="wrap_content"
        android:background="#00000000"
        android:padding="10dp">

        <TextView
            android:id="@+id/tv_name_p"
            android:layout_width="wrap_content"
            android:layout_height="40dp"
            android:gravity="center_vertical"
            android:text="账户:"
            android:textSize="16sp" />

        <EditText
            android:layout_width="200dp"
            android:layout_height="40dp"
            android:layout_toEndOf="@+id/tv_name_p"
            android:background="@null"
            android:gravity="center_vertical"
            android:inputType="number"
            android:paddingStart="10dp"
            android:paddingEnd="10dp"
            android:singleLine="true"
            android:textSize="16sp"
            tools:text="123" />

        <TextView
            android:id="@+id/tv_password_p"
            android:layout_width="wrap_content"
            android:layout_height="40dp"
            android:layout_below="@+id/tv_name_p"
            android:gravity="center_vertical"
            android:text="密码:"
            android:textSize="16sp" />

        <EditText
            android:layout_width="200dp"
            android:layout_height="40dp"
            android:layout_below="@+id/tv_name_p"
            android:layout_toEndOf="@+id/tv_password_p"
            android:background="@null"
            android:gravity="center_vertical"
            android:inputType="numberPassword"
            android:paddingStart="10dp"
            android:paddingEnd="10dp"
            android:singleLine="true"
            android:textSize="16sp"
            tools:text="123" />
    </RelativeLayout>
</android.support.v7.widget.CardView>
2、逻辑代码
@SuppressLint("InflateParams")
    private void showEnd() {
        view = LayoutInflater.from(this).inflate(R.layout.item_end_input, null, false);

        myPop = new PopupWindow(view, ViewGroup.LayoutParams.WRAP_CONTENT, ViewGroup.LayoutParams.WRAP_CONTENT);
        myPop.setBackgroundDrawable(new ColorDrawable(0x00ffffff));
        myPop.setElevation(10);
        myPop.setOutsideTouchable(true);
        myPop.setFocusable(true);
        myPop.getContentView().measure(0, 0);
        myPop.showAsDropDown(fadEnd, (int) (fadEnd.getWidth() * 1.3), -((fadEnd.getHeight() + myPop.getContentView().getMeasuredHeight()) / 2));
    }
3、注意事项
这里一定要 设置该方法 public void setFocusable(boolean focusable)否则 在切换EditText 的时候只是光标进行了移动,但是 无法召唤软键盘。
1、笔者认为,上面的大概可以满足比较简单的开发需求了,笔者很菜,这些已经足可以满足笔者了目前;
2、关于偏移量这个会涉及导到一些小小的计算和一点点逻辑想法,所以不要只是做 cv 战士,作为文雅的程序员,我们还是需要有点自己的想法的哈;
3、代码上传 github 地址为:PopupWindow
https://github.com/xiangshiweiyu/PopupWindow
4、希望可以帮到你,批评和建议尽管提出来。
喜欢 就关注吧,欢迎投稿!


 2142
2142


 被折叠的 条评论
为什么被折叠?
被折叠的 条评论
为什么被折叠?
 到【灌水乐园】发言


