


CXF
CXF简介
CXF是一个开源的WebService框架。Apache CXF = Celtix + XFire,开始叫 Apache CeltiXfire,后来更名为 Apache CXF 了,以下简称为 CXF。CXF 继承了 Celtix 和 XFire 两大开源项目的精华,提供了对 JAX-WS 全面的支持,并且提供了多种 Binding 、DataBinding、Transport 以及各种 Format 的支持,并且可以根据实际项目的需要,采用代码优先(Code First)或者 WSDL 优先(WSDL First)来轻松地实现 Web Services 的发布和使用。
支持多种标准
- 支持 JAX-WS、 JAX-WSA、JSR-181 和 SAAJ;
- 支持 SOAP 1.1、1.2、WS-I BasicProfile、WS-Security、WS-Addressing、WS-RM 和 WS-Policy;
- 支持 WSDL 1.1 、2.0;
- 支持 MTOM;
它支持多种协议,比如:SOAP1.1,1,2、XML/HTTP、RESTful HTTP 或者 CORBA。CORBA(Common Object Request Broker Architecture公共对象请求代理体系结构,早期语言使用的WS。C,c++,C#)
Cxf是基于SOA总线结构,依靠spring完成模块的集成,实现SOA方式。
灵活的部署:可以运行有Tomcat,Jboss,Jetty(内置),weblogic上面。
CXF入门案例
我们还以昨天的天气服务为案例来看一下CXF的开发过程。
服务端的实现
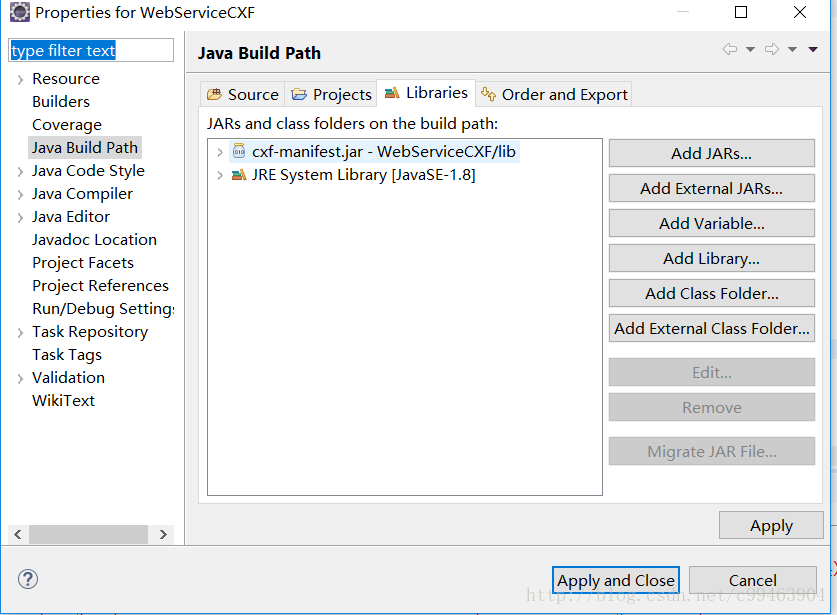
1.创建一个空的java项目,创建一个lib目录,将所有jar包放入lib目录
  然后为工程引入jar包,选择build path,然后Add JARS,只用选择cxf-manifest.jar即可。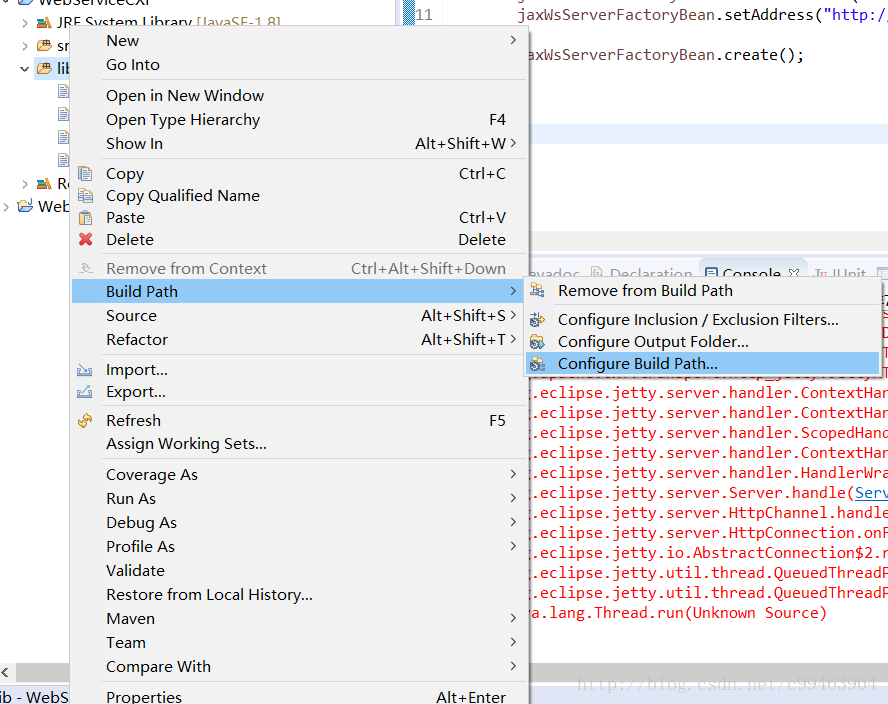
2.创建一个SEI接口,需要在接口上添加@WebService注解

@WebService
public interface WeatherInterface {
    public String queryWeather(String cityName);
}
3.创建SEI接口实现类

public class WeatherInterfaceImpl implements WeatherInterface {

    public String queryWeather(String cityName) {
        if("河南".equals(cityName)) {
            return "热爆炸";
        }else {
            return "冰雹";
        }
    }
}4.发布服务
public class WeatherServer {
public static void main(String[] args) {
//创建服务工厂Bean
JaxWsServerFactoryBean jaxWsServerFactoryBean=new JaxWsServerFactoryBean();
//设置服务接口
jaxWsServerFactoryBean.setServiceClass(WeatherInterface.class);
//设置服务实现类
jaxWsServerFactoryBean.setServiceBean(new WeatherInterfaceImpl());
//设置服务地址
jaxWsServerFactoryBean.setAddress("http://127.0.0.1:12345/weather");
//创建服务
jaxWsServerFactoryBean.create();
}
}
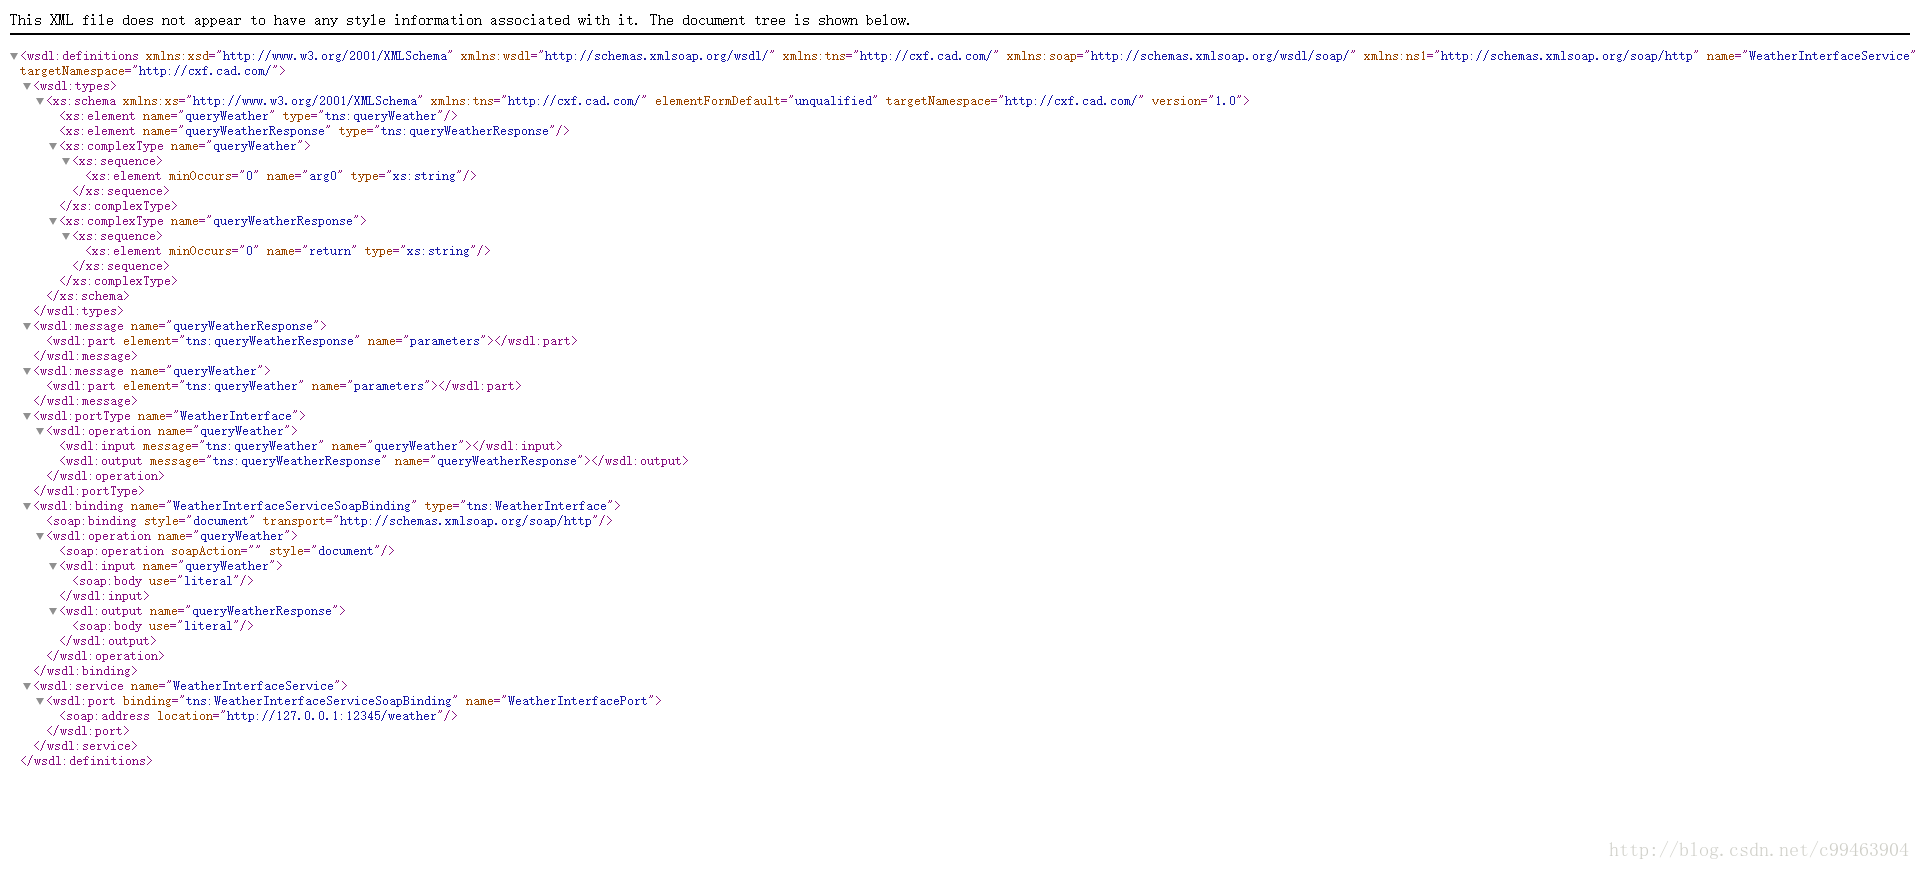
5.访问服务的wsdl文件地址,看服务是否发布成功
    http://127.0.0.1:12345/weather?wsdl
发布SOAP1.2的服务端
SOAP分为1.1版本和1.2版本。JDK1.6并不支持1.2,我们可以通过CXF来发布SOAP1.2的服务端。
只需要在接口上添加注解 @BindingType(SOAPBinding.SOAP12HTTP_BINDING)。然后重新发布服务即可
import javax.jws.WebService;
import javax.xml.ws.BindingType;
import javax.xml.ws.soap.SOAPBinding;

@WebService
@BindingType(SOAPBinding.SOAP12HTTP_BINDING)
public interface WeatherInterface {
    public String queryWeather(String cityName);
}
客户端的实现
Wsdl2java命令是CXF提供的生成客户端的工具,他和wsimport类似,可以根据WSDL生成客户端代码

Wsdl2java常用参数:
-d,指定输出目录
-p,指定包名,如果不指定该参数,默认包名是WSDL的命名空间的倒序

Wsdl2java支持SOAP1.1和SOAP1.2
1.我们先创建一个客户端项目,然后引入jar包,和上面一样,使用Add JARS选择cxf-manifest.jar即可

  然后使用工具生成客户端

  wsdl2java -p com.cad.cxf -d . http://127.0.0.1:12345/weather?wsdl

2.创建客户端

public class WeatherClient {

    public static void main(String[] args) {
        JaxWsProxyFactoryBean jaxWsProxyFactoryBean=new JaxWsProxyFactoryBean();
        //设置服务接口
        jaxWsProxyFactoryBean.setServiceClass(WeatherInterface.class);
        //设置服务地址
        jaxWsProxyFactoryBean.setAddress("http://127.0.0.1:12345/weather");
        //获取服务接口实例
        WeatherInterface weatherInterface=(WeatherInterface) jaxWsProxyFactoryBean.create();
        //调用方法
        String message=weatherInterface.queryWeather("河南");
        System.out.println(message);
    }

}
CXF+Spring整合发布SOAP模式的服务
服务端的实现
1.创建WEB项目,导入jar包 2.创建SEI接口
@WebService
@BindingType(SOAPBinding.SOAP12HTTP_BINDING)
public interface WeatherInterface {
public String queryWeather(String cityName);
}
3.创建SEI实现类
public class WeatherInterfaceImpl implements WeatherInterface {

    public String queryWeather(String cityName) {
        if("河南".equals(cityName)) {
            return "热爆炸";
        }else {
            return "冰雹";
        }
    }
}
4.配置spring配置文件,applicationContext.xml

<?xml version="1.0" encoding="UTF-8"?>
<beans xmlns="http://www.springframework.org/schema/beans"
    xmlns:xsi="http://www.w3.org/2001/XMLSchema-instance" xmlns:jaxws="http://cxf.apache.org/jaxws"
    xmlns:jaxrs="http://cxf.apache.org/jaxrs" xmlns:cxf="http://cxf.apache.org/core"
    xsi:schemaLocation="http://www.springframework.org/schema/beans
                            http://www.springframework.org/schema/beans/spring-beans.xsd
                            http://cxf.apache.org/jaxrs http://cxf.apache.org/schemas/jaxrs.xsd
                            http://cxf.apache.org/jaxws http://cxf.apache.org/schemas/jaxws.xsd
                            http://cxf.apache.org/core http://cxf.apache.org/schemas/core.xsd">

<!--jaxws:server发布SOAP协议的服务 ,对JaxWsServerFactoryBean类封装-->
<!--serviceClass属性是服务接口,address代表地址,因为我们是web服务,不需要输入ip。serviceBean是服务实现类-->
<jaxws:server serviceClass="com.cad.cxf.WeatherInterface" address="/weather">
    <jaxws:serviceBean>
        <ref bean="weatherInterfaceImpl"/>
    </jaxws:serviceBean>
</jaxws:server>
<bean name="weatherInterfaceImpl" class="com.cad.cxf.WeatherInterfaceImpl"></bean>
</beans>
5.配置web.xml

<?xml version="1.0" encoding="UTF-8"?>
<web-app xmlns:xsi="http://www.w3.org/2001/XMLSchema-instance" xmlns="http://java.sun.com/xml/ns/javaee" xsi:schemaLocation="http://java.sun.com/xml/ns/javaee http://java.sun.com/xml/ns/javaee/web-app_2_5.xsd" id="WebApp_ID" version="2.5">
  <display-name>CXFSpringDemo</display-name>

  //配置Tomcat启动时加载Spring配置文件
  <context-param>
    <param-name>contextConfigLocation</param-name>
    <param-value>classpath:applicationContext.xml</param-value>
  </context-param>
  <listener>
    <listener-class>org.springframework.web.context.ContextLoaderListener</listener-class>
  </listener>

  //配置CXF提供的Servlet
   <servlet>
    <servlet-name>CXF</servlet-name>
    <servlet-class>org.apache.cxf.transport.servlet.CXFServlet</servlet-class>
  </servlet>
  <servlet-mapping>
    <servlet-name>CXF</servlet-name>
    <url-pattern>/ws/*</url-pattern>
  </servlet-mapping>


  <welcome-file-list>
    <welcome-file>index.html</welcome-file>
    <welcome-file>index.htm</welcome-file>
    <welcome-file>index.jsp</welcome-file>
    <welcome-file>default.html</welcome-file>
    <welcome-file>default.htm</welcome-file>
    <welcome-file>default.jsp</welcome-file>
  </welcome-file-list>
</web-app>6.部署到Tomcat下,发布服务,并访问
http://localhost:8080/CXFSpringDemo/ws/weather?wsdl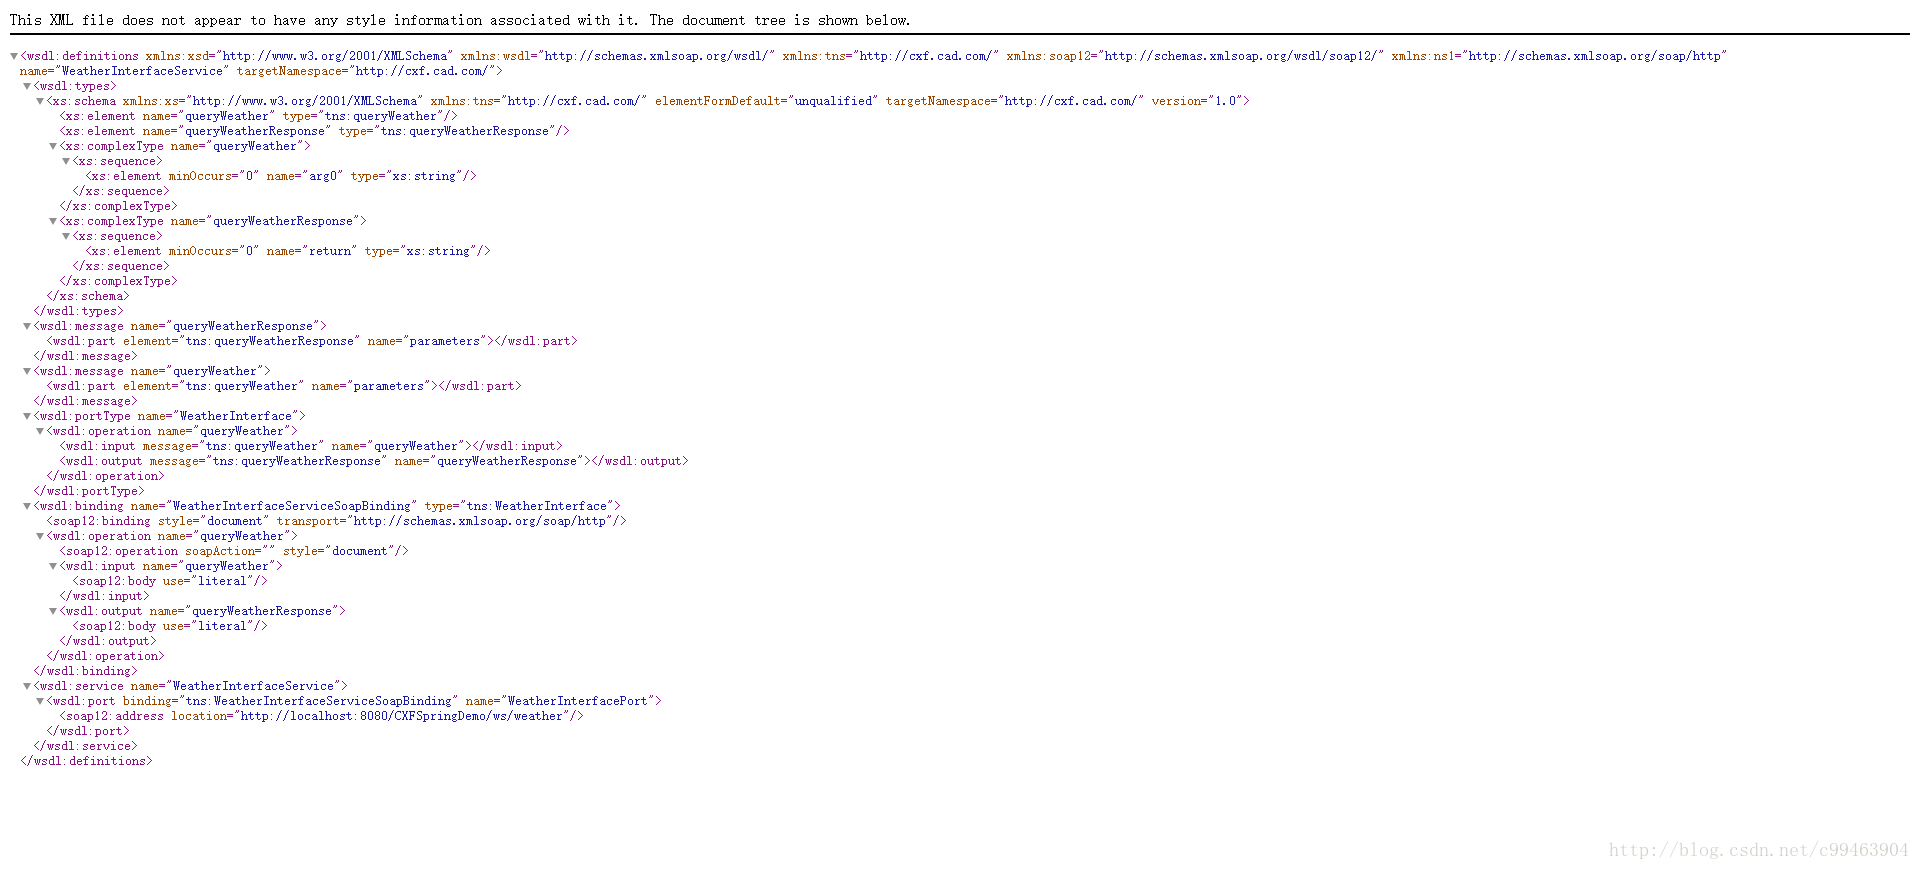
客户端的实现
1.创建项目,导入jar包,生成客户端

wsdl2java -p com.cad.cxf -d . http://localhost:8080/CXFSpringDemo/ws/weather?wsdl

2.配置Spring文件

<?xml version="1.0" encoding="UTF-8"?>
<beans xmlns="http://www.springframework.org/schema/beans"
    xmlns:xsi="http://www.w3.org/2001/XMLSchema-instance" xmlns:jaxws="http://cxf.apache.org/jaxws"
    xmlns:jaxrs="http://cxf.apache.org/jaxrs" xmlns:cxf="http://cxf.apache.org/core"
    xsi:schemaLocation="http://www.springframework.org/schema/beans
                            http://www.springframework.org/schema/beans/spring-beans.xsd
                            http://cxf.apache.org/jaxrs http://cxf.apache.org/schemas/jaxrs.xsd
                            http://cxf.apache.org/jaxws http://cxf.apache.org/schemas/jaxws.xsd
                            http://cxf.apache.org/core http://cxf.apache.org/schemas/core.xsd">
    <!-- <jaxws:client实现客户端 ,对JaxWsProxyFactoryBean类封装-->
    <!-- address是服务地址,servicelass是服务接口,返回服务实现类-->
    <jaxws:client id="weatherClient" address="http://localhost:8080/CXFSpringDemo/ws/weather" serviceClass="com.cad.cxf.WeatherInterface"/>
</beans>
3.通过Spring容器获取服务实现类,调用方法

public class WeatherClient {

    public static void main(String[] args) {
        ApplicationContext context = new ClassPathXmlApplicationContext("classpath:applicationContext.xml");
        WeatherInterface  weatherInterface = (WeatherInterface) context.getBean("weatherClient");
        String message=weatherInterface.queryWeather("河南");
        System.out.println(message);
    }

}

CXF发布REST模式的服务
REST即表述性状态传递(英文:Representational State Transfer,简称REST),是一种软件架构风格。
因为REST模式的Web服务与复杂的SOAP和XML-RPC对比来讲明显的更加简洁,越来越多的web服务开始采用REST风格设计和实现rest服务采用HTTP 做传输协议,REST 对于HTTP 的利用实现精确的资源定位。
例如:
非rest方式:http://ip:port/queryUser.action?userType=student&id=001

Rest方式:http://ip:port/user/student/query/001
1.创建一个项目,导入CXF jar包 2.创建一个实体类 Student
@XmlRootElement(name="student")可以实现XML和对象之间的转换,name属性指定根元素
@XmlRootElement(name="student")
public class Student {
private int id;
private String name;
private Date birthday;
public int getId() {
return id;
}
public void setId(int id) {
this.id = id;
}
public String getName() {
return name;
}
public void setName(String name) {
this.name = name;
}
public Date getBirthday() {
return birthday;
}
public void setBirthday(Date birthday) {
this.birthday = birthday;
}
}
3.创建SEI接口

@WebService
//@Path("/student")就是指定访问该接口的路径
@Path("/Student")
public interface StudentInterface {
        //指定请求方式,如果服务端发布的时候指定的是GET(POST),那么客户端访问时必须使用GET(POST
        @GET
        //指定服务数据类型,可以是XML,json等数据类型
        @Produces(MediaType.APPLICATION_XML)
        //@Path("/query/{id}")指定该方法的路径,“{id}”指参数,多个参数,以“/”隔开,放到“{}”中
        @Path("/query/{id}")
        public Student queryStudent(@PathParam("id")int id);

        @GET
        @Produces(MediaType.APPLICATION_XML)
        @Path("/queryList/{name}")
        public List<Student> queryList(@PathParam("name")String name);
}
4.创建SEI实现类

public class StudentInterfaceImpl implements StudentInterface {
    @Override
    public Student queryStudent(int id) {
        Student s=new Student();
        s.setId(666);
        s.setName("张三");
        s.setBirthday(new Date());
        return s;
    }

    @Override
    public List<Student> queryList(String name) {
        Student s=new Student();
        s.setId(666);
        s.setName("张三");
        s.setBirthday(new Date());

        Student s2=new Student();
        s2.setId(888);
        s2.setName("李四");
        s2.setBirthday(new Date());

        List<Student> l=new ArrayList<Student>();
        l.add(s);
        l.add(s2);
        return l;
    }

}5.发布服务
public class StudentServer {
public static void main(String[] args) {
JAXRSServerFactoryBean jaxrsServerFactoryBean=new JAXRSServerFactoryBean();
//设置服务实现类
jaxrsServerFactoryBean.setServiceBean(new StudentInterfaceImpl());
//设置资源类,如果有多个资源类,可以以“,”隔开,例如Student.class StudentInterface.class都是资源类,但是StudentInterfaceImpl里面已经包含了Student.class StudentInterface.class,所以不用重复指定
jaxrsServerFactoryBean.setResourceClasses(StudentInterfaceImpl.class);
//设置服务地址
jaxrsServerFactoryBean.setAddress("http://127.0.0.1:12345/Class");
//发布服务
jaxrsServerFactoryBean.create();
}
}6.测试服务
访问query方法
http://127.0.0.1:12345/Class/Student/query/001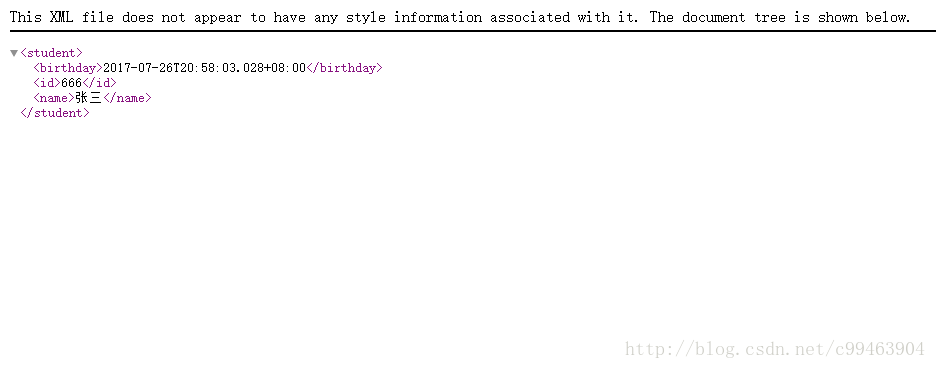
访问queryList方法
    http://127.0.0.1:12345/Class/Student/queryList/xxx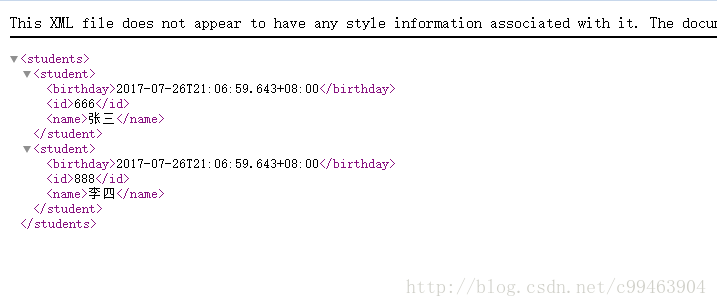
如果服务端发布时指定请求方式是GET(POST),客户端必须使用GET(POST)访问服务端,否则会报异常。
如果在同一方法上同时指定XML和JSON媒体类型,在GET请求下,默认返回XML,在POST请求下,默认返回JSON
CXF+Spring整合发布REST模式的服务
1.创建web项目,引入jar包2.创建一个实体类 Student
@XmlRootElement(name="student")可以实现XML和对象之间的转换,name属性指定根元素
@XmlRootElement(name="student")
public class Student {
private int id;
private String name;
private Date birthday;
public int getId() {
return id;
}
public void setId(int id) {
this.id = id;
}
public String getName() {
return name;
}
public void setName(String name) {
this.name = name;
}
public Date getBirthday() {
return birthday;
}
public void setBirthday(Date birthday) {
this.birthday = birthday;
}
}
3.创建SEI接口

@WebService
//@Path("/student")就是指定访问该接口的路径
@Path("/Student")
public interface StudentInterface {
        //指定请求方式,如果服务端发布的时候指定的是GET(POST),那么客户端访问时必须使用GET(POST
        @GET
        //指定服务数据类型,可以是XML,json等数据类型
        @Produces(MediaType.APPLICATION_XML)
        //@Path("/query/{id}")指定该方法的路径,“{id}”指参数,多个参数,以“/”隔开,放到“{}”中
        @Path("/query/{id}")
        public Student queryStudent(@PathParam("id")int id);

        @GET
        @Produces(MediaType.APPLICATION_XML)
        @Path("/queryList/{name}")
        public List<Student> queryList(@PathParam("name")String name);
}
4.创建SEI实现类

public class StudentInterfaceImpl implements StudentInterface {
    @Override
    public Student queryStudent(int id) {
        Student s=new Student();
        s.setId(666);
        s.setName("张三");
        s.setBirthday(new Date());
        return s;
    }

    @Override
    public List<Student> queryList(String name) {
        Student s=new Student();
        s.setId(666);
        s.setName("张三");
        s.setBirthday(new Date());

        Student s2=new Student();
        s2.setId(888);
        s2.setName("李四");
        s2.setBirthday(new Date());

        List<Student> l=new ArrayList<Student>();
        l.add(s);
        l.add(s2);
        return l;
    }

}
第五步:配置Spring配置文件,applicationContext.xml
<?xml version="1.0" encoding="UTF-8"?>
<beans xmlns="http://www.springframework.org/schema/beans"
xmlns:xsi="http://www.w3.org/2001/XMLSchema-instance" xmlns:jaxws="http://cxf.apache.org/jaxws"
xmlns:jaxrs="http://cxf.apache.org/jaxrs" xmlns:cxf="http://cxf.apache.org/core"
xsi:schemaLocation="http://www.springframework.org/schema/beans
http://www.springframework.org/schema/beans/spring-beans.xsd
http://cxf.apache.org/jaxrs http://cxf.apache.org/schemas/jaxrs.xsd
http://cxf.apache.org/jaxws http://cxf.apache.org/schemas/jaxws.xsd
http://cxf.apache.org/core http://cxf.apache.org/schemas/core.xsd">
<!-- <jaxrs:server发布REST的服务 ,对JAXRSServerFactoryBean类封装-->
<jaxrs:server address="/user">
<jaxrs:serviceBeans>
<ref bean="studentInterface"/>
</jaxrs:serviceBeans>
</jaxrs:server>
<!-- 配置服务实现类 -->
<bean name="studentInterface" class="com.cad.rest.StudentInterfaceImpl"/>
</beans>
6.配置web.xml文件

<?xml version="1.0" encoding="UTF-8"?>
<web-app xmlns:xsi="http://www.w3.org/2001/XMLSchema-instance" xmlns="http://java.sun.com/xml/ns/javaee" xsi:schemaLocation="http://java.sun.com/xml/ns/javaee http://java.sun.com/xml/ns/javaee/web-app_3_0.xsd" id="WebApp_ID" version="3.0">
  <display-name>ws_2_cxf_spring_server</display-name>

  <!-- 设置spring的环境 -->
  <context-param>
    <!--contextConfigLocation是不能修改的  -->
    <param-name>contextConfigLocation</param-name>
    <param-value>classpath:applicationContext.xml</param-value>
  </context-param>
  <listener>
    <listener-class>org.springframework.web.context.ContextLoaderListener</listener-class>
  </listener>

  <!-- 配置CXF的Servlet -->
  <servlet>
    <servlet-name>CXF</servlet-name>
    <servlet-class>org.apache.cxf.transport.servlet.CXFServlet</servlet-class>
  </servlet>
  <servlet-mapping>
    <servlet-name>CXF</servlet-name>
    <url-pattern>/ws/*</url-pattern>
  </servlet-mapping>

  <welcome-file-list>
    <welcome-file>index.html</welcome-file>
    <welcome-file>index.htm</welcome-file>
    <welcome-file>index.jsp</welcome-file>
    <welcome-file>default.html</welcome-file>
    <welcome-file>default.htm</welcome-file>
    <welcome-file>default.jsp</welcome-file>
  </welcome-file-list>
</web-app>
7.部署到Tomcat中,发布服务,测试一下
http://127.0.0.1:8080/CXFRestDemo/ws/user/Student/query/100
综合案例:手机归属地查询
1.创建web项目,导入 CXF jar包 2.生成公网提供的手机归属地查询的客户端
wsdl2java -p com.cad.mobile -d . http://ws.webxml.com.cn/WebServices/MobileCodeWS.asmx?wsdl
3.编写我们自己的SEI接口

@WebService
public interface MobileInterface {
    public String  queryMobile(String phoneNum);
}
4.编写我们的SEI实现类 ,里面调用公网客户端的查询方法,我们在Spring配置客户端,然后注入即可

public class MobileInterfaceImpl implements MobileInterface {
    //公网客户端,提供set方法 以便注入
    private MobileCodeWSSoap mobileClient;

    //调用公网的查询方法
    public String queryMobile(String phoneNum) {
        return mobileClient.getMobileCodeInfo(phoneNum, "");
    }

    public MobileCodeWSSoap getMobileClient() {
        return mobileClient;
    }

    public void setMobileClient(MobileCodeWSSoap mobileClient) {
        this.mobileClient = mobileClient;
    }


}
5.配置Spring 配置文件
<?xml version="1.0" encoding="UTF-8"?>
<beans xmlns="http://www.springframework.org/schema/beans"
xmlns:xsi="http://www.w3.org/2001/XMLSchema-instance" xmlns:jaxws="http://cxf.apache.org/jaxws"
xmlns:jaxrs="http://cxf.apache.org/jaxrs" xmlns:cxf="http://cxf.apache.org/core"
xsi:schemaLocation="http://www.springframework.org/schema/beans
http://www.springframework.org/schema/beans/spring-beans.xsd
http://cxf.apache.org/jaxrs http://cxf.apache.org/schemas/jaxrs.xsd
http://cxf.apache.org/jaxws http://cxf.apache.org/schemas/jaxws.xsd
http://cxf.apache.org/core http://cxf.apache.org/schemas/core.xsd">
<!-- 配置公网客户端 -->
<jaxws:client id="mobileClient" address="http://ws.webxml.com.cn/WebServices/MobileCodeWS.asmx"
serviceClass="com.cad.mobile.MobileCodeWSSoap"/>
<!-- <jaxws:server发布我们的服务-->
<jaxws:server address="/mobile" serviceClass="com.cad.server.MobileInterface">
<jaxws:serviceBean>
<ref bean="mobileServer"/>
</jaxws:serviceBean>
</jaxws:server>
<!-- 配置我们的服务实现类 -->
<bean name="mobileServer" class="com.cad.server.MobileInterfaceImpl">
<property name="mobileClient" ref="mobileClient"/>
</bean>
</beans> 6.创建查询页面
<body>
<form action="MobileServlet" method="post">
手机号归属地查询:<input type="text" name="phoneNum"><input type="submit" value="查询"><br>
查询结果:${result}
</form>
</body>7.创建处理的Servlet
@WebServlet("/MobileServlet")
public class MobileServlet extends HttpServlet {
private MobileInterface mobileServer;
protected void doGet(HttpServletRequest request, HttpServletResponse response) throws ServletException, IOException {
//获取页面的电话号
String phoneNum = request.getParameter("phoneNum");
if(null != phoneNum && !"".equals(phoneNum)){
//获取Spring容器
ApplicationContext context = WebApplicationContextUtils.getWebApplicationContext(this.getServletContext());
//获取我们的服务实现类
mobileServer = (MobileInterface) context.getBean("mobileServer");
//调用查询方法
String result = mobileServer.queryMobile(phoneNum);
request.setAttribute("result", result);
}
//请求转发
request.getRequestDispatcher("/index.jsp").forward(request, response);
}
protected void doPost(HttpServletRequest request, HttpServletResponse response) throws ServletException, IOException {
// TODO Auto-generated method stub
doGet(request, response);
}
}
8.配置web.xml

<?xml version="1.0" encoding="UTF-8"?>
<web-app xmlns:xsi="http://www.w3.org/2001/XMLSchema-instance" xmlns="http://xmlns.jcp.org/xml/ns/javaee" xsi:schemaLocation="http://xmlns.jcp.org/xml/ns/javaee http://xmlns.jcp.org/xml/ns/javaee/web-app_3_1.xsd" id="WebApp_ID" version="3.1">
  <display-name>MobileDemo</display-name>
  <welcome-file-list>
    <welcome-file>index.html</welcome-file>
    <welcome-file>index.htm</welcome-file>
    <welcome-file>index.jsp</welcome-file>
    <welcome-file>default.html</welcome-file>
    <welcome-file>default.htm</welcome-file>
    <welcome-file>default.jsp</welcome-file>
  </welcome-file-list>

    <context-param>
    <!--contextConfigLocation是不能修改的  -->
    <param-name>contextConfigLocation</param-name>
    <param-value>classpath:applicationContext.xml</param-value>
  </context-param>
  <listener>
    <listener-class>org.springframework.web.context.ContextLoaderListener</listener-class>
  </listener>

  <!-- 配置CXF的Servlet -->
  <servlet>
    <servlet-name>CXF</servlet-name>
    <servlet-class>org.apache.cxf.transport.servlet.CXFServlet</servlet-class>
  </servlet>
  <servlet-mapping>
    <servlet-name>CXF</servlet-name>
    <url-pattern>/ws/*</url-pattern>
  </servlet-mapping>

</web-app>
9.部署Tomcat,访问测试 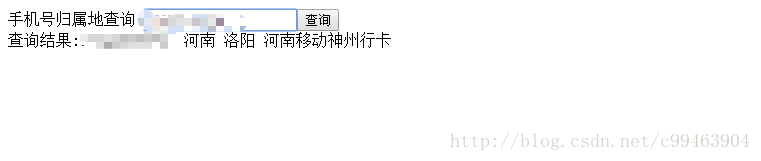


 353
353

 被折叠的 条评论
为什么被折叠?
被折叠的 条评论
为什么被折叠?
 到【灌水乐园】发言


