


from: https://www.learnopencv.com/installing-deep-learning-frameworks-on-ubuntu-with-cuda-support/
Installing Deep Learning Frameworks on Ubuntu with CUDA support
This post is part of the series on Deep Learning for Beginners, which consists of the following tutorials :
- Neural Networks : A 30,000 Feet View for Beginners
- Installation of Deep Learning frameworks (Tensorflow and Keras with CUDA support )
- Introduction to Keras
- Understanding Feedforward Neural Networks
- Image Classification using Feedforward Neural Networks
- Image Recognition using Convolutional Neural Network
- Understanding Activation Functions
- Understanding AutoEncoders using Tensorflow
- Image Classification using pre-trained models in Keras
- Transfer Learning using pre-trained models in Keras
- Fine-tuning pre-trained models in Keras
- More to come . . .
In this article, we will learn how to install Deep Learning Frameworks like TensorFlow, Theano, Keras and PyTorch on a machine having a NVIDIA graphics card.
If you have a brand new computer with a graphics card and you don’t know what libraries to install to start your deep learning journey, this article will help you.
We will install CUDA, cuDNN, Python 2, Python 3, TensorFlow, Theano, Keras, Pytorch, OpenCV, Dlib along with other Python Machine Learning libraries step-by-step.
We have tested the instructions on a system with the following configuration:
Processor : Intel core i7 6850K with 6 cores and 40 PCIe lines
Motherboard : Gigabyte X99P – SLI
RAM : 32 GB
Graphics Card : Zotac GeForce GTX 1080 Ti with 11 GB RAM
We will be assuming a fresh Ubuntu 16.04 installation. i.e nothing has been installed on the system earlier.
Step 1 : Install Prerequisites
Before installing anything, let us first update the information about the packages stored on the computer and upgrade the already installed packages to their latest versions.
| 1 2 |
|
Next, we will install some basic packages which we might need during the installation process as well in future. Also, remove the packages which are not needed.
| 1 2 3 |
|
Step 2 : Install CUDA
CUDA ( Compute Unified Device Architecture ) is a parallel computing platform and API developed by NVIDIA which utilizes the parallel computing capabilities of the GPUs. In order to use the graphics card, we need to have CUDA drivers installed on our system.
If you do not have a NVIDIA CUDA supported Graphics Card, then you can skip this step. and go to Step 4.
Download the CUDA driver from the official nvidia website. We recommend you download the deb ( local ) version from Installer type as shown in the screenshot below.

After downloading the file, go to the folder where you have downloaded the file and run the following commands from the terminal to install the CUDA drivers.
Please make sure that the filename used in the command below is the same as the downloaded file.
| 1 2 3 |
|
Run the following command to check whether the driver has installed successfully by running NVIDIA’s System Management Interface (nvidia-smi). It is a tool used for monitoring the state of the GPU.
| 1 |
|
You should get an output as shown below.
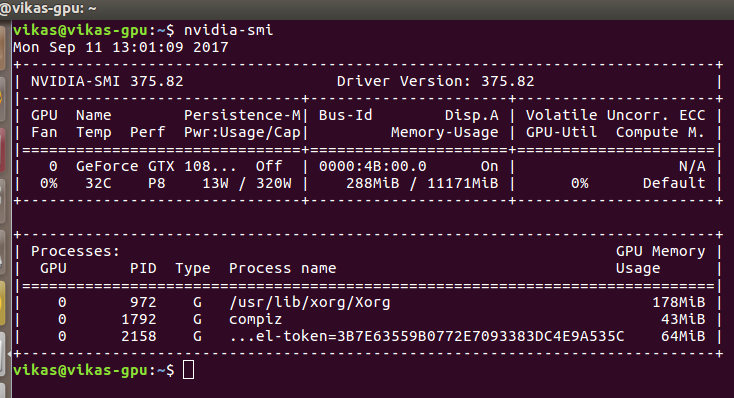
As a side note, I found that apart from getting better resolution options for display, installing the CUDA driver lowers the power consumption of the graphics card from 71W to 16W for a NVIDIA GTX 1080 Ti GPU attached via PCIe x16.
Step 3 : Install cuDNN
CUDA Deep Neural Network (cuDNN) is a library used for further optimizing neural network computations. It is written using the CUDA API.
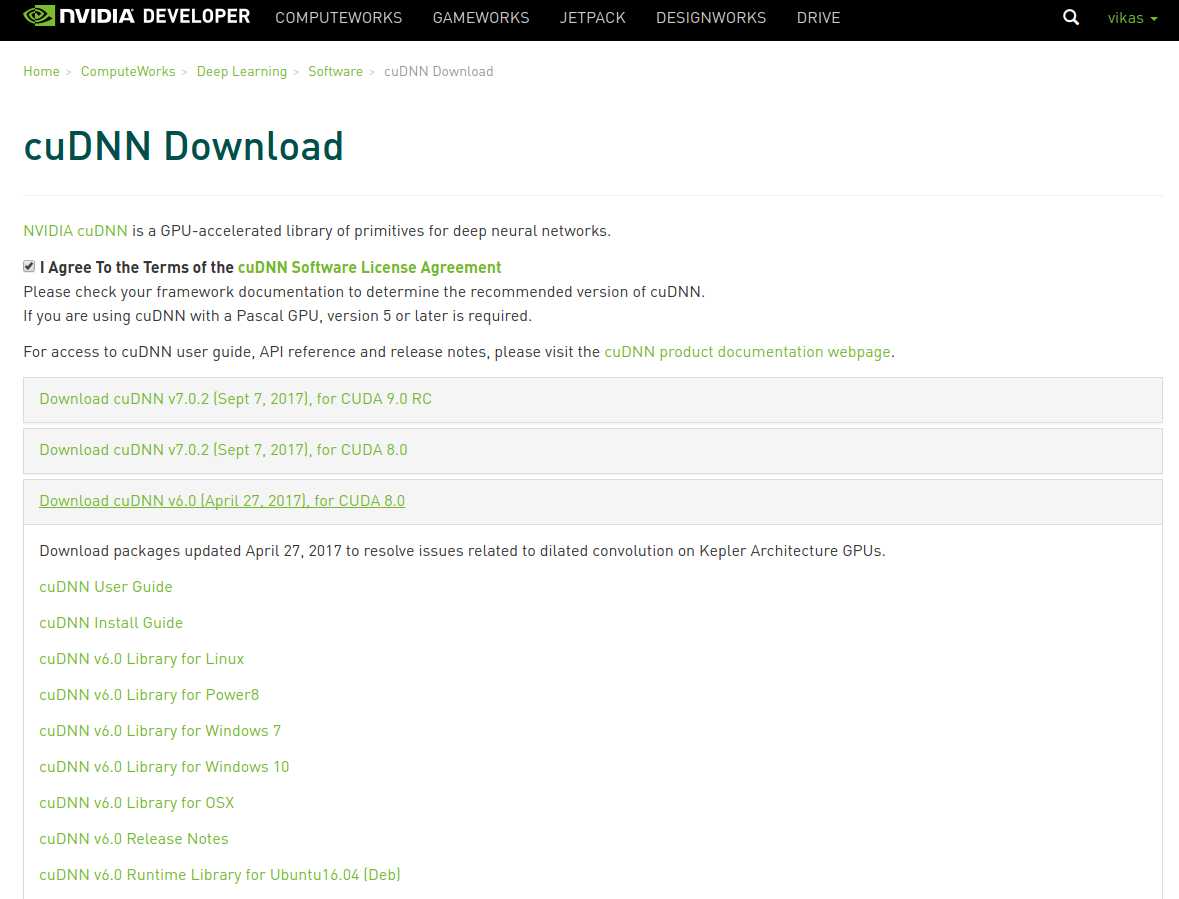
Go to official cudnn website and fill out the form for downloading the cuDNN library. After you get to the download link ( sample shown below ), you should download the “cuDNN v6.0 Library for Linux” from the options.
Now, go to the folder where you have downloaded the “.tgz” file and from the command line execute the following.
| 1 2 3 |
|
Next, update the paths for CUDA library and executables.
| 1 2 3 4 |
|
This should get everything sorted out with respect to CUDA and cuDNN
Step 4 : Install requirements for DL Frameworks
Install dependencies of Deep Learning Frameworks
| 1 2 |
|
NOTE : If you get a warning saying
/usr/lib/nvidia-375/libEGL.so.1 not a symbolic link
Then execute the following commands.
| 1 2 3 4 |
|
Next, we install python 2 and 3 along with other important packages like boost, lmdb, glog, blas etc.
| 1 2 3 4 5 6 |
|
Step 5 : Enable Virtual Environments
Most of us work on different projects and like to keep the settings for these projects separate too. This can be done using Virtual environments in Python. In a virtual environment, you can install any python library without affecting the global installation or other virtual environments. This way, even if you damage the libraries in one virtual environment, your rest of the projects remain safe. It is highly recommended to use virtual environments.
Install the virtual environment wrapper which enables us to create and work on virtual environments in python.
| 1 2 3 4 5 |
|
Step 6 : Install Deep Learning frameworks
Now, we install Tensorflow, Keras, PyTorch, dlib along with other standard Python ML libraries like numpy, scipy, sklearn etc.
We will create virtual environments and install all the deep learning frameworks inside them. We create separate environments for Python 2 and 3.
NOTE that PyTorch is in beta at the time of writing this article. So, the download link for PyTorch can change in future. You can visit this link to get the correct download link according to your desktop configuration.
For Python 2
| 1 2 3 4 5 6 7 8 9 10 11 12 13 14 15 16 17 18 |
|
For Python 3
| 1 2 3 4 5 6 7 8 9 10 11 12 13 14 15 16 17 18 |
|
Check Installation of Frameworks
| 1 2 3 4 5 6 7 8 9 10 11 12 13 14 |
|
You should get an output similar to the figure shown below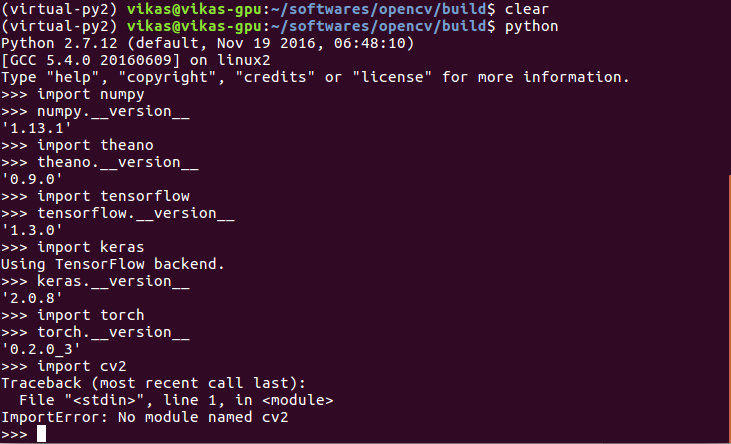
If you want to install OpenCV 3.3, follow along
Step 7 : Install OpenCV 3.3
First we will install the dependencies
| 1 2 3 4 5 6 7 8 9 10 11 12 13 14 15 16 17 18 |
|
Download OpenCV and OpenCV-contrib
| 1 2 3 4 |
|
| 1 2 3 4 |
|
Configure and generate the MakeFile
| 1 2 3 4 5 6 7 8 9 10 11 12 13 14 15 16 |
|
Compile and Install
NOTE : The make operation takes quite a long time, almost an hour using 12 cores on an i7 processor. Also, it might get stuck for long at some places, but don’t worry unless it is stuck for more than an hour.
| 1 2 3 4 |
|
Link OpenCV to your virtual environments
| 1 2 |
|
It should give an output similar to the one shown below/usr/local/lib/python3.5/dist-packages/cv2.cpython-35m-x86_64-linux-gnu.so
/usr/local/lib/python2.7/dist-packages/cv2.so
These are the locations where OpenCV’s Python runtime library file ( cv2.so ) is located. We need to create symlinks to these files from our virtual environment in order to use OpenCV inside them without reinstalling OpenCV.
Note the exact path of the cv2.so file. In my system, it is located in dist-packages. But in most systems, it is located in site-packages directory.
The creation of symlinks is done as follows
| 1 2 3 4 5 6 7 |
|
Check OpenCV Installation
| 1 2 3 4 |
|
You should get an output similar to the figure given below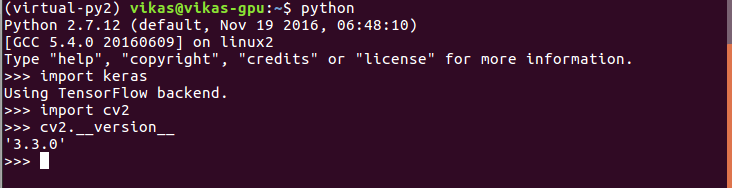
What next?
Check out our next posts on Keras Basics and Feedforward Neural Networks Basics. More posts on Deep Learning to follow. Stay Tuned!
Subscribe & Download Code
If you liked this article and would like to download code (C++ and Python) and example images used all the posts of this blog, please subscribe to our newsletter. You will also receive a free Computer Vision Resource Guide. In our newsletter, we share OpenCV tutorials and examples written in C++/Python, and Computer Vision and Machine Learning algorithms and news.
References
Here is a list of other resources you may find useful.
https://github.com/floydhub/dl-setup
http://www.born2data.com/2017/deeplearning_install-part1.html
http://www.pyimagesearch.com/2016/10/24/ubuntu-16-04-how-to-install-opencv


 被折叠的 条评论
为什么被折叠?
被折叠的 条评论
为什么被折叠?
 到【灌水乐园】发言


