
使用Python中的线程模块,能够同时运行程序的不同部分,并简化设计。如果你已经入门Python,并且想用线程来提升程序运行速度的话,那本文就是为你准备的!
通过阅读本文,你将了解到:
· 什么是线程?
· 如何创建、执行线程?
· 如何使用线程池ThreadPoolExecutor?
· 如何避免资源竞争问题?
· 如何使用Python中线程模块threading提供的常用工具?
目录
1. 什么是线程
2. 创建线程
2.1. 守护线程
2.2. 加入线程
3. 多线程
4. 线程池
5. 竞态条件
5.1. 单线程
5.2. 两个线程
5.3. 示例的意义
6. 同步锁
7. 死锁
8. 生产者-消费者模型中的线程
8.1 在生产者-消费者模型中使用锁
8.2 在生产者-消费者模型中使用队列
9. 线程对象
9.1 信号量
9.2 定时器
9.3 栅栏
阅读提醒:
已掌握Python基本知识;
使用Python 3.6以上版本运行。

1. 什么是线程

线程是操作系统能够进行运算调度的最小单位,它被包含在进程之中,是进程中的实际运作单位。一条线程指的是进程中一个单一顺序的控制流,一个进程中可以并发多个线程,每条线程并行执行不同的任务。
在Python3中实现的大部分运行任务里,不同的线程实际上并没有同时运行:它们只是看起来像是同时运行的。
大家很容易认为线程化是在程序上运行两个(或多个)不同的处理器,每个处理器同时执行一个独立的任务。这种理解并不完全正确,线程可能会在不同的处理器上运行,但一次只能运行一个线程。
同时执行多个任务需要使用非标准的Python运行方式:用不同的语言编写一部分代码,或者使用多进程模块multiprocessing,但这么做会带来一些额外的开销。
由于Python默认的运行环境是CPython(C语言开发的Python),所以线程化可能不会提升所有任务的运行速度。这是因为和GIL(Global Interpreter Lock)的交互形成了限制:一次只能运行一个Python线程。
线程化的一般替代方法是:让各项任务花费大量时间等待外部事件。但问题是,如果想缩短等待时间,会需要大量的CPU计算,结果是程序的运行速度可能并不会提升。
当代码是用Python语言编写并在默认执行环境CPython上运行时,会出现这种情况。如果线程代码是用C语言写的,那它们就能够释放GIL并同时运行。如果是在别的Python执行环境(如IPython, PyPy,Jython, IronPython)上运行,请参考相关文档了解它们是如何处理线程的。
如果只用Python语言在默认的Python执行环境下运行,并且遇到CPU受限的问题,那就应该用多进程模块multiprocessing来解决。
在程序中使用线程也可以简化设计。本文中的大部分示例并不保证可以提升程序运行速度,其目的是使设计结构更加清晰、便于逻辑推理。
下面就来看看如何使用线程吧!

2. 创建线程

既然已经对什么是线程有了初步了解,下面让我们来学习如何创建一个线程。
Python标准库提供了threading模块,里面包含将在本文中介绍的大部分基本模块。在这个模块中,Thread类很好地封装了有关线程的子类,为我们提供了干净的接口来使用它们。
要启动一个线程,需要创建一个Thread实例,然后调用.start()方法:
import loggingimport threadingimport timedef thread_function(name):    logging.info("Thread %s: starting", name)    time.sleep(2)    logging.info("Thread %s: finishing", name)if __name__ == "__main__":     format = "%(asctime)s: %(message)s"     logging.basicConfig(format=format, level=logging.INFO,                        datefmt="%H:%M:%S")     logging.info("Main    : before creating thread")     x = threading.Thread(target=thread_function, args=(1,))     logging.info("Main    : before running thread")     x.start()     logging.info("Main    : wait for the thread to finish")     # x.join()     logging.info("Main    : all done")
import time


def thread_function(name):
    logging.info("Thread %s: starting", name)
    time.sleep(2)
    logging.info("Thread %s: finishing", name)


if __name__ == "__main__":
     format = "%(asctime)s: %(message)s"
     logging.basicConfig(format=format, level=logging.INFO,
                        datefmt="%H:%M:%S")

     logging.info("Main    : before creating thread")
     x = threading.Thread(target=thread_function, args=(1,))
     logging.info("Main    : before running thread")
     x.start()
     logging.info("Main    : wait for the thread to finish")
     # x.join()
     logging.info("Main    : all done")
查看日志语句,可以看到__main__部分正在创建并启动线程:
x = threading.Thread(target=thread_function, args=(1,))x.start()
创建线程时,我们需要传递两个参数,第一个参数target是函数名,指定这个线程去哪个函数里面去执行代码,第二个参数args是一个元组类型,指定为这个函数传递的参数。在本例中,Thread运行函数thread_function(),并将1作为参数传递给该函数。
在本文中,我们用连续整数为线程命名。虽然threading.get_ident()方法能够为每一个线程生成唯一的名称,但这些名称通常会比较长,而且可读性差。
这里的thread_function()函数本身没做什么,它只是简单地记录了一些信息,并用time.sleep()隔开。
运行程序(注释掉倒数第二行代码),结果如下:
$ ./single_thread.pyMain    : before creating threadMain    : before running threadThread 1: startingMain    : wait for the thread to finishMain    : all doneThread 1: finishing
Main    : before running thread
Thread 1: starting
Main    : wait for the thread to finish
Main    : all done
Thread 1: finishing
可以看到,线程Thread在__main__部分代码运行完后才结束。下一节会对这一现象做出解释,并讨论被注释掉那行代码。
2.1. 守护线程
在计算机科学中,守护进程daemon是一类在后台运行的特殊进程,用于执行特定的系统任务。
守护进程daemon在Python线程模块threading中有着特殊的含义。当程序退出时,守护线程将立即关闭。可以这么理解,守护线程是一个在后台运行,且不用费心去关闭它的线程,因为它会随程序自动关闭。
如果程序运行的线程是非守护线程,那么程序将等待所有线程结束后再终止。但如果运行的是守护线程,当程序退出时,守护线程会被自动杀死。
我们仔细研究一下上面程序运行的结果,注意看最后两行。当运行程序时,在__main__部分打印完all done信息后、线程结束前,有一个大约2秒的停顿。
这时,Python在等待非守护线程完成运行。当Python程序结束时,关闭过程的一部分是清理线程。
查看Python线程模块的源代码,可以看到thread ._shutdown()方法遍历所有正在运行的线程,并在每个非守护线程上调用.join()函数,检查它们是否已经结束运行。
因此,程序退出时需要等待,因为守护线程本身会在休眠中等待其他非守护线程运行结束。一旦thread ._shutdown()运行完毕并打印出信息,程序就可以退出。
守护线程这种自动退出的特性很实用,但其实还有其他的方法能实现相同的功能。我们先用守护线程重复运行一下上面的程序,看看结果。只需在创建线程时,添加参数daemon=True。
x = threading.Thread(target=thread_function, args=(1,), daemon=True)1,), daemon=True)
现在运行程序,结果如下:
$ ./single_thread.pyMain    : before creating threadMain    : before running threadThread 1: startingMain    : wait for the thread to finishMain    : all doneThread 1: finishing
Main    : before running thread
Thread 1: starting
Main    : wait for the thread to finish
Main    : all done
Thread 1: finishing
添加参数daemon=True前
$ ./daemon_thread.pyMain    : before creating threadMain    : before running threadThread 1: startingMain    : wait for the thread to finishMain    : all done
Main    : before running thread
Thread 1: starting
Main    : wait for the thread to finish
Main    : all done
添加参数daemon=True后
不同的地方是,之前输出的最后一行不见了,说明thread_function()函数没有机会完成运行。这是一个守护线程,所以当__main__部分运行完最后一行代码,程序终止,守护线程被杀死。
2.2. 加入一个线程
守护线程用起来很方便,但如果想让守护线程运行完毕后再结束程序该怎么办?或者想让守护线程运行完后不退出程序呢?
让我们来看一下刚刚注释掉的那行代码:
# x.join()要让一个线程等待另一个线程完成,可以调用.join()函数。如果取消对这行代码的注释,主线程将会暂停,等待线程x完成运行。
这个功能在守护线程和非守护线程上同样适用。如果用.join()函数加入了一个线程,则主线程将一直等待,直到被加入的线程运行完成。

3. 多线程

到目前为止,示例代码中只用到了两个线程:主线程和一个threading.Thread线程对象。
通常,我们希望同时启动多个线程,让它们执行不同的任务。先来看看比较复杂的创建多线程的方法,然后再看简单的。
这个复杂的创建方法其实前面已经展示过了:
import loggingimport threadingimport timedef thread_function(name):    logging.info("Thread %s: starting", name)    time.sleep(2)    logging.info("Thread %s: finishing", name)if __name__ == "__main__":    format = "%(asctime)s: %(message)s"    logging.basicConfig(format=format, level=logging.INFO,                        datefmt="%H:%M:%S")    threads = list()    for index in range(3):        logging.info("Main    : create and start thread %d.", index)        x = threading.Thread(target=thread_function, args=(index,))        threads.append(x)        x.start()    for index, thread in enumerate(threads):        logging.info("Main    : before joining thread %d.", index)        thread.join()        logging.info("Main    : thread %d done", index)
import time

def thread_function(name):
    logging.info("Thread %s: starting", name)
    time.sleep(2)
    logging.info("Thread %s: finishing", name)

if __name__ == "__main__":
    format = "%(asctime)s: %(message)s"
    logging.basicConfig(format=format, level=logging.INFO,
                        datefmt="%H:%M:%S")

    threads = list()
    for index in range(3):
        logging.info("Main    : create and start thread %d.", index)
        x = threading.Thread(target=thread_function, args=(index,))
        threads.append(x)
        x.start()

    for index, thread in enumerate(threads):
        logging.info("Main    : before joining thread %d.", index)
        thread.join()
        logging.info("Main    : thread %d done", index)
这段代码和前面提到的创建单线程时的结构是一样的,创建线程对象,然后调用.start()方法。程序中会保存一个包含多个线程对象的列表,为稍后使用.join()函数做准备。
多次运行这段代码可能会产生一些有趣的结果:
Main    : create and start thread 0.Thread 0: startingMain    : create and start thread 1.Thread 1: startingMain    : create and start thread 2.Thread 2: startingMain    : before joining thread 0.Thread 2: finishingThread 1: finishingThread 0: finishingMain    : thread 0 doneMain    : before joining thread 1.Main    : thread 1 doneMain    : before joining thread 2.Main    : thread 2 doneand start thread 0.
Thread 0: starting
Main    : create and start thread 1.
Thread 1: starting
Main    : create and start thread 2.
Thread 2: starting
Main    : before joining thread 0.
Thread 2: finishing
Thread 1: finishing
Thread 0: finishing
Main    : thread 0 done
Main    : before joining thread 1.
Main    : thread 1 done
Main    : before joining thread 2.
Main    : thread 2 done
仔细看一下输出结果,三个线程都按照预想的顺序创建0,1,2,但它们的结束顺序却是相反的!多次运行将会生成不同的顺序。查看线程Thread x: finish中的信息,可以知道每个线程都在何时完成。
线程的运行顺序是由操作系统决定的,并且很难预测。很有可能每次运行所得到的顺序都不一样,所以在用线程设计算法时需要注意这一点。
幸运的是,Python中提供了几个基础模块,可以用来协调线程并让它们一起运行。在介绍这部分内容之前,让我们先看看如何更简单地创建一组线程。

4. 线程池

我们可以用一种更简单的方法来创建一组线程:线程池ThreadPoolExecutor,它是Python中concurrent.futures标准库的一部分。(Python 3.2 以上版本适用)。
最简单的方式是把它创建成上下文管理器,并使用with语句管理线程池的创建和销毁。
用ThreadPoolExecutor重写上例中的__main__部分,代码如下:
import concurrent.futures# [rest of code]if __name__ == "__main__":    format = "%(asctime)s: %(message)s"    logging.basicConfig(format=format, level=logging.INFO,                        datefmt="%H:%M:%S")    with concurrent.futures.ThreadPoolExecutor(max_workers=3) as executor:        executor.map(thread_function, range(3))
# [rest of code]

if __name__ == "__main__":
    format = "%(asctime)s: %(message)s"
    logging.basicConfig(format=format, level=logging.INFO,
                        datefmt="%H:%M:%S")

    with concurrent.futures.ThreadPoolExecutor(max_workers=3) as executor:
        executor.map(thread_function, range(3))
这段代码创建一个线程池ThreadPoolExecutor作为上下文管理器,并传入需要的工作线程数量。然后使用.map()遍历可迭代对象,本例中是range(3),每个对象生成池中的一个线程。
在with模块的结尾,会让线程池ThreadPoolExecutor对池中的每个线程调用.join()。强烈建议使用线程池ThreadPoolExecutor作为上下文管理器,因为这样就不会忘记写.join()。
注:
使用线程池ThreadPoolExecutor可能会报一些奇怪的错误。例如,调用一个没有参数的函数,但将参数传入.map()时,线程将抛出异常。
不幸的是,线程池ThreadPoolExecutor会隐藏该异常,程序会在没有任何输出的情况下终止。刚开始调试时,这会让人很头疼。
运行修改后的示例代码,结果如下:
$ ./executor.pyThread 0: startingThread 1: startingThread 2: startingThread 1: finishingThread 0: finishingThread 2: finishing0: starting
Thread 1: starting
Thread 2: starting
Thread 1: finishing
Thread 0: finishing
Thread 2: finishing
再提醒一下,这里的线程1在线程0之前完成,这是因为线程的调度是由操作系统决定的,并不遵循一个特定的顺序。

5. 竞态条件

在继续介绍Python线程模块的一些其他特性之前,让我们先讨论一下在编写线程化程序时会遇到的一个更头疼的问题: 竞态条件。
我们先了解一下竞态条件的含义,然后看一个实例,再继续学习标准库提供的其他模块,来防止竞态条件的发生。
当两个或多个线程访问共享的数据或资源时,可能会出现竞态条件。在本例中,我们创建了一个每次都会发生的大型竞态条件,但请注意,大多数竞态条件不会如此频繁发生。通常情况下,它们很少发生,但一旦发生,会很难进行调试。
在本例中,我们会写一个更新数据库的类,但这里并不需要一个真正的数据库,只是一个虚拟的,因为这不是本文讨论的重点。
这个FakeDatabase类包括.__init__()和.update()方法。
class FakeDatabase:
    def __init__(self):        self.value = 0    def update(self, name):        logging.info("Thread %s: starting update", name)        local_copy = self.value        local_copy += 1        time.sleep(0.1)        self.value = local_copy        logging.info("Thread %s: finishing update", name)
        self.value = 0

    def update(self, name):
        logging.info("Thread %s: starting update", name)
        local_copy = self.value
        local_copy += 1
        time.sleep(0.1)
        self.value = local_copy
logging.info("Thread %s: finishing update", name)FakeDatabase类会一直跟踪一个值: .value,它是共享数据,这里会出现竞态条件。
.__init__()方法将.value的值初始化为0。.update()方法从数据库中读取一个值,对其进行一些计算,然后将新值写回数据库。
FakeDatabase类的使用实例如下:
if __name__ == "__main__":    format = "%(asctime)s: %(message)s"    logging.basicConfig(format=format, level=logging.INFO,                        datefmt="%H:%M:%S")    database = FakeDatabase()    logging.info("Testing update. Starting value is %d.", database.value)    with concurrent.futures.ThreadPoolExecutor(max_workers=2) as executor:        for index in range(2):            executor.submit(database.update, index)    logging.info("Testing update. Ending value is %d.", database.value)_ == "__main__":
    format = "%(asctime)s: %(message)s"
    logging.basicConfig(format=format, level=logging.INFO,
                        datefmt="%H:%M:%S")

    database = FakeDatabase()
    logging.info("Testing update. Starting value is %d.", database.value)
    with concurrent.futures.ThreadPoolExecutor(max_workers=2) as executor:
        for index in range(2):
            executor.submit(database.update, index)
    logging.info("Testing update. Ending value is %d.", database.value)
该程序创建一个线程池ThreadPoolExecutor,里面包含两个线程,然后在每个线程上调用.submit()方法,告诉它们运行database.update()函数。
.submit()允许将位置参数和关键字参数传递给正在线程中运行的函数:
.submit(function, *args, **kwargs)
示例代码中,index作为唯一一个位置参数传递给database.update()函数,后面会介绍,也可以用类似的方式传递多个参数。
由于每个线程都会运行.update(), 让.value的变量值加上1,所以最后打印出的database.value值应该是2。但如果是这样的话,举这个例子就没有什么意义了。
实际上,运行上面这段代码的输出如下:
$ ./racecond.pyTesting unlocked update. Starting value is 0.Thread 0: starting updateThread 1: starting updateThread 0: finishing updateThread 1: finishing updateTesting unlocked update. Ending value is 1.Starting value is 0.
Thread 0: starting update
Thread 1: starting update
Thread 0: finishing update
Thread 1: finishing update
Testing unlocked update. Ending value is 1.
我们来仔细研究一下这里究竟发生了什么,有助于更好地理解有关这个问题的解决方案。
5.1. 单线程
在深入研究上面有关两个线程的问题之前,我们先回过头看一下线程到底是如何工作的。
这里不会讨论所有的细节,因为在目前这个学习阶段还没必要掌握这么多内容。我们还将简化一些东西,虽然可能在技术上不够精确,但可以方便大家理解其中的原理。
当线程池ThreadPoolExecutor运行每个线程时,我们会指定运行哪个函数,以及传递给该函数的参数:executor.submit(database.update, index),这里是指运行database.update函数,并传入index参数。
这么做的结果是,线程池中的每个线程都将调用database.update(index)。注意,主线程__main__中创建的database是对FakeDatabase对象的引用。在这个对象上调用.update(),会调用该对象的实例方法。
每个线程都将引用同一个FakeDatabase对象:database。每个线程还有一个独特的index值,使得日志语句更易阅读:
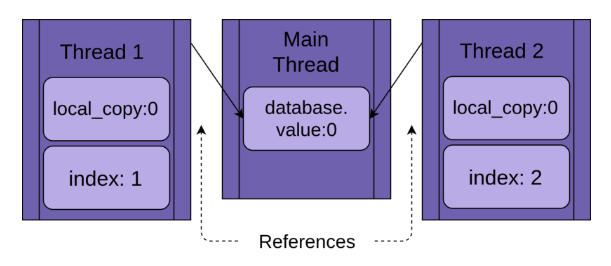
当线程开始运行.update()函数时,它拥有局部变量local_copy。这绝对是一件好事,否则,运行相同函数的两个线程总是会相互混淆。也就是说,函数内定义的局部变量是线程安全的。
现在我们可以看一下,如果使用单线程、调用一次.update()函数运行上面的程序会发生什么。
下图展示了在只运行一个线程的情况下,.update()函数是如何逐步执行的。代码显示在左上角,后面跟着一张图,显示线程中局部变量local_value和共享数据database.value的值:
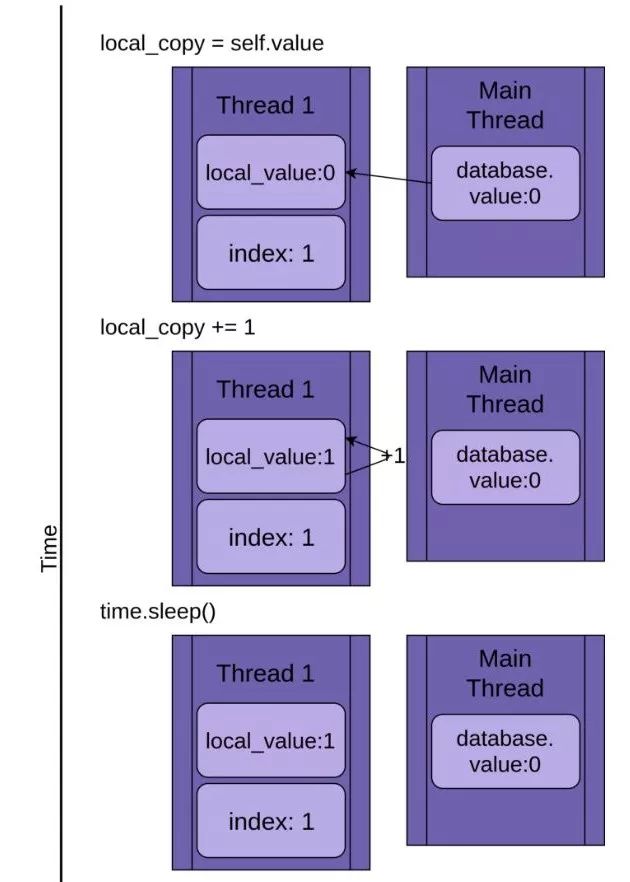
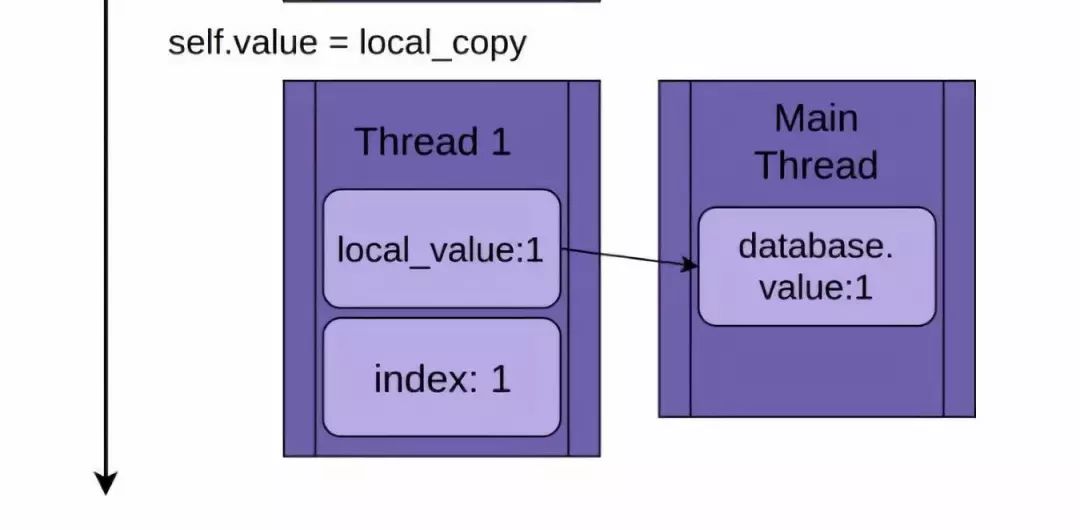
这张图是这样布局的,从上至下时间增加,它以创建线程1开始,并在线程1终止时结束。
线程1启动时,FakeDatabase.value的值为0。第一行代码将值0复制给局部变量local_copy。接下来,local_copy += 1语句让local_copy的值增加1,可以看到线程1中的.value值变成了1。
然后调用time.sleep()方法,暂停当前线程,并允许其他线程运行。因为本例中只有一个线程,这里没什么影响。
当线程1被唤醒继续运行时,它将新值从局部变量local_copy复制到FakeDatabase.value,线程完成运行。可以看到database.value的值被设为1。
到目前为止,一切顺利。我们运行了一次.update()函数,FakeDatabase.value值增加到1。
5.2. 两个线程
回到竞态条件,这两个线程会并发运行,但不会同时运行。它们都有各自的局部变量local_copy,并指向相同的database对象。正是database这个共享数据导致了这些问题。
程序创建线程1,运行update()函数:
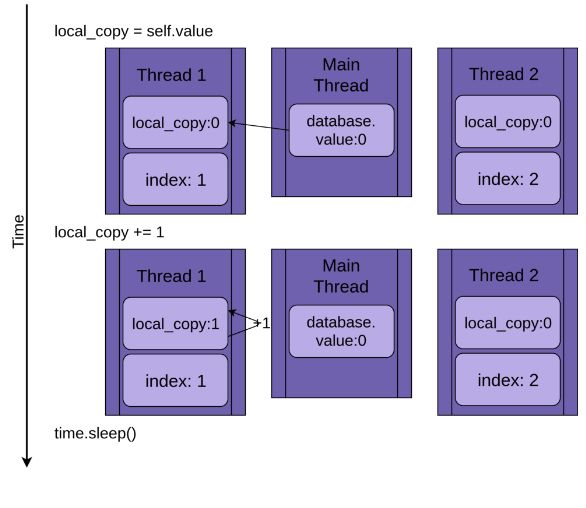
当线程1调用time.sleep()方法时,它允许另一个线程开始运行。这时,线程2启动并执行相同的操作。它也将database.value的值复制给私有变量local_copy,但共享数据database.value的值还未更新,仍为0:
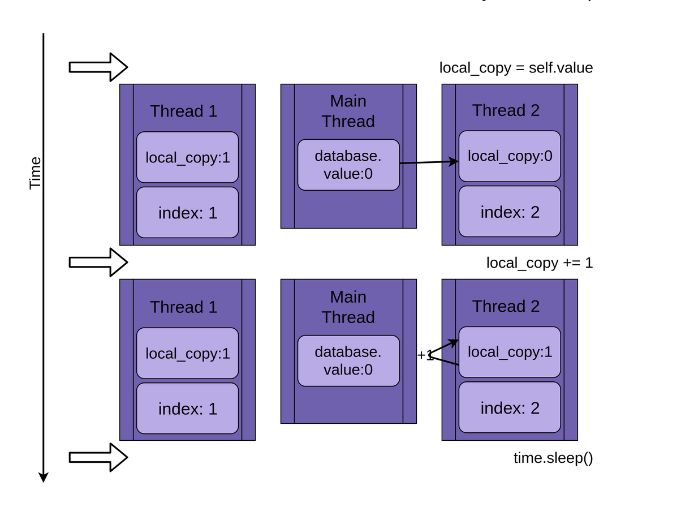
当线程2进入休眠状态时,共享数据database.value的值还是未被修改的0,而且两个线程中的私有变量local_copy的值都是1。
现在线程1被唤醒并保存其私有变量local_copy的值,然后终止,线程2继续运行。线程2在休眠的时候并不知道线程1已经运行完毕并更新了database.value中的值,当继续运行时, 它将自己私有变量local_copy的值存储到database.value中,也是1。
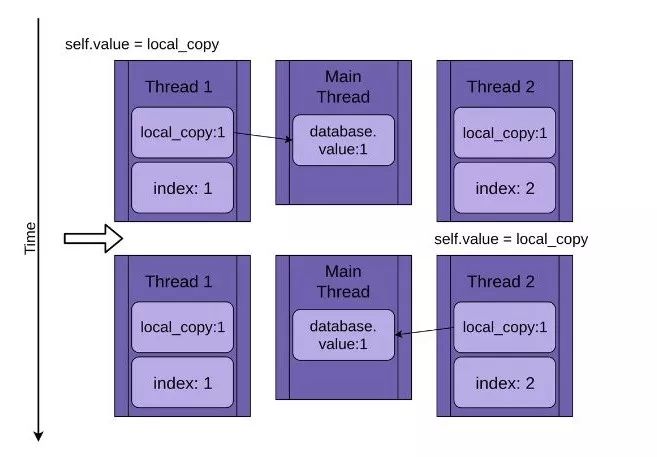
这两个线程交错访问同一个共享对象,覆盖了彼此的结果。当一个线程释放内存或在另一个线程完成访问之前关闭文件句柄时,可能会出现类似的竞争条件。
5.3. 示例的意义
上面的例子是为了确保每次运行程序时都发生竞态条件。因为操作系统可以在任何时候交换出一个线程,所以有可能在读取了x的值之后,像x = x + 1这样的语句会中断,导致写回数据库的值不是我们想要的。
这一过程中的细节非常有趣,但本文剩下部分的学习不需要了解具体细节,所以可以先跳过。
看完有关竞态条件的实例,让我们接下来看看如何解决它们!

6. 同步锁

有很多方法可以避免或解决竞态条件,这里不会介绍所有的解决方法,但会提到一些会经常用到的。让我们先从锁Lock开始学习。
要解决上述竞态条件问题,需要找到一种方法,每次只允许一个线程进入代码的read-modify-write部分。最常用就是Python中的锁。在一些其他语言中,同样的思想被称为互斥锁mutex。互斥锁mutex属于进程互斥MUTual EXclusion的一部分,它和锁所做的工作是一样的。
锁是一种类似于通行证的东西,每次只有一个线程可以拥有锁,任何其他想要获得锁的线程必须等待,直到该锁的所有者将它释放出来。
完成此任务的基本函数是.acquire()和.release()。线程将调用my_lock.acquire()来获取锁。如果锁已经存在,则调用线程将会等待,直到锁被释放。这里有一点很重要,如果一个线程获得了锁,但从未释放,程序会被卡住。稍后会介绍更多关于这方面的内容。
幸运的是,Python的锁也将作为上下文管理器运行,所以可以在with语句中使用它,并且当with模块出于任何原因退出时,锁会自动释放。
让我们看看添加了锁的FakeDatabase,调用函数保持不变:
class FakeDatabase:    def __init__(self):        self.value = 0        self._lock = threading.Lock()    def locked_update(self, name):        logging.info("Thread %s: starting update", name)        logging.debug("Thread %s about to lock", name)        with self._lock:            logging.debug("Thread %s has lock", name)            local_copy = self.value            local_copy += 1            time.sleep(0.1)            self.value = local_copy            logging.debug("Thread %s about to release lock", name)        logging.debug("Thread %s after release", name)        logging.info("Thread %s: finishing update", name)
    def __init__(self):
        self.value = 0
        self._lock = threading.Lock()

    def locked_update(self, name):
        logging.info("Thread %s: starting update", name)
        logging.debug("Thread %s about to lock", name)
        with self._lock:
            logging.debug("Thread %s has lock", name)
            local_copy = self.value
            local_copy += 1
            time.sleep(0.1)
            self.value = local_copy
            logging.debug("Thread %s about to release lock", name)
        logging.debug("Thread %s after release", name)
        logging.info("Thread %s: finishing update", name)
除了添加一些调试日志以便更清楚地查看锁的运行之外,这里最大的变化是添加了一个叫._lock的成员,它是一个thread . lock()对象。这个._lock在未锁定状态下被初始化,并由with语句锁定和释放。
值得注意的是,运行该函数的线程将一直持有这个锁,直到它完全更新完数据库。在本例中,这意味着它将在复制、更新、休眠并将值写回数据库的整个过程中持有锁。
日志设置为警告级别,运行程序,结果如下:
$ ./fixrace.pyTesting locked update. Starting value is 0.Thread 0: starting updateThread 1: starting updateThread 0: finishing updateThread 1: finishing updateTesting locked update. Ending value is 2.Starting value is 0.
Thread 0: starting update
Thread 1: starting update
Thread 0: finishing update
Thread 1: finishing update
Testing locked update. Ending value is 2.
在主线程__main__中配置完日志输出后,将日志级别设置为DEBUG可以打开完整的日志:
logging.getLogger().setLevel(logging.DEBUG).getLogger().setLevel(logging.DEBUG)
用调试日志运行程序的结果如下:
$ ./fixrace.pyTesting locked update. Starting value is 0.Thread 0: starting updateThread 0 about to lockThread 0 has lockThread 1: starting updateThread 1 about to lockThread 0 about to release lockThread 0 after releaseThread 0: finishing updateThread 1 has lockThread 1 about to release lockThread 1 after releaseThread 1: finishing updateTesting locked update. Ending value is 2.Starting value is 0.
Thread 0: starting update
Thread 0 about to lock
Thread 0 has lock
Thread 1: starting update
Thread 1 about to lock
Thread 0 about to release lock
Thread 0 after release
Thread 0: finishing update
Thread 1 has lock
Thread 1 about to release lock
Thread 1 after release
Thread 1: finishing update
Testing locked update. Ending value is 2.
线程0获得锁,并且在它进入睡眠状态时仍然持有锁。然后线程1启动并尝试获取同一个锁,因为线程0仍然持有它,线程1就必须等待。这就是互斥锁。
本文其余部分的许多示例都有警告和调试级别的日志记录。我们通常只显示警告级别的输出,因为调试日志可能非常长。

7. 死锁

在继续学习之前,我们先看一下使用锁时会出现的常见问题。在上例中,如果锁已经被某个线程获取,那么第二次调用.acquire()时将一直等待,直到持有锁的线程调用.release()将锁释放。
思考一下,运行下面这段代码会得到什么结果:
import threadingl = threading.Lock()print("before first acquire")l.acquire()print("before second acquire")l.acquire()print("acquired lock twice")

l = threading.Lock()
print("before first acquire")
l.acquire()
print("before second acquire")
l.acquire()
print("acquired lock twice")
当程序第二次调用l.acquire()时,它需要等待锁被释放。在本例中,可以删除第二次调用修复死锁,但是死锁通常在以下两种情况下会发生:
① 锁没有被正确释放时会产生运行错误;
② 在一个实用程序函数需要被其他函数调用的地方会出现设计问题,这些函数可能已经拥有或者没有锁。
第一种情况有时会发生,但是使用锁作为上下文管理器可以大大减少这种情况发生的频率。建议充分利用上下文管理器来编写代码,因为它们有助于避免出现异常跳过.release()调用的情况。
在某些语言中,设计问题可能有点棘手。庆幸的是,Python的线程模块还提供了另一个锁对象RLock。它允许线程在调用.release()之前多次获取.acquire()锁,且程序不会阻塞。该线程仍需要保证.release()和.acquire()的调用次数相同,但它是用了另一种方式而已。
Lock和RLock是线程化编程中用来防止竞争条件的两个基本工具,还有一些其他的工具。在研究它们之前,我们先转移到一个稍微不同的领域。

8. 生产者-消费者模型中的线程

生产者-消费者模型是一个标准的计算机科学领域的问题,用于解决线程同步或进程同步。我们先介绍一个它的变形,大致了解一下Python中的线程模块提供了哪些基础模块。
本例中,假设需要写一个从网络读取消息并将其写入磁盘的程序。该程序不会主动请求消息,它必须在消息传入时侦听并接受它们。而且这些消息不会以固定的速度传入,而是以突发的方式传入。这一部分程序叫做生产者。
另一方面,一旦传入了消息,就需要将其写入数据库。数据库访问很慢,但访问速度足以跟上消息传入的平均速度。但当大量消息同时传入时,速度会跟不上。这部分程序叫消费者。
在生产者和消费者之间,需要创建一个管道Pipeline,随着对不同同步对象的深入了解,我们需要对管道里面的内容进行修改。
这就是基本的框架。让我们看看使用Lock的解决方案。虽然它并不是最佳的解决方法,但它运用的是前面已经介绍过的工具,所以比较容易理解。
8.1. 在生产者-消费者模型中使用锁
既然这是一篇关于Python线程的文章,而且刚刚已经阅读了有关锁的内容,所以让我们尝试用锁解决竞态条件问题。
先写一个生产者线程,从虚拟网络中读取消息并放入管道中:
SENTINEL = object()def producer(pipeline):    """Pretend we're getting a message from the network."""    for index in range(10):        message = random.randint(1, 101)        logging.info("Producer got message: %s", message)        pipeline.set_message(message, "Producer")    # Send a sentinel message to tell consumer we're done    pipeline.set_message(SENTINEL, "Producer")
def producer(pipeline):
    """Pretend we're getting a message from the network."""
    for index in range(10):
        message = random.randint(1, 101)
        logging.info("Producer got message: %s", message)
        pipeline.set_message(message, "Producer")

    # Send a sentinel message to tell consumer we're done
    pipeline.set_message(SENTINEL, "Producer")
生产者获得一个介于1到100之间的随机数,作为生成的虚拟消息。它调用管道上的.set_message()方法将其发送给消费者。
生产者还用一个SENTINEL值来警告消费者,在它发送10个值之后停止。这有点奇怪,但不必担心,在完成本示例后,会介绍如何去掉这个SENTINEL值。
管道pipeline的另一端是消费者:
def consumer(pipeline):    """Pretend we're saving a number in the database."""    message = 0    while message is not SENTINEL:        message = pipeline.get_message("Consumer")        if message is not SENTINEL:            logging.info("Consumer storing message: %s", message)
    """Pretend we're saving a number in the database."""
    message = 0
    while message is not SENTINEL:
        message = pipeline.get_message("Consumer")
        if message is not SENTINEL:
            logging.info("Consumer storing message: %s", message)
消费者从管道中读取一条消息并将其写入虚拟数据库,在本例中,只是将其储存到磁盘中。如果消费者获取了SENTINEL值,线程会终止。
在研究管道Pipeline之前,先看一下生成这些线程的主线程__main__部分:
if __name__ == "__main__":    format = "%(asctime)s: %(message)s"    logging.basicConfig(format=format, level=logging.INFO,                        datefmt="%H:%M:%S")    # logging.getLogger().setLevel(logging.DEBUG)    pipeline = Pipeline()    with concurrent.futures.ThreadPoolExecutor(max_workers=2) as executor:        executor.submit(producer, pipeline)        executor.submit(consumer, pipeline)_ == "__main__":
    format = "%(asctime)s: %(message)s"
    logging.basicConfig(format=format, level=logging.INFO,
                        datefmt="%H:%M:%S")
    # logging.getLogger().setLevel(logging.DEBUG)

    pipeline = Pipeline()
    with concurrent.futures.ThreadPoolExecutor(max_workers=2) as executor:
        executor.submit(producer, pipeline)
        executor.submit(consumer, pipeline)
看起来应该很熟悉,因为它和前面示例中介绍过的__main__部分类似。
注意,打开调试日志可以查看所有的日志消息,方法是取消对这一行的注释:
# logging.getLogger().setLevel(logging.DEBUG).getLogger().setLevel(logging.DEBUG)
我们有必要遍历调试日志消息,来查看每个线程是在何处获得和释放锁的。
现在让我们看一下将消息从生产者传递给消费者的管道Pipeline:
class Pipeline:    """    Class to allow a single element pipeline between producer and consumer.    """    def __init__(self):        self.message = 0        self.producer_lock = threading.Lock()        self.consumer_lock = threading.Lock()        self.consumer_lock.acquire()    def get_message(self, name):        logging.debug("%s:about to acquire getlock", name)        self.consumer_lock.acquire()        logging.debug("%s:have getlock", name)        message = self.message        logging.debug("%s:about to release setlock", name)        self.producer_lock.release()        logging.debug("%s:setlock released", name)        return message    def set_message(self, message, name):        logging.debug("%s:about to acquire setlock", name)        self.producer_lock.acquire()        logging.debug("%s:have setlock", name)        self.message = message        logging.debug("%s:about to release getlock", name)        self.consumer_lock.release()        logging.debug("%s:getlock released", name)
    """
    Class to allow a single element pipeline between producer and consumer.
    """
    def __init__(self):
        self.message = 0
        self.producer_lock = threading.Lock()
        self.consumer_lock = threading.Lock()
        self.consumer_lock.acquire()

    def get_message(self, name):
        logging.debug("%s:about to acquire getlock", name)
        self.consumer_lock.acquire()
        logging.debug("%s:have getlock", name)
        message = self.message
        logging.debug("%s:about to release setlock", name)
        self.producer_lock.release()
        logging.debug("%s:setlock released", name)
        return message

    def set_message(self, message, name):
        logging.debug("%s:about to acquire setlock", name)
        self.producer_lock.acquire()
        logging.debug("%s:have setlock", name)
        self.message = message
        logging.debug("%s:about to release getlock", name)
        self.consumer_lock.release()
        logging.debug("%s:getlock released", name)
好长一段代码!别害怕,大部分是日志语句,删除所有日志语句后的代码如下:
class Pipeline:    """    Class to allow a single element pipeline between producer and consumer.    """    def __init__(self):        self.message = 0        self.producer_lock = threading.Lock()        self.consumer_lock = threading.Lock()        self.consumer_lock.acquire()    def get_message(self, name):        self.consumer_lock.acquire()        message = self.message        self.producer_lock.release()        return message    def set_message(self, message, name):        self.producer_lock.acquire()        self.message = message        self.consumer_lock.release()
    """
    Class to allow a single element pipeline between producer and consumer.
    """
    def __init__(self):
        self.message = 0
        self.producer_lock = threading.Lock()
        self.consumer_lock = threading.Lock()
        self.consumer_lock.acquire()

    def get_message(self, name):
        self.consumer_lock.acquire()
        message = self.message
        self.producer_lock.release()
        return message

    def set_message(self, message, name):
        self.producer_lock.acquire()
        self.message = message
        self.consumer_lock.release()
这样看起来更清晰,管道类中有三个成员:
① .message存储要传递的消息;
② .producer_lock是一个线程锁对象,限制生产者线程对消息的访问;
③.consumer_lock也是一个线程锁,限制消费者线程对消息的访问。
__init__() 初始化这三个成员,然后在.consumer_lock上调用.acquire(),消费者获得锁。生产者可以添加新消息,但消费者需要等待消息出现。
get_message()和.set_messages()几乎是相反的操作。.get_message()在consumer_lock上调用.acquire(),这么做的目的是让消费者等待,直到有消息传入。
一旦消费者获得了锁.consumer_lock,它会将self.message的值复制给.message,然后在.producer_lock上调用.release()。释放此锁允许生产者在管道中插入下一条消息。
.get_message()函数中有一些细节很容易被忽略。大家思考一下,为什么不把message变量删掉,直接返回self.message的值呢?
答案如下。
只要消费者调用.producer_lock.release(),它就被交换出去,生产者开始运行,这可能发生在锁被完全释放之前!也就是说,存在一种微小的可能性,当函数返回self.message时,这个值是生产者生成的下一条消息,导致第一条消息丢失。这是竞态条件的另一个例子。
我们继续看事务的另一端:.set_message()。生产者通过传入一条消息来调用该函数,获得锁.producer_lock,传入.message值,然后调用consumer_lock.release()释放锁,这将允许消费者读取该值。
运行代码,日志设置为警告级别,结果如下:
$ ./prodcom_lock.pyProducer got data 43Producer got data 45Consumer storing data: 43Producer got data 86Consumer storing data: 45Producer got data 40Consumer storing data: 86Producer got data 62Consumer storing data: 40Producer got data 15Consumer storing data: 62Producer got data 16Consumer storing data: 15Producer got data 61Consumer storing data: 16Producer got data 73Consumer storing data: 61Producer got data 22Consumer storing data: 73Consumer storing data: 22data 43
Producer got data 45
Consumer storing data: 43
Producer got data 86
Consumer storing data: 45
Producer got data 40
Consumer storing data: 86
Producer got data 62
Consumer storing data: 40
Producer got data 15
Consumer storing data: 62
Producer got data 16
Consumer storing data: 15
Producer got data 61
Consumer storing data: 16
Producer got data 73
Consumer storing data: 61
Producer got data 22
Consumer storing data: 73
Consumer storing data: 22
大家可能会觉得奇怪,生产者在消费者还没运行之前就获得了两条消息。回过头仔细看一下生产者和.set_message()函数,生产者先获取消息,打印出日志语句,然后试图将消息放入管道中,这时才需要等待锁。
当生产者试图传入第二条消息时,它会第二次调用.set_message(),发生阻塞。
操作系统可以在任何时候交换线程,但它通常会允许每个线程在交换之前有一段合理的运行时间。这就是为什么生产者会一直运行,直到第二次调用.set_message()时被阻塞。
一旦线程被阻塞,操作系统总是会把它交换出去,并找到另一个线程去运行。在本例中,就是消费者线程。
消费者调用.get_message()函数,它读取消息并在.producer_lock上调用.release()方法,释放锁,允许生产者再次运行。
注意,第一个值是43,正是消费者所读取的值,虽然生产者已经生成了新值45。
尽管使用锁的这种方法适用于本例,但对于常见的生产者-消费者模式问题,这不是一个很好的解决方法,因为它一次只允许管道中有一个值。当生产者收到大量值时,将无处安放。
让我们继续看一个更好的解决方法:使用队列Queue.
8.2. 在生产者-消费者模型中使用队列
如果想在管道中一次处理多个值,我们需要为管道提供一个数据结构,当从生产者线程备份数据时,该结构允许管道中的数据量灵活变动,不再是单一值。
Python标准库中有一个模块叫队列queue,里面有一个类叫Queue。让我们用队列Queue改写一下上面受锁保护的管道。
此外,我们还会介绍另一种停止工作线程的方法,使用Python线程模块中的事件Event对象。
事件的触发机制可以是多种多样的。在本例中,主线程只是休眠一段时间,然后调用event.set()方法,通知所有处于等待阻塞状态的线程恢复运行状态:
1 if __name__ == "__main__":2     format = "%(asctime)s: %(message)s"3     logging.basicConfig(format=format, level=logging.INFO,4                          datefmt="%H:%M:%S")5     # logging.getLogger().setLevel(logging.DEBUG)67     pipeline = Pipeline()8     event = threading.Event()9     with concurrent.futures.ThreadPoolExecutor(max_workers=2) as executor:10        executor.submit(producer, pipeline, event)11        executor.submit(consumer, pipeline, event)1213        time.sleep(0.1)14        logging.info("Main: about to set event")15        event.set()if __name__ == "__main__":
2     format = "%(asctime)s: %(message)s"
3     logging.basicConfig(format=format, level=logging.INFO,
4                          datefmt="%H:%M:%S")
5     # logging.getLogger().setLevel(logging.DEBUG)
6
7     pipeline = Pipeline()
8     event = threading.Event()
9     with concurrent.futures.ThreadPoolExecutor(max_workers=2) as executor:
10        executor.submit(producer, pipeline, event)
11        executor.submit(consumer, pipeline, event)
12
13        time.sleep(0.1)
14        logging.info("Main: about to set event")
15        event.set()
这里惟一的变化是在第8行创建了事件对象event,在第10行和第11行传递了event参数,代码的最后一个部分13-15行,先休眠0.1秒,记录一条消息,然后在事件上调用.set()方法。
生产者也不用变太多:
def producer(pipeline, event):    """Pretend we're getting a number from the network."""    while not event.is_set():    message = random.randint(1, 101)    logging.info("Producer got message: %s", message)    pipeline.set_message(message, "Producer")    logging.info("Producer received EXIT event. Exiting")
    """Pretend we're getting a number from the network."""
    while not event.is_set():
    message = random.randint(1, 101)
    logging.info("Producer got message: %s", message)
    pipeline.set_message(message, "Producer")

    logging.info("Producer received EXIT event. Exiting")
在第3行循环部分设置了事件,而且也不用再把SENTINEL值放入管道中。
消费者的变化稍多:
def consumer(pipeline, event):    """Pretend we're saving a number in the database."""    while not event.is_set() or not pipeline.empty():        message = pipeline.get_message("Consumer")        logging.info(            "Consumer storing message: %s  (queue size=%s)",            message,            pipeline.qsize(),        )    logging.info("Consumer received EXIT event. Exiting")
    """Pretend we're saving a number in the database."""
    while not event.is_set() or not pipeline.empty():
        message = pipeline.get_message("Consumer")
        logging.info(
            "Consumer storing message: %s  (queue size=%s)",
            message,
            pipeline.qsize(),
        )

    logging.info("Consumer received EXIT event. Exiting")
除了需要删掉和SENTINEL值相关的代码,还要执行稍微复杂一点的循环条件。它会一直循环,直到事件结束,管道中的数据被清空。
一定要确保当消费者退出时,队列是空的。如果消费者在管道包含消息时退出,可能会出现两个问题。一是会丢失那部分数据,但更严重的是生产者会被锁住。
在生产者检查.is_set()条件后、但在调用pipeline.set_message()前触发事件,则会发生这种情况。
一旦发生这种情况,生产者可能被唤醒并退出,但此时锁仍被消费者持有。然后,生产者将尝试用.acquire()方法获取锁,但是消费者已经退出,而且永远不会释放锁,所以生产者就会一直等下去。
消费者的其余部分看起来应该很熟悉。
管道类的写法变化最大:
class Pipeline(queue.Queue):    def __init__(self):        super().__init__(maxsize=10)    def get_message(self, name):        logging.debug("%s:about to get from queue", name)        value = self.get()        logging.debug("%s:got %d from queue", name, value)        return value    def set_message(self, value, name):        logging.debug("%s:about to add %d to queue", name, value)        self.put(value)        logging.debug("%s:added %d to queue", name, value)
    def __init__(self):
        super().__init__(maxsize=10)

    def get_message(self, name):
        logging.debug("%s:about to get from queue", name)
        value = self.get()
        logging.debug("%s:got %d from queue", name, value)
        return value

    def set_message(self, value, name):
        logging.debug("%s:about to add %d to queue", name, value)
        self.put(value)
        logging.debug("%s:added %d to queue", name, value)
Pipeline是queue.Queue的一个子类。Queue队列里面有一个可选参数,在初始化时指定队列所能容纳的最大数据量。
.get_message()和.set_message()变得更简短,被队列中的.get()和.put()方法替代。
大家可能想知道,防止竞争条件的代码都跑哪里去了?
编写标准库的核心开发人员知道,在多线程环境中经常使用队列Queue,因此将所有锁定代码合并到了队列Queue模块内部。队列Queue本身就是线程安全的。
程序运行结果如下:
$ ./prodcom_queue.pyProducer got message: 32Producer got message: 51Producer got message: 25Producer got message: 94Producer got message: 29Consumer storing message: 32 (queue size=3)Producer got message: 96Consumer storing message: 51 (queue size=3)Producer got message: 6Consumer storing message: 25 (queue size=3)Producer got message: 31[many lines deleted]Producer got message: 80Consumer storing message: 94 (queue size=6)Producer got message: 33Consumer storing message: 20 (queue size=6)Producer got message: 48Consumer storing message: 31 (queue size=6)Producer got message: 52Consumer storing message: 98 (queue size=6)Main: about to set eventProducer got message: 13Consumer storing message: 59 (queue size=6)Producer received EXIT event. ExitingConsumer storing message: 75 (queue size=6)Consumer storing message: 97 (queue size=5)Consumer storing message: 80 (queue size=4)Consumer storing message: 33 (queue size=3)Consumer storing message: 48 (queue size=2)Consumer storing message: 52 (queue size=1)Consumer storing message: 13 (queue size=0)Consumer received EXIT event. Exitingmessage: 32
Producer got message: 51
Producer got message: 25
Producer got message: 94
Producer got message: 29
Consumer storing message: 32 (queue size=3)
Producer got message: 96
Consumer storing message: 51 (queue size=3)
Producer got message: 6
Consumer storing message: 25 (queue size=3)
Producer got message: 31

[many lines deleted]

Producer got message: 80
Consumer storing message: 94 (queue size=6)
Producer got message: 33
Consumer storing message: 20 (queue size=6)
Producer got message: 48
Consumer storing message: 31 (queue size=6)
Producer got message: 52
Consumer storing message: 98 (queue size=6)
Main: about to set event
Producer got message: 13
Consumer storing message: 59 (queue size=6)
Producer received EXIT event. Exiting
Consumer storing message: 75 (queue size=6)
Consumer storing message: 97 (queue size=5)
Consumer storing message: 80 (queue size=4)
Consumer storing message: 33 (queue size=3)
Consumer storing message: 48 (queue size=2)
Consumer storing message: 52 (queue size=1)
Consumer storing message: 13 (queue size=0)
Consumer received EXIT event. Exiting
生产者创建了5条消息,并将其中4条放到队列中。但在放置第5条消息之前,它被操作系统交换出去了。
然后消费者开始运行并储存第1条消息,打印出该消息和队列大小:
Consumer storing message: 32 (queue size=3)queue size=3)
这就是为什么第5条消息没有成功进入管道。删除一条消息后,队列的大小缩减到3个。因为队列最多可以容纳10条消息,所以生产者线程没有被队列阻塞,而是被操作系统交换出去了。
注意:每次运行所得到的结果会不同。这就是使用线程的乐趣所在!
当程序开始结束时,主线程触发事件,生产者立即退出。但消费者仍有很多工作要做,所以它会继续运行,直到清理完管道中的数据为止。
尝试修改生产者或消费者中的队列大小和time.sleep()中的休眠时间,来分别模拟更长的网络或磁盘访问时间。即使是轻微的更改,也会对结果产生很大的影响。
对于生产者-消费者模型,这是一个更好的解决方法,但其实可以进一步简化。去掉管道Pipeline和日志语句,就只剩下和queue.Queue相关的语句了。
直接使用queue.Queue的最终代码如下:
import concurrent.futuresimport loggingimport queueimport randomimport threadingimport timedef producer(queue, event):    """Pretend we're getting a number from the network."""    while not event.is_set():        message = random.randint(1, 101)        logging.info("Producer got message: %s", message)        queue.put(message)    logging.info("Producer received event. Exiting")def consumer(queue, event):    """Pretend we're saving a number in the database."""    while not event.is_set() or not queue.empty():        message = queue.get()        logging.info(            "Consumer storing message: %s (size=%d)", message, queue.qsize()        )    logging.info("Consumer received event. Exiting")if __name__ == "__main__":    format = "%(asctime)s: %(message)s"    logging.basicConfig(format=format, level=logging.INFO,                        datefmt="%H:%M:%S")    pipeline = queue.Queue(maxsize=10)    event = threading.Event()    with concurrent.futures.ThreadPoolExecutor(max_workers=2) as executor:        executor.submit(producer, pipeline, event)        executor.submit(consumer, pipeline, event)        time.sleep(0.1)        logging.info("Main: about to set event")        event.set()
import logging
import queue
import random
import threading
import time

def producer(queue, event):
    """Pretend we're getting a number from the network."""
    while not event.is_set():
        message = random.randint(1, 101)
        logging.info("Producer got message: %s", message)
        queue.put(message)

    logging.info("Producer received event. Exiting")

def consumer(queue, event):
    """Pretend we're saving a number in the database."""
    while not event.is_set() or not queue.empty():
        message = queue.get()
        logging.info(
            "Consumer storing message: %s (size=%d)", message, queue.qsize()
        )

    logging.info("Consumer received event. Exiting")

if __name__ == "__main__":
    format = "%(asctime)s: %(message)s"
    logging.basicConfig(format=format, level=logging.INFO,
                        datefmt="%H:%M:%S")

    pipeline = queue.Queue(maxsize=10)
    event = threading.Event()
    with concurrent.futures.ThreadPoolExecutor(max_workers=2) as executor:
        executor.submit(producer, pipeline, event)
        executor.submit(consumer, pipeline, event)

        time.sleep(0.1)
        logging.info("Main: about to set event")
        event.set()
可以看到,使用Python的内置基础模块能够简化复杂的问题,让代码阅读起来更清晰。
锁Lock和队列Queue是解决并发问题非常方便的两个类,但其实标准库还提供了其他类。在结束本教程之前,让我们快速浏览一下还有哪些类。

9. 线程对象

Python的线程threading模块还有其他一些基本类型。虽然在上面的例子中没有用到,但它们会在不同的情况下派上用场,所以熟悉一下还是很好处的。
9.1 信号量
首先要介绍的是信号量thread.semaphore,信号量是具有一些特殊属性的计数器。
第一个属性是计数的原子性,可以保证操作系统不会在计数器递增或递减的过程中交换线程。
内部计数器在调用.release()时递增,在调用.acquire()时递减。
另一个特殊属性是,如果线程在计数器为0时调用.acquire(),那么该线程将阻塞,直到另一个线程调用.release()并将计数器的值增加到1。
信号量通常用于保护容量有限的资源。例如,我们有一个连接池,并且希望限制该连接池中的元素数量,就可以用信号量来进行管理。
9.2 定时器
threading.Timer是一个定时器功能的类,指定函数在间隔特定时间后执行任务。我们可以通过传入需要等待的时间和函数来创建一个定时器:
t = threading.Timer(30.0, my_function)30.0, my_function)
调用.start()启动定时器,函数将在指定时间过后的某个时间点上被新线程调用。但请注意,这里并不能保证函数会在我们所期望的确切时间被调用,可能会存在误差。
如果想要停止已经启动的定时器,可以调用.cancel()。在定时器触发后调用.cancel()不会执行任何操作,也不会产生异常。
定时器可用于在特定时间之后提示用户执行操作。如果用户在定时器过时之前执行了操作,可以调用.cancel()取消定时。
9.3 栅栏
threading模块中的栅栏Barrier可以用来指定需要同步运行的线程数量。创建栅栏Barrier时,我们必须指定所需同步的线程数。每个线程都会在Barrier上调用.wait()方法,它们会先保持阻塞状态,直到等待的线程数量达到指定值时,会被同时释放。
注意,线程是由操作系统调度的,因此,即使所有线程同时被释放,一次也只能运行一个线程。
栅栏可以用来初始化一个线程池。让线程初始化后在栅栏里等待,可以确保程序在所有线程都完成初始化后再开始运行。


 1894
1894

 被折叠的 条评论
为什么被折叠?


