


http://blog.csdn.net/kkdelta/article/details/7249122
本文简单介绍一下Apache Camel如何对route进行事务控制,首先介绍整个route只涉及到一个事务参与者的情况,然后再介绍route中涉及到多个事务参与者的情况.Camel是通过和Spring的框架集成进行事务控制的.
1,整个route只有一个事务参与者,"局部事务",这里用JMS的例子,后台的MQ为ActiveMQ,示例图如下:(图片来源于Camel in Action)

route的代码如下:
- public class JMSTransaction extends RouteBuilder {
- public void configure() throws Exception {
- TProcessor0 p0 = new TProcessor0();
- TProcessor1 p1 = new TProcessor1();
- from("jms:queue:TOOL.DEFAULT").process(p0).process(p1).to("file:d:/temp/outbox");
- }
- }
public class JMSTransaction extends RouteBuilder {
    public void configure() throws Exception {
        TProcessor0 p0 = new TProcessor0();
        TProcessor1 p1 = new TProcessor1();
        from("jms:queue:TOOL.DEFAULT").process(p0).process(p1).to("file:d:/temp/outbox");
    }
}
Spring配置如下:
- <beans xmlns="http://www.springframework.org/schema/beans"
- xmlns:xsi="http://www.w3.org/2001/XMLSchema-instance"
- xmlns:broker="http://activemq.apache.org/schema/core"
- xsi:schemaLocation="
- http://www.springframework.org/schema/beans http://www.springframework.org/schema/beans/spring-beans-2.5.xsd
- http://camel.apache.org/schema/spring http://camel.apache.org/schema/spring/camel-spring.xsd
- http://activemq.apache.org/schema/core http://activemq.apache.org/schema/core/activemq-core-5.2.0.xsd">
- <camelContext id="camel" xmlns="http://camel.apache.org/schema/spring">
- <package>
- com.test.camel.transaction.jms
- </package>
- </camelContext>
- <bean id="jms" class="org.apache.activemq.camel.component.ActiveMQComponent">
- <property name="transacted" value="true"/>
- <property name="transactionManager" ref="txManager"/>
- </bean>
- <bean id="txManager" class="org.springframework.jms.connection.JmsTransactionManager">
- <property name="connectionFactory" ref="jmsConnectionFactory"/>
- </bean>
- <bean id="jmsConnectionFactory" class="org.apache.activemq.ActiveMQConnectionFactory">
- <property name="brokerURL" value="tcp://localhost:61616"/>
- </bean>
- </beans>
<beans xmlns="http://www.springframework.org/schema/beans"
       xmlns:xsi="http://www.w3.org/2001/XMLSchema-instance"
       xmlns:broker="http://activemq.apache.org/schema/core"
       xsi:schemaLocation="
       http://www.springframework.org/schema/beans http://www.springframework.org/schema/beans/spring-beans-2.5.xsd
       http://camel.apache.org/schema/spring http://camel.apache.org/schema/spring/camel-spring.xsd
       http://activemq.apache.org/schema/core http://activemq.apache.org/schema/core/activemq-core-5.2.0.xsd">
    <camelContext id="camel" xmlns="http://camel.apache.org/schema/spring">
        <package>
            com.test.camel.transaction.jms
        </package>
    </camelContext>
    <bean id="jms" class="org.apache.activemq.camel.component.ActiveMQComponent">
        <property name="transacted" value="true"/>
        <property name="transactionManager" ref="txManager"/>
    </bean>
    <bean id="txManager" class="org.springframework.jms.connection.JmsTransactionManager">
        <property name="connectionFactory" ref="jmsConnectionFactory"/>
    </bean>
    <bean id="jmsConnectionFactory" class="org.apache.activemq.ActiveMQConnectionFactory">
        <property name="brokerURL" value="tcp://localhost:61616"/>
    </bean>
</beans>
route定义的逻辑为从queue里取消息,然后进行一系列的处理(process(p0).process(p1)),<property name="transacted" value="true"/>的意思是通过这个jms进行的消息存取是有事务控制的.上面的route在process(p1)里抛出异常,txManager会进行rollback处理.(在activeMQ里,消息默认会redelivery到客户端6次,如果继续异常,消息会放到deadletter queue里(ActiveMQ.DLQ)),需要在AciveMQ的配置文件activemq.xml里配置如下:(non-persistent的queue的消息出错也转到dead letter queue)
<policyEntry queue=">">
<deadLetterStrategy>
<sharedDeadLetterStrategy processNonPersistent="true" />
</deadLetterStrategy>
如果<property name="transacted" value="false"/>的话,消息在重发了6次后会丢失.
如果上面例子中的事务参与者是数据库的话,道理与之类似,只是配置的transaction manager不同,如:
<bean id="txManager" class="org.springframework.jdbc.datasource.DataSourceTransactionManager"/>
Camel里使用ActiveMQ JMS的例子可以参照 http://blog.csdn.net/kkdelta/article/details/7237096
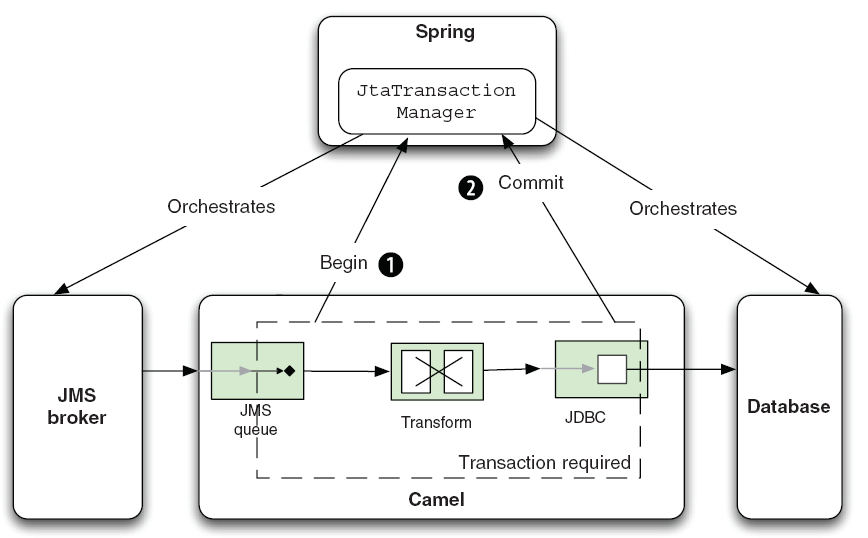
2,Camel里的全局事务,一个route里有多个事务参与者,示例图如下:(图片来源于Camel in Action)
route的定义如下:
- public class XaTransaction extends RouteBuilder {
- public void configure() throws Exception {
- TProcessor1 p1 = new TProcessor1();
- from("jms:queue:TOOL.DEFAULT")
- .transacted()
- .log("+++ before database +++")
- .bean(SQLBean.class, "toSql")
- .to("jdbc:myDataSource")
- .process(p1)
- .log("+++ after database +++");
- }
- }
- public class SQLBean {
- public String toSql(String str) {
- //create table CamelTEST(msg varchar2(2000));
- StringBuilder sb = new StringBuilder();
- sb.append("INSERT INTO CamelTEST VALUES ('camel test')");
- return sb.toString();
- }
- }
public class XaTransaction extends RouteBuilder {
    public void configure() throws Exception {
        TProcessor1 p1 = new TProcessor1();
        from("jms:queue:TOOL.DEFAULT")
        .transacted()
        .log("+++ before database +++")
        .bean(SQLBean.class, "toSql")
        .to("jdbc:myDataSource")
        .process(p1)
        .log("+++ after database +++");
    }
}
public class SQLBean {
    public String toSql(String str) {
        //create table CamelTEST(msg varchar2(2000));
        StringBuilder sb = new StringBuilder();
        sb.append("INSERT INTO CamelTEST VALUES ('camel test')");
        return sb.toString();
    }
}
route的逻辑是从queue里取消息,然后操作数据库,然后做后续其他操作(process(p1)),这里的process(p1)如果抛出异常的话,取消息和数据库操作都回滚,
如果整个route都成功完成的话,取消息和数据库操作提交.
这里用到JTA transaction manager是atomikos,相应的jar包可以从这里下载:http://download.csdn.net/detail/kkdelta/4056226
atomikos的主页 http://www.atomikos.com/Main/ProductsOverview
Spring的配置如下:
- <beans xmlns="http://www.springframework.org/schema/beans"
- xmlns:xsi="http://www.w3.org/2001/XMLSchema-instance"
- xmlns:broker="http://activemq.apache.org/schema/core"
- xsi:schemaLocation="
- http://www.springframework.org/schema/beans http://www.springframework.org/schema/beans/spring-beans-2.5.xsd
- http://camel.apache.org/schema/spring http://camel.apache.org/schema/spring/camel-spring.xsd
- http://activemq.apache.org/schema/core http://activemq.apache.org/schema/core/activemq-core-5.2.0.xsd">
- <camelContext id="camel" xmlns="http://camel.apache.org/schema/spring">
- <package>
- com.test.camel.transaction.xa
- </package>
- </camelContext>
- <bean id="atomikosTransactionManager"
- class="com.atomikos.icatch.jta.UserTransactionManager"
- init-method="init" destroy-method="close" >
- <!-- when close is called, should we force transactions to terminate or not? -->
- <property name="forceShutdown" value="false"/>
- </bean>
- <!-- this is some atomikos setup you must do -->
- <bean id="atomikosUserTransaction" class="com.atomikos.icatch.jta.UserTransactionImp" >
- <property name="transactionTimeout" value="300"/>
- </bean>
- <!-- this is some atomikos setup you must do -->
- <bean id="connectionFactory"
- class="com.atomikos.jms.AtomikosConnectionFactoryBean" >
- <property name="uniqueResourceName" value="amq1"/>
- <property name="xaConnectionFactory" ref="jmsXaConnectionFactory"/>
- </bean>
- <!-- this is the Spring JtaTransactionManager which under the hood uses Atomikos -->
- <bean id="jtaTransactionManager"
- class="org.springframework.transaction.jta.JtaTransactionManager" >
- <property name="transactionManager" ref="atomikosTransactionManager"/>
- <property name="userTransaction" ref="atomikosUserTransaction"/>
- </bean>
- <!-- Is the ConnectionFactory to connect to the JMS broker -->
- <!-- notice how we must use the XA connection factory -->
- <bean id="jmsXaConnectionFactory" class="org.apache.activemq.ActiveMQXAConnectionFactory" >
- <property name="brokerURL" value="tcp://localhost:61616"/>
- </bean>
- <!-- define the activemq Camel component so we can integrate with the AMQ broker below -->
- <bean id="jms" class="org.apache.activemq.camel.component.ActiveMQComponent" >
- <property name="transacted" value="true"/>
- <property name="transactionManager" ref="jtaTransactionManager"/>
- </bean>
- <bean id="myDataSource"
- class="com.atomikos.jdbc.AtomikosDataSourceBean"
- init-method="init" destroy-method="close">
- <!-- set an arbitrary but unique name for the datasource -->
- <property name="uniqueResourceName"><value>XADBMS</value></property>
- <property name="xaDataSourceClassName">
- <value>oracle.jdbc.xa.client.OracleXADataSource</value>
- </property>
- <property name="xaProperties">
- <props>
- <prop key="user">xxx</prop>
- <prop key="password">xxx</prop>
- <prop key="URL">jdbc:oracle:thin:@147.151.240.xxx:1521:orcl</prop>
- </props>
- </property>
- <property name="poolSize" value="1"/>
- </bean>
- </beans>
===========http://camel.apache.org/transactional-client.html
Transaction Oriented Endpoints (Camel Toes) like JMS support using a transaction for both inbound and outbound message exchanges. Endpoints that support transactions will participate in the current transaction context that they are called from.
You should use the SpringRouteBuilder to setup the routes since you will need to setup the spring context with the TransactionTemplates that will define the transaction manager configuration and policies.
For inbound endpoint to be transacted, they normally need to be configured to use a Spring PlatformTransactionManager. In the case of the JMS component, this can be done by looking it up in the spring context.
You first define needed object in the spring configuration.
<
bean
id="jmsTransactionManager" class="org.springframework.jms.connection.JmsTransactionManager">
<
property
name="connectionFactory" ref="jmsConnectionFactory" />
</
bean
>
<
bean
id="jmsConnectionFactory" class="org.apache.activemq.ActiveMQConnectionFactory">
</
bean
>
|
Then you look them up and use them to create the JmsComponent.
PlatformTransactionManager transactionManager = (PlatformTransactionManager) spring.getBean("jmsTransactionManager");
ConnectionFactory connectionFactory = (ConnectionFactory) spring.getBean("jmsConnectionFactory");
JmsComponent component = JmsComponent.jmsComponentTransacted(connectionFactory, transactionManager);
component.getConfiguration().setConcurrentConsumers(
1
);
ctx.addComponent("activemq", component);
|
Transaction Policies
Outbound endpoints will automatically enlist in the current transaction context. But what if you do not want your outbound endpoint to enlist in the same transaction as your inbound endpoint? The solution is to add a Transaction Policy to the processing route. You first have to define transaction policies that you will be using. The policies use a spring TransactionTemplate under the covers for declaring the transaction demarcation to use. So you will need to add something like the following to your spring xml:
<
bean
id="PROPAGATION_REQUIRED" class="org.apache.camel.spring.spi.SpringTransactionPolicy">
<
property
name="transactionManager" ref="jmsTransactionManager"/>
</
bean
>
<
bean
id="PROPAGATION_REQUIRES_NEW" class="org.apache.camel.spring.spi.SpringTransactionPolicy">
<
property
name="transactionManager" ref="jmsTransactionManager"/>
<
property
name="propagationBehaviorName" value="PROPAGATION_REQUIRES_NEW"/>
</
bean
>
|
Then in your SpringRouteBuilder, you just need to create new SpringTransactionPolicy objects for each of the templates.
public
void
configure() {
...
Policy requried = bean(SpringTransactionPolicy.
class
, "PROPAGATION_REQUIRED"));
Policy requirenew = bean(SpringTransactionPolicy.
class
, "PROPAGATION_REQUIRES_NEW"));
...
}
|
Once created, you can use the Policy objects in your processing routes:
// Send to bar in a new transaction
from("activemq:queue:foo").policy(requirenew).to("activemq:queue:bar");
// Send to bar without a transaction.
from("activemq:queue:foo").policy(notsupported ).to("activemq:queue:bar");
|
OSGi Blueprint
If you are using OSGi Blueprint then you most likely have to explicit declare a policy and refer to the policy from the transacted in the route.
<
bean
id="required" class="org.apache.camel.spring.spi.SpringTransactionPolicy">
<
property
name="transactionManager" ref="jmsTransactionManager"/>
<
property
name="propagationBehaviorName" value="PROPAGATION_REQUIRED"/>
</
bean
>
|
And then refer to "required" from the route:
<
route
>
<
from
uri="activemq:queue:foo"/>
<
transacted
ref="required"/>
<
to
uri="activemq:queue:bar"/>
</
route
>
|
Database Sample
In this sample we want to ensure that two endpoints is under transaction control. These two endpoints inserts data into a database.
The sample is in its full as a unit test.
First of all we setup the usual spring stuff in its configuration file. Here we have defined a DataSource to the HSQLDB and a most importantly
the Spring DataSoruce TransactionManager that is doing the heavy lifting of ensuring our transactional policies. You are of course free to use any
of the Spring based TransactionMananger, eg. if you are in a full blown J2EE container you could use JTA or the WebLogic or WebSphere specific managers.
As we use the new convention over configuration we do not need to configure a transaction policy bean, so we do not have any PROPAGATION_REQUIRED beans.
All the beans needed to be configured is standard Spring beans only, eg. there are no Camel specific configuration at all.
<!-- this example uses JDBC so we define a data source -->
<
jdbc:embedded-database
id="dataSource" type="DERBY">
<
jdbc:script
location="classpath:sql/init.sql" />
</
jdbc:embedded-database
>
<!-- spring transaction manager -->
<!-- this is the transaction manager Camel will use for transacted routes -->
<
bean
id="txManager" class="org.springframework.jdbc.datasource.DataSourceTransactionManager">
<
property
name="dataSource" ref="dataSource"/>
</
bean
>
<!-- bean for book business logic -->
<
bean
id="bookService" class="org.apache.camel.spring.interceptor.BookService">
<
property
name="dataSource" ref="dataSource"/>
</
bean
>
|
Then we are ready to define our Camel routes. We have two routes: 1 for success conditions, and 1 for a forced rollback condition.
This is after all based on a unit test. Notice that we mark each route as transacted using the transacted tag.
<
route
>
<
from
uri="direct:okay"/>
<!-- we mark this route as transacted. Camel will lookup the spring transaction manager
and use it by default. We can optimally pass in arguments to specify a policy to use
that is configured with a spring transaction manager of choice. However Camel supports
convention over configuration as we can just use the defaults out of the box and Camel
that suites in most situations -->
<
transacted
/>
<
setBody
>
<
constant
>Tiger in Action</
constant
>
</
setBody
>
<
bean
ref="bookService"/>
<
setBody
>
<
constant
>Elephant in Action</
constant
>
</
setBody
>
<
bean
ref="bookService"/>
</
route
>
<
route
>
<
from
uri="direct:fail"/>
<!-- we mark this route as transacted. See comments above. -->
<
transacted
/>
<
setBody
>
<
constant
>Tiger in Action</
constant
>
</
setBody
>
<
bean
ref="bookService"/>
<
setBody
>
<
constant
>Donkey in Action</
constant
>
</
setBody
>
<
bean
ref="bookService"/>
</
route
>
</
camelContext
>
|
That is all that is needed to configure a Camel route as being transacted. Just remember to use the transacted DSL. The rest is standard Spring XML to setup the transaction manager.
JMS Sample
In this sample we want to listen for messages on a queue and process the messages with our business logic java code and send them along. Since its based on a unit test the destination is a mock endpoint.
First we configure the standard Spring XML to declare a JMS connection factory, a JMS transaction manager and our ActiveMQ component that we use in our routing.
<!-- setup JMS connection factory -->
<
bean
id="poolConnectionFactory" class="org.apache.activemq.pool.PooledConnectionFactory">
<
property
name="maxConnections" value="8"/>
<
property
name="connectionFactory" ref="jmsConnectionFactory"/>
</
bean
>
<
bean
id="jmsConnectionFactory" class="org.apache.activemq.ActiveMQConnectionFactory">
<
property
name="brokerURL" value="vm://localhost?
broker.persistent
=
false
&
broker.useJmx
=
false
"/>
</
bean
>
<!-- setup spring jms TX manager -->
<
bean
id="jmsTransactionManager" class="org.springframework.jms.connection.JmsTransactionManager">
<
property
name="connectionFactory" ref="poolConnectionFactory"/>
</
bean
>
<!-- define our activemq component -->
<
bean
id="activemq" class="org.apache.activemq.camel.component.ActiveMQComponent">
<
property
name="connectionFactory" ref="poolConnectionFactory"/>
<!-- define the jms consumer/producer as transacted -->
<
property
name="transacted" value="true"/>
<!-- setup the transaction manager to use -->
<!-- if not provided then Camel will automatic use a JmsTransactionManager, however if you
for instance use a JTA transaction manager then you must configure it -->
<
property
name="transactionManager" ref="jmsTransactionManager"/>
</
bean
>
|
And then we configure our routes. Notice that all we have to do is mark the route as transacted using the transacted tag.
<!-- disable JMX during testing -->
<
jmxAgent
id="agent" disabled="true"/>
<
route
>
<!-- 1: from the jms queue -->
<
from
uri="activemq:queue:okay"/>
<!-- 2: mark this route as transacted -->
<
transacted
/>
<!-- 3: call our business logic that is myProcessor -->
<
process
ref="myProcessor"/>
<!-- 4: if success then send it to the mock -->
<
to
uri="mock:result"/>
</
route
>
</
camelContext
>
<
bean
id="myProcessor" class="org.apache.camel.component.jms.tx.JMSTransactionalClientTest$MyProcessor"/>
|
Using multiple routes with different propagation behaviors
Available as of Camel 2.2
Suppose you want to route a message through two routes and by which the 2nd route should run in its own transaction. How do you do that? You use propagation behaviors for that where you configure it as follows:
- The first route use
PROPAGATION_REQUIRED - The second route use
PROPAGATION_REQUIRES_NEW
This is configured in the Spring XML file:
<
bean
id="PROPAGATION_REQUIRED" class="org.apache.camel.spring.spi.SpringTransactionPolicy">
<
property
name="transactionManager" ref="txManager"/>
<
property
name="propagationBehaviorName" value="PROPAGATION_REQUIRED"/>
</
bean
>
<
bean
id="PROPAGATION_REQUIRES_NEW" class="org.apache.camel.spring.spi.SpringTransactionPolicy">
<
property
name="transactionManager" ref="txManager"/>
<
property
name="propagationBehaviorName" value="PROPAGATION_REQUIRES_NEW"/>
</
bean
>
|
Then in the routes you use transacted DSL to indicate which of these two propagations it uses.
from("direct:mixed")
// using required
.transacted("PROPAGATION_REQUIRED")
// all these steps will be okay
.setBody(constant("Tiger in Action")).beanRef("bookService")
.setBody(constant("Elephant in Action")).beanRef("bookService")
// continue on route 2
.to("direct:mixed2");
from("direct:mixed2")
// tell Camel that if this route fails then only rollback this last route
// by using (rollback only *last*)
.onException(Exception.
class
).markRollbackOnlyLast().end()
// using a different propagation which is requires new
.transacted("PROPAGATION_REQUIRES_NEW")
// this step will be okay
.setBody(constant("Lion in Action")).beanRef("bookService")
// this step will fail with donkey
.setBody(constant("Donkey in Action")).beanRef("bookService");
|
Notice how we have configured the onException in the 2nd route to indicate in case of any exceptions we should handle it and just rollback this transaction.
This is done using the markRollbackOnlyLast which tells Camel to only do it for the current transaction and not globally.
TransactionErrorHandler
Available as of Camel 2.0
This is the new default transaction error handler in Camel 2.0 onwards, used for transacted routes.
It uses the same base as the DefaultErrorHandler so it has the same feature set as this error handler.
By default any exception thrown during routing will be propagated back to the caller and the Exchange ends immediately. However you can use the Exception Clause to catch a given exception and lower the exception by marking it as handled. If so the exception will not be sent back to the caller and the Exchange continues to be routed.
Example
In this route below, any exception thrown in eg the validateOrder bean will be propagated back to the caller, and its the jetty endpoint. It will return a HTTP error message back to the client.
from("jetty:http:
//localhost/myservice/order").transacted().to("bean:validateOrder").to("jms:queue:order");
|
We can add a onException in case we want to catch certain exceptions and route them differently, for instance to catch a ValidationException and return a fixed response to the caller.
onException(ValidationException.
class
).handled(
true
).transform(body(constant("INVALID ORDER")));
from("jetty:http:
//localhost/myservice/order").transacted().to("bean:validateOrder").to("jms:queue:order");
|
When the ValidationException is thrown from the validate order bean it is intercepted by the TransactionErrorHandler and it let the onException(ValidationException.class handle it so the Exchange is routed to this route and since we use handled(true) then the original exception is lowered (= cleared) and we transform the message into a fixed response that are returned to jetty endpoint that returns it to the original caller.
Convention over configuration
When you configure a route to be transacted you just mark it as transacted as follows:
from("jms:queue:foo").transacted().to("bean:handleFoo");
|
And in Spring DSL:
<
route
>
<
from
uri="jms:queue:foo"/>
<
transacted
/>
<
to
uri="bean:handleFoo"/>
</
route
>
|
What happens is that Camel will automatic lookup the right Spring transaction manager. It does using the following rules, in order:
1. If there is only 1 bean with the type org.apache.camel.spi.TransactedPolicy then its used.
2. If there is a bean with id PROPAGATION_REQUIRED and of type org.apache.camel.spi.TransactedPolicy then its used.
3. If there is only 1 bean with the type org.springframework.transaction.PlatformTransactionManager then its used.
However you can explicit configure what you want to use. For instance the transacted DSL accepts a String reference parameter to indicate the bean id of the org.apache.camel.spi.TransactedPolicy bean to use in case you have multiple beans. For instance a PROPAGATION_REQUIRES_NEW bean.
The transactionErrorHandler like the transacted also supprts convention over configuration and it will also automatic lookup the right Spring transaction manager. It does using the following rules, in order:
1. If there is only 1 bean with the type org.apache.camel.spi.TransactedPolicy then its used.
2. If there is a bean with id PROPAGATION_REQUIRED and of type org.apache.camel.spi.TransactedPolicy then its used.
3. If there is only 1 bean with the type org.springframework.transaction.support.TransactionTemplate then its used.
4. If there is only 1 bean with the type org.springframework.transaction.PlatformTransactionManager then its used.
However you can explicit configure what you want to use. For instance the transactionErrorHandler DSL accepts either a TransactedPolicy, a TransactionTemplate or a PlatformTransactionManager.
Using Camel to do redeliveries
As the TransactionErrorHandler also supports to let Camel do redeliveries you can use both worlds. Letting Camel do some redeliveries and at the end the backing transaction manager doing other redeliveries. In fact in the end the transaction manager have the final word. That means if Camel cannot process the exchange then its thrown back to the transaction manager that will perform the rollback, and redelivery.
Example with using Camel to do redeliveries:
In the route below we have configured a transaction error handler. It will by default do local redeliveries up till 6 times. In Case Camel could not redeliver the message it will be thrown back to the transaction manager that will do a rollback, and a redelivery if it was configured to do so.
Notice that as we have all the powers from DefaultErrorHandler we can configure an onException where we state that in case of this particular exception, an IllegalArgumentException we will only do redeliveries up till 4 times. (Yes the code is based on an unit test).
And also notice that we mark the routes as transacted using transacted. This is always needed to instruct Camel that these routes are transacted.
If you do not provide any Spring TransactionTemplate to either the transactionErrorHandler, then Camel will automatic lookup in the Spring application context for a transaction manager to use. See more in the Convention over configuration section on this page.
And now the route:
// configure transacted error handler to use up till 4 redeliveries
// we have not passed in any spring TX manager. Camel will automatic
// find it in the spring application context. You only need to help
// Camel in case you have multiple TX managers
errorHandler(transactionErrorHandler().maximumRedeliveries(
6
));
// speical for this exception we only want to do it at most 4 times
onException(IllegalArgumentException.
class
).maximumRedeliveries(
4
);
from("direct:okay")
// marks this route as transacted, and we dont pass in any parameters so we
// will auto lookup and use the Policy defined in the spring XML file
.transacted()
.setBody(constant("Tiger in Action")).beanRef("bookService")
.setBody(constant("Elephant in Action")).beanRef("bookService");
// marks this route as transacted that will use the single policy defined in the registry
from("direct:fail")
// marks this route as transacted, and we dont pass in any parameters so we
// will auto lookup and use the Policy defined in the spring XML file
.transacted()
.setBody(constant("Tiger in Action")).beanRef("bookService")
.setBody(constant("Donkey in Action")).beanRef("bookService");
|


 1万+
1万+

 被折叠的 条评论
为什么被折叠?
被折叠的 条评论
为什么被折叠?
 到【灌水乐园】发言


