


消息机制Handler
安卓的异步消息处理机制就是handler机制。
主线程,ActivityThread被创建的时候就会创建Looper,
Looper被创建的时候创建MessageQueue。
也就是说主线程会直接或简介创建出来Looper和MessageQueue。
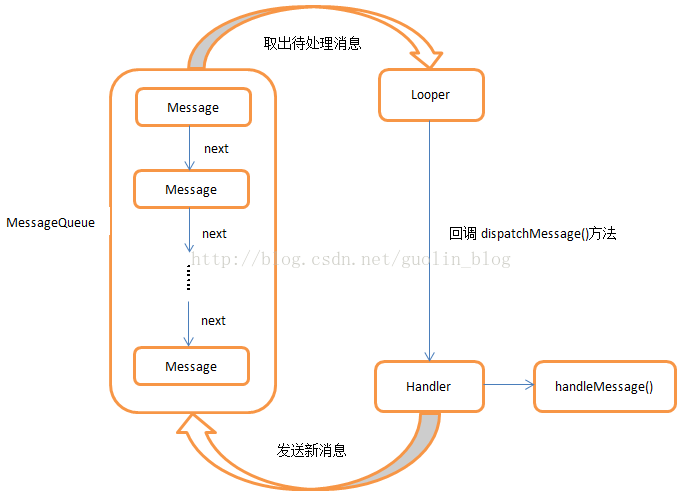
Handler的工作机制简单来说是这样的
1、Handler发送消息仅仅是调用MessageQueue的enqueueMessage向插入一条信息到MessageQueue
2、Looper不断轮询调用MeaasgaQueue的next方法
3、如果发现message就调用handler的dispatchMessage,dispatchMessage被成功调用,接着调用handlerMessage()

消息机制用到的类
Handler(发送消息)
Looper(轮询消息)
Message(消息)
MessageQueue(消息队列)
一个例子
public class MainActivity extends AppCompatActivity {
private int mCount = 0;
//子线程Handler
private Handler mThrHandler = null;
//主线程Handler
private Handler mHandler = new Handler() {
    @Override
    public void handleMessage(Message msg) {
        super.handleMessage(msg);
        mThrHandler.sendEmptyMessage(1);
        mCount++;
        if (mCount >= 3) {
            mThrHandler.getLooper().quit();
        }
    }
};
//子线程通过Handler向主线程发送消息,主线程接受到消息后再向子线程发送消息,
// 这样循环发送,直到mCount>=3,Looper.quit()
@Override
protected void onCreate(Bundle savedInstanceState) {
    super.onCreate(savedInstanceState);
    setContentView(R.layout.activity_main);
        new Thread() {
            @Override
            public void run() {
                super.run();
                Looper.prepare();
                mThrHandler = new Handler() {
                    @Override
                    public void handleMessage(Message msg) {
                        super.handleMessage(msg);
                        mHandler.sendEmptyMessage(0);
                    }
                };
                mHandler.sendEmptyMessage(0);
                Looper.loop();
            }
        }.start();
    }
}
Looper
什么是Looper
它是消息机制中轮询消息的工具类
Looper有什么用
用来轮询消息队列中的消息,原理是内部维护了一个死循环的方法,不断从消息队列中查询消息,如果有消息就会分发消息
源码分析
Looper类代码不多,只有三百多行,还是包括不少的注释。
从创建Handler代码分析,执行了handler的构造方法
public Handler() {
    this(null, false);
}
this重构了构造方法
public Handler(Callback callback, boolean async) {
    if (FIND_POTENTIAL_LEAKS) {
        final Class<? extends Handler> klass = getClass();
        if ((klass.isAnonymousClass() || klass.isMemberClass() || klass.isLocalClass()) &&
                (klass.getModifiers() & Modifier.STATIC) == 0) {
            Log.w(TAG, "The following Handler class should be static or leaks might occur: " +
                klass.getCanonicalName());
        }
    }

    mLooper = Looper.myLooper();
    if (mLooper == null) {
        throw new RuntimeException(
            "Can't create handler inside thread that has not called Looper.prepare()");
    }
    mQueue = mLooper.mQueue;
    mCallback = callback;
    mAsynchronous = async;
}
mLooper = Looper.myLooper();这句话看出,获取一个Looper对象,这里用到了Looper,从这里开始分析Looper,点进去
public static @Nullable Looper myLooper() {
    return sThreadLocal.get();
}
从sThreadLocal(每个线程内部维护了一个ThreadLocalmap集合,用来存储线程内部使用的值)里获取Looper。这里是直接从sThreadLocal获取Looper,而sThreadLocal里的Looper实例对象是哪里来的?
 private static void prepare(boolean quitAllowed) {
    if (sThreadLocal.get() != null) {
        throw new RuntimeException("Only one Looper may be created per thread");
    }
    sThreadLocal.set(new Looper(quitAllowed));
}
从Looper里发现了这段代码,但是哪里调用这段代码。查看ActivityThread源码会发现,在android的应用入口ActivityThread中main方法中
public static void main(String[] args) {
    Trace.traceBegin(Trace.TRACE_TAG_ACTIVITY_MANAGER, "ActivityThreadMain");
    SamplingProfilerIntegration.start();

    // CloseGuard defaults to true and can be quite spammy.  We
    // disable it here, but selectively enable it later (via
    // StrictMode) on debug builds, but using DropBox, not logs.
    CloseGuard.setEnabled(false);

    Environment.initForCurrentUser();

    // Set the reporter for event logging in libcore
    EventLogger.setReporter(new EventLoggingReporter());

    // Make sure TrustedCertificateStore looks in the right place for CA certificates
    final File configDir = Environment.getUserConfigDirectory(UserHandle.myUserId());
    TrustedCertificateStore.setDefaultUserDirectory(configDir);

    Process.setArgV0("<pre-initialized>");

    Looper.prepareMainLooper();

    ActivityThread thread = new ActivityThread();
    thread.attach(false);

    if (sMainThreadHandler == null) {
        sMainThreadHandler = thread.getHandler();
    }

    if (false) {
        Looper.myLooper().setMessageLogging(new
                LogPrinter(Log.DEBUG, "ActivityThread"));
    }

    // End of event ActivityThreadMain.
    Trace.traceEnd(Trace.TRACE_TAG_ACTIVITY_MANAGER);
    Looper.loop();

    throw new RuntimeException("Main thread loop unexpectedly exited");
}
发现Looper.prepareMainLooper();这句代码。跟进去Looper类中
public static void prepareMainLooper() {
    prepare(false);
    synchronized (Looper.class) {
        if (sMainLooper != null) {
            throw new IllegalStateException("The main Looper has already been prepared.");
        }
        sMainLooper = myLooper();
    }
}
方法prepareMainLooper中,prepare(false)方法会去实例化一个Looper,就又回到这里(这里有个疑问,为什么ActivityThread不直接调用prepare(false),Looper特意为ActivityThread写了一个prepareMainLooper方法)
 private static void prepare(boolean quitAllowed) {
    if (sThreadLocal.get() != null) {
        throw new RuntimeException("Only one Looper may be created per thread");
    }
    sThreadLocal.set(new Looper(quitAllowed));
}
prepareMainLooper这个方法只有ActivityThread类中调用,他是Looper特意为ActivityThread而写的方法。这就是主线程中默认已经有Looper实例的原因了,而子线程必须自己调用Looper.prepare()方法。
这里也会有个疑问为什么子线程必须自己调用Looper.prepare(),而不是prepareMainLooper()方法,他俩有什么区别。看完就明白了
注意
- 子线程中不能直接使用Handler,需要调用Looper.prepare(),之后调用Looper.loop();开始轮询消息。
- 每个线程只能有一个Looper对象
- 可以通过Looper.myLooper()获取当前线程的Looper实例,通过Looper.getMainLooper()获取主(UI)线程的Looper实例
- 一个Looper只能对应了一个MessageQueue。
- 一个线程中只有一个Looper实例,一个MessageQueue实例,可以有多个Handler实例。
MessageQueue
什么是MessageQueue
顾名思义,消息队列,他是用来存放消息的工具类
MessageQueue的作用
存放消息(消息的插入与排序)
源码分析
从Handler发送的消息,会被插入到消息队列中去,从Handler的sendEmptyMessage方法点进去,发现有三个分支
1、sendMessage
sendMessage->sendMessageDelayed->sendMessageAtTime->enqueueMessage
2、sendEmptyMessage
sendEmptyMessage->sendEmptyMessageDelayed->sendMessageDelayed->sendMessageAtTime->enqueueMessage
3、sendMessageAtFrontOfQueue
sendMessageAtFrontOfQueue->enqueueMessage
最终都是调用enqueueMessage方法,插入消息。他们的区别是:
- sendMessage发送一个msg消息
- sendEmptyMessage发送一个不带msg的消息
- sendMessageAtFrontOfQueue发送一个msg,把它置顶,也就是最先处理的是这个msg消息(messagequeue是一个以链表存储的队列)
enqueueMessage代码
private boolean enqueueMessage(MessageQueue queue, Message msg, long uptimeMillis) {
    msg.target = this;
    if (mAsynchronous) {
        msg.setAsynchronous(true);
    }
    return queue.enqueueMessage(msg, uptimeMillis);
}
msg.target = this;将当前handler对象设置给msg的target,后边用来给那个handler分发消息和处理消息。
然后queue.enqueueMessage(msg, uptimeMillis);调用消息队列的插入消息,queue这个对象在在handler构造方法里进行Looper初始化的时候在Looper类里进行创建的。下面是MessageQueue主要代码分析,enqueueMessage点进去这个方法(as里是点不进去的,只能到MessageQueue里去查找)
boolean enqueueMessage(Message msg, long when) {
    if (msg.target == null) {
        throw new IllegalArgumentException("Message must have a target.");
    }
    if (msg.isInUse()) {
        throw new IllegalStateException(msg + " This message is already in use.");
    }

    synchronized (this) {
        if (mQuitting) {
            IllegalStateException e = new IllegalStateException(
                    msg.target + " sending message to a Handler on a dead thread");
            Log.w(TAG, e.getMessage(), e);
            msg.recycle();
            return false;
        }

        msg.markInUse();
        msg.when = when;
        Message p = mMessages;
        boolean needWake;
        if (p == null || when == 0 || when < p.when) {
            // New head, wake up the event queue if blocked.
            msg.next = p;
            mMessages = msg;
            needWake = mBlocked;
        } else {
            // Inserted within the middle of the queue.  Usually we don't have to wake
            // up the event queue unless there is a barrier at the head of the queue
            // and the message is the earliest asynchronous message in the queue.
            needWake = mBlocked && p.target == null && msg.isAsynchronous();
            Message prev;
            for (;;) {
                prev = p;
                p = p.next;
                if (p == null || when < p.when) {
                    break;
                }
                if (needWake && p.isAsynchronous()) {
                    needWake = false;
                }
            }
            msg.next = p; // invariant: p == prev.next
            prev.next = msg;
        }

        // We can assume mPtr != 0 because mQuitting is false.
        if (needWake) {
            nativeWake(mPtr);
        }
    }
    return true;
}
里面是用链表进行存放、并排序的。假如这时我们的MessageQueue插入了我们发送的消息,回到Looper类里
public static void loop() {
    final Looper me = myLooper();
    if (me == null) {
        throw new RuntimeException("No Looper; Looper.prepare() wasn't called on this thread.");
    }
    final MessageQueue queue = me.mQueue;

    // Make sure the identity of this thread is that of the local process,
    // and keep track of what that identity token actually is.
    Binder.clearCallingIdentity();
    final long ident = Binder.clearCallingIdentity();

    for (;;) {
        Message msg = queue.next(); // might block
        if (msg == null) {
            // No message indicates that the message queue is quitting.
            return;
        }

        // This must be in a local variable, in case a UI event sets the logger
        final Printer logging = me.mLogging;
        if (logging != null) {
            logging.println(">>>>> Dispatching to " + msg.target + " " +
                    msg.callback + ": " + msg.what);
        }

        final long traceTag = me.mTraceTag;
        if (traceTag != 0 && Trace.isTagEnabled(traceTag)) {
            Trace.traceBegin(traceTag, msg.target.getTraceName(msg));
        }
        try {
            msg.target.dispatchMessage(msg);
        } finally {
            if (traceTag != 0) {
                Trace.traceEnd(traceTag);
            }
        }

        if (logging != null) {
            logging.println("<<<<< Finished to " + msg.target + " " + msg.callback);
        }

        // Make sure that during the course of dispatching the
        // identity of the thread wasn't corrupted.
        final long newIdent = Binder.clearCallingIdentity();
        if (ident != newIdent) {
            Log.wtf(TAG, "Thread identity changed from 0x"
                    + Long.toHexString(ident) + " to 0x"
                    + Long.toHexString(newIdent) + " while dispatching to "
                    + msg.target.getClass().getName() + " "
                    + msg.callback + " what=" + msg.what);
        }

        msg.recycleUnchecked();
    }
}
这里可以看到一个for的死循环, Message msg = queue.next();从消息队列里获取next()方法里的消息, msg.target.dispatchMessage(msg);在用在handler里设置的那个 msg.target对象,进行消息分发。
到这里,我们的handler自己就开始处理消息了
 public void dispatchMessage(Message msg) {
    if (msg.callback != null) {
        handleCallback(msg);
    } else {
        if (mCallback != null) {
            if (mCallback.handleMessage(msg)) {
                return;
            }
        }
        handleMessage(msg);
    }
}
看到了我们熟悉的 handleMessage(msg);方法。此时整个消息处理机制流程已经走完了。
还有一点是子线程可以停止消息的循环mQuitAllowed这就是为是什么ActivityThread中需要调用prepareMainLooper方法,子线程调用 Looper.prepare();源码中他的参数是ture,而prepareMainLooper方法中的参数false.
public static void prepare() {
    prepare(true);
}
Looper类中:
public void quit() {
    mQueue.quit(false);
}
MessageQueue类中:
void quit(boolean safe) {
    if (!mQuitAllowed) {
        throw new IllegalStateException("Main thread not allowed to quit.");
    }

    synchronized (this) {
        if (mQuitting) {
            return;
        }
        mQuitting = true;

        if (safe) {
            removeAllFutureMessagesLocked();
        } else {
            removeAllMessagesLocked();
        }

        // We can assume mPtr != 0 because mQuitting was previously false.
        nativeWake(mPtr);
    }
}
总结:子线程可以可以退出消息循环,主线程不可以。
参考
http://blog.csdn.net/yanbober/article/details/45936145http://blog.csdn.net/yanbober/article/details/45936145
IntentService
IntentService是什么
IntentService是继承并处理异步请求的一个类,在IntentServi内有一个工作线程来处理耗时操作,启动IntentService的方式和启动传统的Service一样,同时,当任务执行完后,IntentService会自动停止,而不需要我们手动去控制或stopSelf().另外,可以启动IntentService多次,而每一个耗时操作会以工作队列的方式在IntentService的onHandlerIntent回调方法中执行,并且,每次只会执行一个工作线程,执行完第一个再执行第二个,串行操作。
- 它本质是一种特殊的Service,继承自Service并且本身就是一个抽象类
- 它内部通过HandlerThread和Handler实现异步操作
IntentService使用方法
         //intentservice初始化
        InitializeService.start(this);


        public class InitializeService extends IntentService {
        private static final String ACTION_INIT_WHEN_APP_CREATE = "com.xingyuyou.xingyuyou.service.action.INIT";
        private static Context mContext;

        public InitializeService() {
            super("InitializeService");
        }

        public static void start(Context context) {
            mContext=context;
            Intent intent = new Intent(context, InitializeService.class);
            intent.setAction(ACTION_INIT_WHEN_APP_CREATE);
            context.startService(intent);
        }


        @Override
        protected void onHandleIntent(Intent intent) {
            if (intent != null) {
                final String action = intent.getAction();
                if (ACTION_INIT_WHEN_APP_CREATE.equals(action)) {
                    performInit();
                }
            }
        }

        private void performInit() {
            //空布局初始化
            initLoadView();
            //下载初始化
            x.Ext.init(getApplication());
            //工具类初始化
            Utils.init(mContext);
            //网络初始化
            initOkhttp();
            //友盟分享
            youmeng();
        }


        private void youmeng() {
            UMShareAPI.get(mContext);
            PlatformConfig.setWeixin("wxd1ba8471fb789ac4","9e449358803ed70d0cd995ca3d3d9149");
            PlatformConfig.setQQZone("1106012303","hgqXkjzu7Mq1USGL");
            PlatformConfig.setSinaWeibo("3073251384","8304b645771ea95644c209ed5e6b9558","http://www.xingyuyou.com");
        }

        /**
         * 配置网络请求
         */
        private void initOkhttp() {
            OkHttpClient okHttpClient = new OkHttpClient.Builder()
    //                .addInterceptor(new LoggerInterceptor("TAG"))
                    .connectTimeout(90000L, TimeUnit.MILLISECONDS)
                    .readTimeout(90000L, TimeUnit.MILLISECONDS)
                    //其他配置
                    .build();
            OkHttpUtils.initClient(okHttpClient);
        }
        private void initLoadView() {
            LoadingLayout.getConfig()
                    .setErrorText("出错啦~请稍后重试!")
                    .setEmptyText("抱歉,暂无数据")
                    .setNoNetworkText("无网络连接,请检查您的网络···")
                    .setErrorImage(R.mipmap.error)
                    .setEmptyImage(R.mipmap.empty)
                    .setNoNetworkImage(R.mipmap.no_network)
                    .setAllTipTextColor(R.color.colorAccent)
                    .setAllTipTextSize(14)
                    .setReloadButtonText("点我重试哦")
                    .setReloadButtonTextSize(14)
                    .setReloadButtonTextColor(R.color.colorAccent)
                    .setReloadButtonWidthAndHeight(150,40);
        }

    }
IntentService源码解析
- IntentService与Service区别就是它能内部有个方法能异步执行,进行耗时操作
- IntentService原理,内部就是对HandlerThread和Handler的封装
它的 stopSelf(msg.arg1);保证了最后一个消息执行完毕,才会销毁service。不用手动取消service。
public abstract class IntentService extends Service {
    private volatile Looper mServiceLooper;
    private volatile ServiceHandler mServiceHandler;
    private String mName;
    private boolean mRedelivery;

    private final class ServiceHandler extends Handler {
        public ServiceHandler(Looper looper) {
            super(looper);
        }

        @Override
        public void handleMessage(Message msg) {
            onHandleIntent((Intent)msg.obj);
            stopSelf(msg.arg1);
        }
    }

    /**
     * Creates an IntentService.  Invoked by your subclass's constructor.
     *
     * @param name Used to name the worker thread, important only for debugging.
     */
    public IntentService(String name) {
        super();
        mName = name;
    }

    /**
     * Sets intent redelivery preferences.  Usually called from the constructor
     * with your preferred semantics.
     *
     * <p>If enabled is true,
     * {@link #onStartCommand(Intent, int, int)} will return
     * {@link Service#START_REDELIVER_INTENT}, so if this process dies before
     * {@link #onHandleIntent(Intent)} returns, the process will be restarted
     * and the intent redelivered.  If multiple Intents have been sent, only
     * the most recent one is guaranteed to be redelivered.
     *
     * <p>If enabled is false (the default),
     * {@link #onStartCommand(Intent, int, int)} will return
     * {@link Service#START_NOT_STICKY}, and if the process dies, the Intent
     * dies along with it.
     */
    public void setIntentRedelivery(boolean enabled) {
        mRedelivery = enabled;
    }

    @Override
    public void onCreate() {
        // TODO: It would be nice to have an option to hold a partial wakelock
        // during processing, and to have a static startService(Context, Intent)
        // method that would launch the service & hand off a wakelock.

        super.onCreate();
        HandlerThread thread = new HandlerThread("IntentService[" + mName + "]");
        thread.start();

        mServiceLooper = thread.getLooper();
        mServiceHandler = new ServiceHandler(mServiceLooper);
    }

    @Override
    public void onStart(@Nullable Intent intent, int startId) {
        Message msg = mServiceHandler.obtainMessage();
        msg.arg1 = startId;
        msg.obj = intent;
        mServiceHandler.sendMessage(msg);
    }

    /**
     * You should not override this method for your IntentService. Instead,
     * override {@link #onHandleIntent}, which the system calls when the IntentService
     * receives a start request.
     * @see android.app.Service#onStartCommand
     */
    @Override
    public int onStartCommand(@Nullable Intent intent, int flags, int startId) {
        onStart(intent, startId);
        return mRedelivery ? START_REDELIVER_INTENT : START_NOT_STICKY;
    }

    @Override
    public void onDestroy() {
        mServiceLooper.quit();
    }

    /**
     * Unless you provide binding for your service, you don't need to implement this
     * method, because the default implementation returns null.
     * @see android.app.Service#onBind
     */
    @Override
    @Nullable
    public IBinder onBind(Intent intent) {
        return null;
    }

    /**
     * This method is invoked on the worker thread with a request to process.
     * Only one Intent is processed at a time, but the processing happens on a
     * worker thread that runs independently from other application logic.
     * So, if this code takes a long time, it will hold up other requests to
     * the same IntentService, but it will not hold up anything else.
     * When all requests have been handled, the IntentService stops itself,
     * so you should not call {@link #stopSelf}.
     *
     * @param intent The value passed to {@link
     *               android.content.Context#startService(Intent)}.
     *               This may be null if the service is being restarted after
     *               its process has gone away; see
     *               {@link android.app.Service#onStartCommand}
     *               for details.
     */
    @WorkerThread
    protected abstract void onHandleIntent(@Nullable Intent intent);
}
handlerThread
handlerThread是什么
handler+thread+looper(thread内部有looper)
一般情况下,我们会经常用Handler在子线程中更新UI线程,那是因为在主线程中有Looper循环,而HandlerThread新建拥有Looper的子线程又有什么用呢?
必然是执行耗时操作。举个例子,数据实时更新,我们每10秒需要切换一下显示的数据,如果我们将这种长时间的反复调用操作放到UI线程中,虽说可以执行,但是这样的操作多了之后,很容易会让UI线程卡顿甚至崩溃。
于是,就必须在子线程中调用这些了。
HandlerThread继承自Thread,一般适应的场景,便是集Thread和Handler之所长,适用于会长时间在后台运行,并且间隔时间内(或适当情况下)会调用的情况,比如上面所说的实时更新。
handlerThread产生背景
开启Thread子线程进行耗时操作,多次创建和销毁线程是很耗费系统资源的
特点
- HandlerThread本质上是一个线程类,它继承了Thread
- HandlerThread有自己的内部Looper对象,可以进行looper循环
- 通过获取HandlerThread的looper对象传递给Handler对象,可以在handleMessa方法中执行异步任务
- 优点是不会有堵塞,减少了对性能的消耗,缺点是不能同时进行多任务的处理,需要等待进行处理。处理效率较低。
- 与线程池注重迸发不同,HandlerThread是一个串行队列,HandlerThread背后只有一个线程。
使用
        public class MainActivity extends AppCompatActivity {

        private TextView tvMain;

        private HandlerThread mHandlerThread;
        //子线程中的handler
        private Handler mThreadHandler;
        //UI线程中的handler
        private Handler mMainHandler = new Handler();

        //以防退出界面后Handler还在执行
        private boolean isUpdateInfo;
        //用以表示该handler的常熟
        private static final int MSG_UPDATE_INFO = 0x110;

        @Override
        protected void onCreate(Bundle savedInstanceState)
        {
            super.onCreate(savedInstanceState);
            setContentView(R.layout.activity_main);

            tvMain = (TextView) findViewById(R.id.tv_main);

            initThread();
        }


        private void initThread()
        {
            mHandlerThread = new HandlerThread("check-message-coming");
            mHandlerThread.start();

            mThreadHandler = new Handler(mHandlerThread.getLooper())
            {
                @Override
                public void handleMessage(Message msg)
                {
                    update();//模拟数据更新

                    if (isUpdateInfo)
                        mThreadHandler.sendEmptyMessage(MSG_UPDATE_INFO);
                }
            };

        }

        private void update()
        {
            try
            {
                //模拟耗时
                Thread.sleep(2000);
                mMainHandler.post(new Runnable()
                {
                    @Override
                    public void run()
                    {
                        String result = "每隔2秒更新一下数据:";
                        result += Math.random();
                        tvMain.setText(result);
                    }
                });

            } catch (InterruptedException e)
            {
                e.printStackTrace();
            }

        }

        @Override
        protected void onResume()
        {
            super.onResume();
            //开始查询
            isUpdateInfo = true;
            mThreadHandler.sendEmptyMessage(MSG_UPDATE_INFO);
        }

        @Override
        protected void onPause()
        {
            super.onPause();
            //停止查询
            //以防退出界面后Handler还在执行
            isUpdateInfo = false;
            mThreadHandler.removeMessages(MSG_UPDATE_INFO);
        }

        @Override
        protected void onDestroy()
        {
            super.onDestroy();
            //释放资源
            mHandlerThread.quit();
        }
    }
handlerThread源码解析
首先我们可以看到HandlerThread继承自Thread,因此在run()中的逻辑都是在子线程中运行的。
接下来就是两个关键的方法,run()和getLooper():
run()中可以看到是很简单的创建Looper以及让Looper工作的逻辑。
run()里面当mLooper创建完成后有个notifyAll(),getLooper()中有个wait(),这有什么用呢?因为的mLooper在一个线程中执行创建,而我们的handler是在UI线程中调用getLooper()初始化的。
也就是说,我们必须等到mLooper创建完成,才能正确的返回。getLooper();wait(),notify()就是为了解决这两个线程的同步问题。
        public class HandlerThread extends Thread {
        int mPriority;
        int mTid = -1;
        Looper mLooper;

        public HandlerThread(String name) {
            super(name);
            mPriority = Process.THREAD_PRIORITY_DEFAULT;
        }


        public HandlerThread(String name, int priority) {
            super(name);
            mPriority = priority;
        }


        protected void onLooperPrepared() {
        }

        @Override
        public void run() {
            mTid = Process.myTid();
            Looper.prepare();
            synchronized (this) {
                mLooper = Looper.myLooper();
                notifyAll();
            }
            Process.setThreadPriority(mPriority);
            onLooperPrepared();
            Looper.loop();
            mTid = -1;
        }


        public Looper getLooper() {
            if (!isAlive()) {
                return null;
            }

            // If the thread has been started, wait until the looper has been created.
            synchronized (this) {
                while (isAlive() && mLooper == null) {
                    try {
                        wait();
                    } catch (InterruptedException e) {
                    }
                }
            }
            return mLooper;
        }


        public boolean quit() {
            Looper looper = getLooper();
            if (looper != null) {
                looper.quit();
                return true;
            }
            return false;
        }


        public boolean quitSafely() {
            Looper looper = getLooper();
            if (looper != null) {
                looper.quitSafely();
                return true;
            }
            return false;
        }


        public int getThreadId() {
            return mTid;
        }
    }
AsyncTask
什么是Asynctask
它本质上就是一个封装了线程池和handler的异步框架(主要用来执行异步任务的,他可以方便的从UI线程和子线程来回切换)
AsyncTask的使用方法
    //AsyncTask
    mTextView = (TextView) findViewById(R.id.textView);
    mProgressBar = (ProgressBar) findViewById(R.id.progressBar);
    Button buttonbutton2 = (Button) findViewById(R.id.button2);
    buttonbutton2.setOnClickListener(new View.OnClickListener() {
        @Override
        public void onClick(View view) {
            if (mIsStop) {
                mTestAsyncTask = new TestAsyncTask(mProgressBar, mTextView);
                mTestAsyncTask.execute("4444");
                mIsStop =false;
            } else {
                mTestAsyncTask.cancel(true);
                mIsStop=true;
            }
        }
    });


public class TestAsyncTask extends AsyncTask<String, Integer, String> {
    private ProgressBar mProgressBar;
    private TextView mTextView;
    private String TAG = "TestAsyncTask";

    public TestAsyncTask(ProgressBar mProgressBar, TextView mTextView) {
        this.mProgressBar = mProgressBar;
        this.mTextView = mTextView;
    }

    @Override
    protected void onPreExecute() {
        mTextView.setText("开始执行");
        Log.e(TAG, "onPreExecute: " + Thread.currentThread().getName());
        super.onPreExecute();
    }

    @Override
    protected String doInBackground(String... params) {
        for (int i = 0; i <= 100; i++) {
            if (isCancelled()) {
                publishProgress(i);//此行代码对应下面onProgressUpdate方法
                break;
            }
            try {
                Log.e(TAG, "doInBackground: " + i + Thread.currentThread().getName());
                Thread.sleep(100);//耗时操作,如网络请求
            } catch (Exception e) {
                e.printStackTrace();
            }
        }
        return "执行完毕";
    }

    @Override
    protected void onProgressUpdate(Integer... values) {
        mProgressBar.setProgress(values[0]);
        super.onProgressUpdate(values);
    }

    @Override
    protected void onPostExecute(String s) {
        mTextView.setText(s);
        super.onPostExecute(s);
    }

}
三个参数
三种泛型类型分别代表“启动任务执行的输入参数”、“后台任务执行的进度”、“后台计算结果的类型”。在特定场合下,并不是所有类型都被使用,如果没有被使用,可以用java.lang.Void类型代替。
public abstract class AsyncTask<Params, Progress, Result>
五个方法
一个异步任务的执行一般包括以下几个步骤:
1.execute(Params… params),执行一个异步任务,需要我们在代码中调用此方法,触发异步任务的执行。
2.onPreExecute(),在execute(Params… params)被调用后立即执行,一般用来在执行后台任务前对UI做一些标记。
3.doInBackground(Params… params),在onPreExecute()完成后立即执行,用于执行较为费时的操作,此方法将接收输入参数和返回计算结果。在执行过程中可以调用publishProgress(Progress… values)来更新进度信息。
4.onProgressUpdate(Progress… values),在调用publishProgress(Progress… values)时,此方法被执行,直接将进度信息更新到UI组件上。
5.onPostExecute(Result result),当后台操作结束时,此方法将会被调用,计算结果将做为参数传递到此方法中,直接将结果显示到UI组件上。
AsyncTask内部原理
- AsyncTask的本质是一个静态的线程池,AsyncTask派生出的子类可以实现不同的异步任务,这些任务都是提交到静态的线程池中执行。
- 线程池中的工作线程执行doinBackground(mParams)方法执行异步任务
- 当任务状态改变之后,工作线程会向UI线程发送消息,AsyncTask内部的Internalhandler响应这些消息,并调用相关的回调函数
AsyncTask的注意事项
1.异步任务的实例必须在UI线程中创建。
2.execute(Params… params)方法必须在UI线程中调用。
3.不要手动调用onPreExecute(),doInBackground(Params… params),onProgressUpdate(Progress… values),onPostExecute(Result result)这几个方法。
4.不能在doInBackground(Params… params)中更改UI组件的信息。
5.一个任务实例只能执行一次,如果执行第二次将会抛出异常。
内存泄露:
和handler一样


 1071
1071

 被折叠的 条评论
为什么被折叠?
被折叠的 条评论
为什么被折叠?
 到【灌水乐园】发言


