


前言
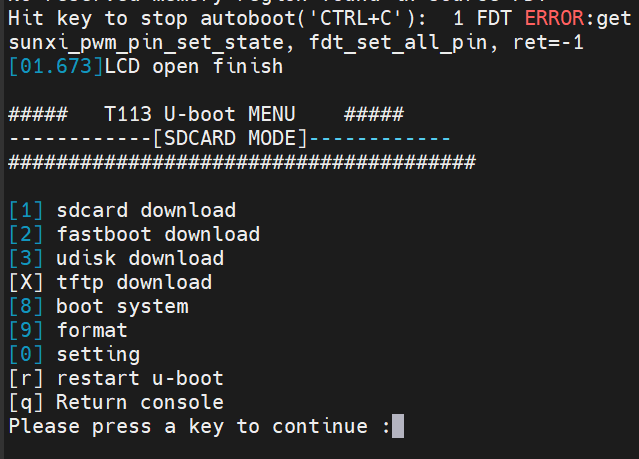
在某个厂家的开发板中,在进入它的U-Boot后,会自动弹出一个菜单页面,输入对应的选项就会执行对应的功能。如SD卡镜像更新、显示设置等:
目标
本文主要分析U-Boot在程序中的执行顺序,又如何在U-Boot阶段调起菜单?相信大家都试过,在U-Boot倒数结束前按任意按键后,会进入U-Boot命令行模式。
这里先留一个问题:如何做到按键按下后,调启的是自己的U-Boot菜单,而不再是进入冷冰冰的命令行模式?
环境背景
本文介绍所用的U-Boot版本:2018
U-Boot如何自动调起菜单
U-Boot的入口程序文件是<u-boot>/common/main.c,入口函数main_loop():
/* We come here after U-Boot is initialised and ready to process commands */
/* 在U-Boot初始化并准备好处理命令之后,我们来到这里。 */
void main_loop(void)
{
    const char *s;

    bootstage_mark_name(BOOTSTAGE_ID_MAIN_LOOP, "main_loop");

    #ifdef CONFIG_VERSION_VARIABLE
    env_set("ver", version_string);  /* set version variable */
    #endif /* CONFIG_VERSION_VARIABLE */

    cli_init();							//命令初始化有关,初始化 hush shell 相关的变量

    run_preboot_environment_command();	//获取环境变量 perboot 的内容

    #if defined(CONFIG_UPDATE_TFTP)
    update_tftp(0UL, NULL, NULL);
    #endif /* CONFIG_UPDATE_TFTP */

    s = bootdelay_process();	//此函数会读取环境变量 bootdelay 和 bootcmd 的内容
    if (cli_process_fdt(&s))
        cli_secure_boot_cmd(s);

    autoboot_command(s);		//开启倒计时,并在倒计时结束前检测是否有按键按下

    cli_loop();					//命令行处理函数(即进入U-Boot命令行)
    panic("No CLI available");
}
关键函数是autoboot_command(),该函数的实现在<u-boot>/common/autoboot.c:
void autoboot_command(const char *s)
{
    debug("### main_loop: bootcmd=\"%s\"\n", s ? s : "<UNDEFINED>");

    if (stored_bootdelay != -1 && s && !abortboot(stored_bootdelay)) {	// 倒计时过程中,没有按键按下
#if defined(CONFIG_AUTOBOOT_KEYED) && !defined(CONFIG_AUTOBOOT_KEYED_CTRLC)
    int prev = disable_ctrlc(1);    /* disable Control C checking */
#endif

    run_command_list(s, -1, 0);		// 倒计时结束后,启动内核

#if defined(CONFIG_AUTOBOOT_KEYED) && !defined(CONFIG_AUTOBOOT_KEYED_CTRLC)
    disable_ctrlc(prev);    /* restore Control C checking */
#endif
    }

#ifdef CONFIG_MENUKEY
    if (menukey == CONFIG_MENUKEY) {
        s = env_get("menucmd");
        if (s)
            run_command_list(s, -1, 0);
    }
#endif /* CONFIG_MENUKEY */
}
进入autoboot_command()后,先看第一个if:
void autoboot_command(const char *s)
{
    ...

    if (stored_bootdelay != -1 && s && !abortboot(stored_bootdelay))

    ...
}
这里有三个条件:
stored_bootdelay != -1:stored_bootdelay是倒数的总时间,就是常见的3秒、5秒不等;s:传进来的参数s不能为空;!abortboot(stored_bootdelay):该函数会从stored_bootdelay开始倒计时,期间判断是否有按键按下。函数实现如下,倒计时过程中若检测到按键按下,则令abort=1。无按键按下,则abort=0。最后返回abort。
static int __abortboot(int bootdelay)
{
        int abort = 0;
        unsigned long ts;

#ifdef CONFIG_MENUPROMPT
        printf(CONFIG_MENUPROMPT);
#else
        printf("Hit any key to stop autoboot: %2d ", bootdelay);
#endif

        /*
         * Check if key already pressed
         */
        if (tstc()) {   /* we got a key press   */
                (void) getc();  /* consume input        */
                puts("\b\b\b 0");
                abort = 1;      /* don't auto boot      */
        }

        while ((bootdelay > 0) && (!abort)) {
                --bootdelay;
                /* delay 1000 ms */
                ts = get_timer(0);
                do {
                        if (tstc()) {   /* we got a key press   */
                                abort  = 1;     /* don't auto boot      */
                                bootdelay = 0;  /* no more delay        */
# ifdef CONFIG_MENUKEY
                                menukey = getc();
# else
                                (void) getc();  /* consume input        */
# endif
                                break;
                        }
                        udelay(10000);
                } while (!abort && get_timer(ts) < 1000);

                printf("\b\b\b%2d ", bootdelay);
        }

        putc('\n');

        return abort;
}
刚刚说了,abortboot()函数执行期间有按键按下的话,abortboot()会返回1,那就不会进入第一个if,程序会接着往下运行直至该函数运行结束。autoboot_command()结束后继续返回到main_loop(),随后立刻执行cli_loop(),进入我们所熟悉的U-Boot命令行模式。
void main_loop(void)
{
    ...

    autoboot_command(s);		//检查倒计时是否结束

    cli_loop();					//命令行处理函数
}

至此,就实现了U-Boot倒数期间,有按键按下,则进入U-Boot的命令行模式。
现在继续回到第一个if:
void autoboot_command(const char *s)
{
    ...

    if (stored_bootdelay != -1 && s && !abortboot(stored_bootdelay)) {	// 倒计时过程中,没有按键按下
#if defined(CONFIG_AUTOBOOT_KEYED) && !defined(CONFIG_AUTOBOOT_KEYED_CTRLC)
    int prev = disable_ctrlc(1);    /* disable Control C checking */
#endif

    run_command_list(s, -1, 0);		// 倒计时结束后,启动内核

#if defined(CONFIG_AUTOBOOT_KEYED) && !defined(CONFIG_AUTOBOOT_KEYED_CTRLC)
    disable_ctrlc(prev);    /* restore Control C checking */
#endif
    }

    ...
}
如果在autoboot倒计时结束前,一直没有按键按下呢?那abortboot()最后会返回0,第一个if的三个条件全部满足。进入if,run_command_list()执行一系列命令后,启动内核。注意,这里的现象是直接启动内核,run_command_list()后的程序不再执行。
解析到这里,我们得出一个结论:在autoboot倒计时中,如果有按键按下的话,会进入U-Boot的命令行模式。无按键按下则在倒计时结束后直接启动内核。
那现在可以回答第一个问题,如何做到按下按键后,是自启动U-Boot菜单,而不是进入U-Boot命令行呢?答案是在执行cli_loop()之前,我们可以在autoboot检测到按键按下后,调用run_command()函数执行menu命令,从而调起菜单。
void autoboot_command(const char *s)
{
    debug("### main_loop: bootcmd=\"%s\"\n", s ? s : "<UNDEFINED>");

    if (stored_bootdelay != -1 && s && !abortboot(stored_bootdelay)) {
#if defined(CONFIG_AUTOBOOT_KEYED) && !defined(CONFIG_AUTOBOOT_KEYED_CTRLC)
    int prev = disable_ctrlc(1);    /* disable Control C checking */
#endif

    run_command_list(s, -1, 0);

#if defined(CONFIG_AUTOBOOT_KEYED) && !defined(CONFIG_AUTOBOOT_KEYED_CTRLC)
    disable_ctrlc(prev);    /* restore Control C checking */
#endif
    }

    //启动菜单
    run_command("menu", 0);

#ifdef CONFIG_MENUKEY
    if (menukey == CONFIG_MENUKEY) {
        s = env_get("menucmd");
        if (s)
            run_command_list(s, -1, 0);
    }
#endif /* CONFIG_MENUKEY */
}
U-Boot添加自定义命令
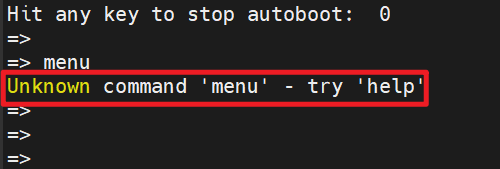
难道通过run_command()执行menu命令后,菜单就自己出来了?这是一个理所当然的猜想。实际上U-Boot根本不认识menu命令:
接下来看看如何添加U-Boot命令,参考一下别人的代码:
int do_brightness(cmd_tbl_t *cmdtp, int flag, int argc, char * const argv[])
{
	int rcode = 0;
	ulong side;
	ulong bright;

	switch (argc) {
	case 3:
		side = simple_strtoul(argv[1], NULL, 10);
		bright = simple_strtoul(argv[2], NULL, 10);
		if ((side >= 0) && (side <= 3) &&
			(bright >= 0) && (bright <= 1000)) {
			vcxk_setbrightness(side, bright);
			rcode = 0;
		} else {
			printf("parameters out of range\n");
			printf("Usage:\n%s\n", cmdtp->usage);
			rcode = 1;
		}
		break;
	default:
		printf("Usage:\n%s\n", cmdtp->usage);
		rcode = 1;
		break;
	}
	return rcode;
}

U_BOOT_CMD(
	bright,	3,	0,	do_brightness,
	"sets the display brightness\n",
	" <side> <0..1000>\n        side: 0/3=both; 1=first; 2=second\n"
);
先看最底下的U_BOOT_CMD,这是一个宏,用来添加U-Boot命令:
#define U_BOOT_CMD(_name, _maxargs, _rep, _cmd, _usage, _help)		\
	U_BOOT_CMD_COMPLETE(_name, _maxargs, _rep, _cmd, _usage, _help, NULL)
- _name:命令的名字
- _maxargs:添加的命令最多有几个参数
- _rep:是否重复(1重复,0不重复),指在U-Boot命令行按下Enter键的时候,重复执行上次的命令
- _cmd:执行函数(即执行该命令后,运行哪个函数)
- _usage:短帮助信息
- _help:长帮助信息
再来看看执行函数do_brightness的声名:
int (*cmd)(struct cmd_tbl_s *cmdtp, int flag, int argc, char *const argv[]);
- cmdtp:Table entry describing the command (see above).
- flag:A bitmap which may contain the following bit
- CMD_FLAG_REPEAT - The last command is repeated.
- CMD_FLAG_BOOTD - The command is called by the bootd command.
- CMD_FLAG_ENV - The command is called by the run command.
- argc:执行命令时,传入的参数数量
- argv:传入的参数
实践
下面,添加一个U-Boot菜单,不过只作打印,没有实际功能。
在<u-boot>/drivers下创建一个名为mymenu的文件夹:

在mymenu文件夹下创建mymenu.c,内容如下:
#include <common.h>
#include <command.h>
#include <linux/ctype.h>
#include <cli.h>
#include <fs.h>

static int do_mymenu(struct cmd_tbl_s *cmdtp, int flag, int argc, char *const argv[])
{
    if(argc != 2)
        return 0;

    if(!strcmp(argv[1], "pageone"))
        printf("\n======== pageone ========\n");
    else if(!strcmp(argv[1], "pagetwo"))
        printf("\n======== pagetwo ========\n");
    else
        printf("\n======== pageone ========\n");

    printf("== [1] xxxxxx\n");
    printf("== [2] xxxxxx\n");
    printf("== [3] xxxxxx\n");
    printf("== [4] xxxxxx\n");
    printf("=========================\n\n");

    return 0;
}

U_BOOT_CMD(
	mymenu,	2,	1, do_mymenu,
	"here is uboot mymenu\n",
	"here is uboot mymenu, make in 2024-05-15\n"
);
还需在mymenu文件夹下创建一个Makefile文件,内容如下:
obj-y += mymenu.o
最后修改<u-boot>/drivers/下的Makefile,在结尾加上如下内容,表示要编译mymenu路径下的文件:

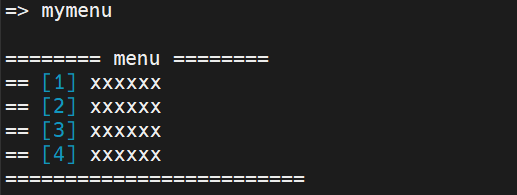
编译U-Boot,更新U-Boot,重启单板,在U-Boot倒计时结束前,按任意按键进入U-Boot命令行,输入mymenu后,可以看到命令被正确识别,对应的函数也执行成功:
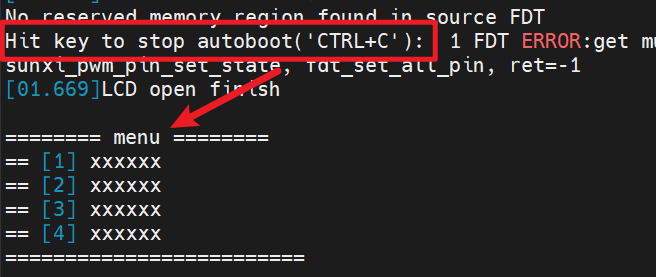
那如何做到按任意按键后直接调起菜单呢?上面有说过,可以在autoboot检测到按键按下后,调用run_command()函数执行mymenu命令,从而调起菜单。
void autoboot_command(const char *s)
{
    debug("### main_loop: bootcmd=\"%s\"\n", s ? s : "<UNDEFINED>");

    if (stored_bootdelay != -1 && s && !abortboot(stored_bootdelay)) {
#if defined(CONFIG_AUTOBOOT_KEYED) && !defined(CONFIG_AUTOBOOT_KEYED_CTRLC)
    int prev = disable_ctrlc(1);    /* disable Control C checking */
#endif

    run_command_list(s, -1, 0);

#if defined(CONFIG_AUTOBOOT_KEYED) && !defined(CONFIG_AUTOBOOT_KEYED_CTRLC)
    disable_ctrlc(prev);    /* restore Control C checking */
#endif
    }

    //启动菜单
    run_command("mymenu", 0);

#ifdef CONFIG_MENUKEY
    if (menukey == CONFIG_MENUKEY) {
        s = env_get("menucmd");
        if (s)
            run_command_list(s, -1, 0);
    }
#endif /* CONFIG_MENUKEY */
}
剩下的菜单程序编写就是根据实际功能来开发了。


 536
536

 被折叠的 条评论
为什么被折叠?
被折叠的 条评论
为什么被折叠?
 到【灌水乐园】发言


