


一、官方提供的spring-initializer来构建一个springboot的web项目
上文说道我们如何构建一个maven的web项目添加springboot依赖,即一个springboot的web项目,现在我们可以用第二种方式,官方提供的spring initializer来构建一个springboot的web项目:
1.浏览器中打开网页http://start.spring.io/
2.选择并填写相关信息,在依赖中选择web,截图如下:
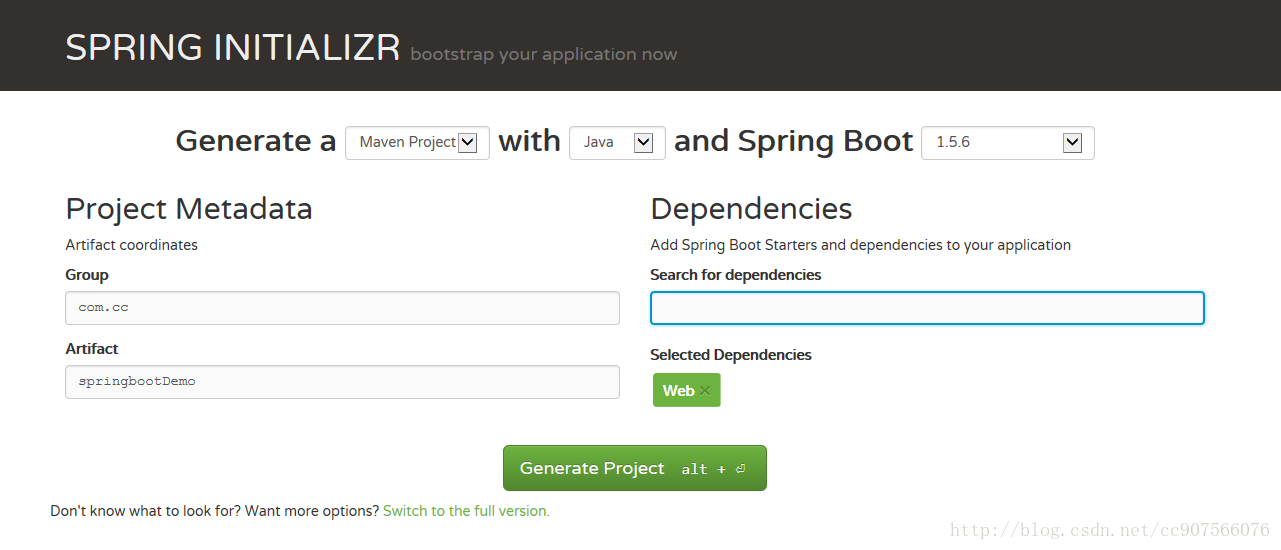
3.单击“Generate Project”下载项目压缩包
4.解压压缩包,用构建工具maven项目导入,即可
(1)目录结构
现在我们手里应该有了一个springboot的web项目:
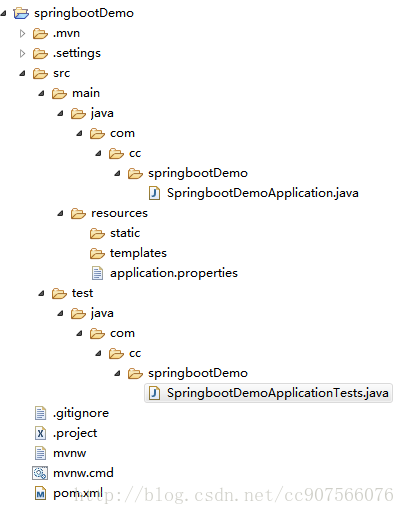
Src/main/java:主程序入口HelloApplication,可以通过直接运行类来启动springboot应用
Src/main/resources:配置目录,该目录用来存放应用的一些配置信息,比如应用名,服务端口,数据库连接等。由于我们引用了web模块,因此产生了static目录与templates目录,前者用于存放静态资源,如图片,css,javascript等;后者用于存放web页面的模板文件,主要演示提供RESTful API,所以这两个目录并不会用到。
Src/test/:单元测试目录,通过JUNIT4实现,可以直接运行springboot应用的测试。
(2)Pom.xml文件:
<?xml version="1.0" encoding="UTF-8"?>
<project xmlns="http://maven.apache.org/POM/4.0.0" xmlns:xsi="http://www.w3.org/2001/XMLSchema-instance"
    xsi:schemaLocation="http://maven.apache.org/POM/4.0.0 http://maven.apache.org/xsd/maven-4.0.0.xsd">
    <modelVersion>4.0.0</modelVersion>

    <groupId>com.cc</groupId>
    <artifactId>springbootDemo</artifactId>
    <version>0.0.1-SNAPSHOT</version>
    <packaging>jar</packaging>

    <name>springbootDemo</name>
    <description>Demo project for Spring Boot</description>

    <parent>
        <groupId>org.springframework.boot</groupId>
        <artifactId>spring-boot-starter-parent</artifactId>
        <version>1.5.6.RELEASE</version>
        <relativePath/> <!-- lookup parent from repository -->
    </parent>

    <properties>
        <project.build.sourceEncoding>UTF-8</project.build.sourceEncoding>
        <project.reporting.outputEncoding>UTF-8</project.reporting.outputEncoding>
        <java.version>1.8</java.version>
    </properties>

    <dependencies>
        <dependency>
            <groupId>org.springframework.boot</groupId>
            <artifactId>spring-boot-starter-web</artifactId>
        </dependency>

        <dependency>
            <groupId>org.springframework.boot</groupId>
            <artifactId>spring-boot-starter-test</artifactId>
            <scope>test</scope>
        </dependency>
    </dependencies>

    <build>
        <plugins>
            <plugin>
                <groupId>org.springframework.boot</groupId>
                <artifactId>spring-boot-maven-plugin</artifactId>
            </plugin>
        </plugins>
    </build>


</project>
说明:
1.打包方式默认为jar,因为springboot的默认web模块会包含嵌入Tomcat,使我们jar本身就包含web服务能力
2.spring-boot-starter-parent定义该springboot版本的基础父集依赖以及一些默认配置内容,比如application.properties的配置位置等。
3.项目依赖dependencies中包含:
spring-boot-starter-web:全栈web开发模式,包含嵌入式Tomcat,springMVC
spring-boot-starter-test:通用测试模块,包含JUNIT,Hamcrest,Mokito
Ps:如果想让项目添加些别的功能,可以在此处添加spring-boot-starter-(为具体功能)即可,不需要再大量配置xml依赖,使整合变得轻便
4.项目构建build部分:
引入了springboot的Maven插件,此插件帮助我们方便的启停应用,这样开发时就不需要我们找主类或是jar包来运行,只需要通过mvn springboot:run命令就可以快速的启动spring boot应用
二、实现RESTfull API:
在springboot中创建一个RESTful API的实现代码同spring MVC应用一样,只是不需要像spring MVC那样先做很多配置,而是像下面这样直接开始编写Controller内容。
新建HelloController类:
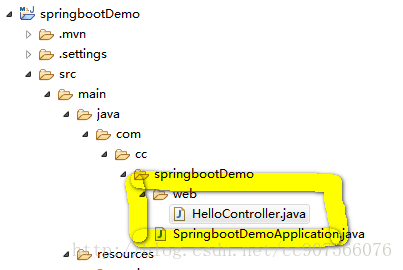
package com.cc.springbootDemo.web;

import org.springframework.web.bind.annotation.RequestMapping;
import org.springframework.web.bind.annotation.RestController;

@RestController
public class HelloController {

    //http://localhost:8080/hello
    @RequestMapping("/hello")
    public String index() {
        return "Hello World";
    }
}
启动该应用,通过浏览器访问路径,返回预期结果:Hello World
(1)启动springboot应用的方式:
1.作为一个java程序的话,可以直接run as我们的main函数来启动
2.在maven配置中的话,我们前面说到,可以通过springboot的Maven插件,用它来启动。
mvnspringboot:run3.打成jar包,通过命令
jar tvf,上一个文档有说道
(2)编写单元测试
单元测试可以验证代码正确性,并支持未来良好代码重构。
打开测试包下的测试入口:SpringbootDemoApplicationTests
现在我们简单的写一个测试类,模拟http请求,测试之前的/hello功能
package com.cc.springbootDemo;

import org.junit.Before;
import org.junit.Test;
import org.junit.runner.RunWith;
import org.springframework.boot.test.context.SpringBootTest;
import org.springframework.http.MediaType;
import org.springframework.test.context.junit4.SpringJUnit4ClassRunner;
import org.springframework.test.context.web.WebAppConfiguration;
import org.springframework.test.web.servlet.MockMvc;
import org.springframework.test.web.servlet.request.MockMvcRequestBuilders;
import org.springframework.test.web.servlet.setup.MockMvcBuilders;
//引用下面的静态引用,让status,content,equalTo函数可用
import static org.hamcrest.Matchers.equalTo;
import static org.springframework.test.web.servlet.result.MockMvcResultMatchers.content;
import static org.springframework.test.web.servlet.result.MockMvcResultMatchers.status;

import com.cc.springbootDemo.web.HelloController;

@RunWith(SpringJUnit4ClassRunner.class)//引入spring对JUnit4的支持
//@SpringApplicationConfiguration(classes = SpringbootDemoApplication.class) springboot1.4后被替换使用以下
@SpringBootTest(classes = SpringbootDemoApplication.class)//指定springboot的启动类
@WebAppConfiguration//开启web应用的配置,用于模拟ServletContext
public class SpringbootDemoApplicationTests {

    //用于模拟调用Controller的接口发起请求,在@Test定义的hello测试用例中。perferm函数执行一次请求调用,accept用于执行接受的数据类型
    //andExpect用于判断接口返回的期望值
    private MockMvc mvc;

    @Before//JUnit定义在测试用例@Test内容执行前预加载的内容,这里用来初始化对HelloController的模拟
    public void setUp() throws Exception{
        mvc = MockMvcBuilders.standaloneSetup(new HelloController()).build();
    }

    @Test
    public void contextLoads() throws Exception{
        mvc.perform(MockMvcRequestBuilders.get("/hello").accept(MediaType.APPLICATION_JSON))
        .andExpect(status().isOk())
        .andExpect(content().string(equalTo("Hello World")));
    }

    public MockMvc getMvc() {
        return mvc;
    }

    public void setMvc(MockMvc mvc) {
        this.mvc = mvc;
    }

}
此文件右键—>Run as —>JUnit Test—>failure:0


 被折叠的 条评论
为什么被折叠?
被折叠的 条评论
为什么被折叠?
 到【灌水乐园】发言


