


This tutorial shows you how to create a simple hello world example in Spring 3.0.
Technologies used in this article :
- Spring 3.0.5.RELEASE
- Maven 3.0.3
- Eclipse 3.6
- JDK 1.6.0.13
P.S Spring 3.0, at least JDK 1.5 is required to work.
Spring 3.0 dependencies
In Spring 2.5.x, almost the entire Spring modules are grouped into a singlespring.jarfile. Since Spring 3.0, every modules are split into an individual jar file, for example,spring-core,spring-expression,spring-context,spring-aopand etc.
1. Generate project structure with Maven
Issue below Maven command to create a standard Java project structure.
mvn archetype:generate -DgroupId=com.mkyong.core -DartifactId=Spring3Example
    -DarchetypeArtifactId=maven-archetype-quickstart -DinteractiveMode=false
2. Convert to Eclipse project
Convert Maven style project to Eclipse’s style project, and import into Eclipse IDE.
mvn eclipse:eclipse3. Add Spring 3.0 dependency
Add the Spring 3.0 dependencies listed below in Maven’s pom.xml file. The Spring dependencies are available for download via Maven central repository.
File : pom.xml
<project xmlns="http://maven.apache.org/POM/4.0.0"
    xmlns:xsi="http://www.w3.org/2001/XMLSchema-instance"
    xsi:schemaLocation="http://maven.apache.org/POM/4.0.0
    http://maven.apache.org/maven-v4_0_0.xsd">
    <modelVersion>4.0.0</modelVersion>
    <groupId>com.mkyong.core</groupId>
    <artifactId>Spring3Example</artifactId>
    <packaging>jar</packaging>
    <version>1.0-SNAPSHOT</version>
    <name>Spring3Example</name>
    <url>http://maven.apache.org</url>

    <properties>
        <spring.version>3.0.5.RELEASE</spring.version>
    </properties>

    <dependencies>

        <!-- Spring 3 dependencies -->
        <dependency>
            <groupId>org.springframework</groupId>
            <artifactId>spring-core</artifactId>
            <version>${spring.version}</version>
        </dependency>

        <dependency>
            <groupId>org.springframework</groupId>
            <artifactId>spring-context</artifactId>
            <version>${spring.version}</version>
        </dependency>

    </dependencies>
</project>
4. Spring bean
A simple Spring bean.
package com.mkyong.core;

/**
 * Spring bean
 *
 */
public class HelloWorld {
    private String name;

    public void setName(String name) {
        this.name = name;
    }

    public void printHello() {
        System.out.println("Spring 3 : Hello ! " + name);
    }
}
5. Spring bean configuration file
Create a Spring configuration file, and declare all the available Spring beans.
File : SpringBeans.xml
<beans xmlns="http://www.springframework.org/schema/beans"
    xmlns:xsi="http://www.w3.org/2001/XMLSchema-instance"
    xsi:schemaLocation="http://www.springframework.org/schema/beans
    http://www.springframework.org/schema/beans/spring-beans-3.0.xsd">

    <bean id="helloBean" class="com.mkyong.core.HelloWorld">
        <property name="name" value="Mkyong" />
    </bean>

</beans>
6. Review project structure
Review directory structure as follows
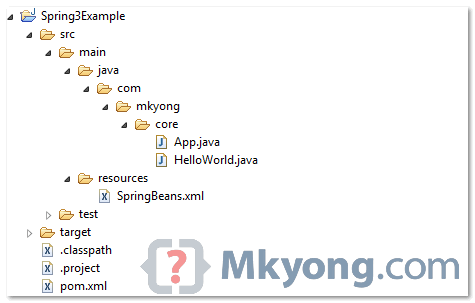
6. Run It
Run it.
package com.mkyong.core;

import org.springframework.context.ApplicationContext;
import org.springframework.context.support.ClassPathXmlApplicationContext;

public class App {
    public static void main(String[] args) {
        ApplicationContext context = new ClassPathXmlApplicationContext(
                "SpringBeans.xml");

        HelloWorld obj = (HelloWorld) context.getBean("helloBean");
        obj.printHello();
    }
}
7. Output
Spring 3 : Hello ! Mkyong


 690
690


 被折叠的 条评论
为什么被折叠?
被折叠的 条评论
为什么被折叠?
 到【灌水乐园】发言


