


前言
最近项目中用到了Mybatis,之前没有研究过,所以抽出空闲时间,看看小张哥买的新书,顺便做做里边的例子,今天的博客就是书中第一章的例子,算是Mybatis最简单的入门Demo,有兴趣的可以看看
一、首先建立maven的项目,并配置好pom文件
<project xmlns="http://maven.apache.org/POM/4.0.0" xmlns:xsi="http://www.w3.org/2001/XMLSchema-instance" xsi:schemaLocation="http://maven.apache.org/POM/4.0.0 http://maven.apache.org/xsd/maven-4.0.0.xsd">
  <modelVersion>4.0.0</modelVersion>
  <groupId>tk.mybatis</groupId>
  <artifactId>simple</artifactId>
  <version>0.0.1-SNAPSHOT</version>

  <properties>
    <project.build.sourceEncoding>UTF-8</project.build.sourceEncoding>
  </properties>

  <dependencies>
    <dependency>
        <groupId>junit</groupId>
        <artifactId>junit</artifactId>
        <version>4.12</version>
        <scope>test</scope>
    </dependency>

    <dependency>
        <groupId>org.mybatis</groupId>
        <artifactId>mybatis</artifactId>
        <version>3.3.0</version>
    </dependency>

    <dependency>
        <groupId>mysql</groupId>
        <artifactId>mysql-connector-java</artifactId>
        <version>5.1.38</version>
    </dependency>

    <dependency>
        <groupId>org.slf4j</groupId>
        <artifactId>slf4j-api</artifactId>
        <version>1.7.12</version>
    </dependency>

    <dependency>
        <groupId>org.slf4j</groupId>
        <artifactId>slf4j-log4j12</artifactId>
        <version>1.7.12</version>
    </dependency>

    <dependency>
        <groupId>log4j</groupId>
        <artifactId>log4j</artifactId>
        <version>1.2.17</version>
    </dependency>
  </dependencies>

  <build>
    <plugins>
        <plugin>
            <artifactId>maven-compiler-plugin</artifactId>
            <configuration>
                <source>1.6</source>
                <target>1.6</target>
            </configuration>
        </plugin>
    </plugins>
  </build>
</project>
二、配置MyBatis
在src/main/resources路径下创建mybatis-config.xml配置文件,内容如下
<?xml version="1.0" encoding="UTF-8"?>
<!DOCTYPE configuration
    PUBLIC "-//mybatis.org//DTD Config 3.0//EN"
    "http://mybatis.org/dtd/mybatis-3-config.dtd">
    <configuration>
        <settings>
            <!-- 指定使用LOG4J输出日志 -->
            <setting name="logImpl" value="LOG4J"/>
        </settings>

        <!-- 包的别名,通常确定一个类的时候需要使用类的全限定名称
              例如:tk.mybatis.simple.model.Country。
             在这里配置了tk.mybatis.simple.model包,直接使用Country即可
         -->
        <typeAliases>
            <package name="tk.mybatis.simple.model"/>
        </typeAliases>

        <!-- 配置数据库连接 -->
        <environments default="development">
            <environment id="development">
                <transactionManager type="JDBC">
                    <property name="" value=""/>
                </transactionManager>

                <dataSource type="UNPOOLED">
                    <property name="driver" value="com.mysql.jdbc.Driver"/>
                    <property name="url"
                              value="jdbc:mysql://localhost:3306/mybatis"/>
                    <property name="username" value="root"/>
                    <property name="password" value="root"/>
                </dataSource>
            </environment>
        </environments>

        <!--SQL语句和映射配置文件 -->
        <mappers>
            <mapper resource="tk/mybatis/simple/mapper/CountryMapper.xml"/>
        </mappers>
    </configuration>
三、创建实体类和Mapper.xml文件
Mybatis是一个结果映射框架,这里创建的实体类实际上是一个数据值对象。在实际应用中,一个表就会对应一个实体,用于INSERT、UPDATE、DELETE、SELECT操作
package tk.mybatis.simple.model;


public class Country {
    private Long id;
    private String countryname;
    private String countrycode;
    public Long getId() {
        return id;
    }
    public void setId(Long id) {
        this.id = id;
    }
    public String getCountryname() {
        return countryname;
    }
    public void setCountryname(String countryname) {
        this.countryname = countryname;
    }
    public String getCountrycode() {
        return countrycode;
    }
    public void setCountrycode(String countrycode) {
        this.countrycode = countrycode;
    }
}
mapper映射文件:
package tk.mybatis.simple.model;


public class Country {
    private Long idLong;
    private String countryname;
    private String countrycode;
    public Long getIdLong() {
        return idLong;
    }
    public void setIdLong(Long idLong) {
        this.idLong = idLong;
    }
    public String getCountryname() {
        return countryname;
    }
    public void setCountryname(String countryname) {
        this.countryname = countryname;
    }
    public String getCountrycode() {
        return countrycode;
    }
    public void setCountrycode(String countrycode) {
        this.countrycode = countrycode;
    }
}
四、log4j的配置文件
#\u5168\u5C40\u914D\u7F6E
log4j.rootLogger=ERROR, stdout
#MyBatis \u65E5\u5FD7\u914D\u7F6E
log4j.logger.tk.mybatis.simple.mapper=TRACE
#\u63A7\u5236\u53F0\u8F93\u51FA\u914D\u7F6E
log4j.appender.stdout=org.apache.log4j.ConsoleAppender
log4j.appender.stdout.layout=org.apache.log4j.PatternLayout
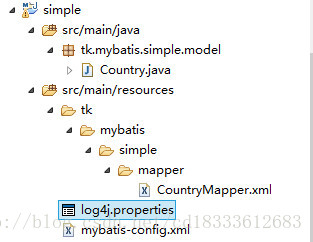
log4j.appender.stdout.layout.ConversionPattern=%5p [%t] - %m%n完整的目录结构
下边我们来写测试代码:
package tk.mybatis.simple.mapper;
import java.io.IOException;
import java.io.Reader;
import java.util.List;
import org.apache.ibatis.io.Resources;
import org.apache.ibatis.session.SqlSession;
import org.apache.ibatis.session.SqlSessionFactory;
import org.apache.ibatis.session.SqlSessionFactoryBuilder;
import org.junit.BeforeClass;
import org.junit.Test;
import tk.mybatis.simple.model.Country;
public class CountryMapperTest {
private static SqlSessionFactory sqlSessionFactory;
@BeforeClass
public static void init(){
try {
//通过Resources工具类将配置文件读入Reader
Reader reader=Resources.getResourceAsReader("mybatis-config.xml");
//通过sqlSessionFactoryBuilder使用Reader创建sqlSessionFactory工厂对象
//创建的过程:
// 1.首先解析mybatis-config.xml配置文件,读取配置文件中的mappers配置后
// 会读取全部的Mapper.xml进行具体方法的解析,解析完成后,SqlSessionFactory就
// 包含了所有的属性配置和执行sql的信息
sqlSessionFactory=new SqlSessionFactoryBuilder().build(reader);
reader.close();
} catch (IOException ignore) {
// TODO: handle exception
ignore.printStackTrace();
}
}
@Test
public void testSelectAll() {
//使用SqlSessionFactory对象获取一个SqlSession
SqlSession sqlSession=sqlSessionFactory.openSession();
try {
//1. 通过SqlSession的selectlist方法查找到CountryMapper.xml中的id="selectAll"的方法
// 执行sql查询
//2. MyBatis底层使用JDBC执行SQL,获得查询结果集ResultSet后,根据resultType的配置
// 将结果映射为Country类型的集合,返回结果
List<Country> countryList=sqlSession.selectList("selectAll");
printCountryList(countryList);
} finally{
//不要忘记关闭sqlSession
sqlSession.close();
}
}
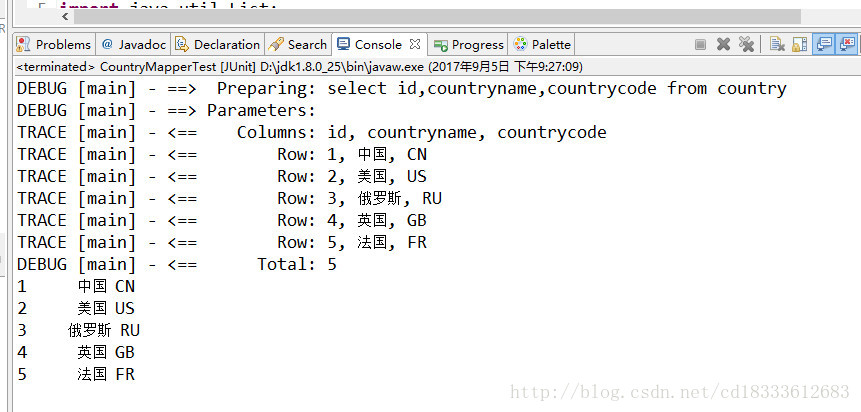
private void printCountryList(List<Country> countryList) {
for(Country country : countryList){
System.out.printf("%-4d%4s%4s\n",country.getId(), country.getCountryname(), country.getCountrycode());
}
}
}输出的结果:
后记
这一个例子参考自刘增辉老师的《MyBatis从入门到精通》,有兴趣可以下载源码参考:
http://mybatis.tk/book/simple-start.zip


 583
583


 被折叠的 条评论
为什么被折叠?
被折叠的 条评论
为什么被折叠?
 到【灌水乐园】发言


