


 本文探讨了接口自动化测试的分层设计思路,通过API定义层、Service层、Testcase层、 TestData层、RawData层和Base层的划分,提高了测试用例的可读性、灵活性、复用性和维护性。文章以创建商品活动的场景为例,展示了分层设计如何解决脚本维护难题,并介绍了参数构造、接口请求和数据驱动等方面的应用。
本文以笔者当前使用的自动化测试项目为例,浅谈分层设计的思路,不涉及到具体的代码细节和某个框架的实现原理,重点关注在分层前后的使用对比,可能会以一些伪代码为例来说明举例。
接口测试三要素:
-
参数构造
-
发起请求,获取响应
-
校验结果
一、原始状态
当我们的用例没有进行分层设计的时候,只能算是一个“苗条式”的脚本。以一个后台创建商品活动的场景为例,大概流程是这样的(默认已经是登录状态下):
创建商品-创建分类-创建优惠券-创建活动
要进行接口测试的话,按照接口测试的三要素来进行,具体的效果如下:
 # 1、参数构造
    createCommodityParams = {
        "input": {
            "title": "活动商品",
            "subtitle": "",
            "brand": "",
            "categoryLevel1Code": "12",
            "categoryLevel2Code": "1312",
            "categoryLevel3Code": "131211",
            "detail": [
                {
                    "uri": "ecommerce/1118d9.jpg",
                    "type": 0
                }
            ],
            "installInfo": {
                "installType": 1,
                "installFee": null
            },
            "pictureList": [
                {
                    "uri": "ecommerce/222.jpg",
                    "main": true
                }
            ],
            "postageInfo": {
                "postageType": 2,
                "postageFee": 1,
                "postageId": null
            },
            "sellerDefinedCode": "",
            "publish": 1,
            "skuList": [
                {
                    "skuCode": "",
                    "externalSkuCode": "",
                    "price": 1,
                    "retailPrice": 6,
                    "stock": 100,
                    "weight": 0,
                    "suggestPrice": 0,
                    "skuAttrValueList": [
                        {
                            "attrCode": "COLOR",
                            "attrName": "颜色",
                            "attrValue": "绿色",
                            "attrValueId": "1001"
                        }
                    ]
                }
            ],
            "jumpSwitch":false,
            "recommendCommodityCodeList": [],
            "recommendFittingCodeList": [],
            "mallCode": "8h4xxx"
        }
    }
    createCategoryParams = {......}
    createCouponParams = {......}
    createPublicityParams = {......}
    publishCommodityParams = {......}
    publishPublicityParams = {......}

    createCommodityParams["input"]["title"] = "autoTest" + str(time.time())
    createCommodityParams["input"]["mallCode"] = self.mallCode
    createCommodityParams["input"]["skuList"][0]["price"] = random.randint(1,10)
    createCategoryParams["input"]["categoryName"] = "autoTestCategory" + str(time.time())
    createCouponParams。。。
    createPublicityParams。。。
    publishCommodityParams。。。
    publishPublicityParams。。。

    # 2、发起请求,获取响应
     # 创建商品并获取商品code
    createCommodityRes = api.getUrl("testApi.create.commodity").post.params(createCommodityParams)
    commodityCode = createCommodityRes["commodityCode"]
     # 创建分类并获取分类code
    createCategoryRes = api.getUrl("testApi.create.category").post.params(createCategoryParams)
    categoryCode = createCategoryRes["categoryCode"]
     # 创建优惠券并获取优惠券code
    createCouponRes = api.getUrl("testApi.create.coupon").post.params(createCouponParams)
    couponCode = createCouponRes["couponCode"]
     # 创建活动并关联商品,绑定优惠券,设置分类
    createPublicityParams["input"]["commodityCode"] = commodityCode
    createPublicityParams["input"]["categoryCode"] = categoryCode
    createPublicityParams["input"]["couponCode"] = couponCode
    createPublicityRes = api.getUrl("testApi.create.publicity").post.params(createPublicityParams)

    # 结果校验(断言)
    assert.equal(createPublicityRes["code"], 0)
    assert.equal(createPublicityRes["publicityName"], createPublicityParams["publicityName"])
    。。。
按照上面的写法,对于单个脚本的调式来说或许可以,但是一旦用例的数量和复杂程度积累起来后,其维护成本将是巨大的,或者可以说不具备可维护性。
弊端说明:
-
可读性差,所有的处理都放在一起,代码量大,不简洁直观
-
灵活性差,参数写死在脚本,适用用例范围小
-
复用性差,如果其他用例需要同样或类似的步骤,需要重新写一份
-
维护性差,如果接口有任何改动,那么所有涉及到此接口的脚本都需要一一修改
例如:随着用例场景的增加,就可能会出现下面这种情况
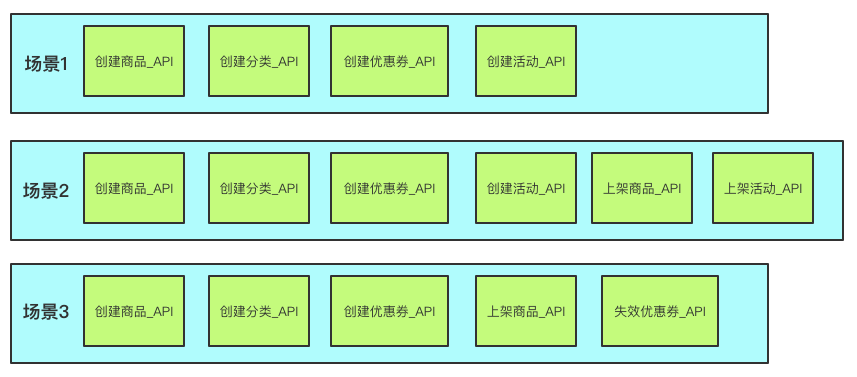
按照原始的模式,我们就需要些3个脚本文件分别来描述着3个场景,并且创建商品_API、创建分类_API、创建优惠券_API在场景1,2,3中均出现了;上架商品_API在场景2,3中均出现。由此我们完全可以预见到,当几百上千的用例场景出现后,这种形式是没有维护性可言的。
二、进化历程
因此我们依照着痛点,以最开始的原始状态为例,对用例进行分层改造,来看看进化后的状态。
1、API 定义层
我们编程的时候会将一些重复的代码进行封装使用,那么这里依然可以借用这种思想,我们将 API 的定义单独抽离,单独定义。
我们期望的效果是这样的:
 最低0.47元/天 解锁文章


 1467
1467

 被折叠的 条评论
为什么被折叠?
被折叠的 条评论
为什么被折叠?
 到【灌水乐园】发言


