


这些是买了阿南的板子后,学习中所遇到的一些问题及解决记录。
由于是从头学起,碰到的问题都是非常基础性的问题。记录如下。
一:硬件测试
参照此贴http://blog.ednchina.com/user_default.aspx?u=taosha126&page=2 感谢原作者
测试方法:
方法一:接上5V电源,4个LED全亮,差不多5秒钟之后有一个LED为不停的闪烁.
方法二:用串口连接PC机与AN2410SSB板,打开超级终端或串口调试软件.将波特率设置成115200,然后接上电源则将在终端上打印系统启动信息.进行了测试.使用 DNW 或Windows的超级终端进行测试。光盘中/测试代码/samsung里有DNW软件,(书上P91)configuration->options里选择115200,然后serial port-connect


按SSB板上的复位键就有信息显示,我的显示如下:
- VIVI version 0.1.4 (root@eady.mizi.com) (gcc version 2.95.3 19991030 (prerelease)) #0.1.4 Tue Jul 6 19:10:29 KST 2004
- MMU table base address = 0x33DFC000
- Succeed memory mapping.
- NAND device: Manufacture ID: 0xec, Chip ID: 0x76 (Samsung K9D1208V0M)
- Found saved vivi parameters.
- Press Return to start the LINUX now, any other key for vivi
- Copy linux kernel from 0x00030000 to 0x30008000, size = 0x000c0000 ... done
- zImage magic = 0x016f2818
- Setup linux parameters at 0x30000100
- linux command line is: "noinitrd root=/dev/bon/2 init=/linuxrc console=ttyS0"
- MACH_TYPE = 193
- NOW, Booting Linux......
- Uncompressing Linux.................................................... done, booting the kernel.
- Linux version 2.4.18-rmk7-pxa1 (eady@eady.mizi.com) (gcc version 2.95.2 20000516 (release) [Rebel.com]) #3 岿 7岿 5 14:39:23 KST 2004
- CPU: ARM/CIRRUS Arm920Tsid(wb) revision 0
- Machine: Samsung-SMDK2410
- On node 0 totalpages: 16384
- zone(0): 16384 pages.
- zone(1): 0 pages.
- zone(2): 0 pages.
- Kernel command line: noinitrd root=/dev/bon/2 init=/linuxrc console=ttyS0
- DEBUG: timer count 15626
- Console: colour dummy device 80x30
- Calibrating delay loop... 99.94 BogoMIPS
- Memory: 64MB = 64MB total
- Memory: 62704KB available (1396K code, 306K data, 60K init)
- Dentry-cache hash table entries: 8192 (order: 4, 65536 bytes)
- Inode-cache hash table entries: 4096 (order: 3, 32768 bytes)
- Mount-cache hash table entries: 1024 (order: 1, 8192 bytes)
- Buffer-cache hash table entries: 4096 (order: 2, 16384 bytes)
- Page-cache hash table entries: 16384 (order: 4, 65536 bytes)
- POSIX conformance testing by UNIFIX
- Linux NET4.0 for Linux 2.4
- Based upon Swansea University Computer Society NET3.039
- Initializing RT netlink socket
- CPU clock = 200.000 Mhz, HCLK = 100.000 Mhz, PCLK = 50.000 Mhz
- Starting kswapd
- devfs: v1.10 (20020120) Richard Gooch (rgooch@atnf.csiro.au)
- devfs: boot_options: 0x1
- JFFS2 version 2.1. (C) 2001, 2002 Red Hat, Inc., designed by Axis Communications AB.
- ttyS00 at I/O 0x50000000 (irq = 52) is a S3C2410
- ttyS01 at I/O 0x50004000 (irq = 55) is a S3C2410
- ttyS02 at I/O 0x50008000 (irq = 58) is a S3C2410
- Console: switching to colour frame buffer device 30x40
- Installed S3C2410 frame buffer
- pty: 256 Unix98 ptys configured
- s3c2410-ts initialized
- S3C2410 Real Time Clock Driver v0.1
- block: 128 slots per queue, batch=32
- eth0: cs8900 rev K(3.3 Volts) found at 0xd0000300
- cs89x0 media RJ-45, IRQ 37
- NAND device: Manufacturer ID: 0xec, Chip ID: 0x76 (Samsung NAND 64MiB 3,3V)
- bon0: 00000000-00030000 (00030000) 00000000
- bon1: 00030000-00100000 (000d0000) 00000000
- bon2: 00100000-03ffc000 (03efc000) 00000000
- NET4: Linux TCP/IP 1.0 for NET4.0
- IP Protocols: ICMP, UDP, TCP, IGMP
- IP: routing cache hash table of 512 buckets, 4Kbytes
- TCP: Hash tables configured (established 4096 bind 4096)
- NET4: Unix domain sockets 1.0/SMP for Linux NET4.0.
- NetWinder Floating Point Emulator V0.95 (c) 1998-1999 Rebel.com
- VFS: Mounted root (cramfs filesystem).
- Mounted devfs on /dev
- Freeing init memory: 60K
- mount /etc as ramfs
- re-create the /etc/mtab entries
- console=/dev/cosole
- init started: BusyBox v0.60.3 (2002.05.13-08:36+0000) multi-c鵯l binary
- Starting pid 16, console /dev/console: '/etc/init.d/rcS'
- exec: /usr/etc/rc.local: No such file or diretory
- Waiting for enter to start '/bin/sh' (pid 19, terminal /dev/console)
- Please press Enter to activate this console.
二 内核检测
BIOS里将并口设置为EPC模式
然后如下图
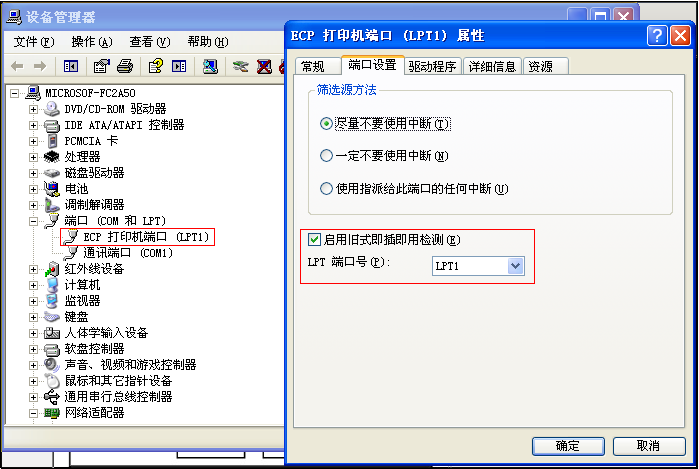
(我开始的时候设置了H-JTAG和EPC模式都不行,然后把图中“启用旧式即插即用检测”勾上了就可以了)
然后H-JTAG如下设置就可以了。(我这里TCK Speed设置任意一个都可以检测到)

三 打开AXD Debugger一直如错
按照群里的Ads1.2+H-JTAG这篇文章来设置。打开AXD Debugger时一直出现如下错误
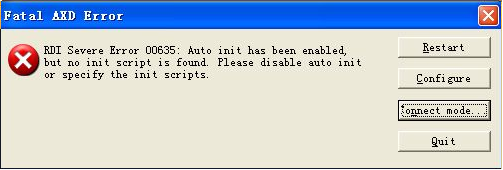
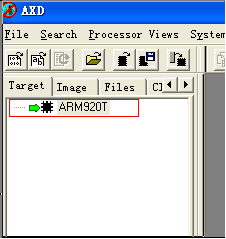
反复restart还是失败。最后百度到了答案(汗,google竟没搜到那个网页),解决方法如下图。

这样就可以连上了。看看AXD Debugger里出现下面这样(关于AUTO INIT可以看JTAG说明书):


 422
422


 被折叠的 条评论
为什么被折叠?
被折叠的 条评论
为什么被折叠?
 到【灌水乐园】发言


