


什么是allure
Allure 是由Qameta Software团队开源的一款旨在于解决让每个人能更容易生成并更简洁阅读的测试报告框架。它支持大多数的测试框架,如:Pytest、TestNG等,简单易用便于集成。简单来说就是把每个自动化测试用例的执行结果记录下来,同时可以对生成的报告内容进行设置,生成图形化的测试报告。
allure环境搭建
在使用的IDE中安装allure相关的库即可
allure的特性
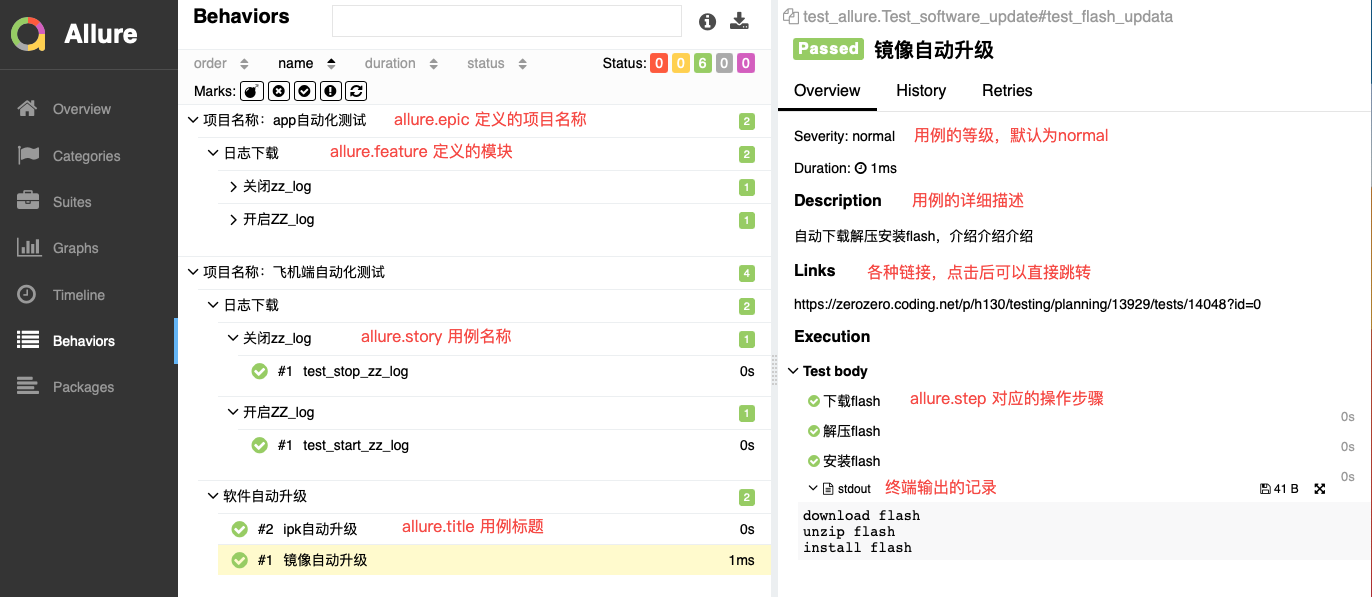
@allure.epic() #定义项目、当有多个项目时使用,下一级是feature
@allure.feature() # 用于定义被测试的功能,被测产品的需求点
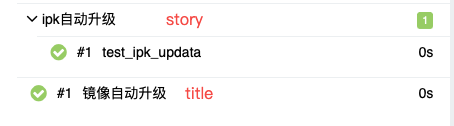
@allure.story # 用于定义被测功能的用户场景,即子功能点
with allure.step # 用于将一个测试用例,分成几个步骤在报告中输出
allure.attach # 用于向测试报告中输入一些附加的信息,通常是一些测试数据信息
allure.step # 用于将一些通用的函数作为测试步骤输出到报告,调用此函数的地方会向报告中输出步骤
| Allure 方法描述 | ||
| 使用方法 | 参数值 | 参数说明 |
| @allure.epic() | Epic 描述 | 定义项目、当有多个项目是使用。下一级是feature |
| @allure.feature() | 模块名称 | 用例按照模块区分,有多个模块时进行区分,修饰代码中的 类 |
| @allure.story() | 用例名称 | 一个用例的描述,修饰代码中的 方法 |
| @allure.title() | 用例标题 | 一个用例的标题 |
| @allure.testcase() | 测试用例的连接地址 | 自动化用例对应的功能用例存放的地址 |
| @allure.issue() | 缺陷地址 | 对应bug管理系统的地址 |
| @allure.description() | 用例描述 | 对测试用例的详细描述 |
| @allure.step() | 操作步骤 | 测试用例的操作步骤,一个用例会包含多个步骤 |
| @allure.severity() | 用例等级 | blocker、critical、normal、minor、trivial |
| @allure.link() | 定义外部链接 | 需要在测试报告中展示的连接 |
| @allure.attachment() | 附件 | 添加测试报告附件 |
如何生成allure测试报告
一个比较简单的方法,在项目下新建 "pytest.ini"文件,文件中写入以下内容,以后每次执行测试就会生成对应的“allure-result”测试报告文件,使用“allure serve allure-result"命令打开测试报告。
[pytest]
log_cli= 1
addopts= -s --alluredir ./allure-results --clean-alluredir --capture=sys

log_format = %(asctime)s %(levelname)s %(message)s
log_date_format = %Y-%m-%d %H:%M:%S
log_level = info  ###记录info等级的日志
测试结果log记录
logging.critical('logging critical message.')
logging.error('logging error message')
logging.warning('logging warning message')
logging.info('logging info message')
logging.debug('logging debug message')
log会在测试报告中进行展示

详细的log使用教程:https://blog.csdn.net/weixin_42297382/article/details/123482659
allure使用实例
实例python代码:
import allure
import logging ###日志打印模块

@allure.epic('项目名称:飞机端自动化测试')
@allure.feature('软件自动升级')
@allure.testcase('https://zerozero.coding.net/p/h130/testing/planning/13929/tests/14048?id=0')
class Test_software_update(object):
    @allure.title('镜像自动升级')
    @allure.description('自动下载解压安装flash,介绍介绍介绍')
    def test_flash_updata(self):
        download_flash()
        unzip_flash()
        install_flash()


    @allure.title('ipk自动升级')
    def test_ipk_updata(self):
        print('install test')
        download_flash()
        unzip_flash()
        install_flash()


@allure.epic('项目名称:飞机端自动化测试')
@allure.feature('日志下载')
@allure.testcase('https://zerozero.coding.net/p/h130/testing/planning/13929/tests/14048?id=0')
class Test_log_download(object):
    @allure.story('开启ZZ_log')
    def test_start_zz_log(self):
        connet_drone()
        start_log()
        check_log()

    @allure.story('关闭zz_log')
    def test_stop_zz_log(self):
        connet_drone()
        connet_drone()
        check_log()


@allure.epic('项目名称:app自动化测试')
@allure.feature('日志下载')
@allure.testcase('https://zerozero.coding.net/p/h130/testing/planning/13929/tests/14048?id=0')
class Test_logs_download(object):
    @allure.story('开启ZZ_log')
    def test_start_zz_log(self):
        connet_drone()
        start_log()
        check_log()

    @allure.story('关闭zz_log')
    def test_stop_zz_log(self):
        connet_drone()
        connet_drone()
        check_log()


###每一个用例所对应的步骤
@allure.step('下载flash')
def download_flash():
    print('download flash')
    logging.info('logging info 记录测试')

@allure.step('解压flash')
def unzip_flash():
    print('unzip flash')

@allure.step('安装flash')
def install_flash():
    print('install flash')


@allure.step('连接飞机')
def connet_drone():
    print('飞机已连接')

@allure.step('开启zz_log')
def start_log():
    print('开启zz_Log')

@allure.step('zz_log 状态检查')
def check_log():
    print('zz_Log已经打开')
生成的测试报告:
Story 和 title的区别


 被折叠的 条评论
为什么被折叠?
被折叠的 条评论
为什么被折叠?
 到【灌水乐园】发言


