swagger介绍使用方法
1 swagger的介绍
1、是一款让你更好的书写API文档规范且完整的框架。
2、提供描述、生产、消费和可视化RESTful Web Service。
3、是由庞大工具集合支撑的形式化规范。这个集合涵盖了从终端用户接口、底层代码库到商业API管理的方方面面。
2 添加依赖
2.1 使用第三方依赖
1.在pom文件中添加第三方swagger依赖
	<dependency>
		<groupId>com.spring4all</groupId>
		<artifactId>swagger-spring-boot-starter</artifactId>
		<version>1.7.0.RELEASE</version>
	</dependency>
2.在SpringBoot项目的启动了上添加@EnableSwagger2Doc注解,就可以直接使用啦。
package com.marvin.demo;

import org.springframework.boot.SpringApplication;
import org.springframework.boot.autoconfigure.SpringBootApplication;
import springfox.documentation.swagger2.annotations.EnableSwagger2;

@SpringBootApplication
@EnableSwagger2
public class SwaggerApplication {
    public static void main(String[] args) {
        SpringApplication.run(SwaggerApplication.class);
    }
}
3、https://github.com/SpringForAll/spring-boot-starter-swagger这是GitHub上这个swagger依赖实现的项目,里面有详细的讲解。
2.2使用官方依赖
1.在pom.xml文件中添加swagger相关依赖
        <dependency>
            <groupId>io.springfox</groupId>
            <artifactId>springfox-swagger2</artifactId>
            <version>2.7.0</version>
        </dependency>
        <dependency>
            <groupId>io.springfox</groupId>
            <artifactId>springfox-swagger-ui</artifactId>
            <version>2.7.0</version>
        </dependency>
第一个是API获取的包,第二是官方给出的一个ui界面。这个界面可以自定义,默认是官方的,对于安全问题,以及ui路由设置需要着重思考。
2.2.1swagger的configuration
需要特别注意的是swagger scan base package,这是扫描注解的配置,即你的API接口位置。
package com.example.demo.config;

import io.swagger.annotations.Api;
import org.springframework.context.annotation.Bean;
import org.springframework.context.annotation.Configuration;
import springfox.documentation.builders.ApiInfoBuilder;
import springfox.documentation.builders.PathSelectors;
import springfox.documentation.builders.RequestHandlerSelectors;
import springfox.documentation.service.ApiInfo;
import springfox.documentation.spi.DocumentationType;
import springfox.documentation.spring.web.plugins.Docket;
import springfox.documentation.swagger2.annotations.EnableSwagger2;

@Configuration
@EnableSwagger2
public class SwaggerConfig {
    @Bean
    public Docket createRestApi() {
        return new Docket(DocumentationType.SWAGGER_2)
                .useDefaultResponseMessages(false)
                .apiInfo(apiInfo())
                .select()
                .apis(RequestHandlerSelectors.withClassAnnotation(Api.class))
                .paths(PathSelectors.any())
                .build();
    }
    private ApiInfo apiInfo() {
        return new ApiInfoBuilder()
                .title("利用swagger构建api文档")
                .description("简单使用swagger2")
                .version("1.0")
                .build();
    }
}
3 swagger的基本注解介绍
swagger通过注解生成接口文档,包括接口名、请求方法、参数、返回信息的等等。
| 注解 | 作用处 | 作用 |
|---|---|---|
| @Api | 用于类 | 修饰整个类,描述Controller的作用 |
| @ApiOperation | 用于方法 | 描述一个类的一个方法,或者说一个接口 |
| @ApiParam | 用于方法,参数,字段说明 | 单个参数描述 |
| @ApiModel | 用于类 | 用对象实体来作为入参 |
| @ApiProperty | 用对象接实体收参数时,描述对象的一个字段 | |
| @ApiResponse | HTTP响应其中1个描述 | |
| @ApiResponses | HTTP响应整体描述 | |
| @ApiIgnore | 用于类,方法,方法参数 | 使用该注解忽略这个API |
| @ApiError | 发生错误返回的信息 | |
| @ApiImplicitParam | 用于方法 | 一个请求参数 |
| @ApiImplicitParams | 用于方法 | 多个请求参数 |
3.1 @Api修饰整个类,描述Controller的作用
用于类;表示标识这个类是swagger的资源
- tags–表示说明
- value–也是说明,可以使用tags替代
但是tags如果有多个值,会生成多个list
@Api(value="用户controller",tags={"用户操作接口"})
@RestController
public class UserController {

}

3.2 @ApiOperation
用于描述一个方法或者接口
表示一个http请求的操作
- value用于方法描述
- notes用于提示内容
- tags可以重新分组(视情况而用)
例
可以添加的参数形式:@ApiOperation(value = “接口说明”, httpMethod = “接口请求方式”, response = “接口返回参数类型”, notes = “接口发布说明”)
例
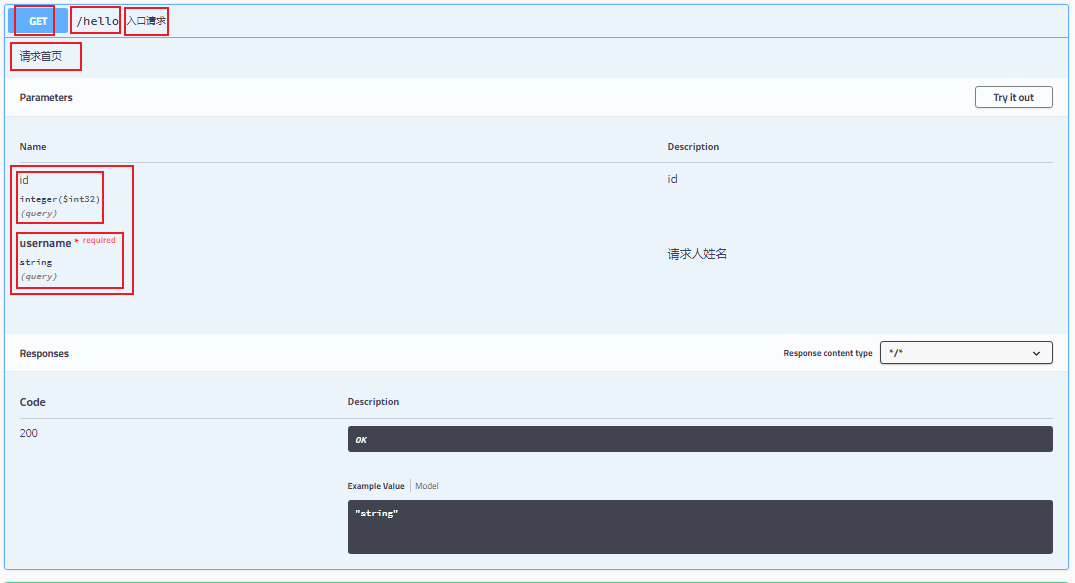
    @RequestMapping(value = "/hello",method = {RequestMethod.GET,RequestMethod.POST})
    @ApiOperation(value = "入口请求",notes = "请求首页",httpMethod = "GET",response = String.class)
    public String testHello(@RequestParam("username") String username,int id){
        System.out.println("username:"+username+"==id:"+id);
        return "ok:"+username;
    }
3.3 @ApiParam单个参数描述
用于方法,参数,字段说明;表示对参数的添加元数据(说明或是否必填等)
- name–参数名
- value–参数说明
- required–是否必填
例
@ApiParam(required = “是否必须参数”, name = “参数名称”, value = “参数具体描述”,dateType="变量类型”,paramType="请求方式”)
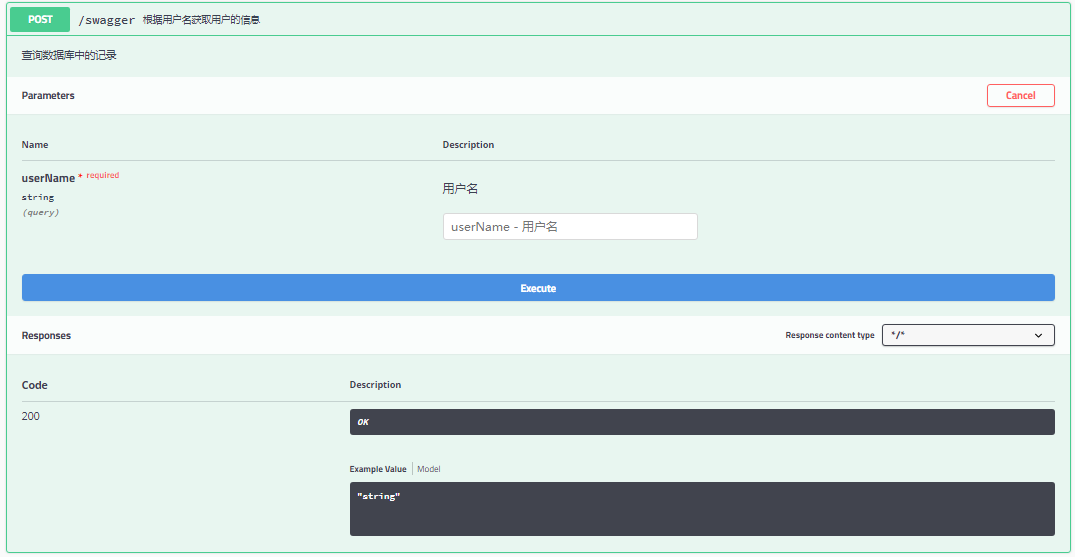
    @RequestMapping("/swagger")
    @ResponseBody
    @ApiOperation(value = "根据用户名获取用户的信息",notes = "查询数据库中的记录",httpMethod = "POST",response = String.class)
    @ApiImplicitParam(name = "userName",value = "用户名",required = true,dataType = "String",paramType = "query")
    public String getUserInfo(String userName) {
        return "1234";
    }
3.4 @ApiImplicitParam 一个请求参数
用于方法
表示单独的请求参数
@ApiImplicitParam(required = “是否必须参数”, name = “参数名称”, value = “参数具体描述”,dateType="变量类型”,paramType="请求方式”)
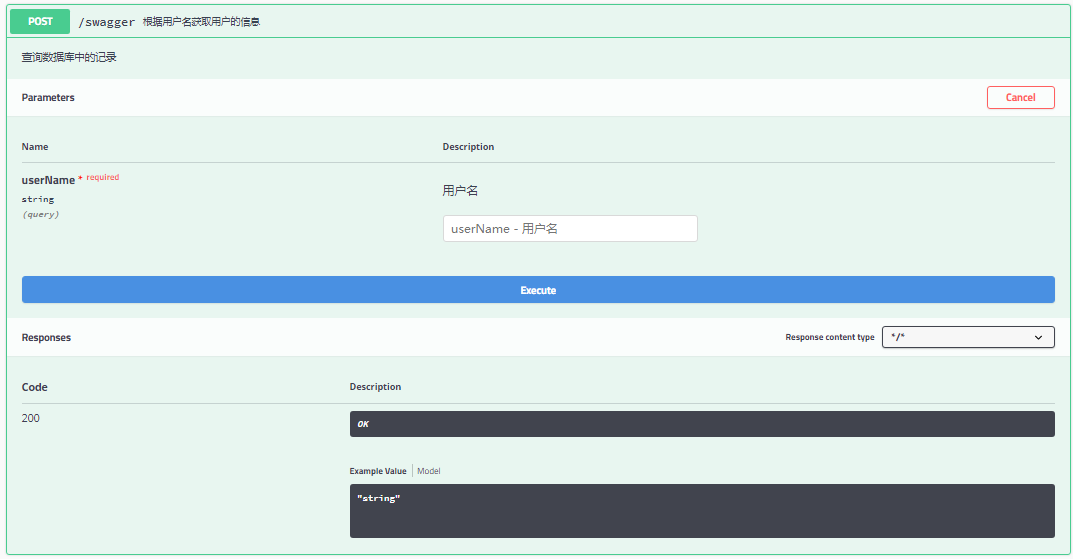
    @RequestMapping("/swagger")
    @ApiOperation(value = "根据用户名获取用户的信息",notes = "查询数据库中的记录",httpMethod = "POST",response = String.class)
    @ApiImplicitParam(name = "userName",value = "用户名",required = true,dataType = "String",paramType = "query")
    public String getUserInfo(String userName) {
        return "1234";
    }
3.5 @ApiImplicitParams 多个请求参数
用于方法,包含多个 @ApiImplicitParam
- name–参数ming
- value–参数说明
- dataType–数据类型
- paramType–参数类型
- example–举例说明
参数和@ApiImplicitParam一致,只是这个注解可以添加多个参数而已
    @RequestMapping(value = "/getuserinfobynickname",method = {RequestMethod.POST,RequestMethod.GET})
    @ApiOperation(value = "根据用户昵称获取用户信息",notes = "查询数据库中的记录")
    @ApiImplicitParams({
            @ApiImplicitParam(name = "nickName",value = "用户的昵称",paramType = "query",dataType = "String",required = true),
            @ApiImplicitParam(name = "id",value = "用户的ID",paramType = "query",dataType = "int",required = true)
    })
    public String getUserInfoByNickName(String nickName, int id) {
        System.out.println("id:"+id+"--nickName:"+nickName);
        return "1234";
    }
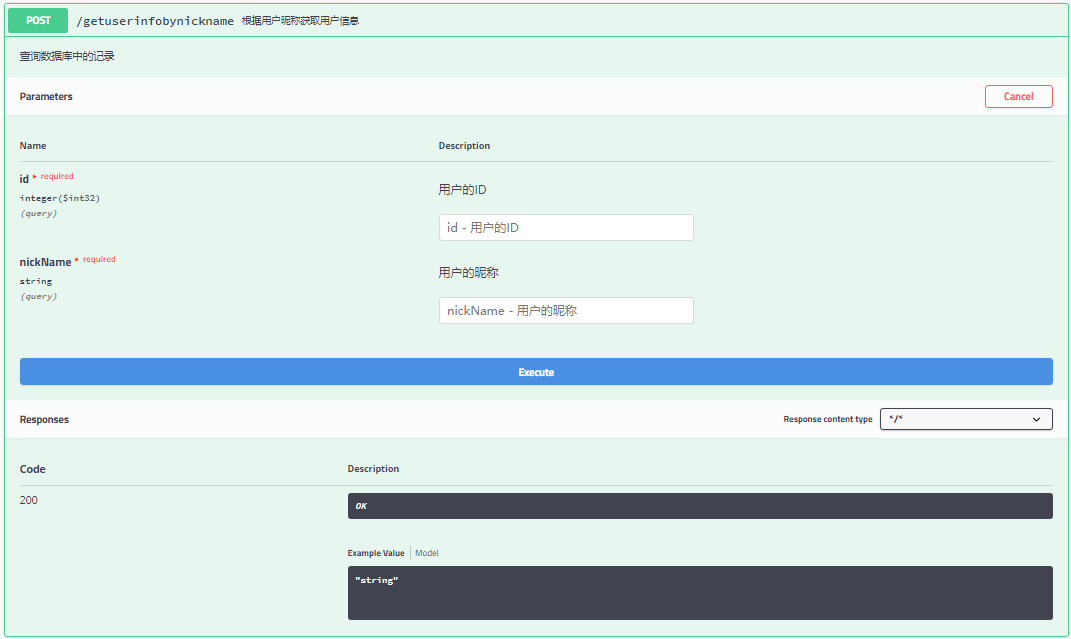
可以直接进行测试
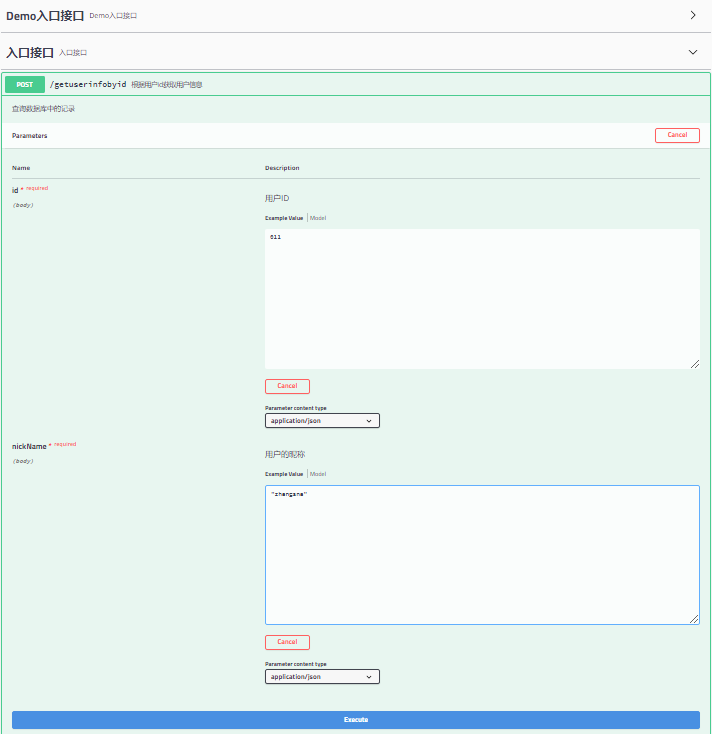
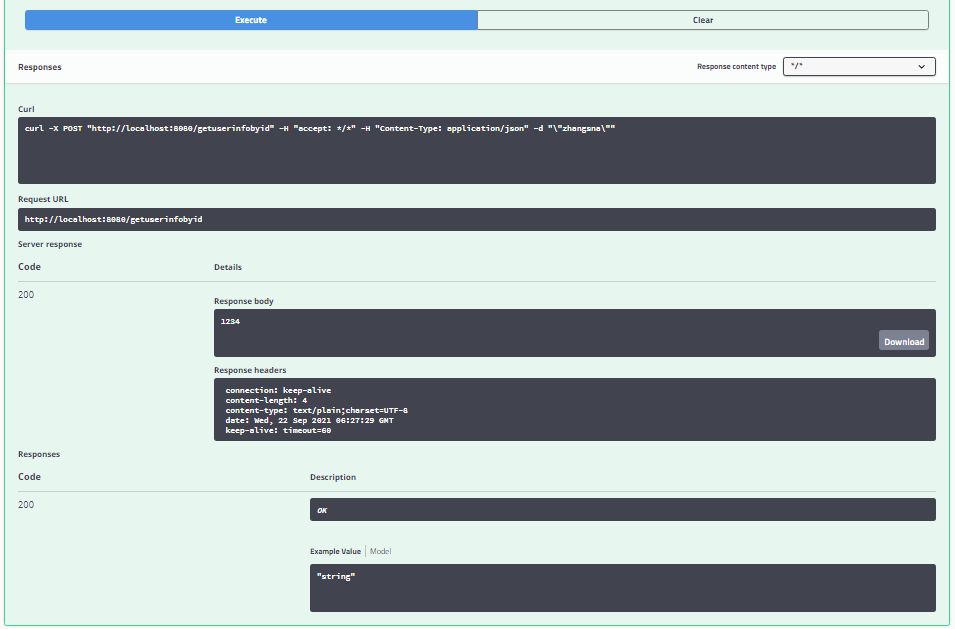
3.6 @ApiModel()
用于类 ;表示对类进行说明,用于参数用实体类接收
- value–表示对象名
- description–描述
都可省略
3.7 @ApiModelProperty()
用于方法,字段; 表示对model属性的说明或者数据操作更改
- value–字段说明
- name–重写属性名字
- dataType–重写属性类型
- required–是否必填
- example–举例说明
- hidden–隐藏
@ApiModel(value="user对象",description="用户对象user")
public class User implements Serializable{
    private static final long serialVersionUID = 1L;
     @ApiModelProperty(value="用户名",name="username",example="xingguo")
     private String username;
     @ApiModelProperty(value="状态",name="state",required=true)
      private Integer state;
      private String password;
      private String nickName;
      private Integer isDeleted;

      @ApiModelProperty(value="id数组",hidden=true)
      private String[] ids;
      private List<String> idList;
     //省略get/set
}
  @ApiOperation("更改用户信息")
  @PostMapping("/updateUserInfo")
  public int updateUserInfo(@RequestBody @ApiParam(name="用户对象",value="传入json格式",required=true) User user){

     int num = userService.updateUserInfo(user);
     return num;
  }
3.8 @ApiIgnore()
用于类或者方法上,可以不被swagger显示在页面上
比较简单, 这里不做举例
3.9 对应的实体说明:
package com.example.demo.pojo;

import io.swagger.annotations.ApiModel;
import io.swagger.annotations.ApiModelProperty;

@ApiModel(value = "用户注册的实体")
public class Register {
    @ApiModelProperty(name = "userName",notes = "用户名",dataType = "String",required = true)
    private String userName;

    @ApiModelProperty(name = "nickName",notes = "用户昵称",dataType = "String",required = true)
    private String nickName;

    @ApiModelProperty(name = "age",notes = "用户年龄",dataType = "int",required = true)
    private int age;
    public String getUserName() {
        return userName;
    }

    public void setUserName(String userName) {
        this.userName = userName;
    }

    public String getNickName() {
        return nickName;
    }

    public void setNickName(String nickName) {
        this.nickName = nickName;
    }

    public int getAge() {
        return age;
    }

    public void setAge(int age) {
        this.age = age;
    }
    @Override
    public String toString() {
        return "Register{" +
                "userName='" + userName + '\'' +
                ", nickName='" + nickName + '\'' +
                ", age=" + age +
                '}';
    }
}
4 测试地址
默认地址:
http://localhost:8080/swagger-ui.html
附录
IndexController代码
package com.example.demo.controller;

import com.example.demo.pojo.Register;
import io.swagger.annotations.*;
import org.springframework.web.bind.annotation.*;

@RestController
@Api(value="用户controller",description="入口接口",tags={"入口接口"})
public class IndexController {
//    @RequestMapping(value = "/userregister",method = {RequestMethod.GET,RequestMethod.POST})
    //@RequestMapping(value = "/userregister",method = {RequestMethod.POST})
//    @ResponseBody
//    @ApiOperation(value = "register",notes = "注册的实体类")

//    @RequestMapping(value = "/hello",method = {RequestMethod.GET,RequestMethod.POST})
//    @ApiOperation(value = "入口请求",notes = "请求首页",httpMethod = "GET",response = String.class)
//    @RequestBody
//    @ApiImplicitParam(name = "username",value = "请求人姓名",required = true,dataType="String",paramType="query")

    @RequestMapping(value = "/hello",method = {RequestMethod.GET,RequestMethod.POST})
    @ApiOperation(value = "入口请求",notes = "请求首页",httpMethod = "GET",response = String.class)
    @ApiImplicitParam(name = "username",value = "请求人姓名",required = true,dataType="String",paramType="query")
    public String testHello(@RequestParam("username") String username,int id){
        System.out.println("username:"+username+"==id:"+id);
        return "ok:"+username;
    }


    @RequestMapping("/swagger")
    @ResponseBody
    @ApiOperation(value = "根据用户名获取用户的信息",notes = "查询数据库中的记录",httpMethod = "POST",response = String.class)
    @ApiImplicitParam(name = "userName",value = "用户名",required = true,dataType = "String",paramType = "query")
    public String getUserInfo(String userName) {
        return "1234";
    }

    @RequestMapping(value = "/getuserinfobynickname",method = {RequestMethod.POST,RequestMethod.GET})
    @ResponseBody
    @ApiOperation(value = "根据用户昵称获取用户信息",notes = "查询数据库中的记录")
    @ApiImplicitParams({
            @ApiImplicitParam(name = "nickName",value = "用户的昵称",paramType = "query",dataType = "String",required = true),
            @ApiImplicitParam(name = "id",value = "用户的ID",paramType = "query",dataType = "int",required = true)
    })
    public String getUserInfoByNickName(String nickName, int id) {
        System.out.println("id:"+id+"--nickName:"+nickName);
        return "1234";
    }

    @RequestMapping(value = "/getuserinfobyid",method = {RequestMethod.POST,RequestMethod.POST})
    @ResponseBody
    @ApiOperation(value = "根据用户id获取用户信息",notes = "查询数据库中的记录",httpMethod = "POST")
    public String getUserInfoById(@ApiParam(name = "nickName",value = "用户的昵称",required = true,defaultValue = "123-默认值")
                                          String nickName,
                                  @ApiParam(name = "id",value = "用户ID",required = true)
                                          Integer id) {

        System.out.println("id:"+id+"--nickName:"+nickName);
        return "1234";
    }

    @RequestMapping(value = "/userregister",method = {RequestMethod.GET,RequestMethod.POST})
    //@RequestMapping(value = "/userregister",method = {RequestMethod.POST})
    @ResponseBody
    @ApiOperation(value = "register",notes = "注册的实体类")
    public Register userRegister(Register register) {
        System.out.println(register.toString());
        return register;
    }
}


 1万+
1万+


 被折叠的 条评论
为什么被折叠?


