一、下载与安装WDK
《寒》说,以前说的
DDK
、
IFS
已成为历史,现在已经改为使用
WDK
了,具体下载地址可以这里注册并下载:
http://connect.microsoft.com,目前的版本是6001.18002,大小只有577MB。
下载安装后,假设安装路径为
“c:/winddk”
,接下来要设计环境变量,添加:
BASEDIR
,值为:
“c:/winddk/6001”
。必须设置此环境变量,否则下面编译时会出问题。
二、
Visual Studio
的开发环境
笔者用的是
Visual Studio 2005
,所以就以此版本介绍,其他版本的类似。
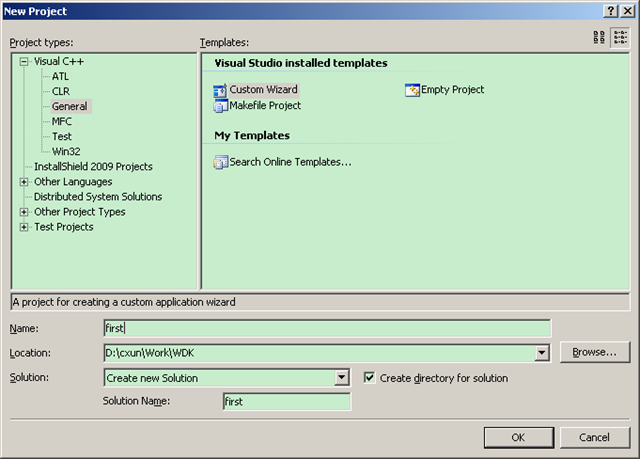
首先新建项目,类型选择
Visual C++->General
中的
“Makefile Project”
,这里的项目保存路径不要包括空格、中文等字符,否则会造成后面编译时的出错。

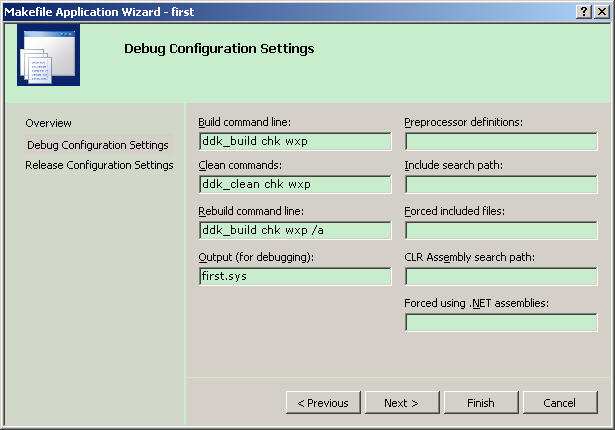
下一步,在
Debug Configuration Settings
中设置如下:
Build command line: ddk_build chk wxp
Clean commands: ddk_clean chk wxp
Rebuild command line: ddk_build chk wxp /a
Output: first.sys
如图:

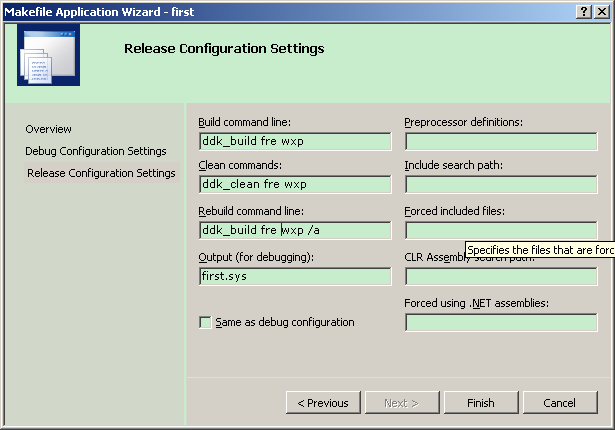
下一步,在
Release Configuration Settings
中与
Debug
的一样,只是把
“chk”
改为
“fre”
即可,如下图:

接下来设置工程属性,在
All Configurations
中,
Configuration Properties->NMake->Include Search Path
中添加路径:
C:/WinDDK/6000/inc/ddk;C:/WinDDK/6000/inc/api
接下来添加源代码文件,举个例子:
first.c
|
#include <ntddk.h>
VOID DriverUnload(PDRIVER_OBJECT driver)
{ DbgPrint("Driver unloading.../n"); }
NTSTATUS DriverEntry(PDRIVER_OBJECT driver, PUNICODE_STRING reg_path)
{ DbgPrint("Entered Driver Entry!/n");
driver->DriverUnload = DriverUnload; return STATUS_SUCCESS; } |
现在可以发现在
VS
中可以使用
VS
开发环境带来的强大功能,如查看
PDRIVER_OBJECT
的定义、查看某变量的成员函数(
Ctrl+J)
等等。
接下来要为编译作准备,添加以下这些文件:
makefile
|
!IF 0
Copyright (C) Microsoft Corporation, 1999 - 2002
Module Name:
makefile.
Notes:
DO NOT EDIT THIS FILE!!! Edit ./sources. if you want to add a new source
file to this component. This file merely indirects to the real make file that is shared by all the components of Windows NT (DDK)
!ENDIF
!INCLUDE $(NTMAKEENV)/makefile.def
|
sources
|
TARGETNAME=first
TARGETTYPE=DRIVER TARGETPATH=obj
SOURCES=first.c
|
ddk_build.bat
|
@echo on
@echo %1 is chk or fre %2 is WXP or W2K or WNET.
if "%4"=="/a" call ddk_clean %1 %2
pushd.
call %BASEDIR%/bin/setenv.bat %BASEDIR% %1 %2 popd
@echo on build |
ddk_clean.bat
|
if exist Debug rd /s /q Debug if exist Release rd /s /q Release if exist obj%1_%2_x86 rd /s /q obj%1_%2_x86 |
现在,按
F7
就可以编译连接了。
以上就是搭建
VS
的内核开发环境过程。
三、调试环境
使用到的工具是:
VMware
、
WinDbg
、
srvinstw.exe
等。


 1万+
1万+

 被折叠的 条评论
为什么被折叠?


