


1.虚拟机管理

列出运行的虚拟机
列出所有的虚拟机
运行虚拟机 后面是虚拟机的名字
显示虚拟机
关闭虚拟机 后面是他的名字
强行关闭虚拟机
图形里面删除虚拟机(前端管理文件) 后面是虚拟机名
删除虚拟机的硬盘
恢复虚拟机 后面是虚拟机的名字.xml,如果提示路径不对,将需要的路径放到上面的/var/lib/libvirt/images/里面(scp和mv命令),但是这是一次性的打开,关闭就没了
永久恢复,后面是虚拟机名字
[root@localhost images]# qemu-img create -f qcow2 -b /var/lib/libvirt/images/westos.qcow2
/var/lib/libvirt/images/node.qcow2`##这个命令是照一张快照,create创建 -f指定类型为qcow2, -b 备份的文件目录,再后面是生成的文件地址
##如果我们的系统坏了,就用快照来恢复,如果快照坏了,我们就删除快照,然后重新创建快照(和上面的命令一样)
##如果我们在需要一个虚拟机,这个时候就不需要重新创建设置了,直接
[root@localhost images]# qemu-img create -f qcow2 -b /var/lib/libvirt/images/westos.qcow2
/var/lib/libvirt/images/node1.qcow2##将后面的改名字比如node1,就会生成新的虚拟机
##如何用脚本自动化批量装虚拟机
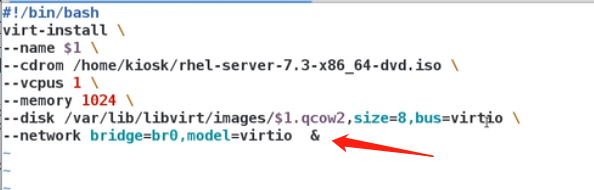
[root@localhost images]# virt-install \##使用virt-instll来按照,然后\是空格加上反斜杠就会达到换行的目的
> --cdrom /home/cxg/rhel-server-7.6-×86_64-dvd.iso \##cdrom是内存然后我们输入的是我们系统镜像的位置,最后加上换行


##上面那一步相当于图片中的两步,选择第一个安装cdrom(使用镜像的本地安装),和选择镜像的位置
> --vcpu 1 \
> --memory 1024 \

##上面这个相当于图片的步骤选择cpu数目和内存的大小
>--disk /var/lib/libvirt/images/test.qcow2,size=8 ,bus=virtio \##这个是设置硬盘保存位置(自己设置)还有size 硬盘的大小,bus总线


>--name test \ ##还有名字虚拟机的名字test

>--network bridge=br0,model=virtio \##这个是设置网络为桥接模式的br0,然后model=virtio格式

##这样就回车后就结束了。下面把详细过程用图片表达下:


##可以看到虚拟机已经创建了
##如何将上面这些操作写成脚本
[root@localhost images]# cd /usr/bin/##我们在bin下写,可以直接生成系统的脚本命令,这文件就是系统的环境变量
[root@localhost bin]# echo $PATH##这个命令可以查看系统的环境变量,这个里面的文件可以用文件的名称来调用
/usr/local/bin:/usr/local/sbin:/usr/bin:/usr/sbin:/bin:/sbin:/root/bin
[root@localhost bin]# vim /usr/bin/vm_create.sh##脚本里面是书写如下

#!/bin/bash##这个是里面的所有命令的运行环境是/bin/bash/
[root@localhost bin]# chmod +x /usr/bin/vm_create.sh##给create.sh一个可以执行的权限
[root@localhost bin]# vm_create.sh##再运行这个脚本就可以创建虚拟机了,但是如果我们已经有一个test虚拟机,如果我们脚本的虚拟机也叫test,那就会报错,那我们写脚本想达到批量创建虚拟机的目的没有达到,那我们怎么解决

##将这两个地方改为$1
##将test改为$1,这个的意思就是脚本后面所跟的第一串字符
##例如:我们编辑一个test.sh 后面我们运行test脚本的时候必须加上对象,不然脚本就无法运行

[root@localhost bin]# vm_create.sh westos1##我们这样直接输入一个westos1就可以直接创建一个名为westos1的虚拟机
##我们不想让运行创建虚拟机占用我们的命令行就在脚本上打上个&符号就行了
##确定脚本没有任何问题,我们可以设>/dev/null &,将输出结果隐藏了
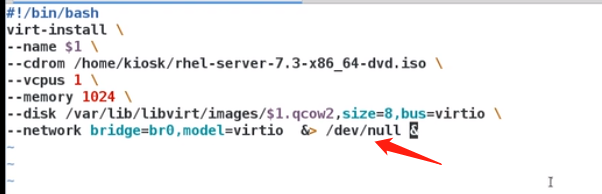

##没有输出,但是这个虚拟机也已经被创建了
2.网络部署

[root@localhost bin]# ping 192.168.0.100##我们ping一下我们本身的ip,可以看到只要我们不停止他,他就会一直ping
PING 192.168.0.100 (192.168.0.100) 56(84) bytes of data.
64 bytes from 192.168.0.100: icmp_seq=1 ttl=64 time=0.043 ms
64 bytes from 192.168.0.100: icmp_seq=2 ttl=64 time=0.045 ms
64 bytes from 192.168.0.100: icmp_seq=3 ttl=64 time=0.040 ms
64 bytes from 192.168.0.100: icmp_seq=4 ttl=64 time=0.050 ms
64 bytes from 192.168.0.100: icmp_seq=5 ttl=64 time=0.054 ms
64 bytes from 192.168.0.100: icmp_seq=6 ttl=64 time=0.061 ms
64 bytes from 192.168.0.100: icmp_seq=7 ttl=64 time=0.132 ms
64 bytes from 192.168.0.100: icmp_seq=8 ttl=64 time=0.267 ms
64 bytes from 192.168.0.100: icmp_seq=9 ttl=64 time=0.050 ms
64 bytes from 192.168.0.100: icmp_seq=10 ttl=64 time=0.046 ms
64 bytes from 192.168.0.100: icmp_seq=11 ttl=64 time=0.040 ms
64 bytes from 192.168.0.100: icmp_seq=12 ttl=64 time=0.049 ms
64 bytes from 192.168.0.100: icmp_seq=13 ttl=64 time=0.043 ms
64 bytes from 192.168.0.100: icmp_seq=14 ttl=64 time=0.042 ms
64 bytes from 192.168.0.100: icmp_seq=15 ttl=64 time=0.048 ms
^C
--- 192.168.0.100 ping statistics ---
15 packets transmitted, 15 received, 0% packet loss, time 14003ms
rtt min/avg/max/mdev = 0.040/0.067/0.267/0.058 ms
[root@localhost bin]# ping -c1 192.168.0.100##-c1代表只ping一次
PING 192.168.0.100 (192.168.0.100) 56(84) bytes of data.
64 bytes from 192.168.0.100: icmp_seq=1 ttl=64 time=0.044 ms

--- 192.168.0.100 ping statistics ---

1 packets transmitted, 1 received, 0% packet loss, time 0ms
rtt min/avg/max/mdev = 0.044/0.044/0.044/0.000 ms
[root@localhost bin]# ping -c1 -w1 192.168.0.100##-w1代表只等待一秒
PING 192.168.0.100 (192.168.0.100) 56(84) bytes of data.
64 bytes from 192.168.0.100: icmp_seq=1 ttl=64 time=0.110 ms

--- 192.168.0.100 ping statistics ---
1 packets transmitted, 1 received, 0% packet loss, time 0ms
rtt min/avg/max/mdev = 0.110/0.110/0.110/0.000 ms
[root@localhost bin]# ifconfig ens33 192.168.0.200/24##我们将ens33的ip改为200
[root@localhost bin]# ifconfig##可以看到ens33的ip已经改为200
ens33: flags=4163<UP,BROADCAST,RUNNING,MULTICAST>  mtu 1500
        inet 192.168.0.200  netmask 255.255.255.0  broadcast 192.168.0.255
        inet6 fe80::20c:29ff:fe38:40af  prefixlen 64  scopeid 0x20<link>
        ether 00:0c:29:38:40:af  txqueuelen 1000  (Ethernet)
        RX packets 12542  bytes 2661616 (2.5 MiB)
        RX errors 0  dropped 0  overruns 0  frame 0
        TX packets 5027  bytes 381900 (372.9 KiB)
        TX errors 0  dropped 0 overruns 0  carrier 0  collisions 0

lo: flags=73<UP,LOOPBACK,RUNNING>  mtu 65536
        inet 127.0.0.1  netmask 255.0.0.0
        inet6 ::1  prefixlen 128  scopeid 0x10<host>
        loop  txqueuelen 1000  (Local Loopback)
        RX packets 804456  bytes 118035236 (112.5 MiB)
        RX errors 0  dropped 0  overruns 0  frame 0
        TX packets 804456  bytes 118035236 (112.5 MiB)
        TX errors 0  dropped 0 overruns 0  carrier 0  collisions 0

virbr0: flags=4099<UP,BROADCAST,MULTICAST>  mtu 1500
        inet 192.168.122.1  netmask 255.255.255.0  broadcast 192.168.122.255
        ether 52:54:00:bd:87:59  txqueuelen 1000  (Ethernet)
        RX packets 0  bytes 0 (0.0 B)
        RX errors 0  dropped 0  overruns 0  frame 0
        TX packets 0  bytes 0 (0.0 B)
        TX errors 0  dropped 0 overruns 0  carrier 0  collisions 0
[root@localhost bin]# ifconfig ens33 down##关闭网卡ens33
[root@localhost bin]# ifconfig##发现ifconfig里面已经找不到ens33了
lo: flags=73<UP,LOOPBACK,RUNNING>  mtu 65536
        inet 127.0.0.1  netmask 255.0.0.0
        inet6 ::1  prefixlen 128  scopeid 0x10<host>
        loop  txqueuelen 1000  (Local Loopback)
        RX packets 2762  bytes 358471 (350.0 KiB)
        RX errors 0  dropped 0  overruns 0  frame 0
        TX packets 2762  bytes 358471 (350.0 KiB)
        TX errors 0  dropped 0 overruns 0  carrier 0  collisions 0

virbr0: flags=4099<UP,BROADCAST,MULTICAST>  mtu 1500
        inet 192.168.122.1  netmask 255.255.255.0  broadcast 192.168.122.255
        ether 52:54:00:bd:87:59  txqueuelen 1000  (Ethernet)
        RX packets 0  bytes 0 (0.0 B)
        RX errors 0  dropped 0  overruns 0  frame 0
        TX packets 0  bytes 0 (0.0 B)
        TX errors 0  dropped 0 overruns 0  carrier 0  collisions 0
[root@localhost bin]# ifconfig ens33 up##然后再打开ens33
[root@localhost bin]# ifconfig##可以看到ens33网关又出来了
ens33: flags=4163<UP,BROADCAST,RUNNING,MULTICAST>  mtu 1500
        inet 192.168.0.100  netmask 255.255.255.0  broadcast 192.168.0.255
        inet6 fe80::20c:29ff:fe38:40af  prefixlen 64  scopeid 0x20<link>
        ether 00:0c:29:38:40:af  txqueuelen 1000  (Ethernet)
        RX packets 12468  bytes 2652495 (2.5 MiB)
        RX errors 0  dropped 0  overruns 0  frame 0
        TX packets 4991  bytes 375152 (366.3 KiB)
        TX errors 0  dropped 0 overruns 0  carrier 0  collisions 0

lo: flags=73<UP,LOOPBACK,RUNNING>  mtu 65536
        inet 127.0.0.1  netmask 255.0.0.0
        inet6 ::1  prefixlen 128  scopeid 0x10<host>
        loop  txqueuelen 1000  (Local Loopback)
        RX packets 2762  bytes 358471 (350.0 KiB)
        RX errors 0  dropped 0  overruns 0  frame 0
        TX packets 2762  bytes 358471 (350.0 KiB)
        TX errors 0  dropped 0 overruns 0  carrier 0  collisions 0

virbr0: flags=4099<UP,BROADCAST,MULTICAST>  mtu 1500
        inet 192.168.122.1  netmask 255.255.255.0  broadcast 192.168.122.255
        ether 52:54:00:bd:87:59  txqueuelen 1000  (Ethernet)
        RX packets 0  bytes 0 (0.0 B)
        RX errors 0  dropped 0  overruns 0  frame 0
        TX packets 0  bytes 0 (0.0 B)
        TX errors 0  dropped 0 overruns 0  carrier 0  collisions 0
##但是我们的ifconfig的修改都是临时的
[root@localhost bin]# systemctl restart network##我们重启网络后
ifconfig[root@localhost bin]# ifconfig##发现我们前面修改的ip也已经还原到原本的100了
ens33: flags=4163<UP,BROADCAST,RUNNING,MULTICAST>  mtu 1500
        inet 192.168.0.100  netmask 255.255.255.0  broadcast 192.168.0.255
        ether 00:0c:29:38:40:af  txqueuelen 1000  (Ethernet)
        RX packets 12659  bytes 2671139 (2.5 MiB)
        RX errors 0  dropped 0  overruns 0  frame 0
        TX packets 5050  bytes 384940 (375.9 KiB)
        TX errors 0  dropped 0 overruns 0  carrier 0  collisions 0

lo: flags=73<UP,LOOPBACK,RUNNING>  mtu 65536
        inet 127.0.0.1  netmask 255.0.0.0
        inet6 ::1  prefixlen 128  scopeid 0x10<host>
        loop  txqueuelen 1000  (Local Loopback)
        RX packets 17051339  bytes 2241633059 (2.0 GiB)
        RX errors 0  dropped 0  overruns 0  frame 0
        TX packets 17051339  bytes 2241633059 (2.0 GiB)
        TX errors 0  dropped 0 overruns 0  carrier 0  collisions 0

virbr0: flags=4099<UP,BROADCAST,MULTICAST>  mtu 1500
        inet 192.168.122.1  netmask 255.255.255.0  broadcast 192.168.122.255
        ether 52:54:00:bd:87:59  txqueuelen 1000  (Ethernet)
        RX packets 0  bytes 0 (0.0 B)
        RX errors 0  dropped 0  overruns 0  frame 0
        TX packets 0  bytes 0 (0.0 B)
        TX errors 0  dropped 0 overruns 0  carrier 0  collisions 0
[root@localhost bin]# ip addr add 192.168.0.200/24 dev eth1##可以创建一个ip为200的网卡名字为eth1
localhost bin]# ip addr
[root@localhost bin]# ip addr del 192.168.0.200/24 dev eth1##这个是删除ip为200的网卡名字为eth0
localhost bin]# ip addr
##如果我们的ip addr add或者del命令没有生效我们可以使用ip addr flush eth0来进行刷新网络
##但是我们的ip addr和ifconfig命令都是临时设定的,如果我们的重启服务全部的设定都会失效

[root@localhost ~]# cd /etc/sysconfig/network-scripts/
[root@localhost network-scripts]# ls##查看网络设置的文件
ifcfg-ens33  ifdown-isdn      ifup          ifup-plip      ifup-tunnel
ifcfg-lo     ifdown-post      ifup-aliases  ifup-plusb     ifup-wireless
ifdown       ifdown-ppp       ifup-bnep     ifup-post      init.ipv6-global
ifdown-bnep  ifdown-routes    ifup-eth      ifup-ppp       network-functions
ifdown-eth   ifdown-sit       ifup-ib       ifup-routes    network-functions-ipv6
ifdown-ib    ifdown-Team      ifup-ippp     ifup-sit
ifdown-ippp  ifdown-TeamPort  ifup-ipv6     ifup-Team
ifdown-ipv6  ifdown-tunnel    ifup-isdn     ifup-TeamPort
##我们先设置一个动态的网络设置
[root@localhost network-scripts]# vim ifcfg-eth0##下面是动态的设置方式

##第二行表示网络服务的时候自动激活网卡
##第三行表示网卡的工作模式是dhcp的
##可以看到我们的nm-connection-editor里面已经显示了新创建的网卡的信息了

##我们可以在上面的vim ifcfg-eth0里面加上一行修改网卡的名字
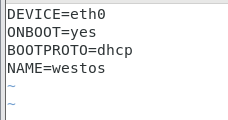

##上面是动态网络的设定方法
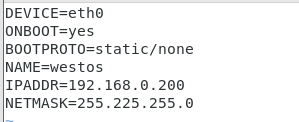
[root@localhost network-scripts]# vim ifcfg-eth0##下面是静态网络的设置方法
[root@localhost network-scripts]# systemctl restart network##重启网络后发现已经生效了
[root@localhost network-scripts]# ip addr

##我们可以看到ens33只有一个ip我们可以给他增加ip让他拥有多个ip

##给上面加上个IPADDR2,然后再重启,这样我们ens33就又两个ip地址了,因此我们可以知道:
##我们修改网络信息的时候使用ifconfg命令是临时的,重启后他就会失效,但是他的作用的方便,直接输入命令就可以执行,我们在etc下的sysconfig/network-scripts/里面修改网络配置信息,是永久修改的,重启后,修改的内容就会生效

[root@localhost ~]# nmcli device show ##显示系统中所有设备的信息
GENERAL.DEVICE:                         virbr0
GENERAL.TYPE:                           bridge
GENERAL.HWADDR:                         52:54:00:BD:87:59
GENERAL.MTU:                            1500
GENERAL.STATE:                          100 (connected)
GENERAL.CONNECTION:                     virbr0
GENERAL.CON-PATH:                       /org/freedesktop/NetworkManager/ActiveConnection/
IP4.ADDRESS[1]:                         192.168.122.1/24
IP4.GATEWAY:                            --
IP4.ROUTE[1]:                           dst = 192.168.122.0/24, nh = 0.0.0.0, mt = 0
IP6.GATEWAY:                            --

GENERAL.DEVICE:                         ens33
GENERAL.TYPE:                           ethernet
GENERAL.HWADDR:                         00:0C:29:38:40:AF
GENERAL.MTU:                            1500
GENERAL.STATE:                          30 (disconnected)
GENERAL.CONNECTION:                     --
GENERAL.CON-PATH:                       --
WIRED-PROPERTIES.CARRIER:               on

GENERAL.DEVICE:                         lo
GENERAL.TYPE:                           loopback
GENERAL.HWADDR:                         00:00:00:00:00:00
GENERAL.MTU:                            65536
GENERAL.STATE:                          10 (unmanaged)
GENERAL.CONNECTION:                     --
[root@localhost ~]# nmcli device status##可以查看系统是让哪个接口在使用着,可以看到系统让桥接运行着
DEVICE      TYPE      STATE         CONNECTION
virbr0      bridge    connected     virbr0
ens33       ethernet  disconnected  --
lo          loopback  unmanaged     --
virbr0-nic  tun       unmanaged     --
[root@localhost ~]# nmcli device connect ens33##让ens33这块网卡启动
Device 'ens33' successfully activated with '148d155a-b5c3-4b88-9624-de0a98966ed7'.
[root@localhost ~]# ifconfig ens33##可以看到ens33这块网卡已经启动了
ens33: flags=4163<UP,BROADCAST,RUNNING,MULTICAST>  mtu 1500
        inet 192.168.0.107  netmask 255.255.255.0  broadcast 192.168.0.255
        inet6 fe80::81c4:d0ab:467b:5f55  prefixlen 64  scopeid 0x20<link>
        ether 00:0c:29:38:40:af  txqueuelen 1000  (Ethernet)
        RX packets 6074  bytes 392606 (383.4 KiB)
        RX errors 0  dropped 0  overruns 0  frame 0
        TX packets 51  bytes 7156 (6.9 KiB)
        TX errors 0  dropped 0 overruns 0  carrier 0  collisions 0
[root@localhost ~]# nmcli device status##也可以通过查看设备状态来查看状态,可以看到ens33的状态时连接中
DEVICE      TYPE      STATE      CONNECTION
ens33       ethernet  connected  ens33
virbr0      bridge    connected  virbr0
lo          loopback  unmanaged  --
virbr0-nic  tun       unmanaged  --
[root@localhost ~]# nmcli device disconnect ens33##取消ens33的链接
Device 'ens33' successfully disconnected.
[root@localhost ~]# nmcli connection show##显示连接的网卡
NAME    UUID                                  TYPE      DEVICE
virbr0  91a31596-f351-419c-9fe4-87ca673d5ac6  bridge    virbr0
ens33   148d155a-b5c3-4b88-9624-de0a98966ed7  ethernet  --
##下面的ens33没有使用DEVICE代表他就是失效了
[root@localhost ~]# nmcli connection delete "ens33"##这个是删除ens33这块网卡的连接删除
Connection 'ens33' (148d155a-b5c3-4b88-9624-de0a98966ed7) successfully deleted.

##可以看到ens33这块网卡的已经被删除掉了
##我们该如何重新建立一个网卡连接呢
[root@localhost ~]# nmcli connection add type ethernet con-name westos ifname ens33 autoconnect yes##nmcli connection add就是增加一个网卡连接,后面的参数都是我们以前手动用图形创建时候需要设置的输入的内容,type ethernet(连接种类为Ethernet)con-name westos(这个是设备名) ifname ens33(真实的设备为ens33)autoconnect yes(指定一个dhcp的网络)


Connection ‘westos’ (7de13e42-aea7-4e25-b8e1-1f40a2cfaba4) successfully added.

##可以看到westos已经被创建出来了
root@localhost network-scripts]# vim ifcfg-westos##我们network-scripts里面已经创建出来个westos,我们查看他,发现它就是我们创建的一个动态dhcp的网卡连接

[root@localhost network-scripts]# nmcli connection delete westos##删除westos
Connection 'westos' (7de13e42-aea7-4e25-b8e1-1f40a2cfaba4) successfully deleted.
[root@localhost network-scripts]# ls##看到网卡设置信息里面已经没有wetos的信息了
ifcfg-ens33  ifdown-isdn      ifup          ifup-plip      ifup-tunnel
ifcfg-lo     ifdown-post      ifup-aliases  ifup-plusb     ifup-wireless
ifdown       ifdown-ppp       ifup-bnep     ifup-post      init.ipv6-global
##如果我们想指定个静态的怎么办?
[root@localhost network-scripts]# nmcli connection add con-name westos type ethernet ifname ens33 ip4 192.168.0.100/24##解释同上,后面加上个ip4 192.168.0.100/24
Connection 'westos' (3afb534b-2076-4df9-81b2-b5bc30a79a25) successfully added.
[root@localhost network-scripts]# ifconfig ens33##可以看到ens33已经建立
ens33: flags=4163<UP,BROADCAST,RUNNING,MULTICAST>  mtu 1500
        inet 192.168.0.100  netmask 255.255.255.0  broadcast 192.168.0.255
        inet6 fe80::24d6:125c:ddee:cbfc  prefixlen 64  scopeid 0x20<link>
        ether 00:0c:29:38:40:af  txqueuelen 1000  (Ethernet)
        RX packets 8941  bytes 595854 (581.8 KiB)
        RX errors 0  dropped 0  overruns 0  frame 0
        TX packets 327  bytes 38874 (37.9 KiB)
        TX errors 0  dropped 0 overruns 0  carrier 0  collisions 0
[root@localhost network-scripts]# ls##可以看到ifcfg-westos文件也会自动建立
ifcfg-ens33   ifdown-ipv6      ifdown-tunnel  ifup-isdn    ifup-TeamPort
ifcfg-lo      ifdown-isdn      ifup           ifup-plip    ifup-tunnel
ifcfg-westos  ifdown-post      ifup-aliases   ifup-plusb   ifup-wireless
[root@localhost network-scripts]# vim ifcfg-westos##进入westos 查看可以看到里面就是静态的 BOOTPROTO=none

##我们如何将westos直接修改为动态的dhcp的
[root@localhost network-scripts]# nmcli connection modify westos ipv4.method --help##通过查询我们可以看到auto代表是dhcp的,manual代表的是静态的
Error: failed to modify ipv4.method: '--help' not among [auto, link-local, manual, shared, disabled].
[root@localhost network-scripts]# nmcli connection modify westos ipv4.method auto
[root@localhost network-scripts]# cat ifcfg-westos ##可以看到我们的westos网卡的连接已经被设置为动态的了
TYPE=Ethernet
PROXY_METHOD=none
BROWSER_ONLY=no
BOOTPROTO=dhcp
IPADDR=192.168.0.100
PREFIX=24
DEFROUTE=yes
IPV4_FAILURE_FATAL=no
IPV6INIT=yes
IPV6_AUTOCONF=yes
IPV6_DEFROUTE=yes
IPV6_FAILURE_FATAL=no
IPV6_ADDR_GEN_MODE=stable-privacy
NAME=westos
UUID=a293ee9b-e46f-4b64-b556-18c2ff53cfa1
DEVICE=ens33
ONBOOT=yes
##我们再尝试将dhcp的改为静态的
[root@localhost network-scripts]# nmcli connection modify westos ipv4.method manual
[root@localhost network-scripts]# cat ifcfg-westos
TYPE=Ethernet
PROXY_METHOD=none
BROWSER_ONLY=no
BOOTPROTO=none
IPADDR=192.168.0.100
PREFIX=24
DEFROUTE=yes
IPV4_FAILURE_FATAL=no
IPV6INIT=yes
IPV6_AUTOCONF=yes
IPV6_DEFROUTE=yes
IPV6_FAILURE_FATAL=no
IPV6_ADDR_GEN_MODE=stable-privacy
NAME=westos
UUID=a293ee9b-e46f-4b64-b556-18c2ff53cfa1
DEVICE=ens33
ONBOOT=yes
##ipv4没有设置因此我们需要在上面的步骤之前加上
[root@localhost network-scripts]# nmcli connection modify westos ipv4.addresses 192.168.0.100##必须先加上这个设置ipv.4的才行,然后再加上[root@localhost network-scripts]# nmcli connection modify westos ipv4.method manual就可以了,最后记得重启网络
[root@localhost network-scripts]# nmcli connection down westos##关闭westos网卡连接
Connection 'westos' successfully deactivated (D-Bus active path: /org/freedesktop/NetworkManager/ActiveConnection/7)
[root@localhost network-scripts]# ip addr##从ip addr里面已经看不到westos(westos)这个网卡了
[root@localhost network-scripts]# nmcli connection up westos##打开westos网卡连接
Connection successfully activated (D-Bus active path: /org/freedesktop/NetworkManager/ActiveConnection/8)
[root@localhost network-scripts]# ip addr##可以看到westos已经建立了网卡连接了
[root@localhost network-scripts]# nmcli connection reload##重新加载配置
–
我们再建立连接的时候有时候多次创建同一个连接
[root@localhost network-scripts]# nmcli connection add con-name westos type ethernet ifname ens33 ip4 192.168.0.100/24
Warning: There are 3 other connections with the name 'westos'. Reference the connection by its uuid '021580fa-d359-4ec6-bbfd-bdf7de0ac734'
Connection 'westos' (021580fa-d359-4ec6-bbfd-bdf7de0ac734) successfully added.
[root@localhost network-scripts]# nmcli connection add con-name westos type ethernet ifname ens33 ip4 192.168.0.100/24
Warning: There are 4 other connections with the name 'westos'. Reference the connection by its uuid 'd3b97ccf-8bb8-4c11-a93c-d3a6e5370f2a'
Connection 'westos' (d3b97ccf-8bb8-4c11-a93c-d3a6e5370f2a) successfully added.
##这个就造成我们存在多个同样的连接,但是只有一个在使用,这就是出现错误了,一个设备只能拥有一个连接

[root@localhost network-scripts]# nmcli connection show##查看连接状态,发现只有第一个westos生效,因此我们需要删除这些没有生效的空连接
NAME    UUID                                  TYPE      DEVICE
virbr0  91a31596-f351-419c-9fe4-87ca673d5ac6  bridge    virbr0
westos  a293ee9b-e46f-4b64-b556-18c2ff53cfa1  ethernet  ens33
westos  ac840fe0-bcc8-44a0-b448-f8d1fffcd943  ethernet  --
westos  17059a08-9dd2-4cb7-b4bf-7317f2125259  ethernet  --
westos  021580fa-d359-4ec6-bbfd-bdf7de0ac734  ethernet  --
westos  d3b97ccf-8bb8-4c11-a93c-d3a6e5370f2a  ethernet  --
[root@localhost network-scripts]# nmcli connection delete westos##如果使用这条命令就会将所有的westos包括正在使用的westos也删除掉,那我们可以看到上面那些westos的连接不同的地方在uuid上那如何删除不用的呢?
[root@localhost network-scripts]# nmcli connection delete uuid ac840fe0-bcc8-44a0-b448-f8d1fffcd943
Connection 'westos' (ac840fe0-bcc8-44a0-b448-f8d1fffcd943) successfully deleted.
[root@localhost network-scripts]# nmcli connection delete uuid 17059a08-9dd2-4cb7-b4bf-7317f2125259
Connection 'westos' (17059a08-9dd2-4cb7-b4bf-7317f2125259) successfully deleted.
[root@localhost network-scripts]# nmcli connection delete uuid 021580fa-d359-4ec6-bbfd-bdf7de0ac734
Connection 'westos' (021580fa-d359-4ec6-bbfd-bdf7de0ac734) successfully deleted.
[root@localhost network-scripts]# nmcli connection delete uuid d3b97ccf-8bb8-4c11-a93c-d3a6e5370f2a
Connection 'westos' (d3b97ccf-8bb8-4c11-a93c-d3a6e5370f2a) successfully deleted.
[root@localhost network-scripts]# nmcli connection show
NAME    UUID                                  TYPE      DEVICE
virbr0  91a31596-f351-419c-9fe4-87ca673d5ac6  bridge    virbr0
westos  a293ee9b-e46f-4b64-b556-18c2ff53cfa1  ethernet  ens33
##我们可以分别根据uuid删除那些不用的westos
2.1路由器及网关
[root@localhost network-scripts]# vim ifcfg-ens33##我们将网卡的IP地址改为1.1.1.100,
[root@localhost network-scripts]# systemctl restart network##重启服务
[root@localhost network-scripts]# ip addr show ens33
2: ens33: <BROADCAST,MULTICAST,UP,LOWER_UP> mtu 1500 qdisc pfifo_fast state UP group default qlen 1000
    link/ether 00:0c:29:38:40:af brd ff:ff:ff:ff:ff:ff
    inet 1.1.1.100/8 brd 1.255.255.255 scope global noprefixroute ens33
       valid_lft forever preferred_lft forever
[root@localhost network-scripts]# ping 192.168.0.200##我们用1.1.1.100这个设备的网络来ping另外一台设备的ip发现不能直接ping,因为网络位不一致192对应的是1,168对应的是1,0对应的是1,200对应的是100,因此不能直接连接
PING 192.168.0.200 (192.168.0.200) 56(84) bytes of data.
From 1.1.1.100 icmp_seq=17 Destination Host Unreachable
From 1.1.1.100 icmp_seq=18 Destination Host Unreachable
##网关就是路由器上处于同一个网段的ip
##路由器就是把一个不可以到达目的地的地址转化为可以到达目的地的地址

例如:##我们原本的ip是1.1.1.100我们直接传输到172.25.254.10是不能实现的,因此我们需要网关将我们的ip修改为1.1.1.250传输到中间的路由器中,然后因为中间的路由器是双网卡,且172.25.254.250可以和172.25.254.10连接,然后传输到路由器的1.1.1.250和172.25.254.250是在同一个内核的双网卡,相当于把1.1.1.250包装上172.25.254.250的外壳,然后和172.25.254.10连接,这样就实现了不同网段的连接
2.2网关的实验设定
##我们这里需要三台虚拟机,一台设置IP为192.168.0.200,一台设置为192.168.0.100和1.1.1.250的双网卡虚拟机,最后一台设置为ip为1.1.1.120,双网卡的设置需要我们

##在虚拟机设备的设定中多加一块网络适配器,并且同时保证第一台的IP和第二台的192.168.0.100能ping通,第三台的ip能和第二台的1.1.1.120能ping通,第二台的192.168.0.100能和第一台ping通,1.1.1.120能和第三台IP能ping通,这样我们的实验环境都完成了,
##我们上面提到的路由器就是把一个不可以到达目的地的地址转化为可以到达目的地的地址,因此我们需要先设定一下这个双网卡主机的信息

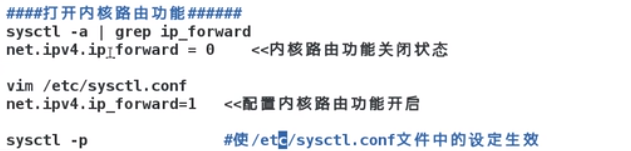
[root@localhost network-scripts]# systctl -a##这个是查看内核参数的
[root@localhost network-scripts]# sysctl -a | grep ip_forward##这个是查看内核的路由功能的参数
net.ipv4.ip_forward = 0
##可以看到ip_forward 功能是关闭的,所以两块网卡没在同一个网段依然无法通信传输,因此我们就需要打开这个功能
[root@localhost network-scripts]# vim /etc/sysctl.conf##这个是路由的配置文件,我们再里面加上net.ipv4.ip_forward = 1

[root@localhost network-scripts]# sysctl -p##可以看到内核的路由功能已经开启了( 从指定的文件加载系统参数,如不指定即从/etc/sysctl.conf中加载)是sysctl.conf配置生效
net.ipv4.ip_forward = 1
[root@localhost network-scripts]# systemctl status firewalld.service##查看防火墙状态
● firewalld.service - firewalld - dynamic firewall daemon
   Loaded: loaded (/usr/lib/systemd/system/firewalld.service; enabled; vendor preset: enabled)
   Active: active (running) since Fri 2020-06-19 20:46:30 CST; 18h ago
     Docs: man:firewalld(1)
 Main PID: 7106 (firewalld)
    Tasks: 2
   CGroup: /system.slice/firewalld.service
           └─7106 /usr/bin/python -Es /usr/sbin/firewalld --nofork --nopid

Jun 19 20:46:28 localhost.localdomain systemd[1]: Starting firewalld - dynami...
Jun 19 20:46:30 localhost.localdomain systemd[1]: Started firewalld - dynamic...
Hint: Some lines were ellipsized, use -l to show in full.
[root@localhost network-scripts]# firewall-cmd --list-all##发现里面的masquerade功能是关着的
public (active)
  target: default
  icmp-block-inversion: no
  interfaces: eth0 eth1
  sources:
  services: ssh dhcpv6-client
  ports:
  protocols:
  masquerade: no
  forward-ports:
  source-ports:
  icmp-blocks:
  rich rules:
[root@localhost network-scripts]# firewall-cmd --permanent --add-masquerade##打开masquerade功能
success
[root@localhost network-scripts]# firewall-cmd --reload ##重新加载下火墙
success
[root@localhost network-scripts]# firewall-cmd --list-all##可以看到masquerade: yes已经是yes了
public (active)
  target: default
  icmp-block-inversion: no
  interfaces: eth0 eth1
  sources:
  services: ssh dhcpv6-client
  ports:
  protocols:
  masquerade: yes
  forward-ports:
  source-ports:
  icmp-blocks:
  rich rules:
##这样现在这台主机就成为了路由器,成为路由器两个步骤先打开地址伪装功能(add-masquerade),配置参数里面打开内核路由功能(net.ipv4.ip_forward = 1)

##我们用第三台主机来ping第一台主机的IP发现依然ping不通是什么原因呢?这是因为我们这个双网卡的路由器和第三台主机没有关系,我们现在用170来ping192.168.0.200,因为中间的双网卡路由和主机没有关系,因此我们需要设置把第三台主机让他把信息不要直接发往192.168.0.200,而是发送到1.1.1.120的那个双网卡路由主机上

网关就是当我们的ip为1.1.1.170时候,和我处在同网段的1.1.1.120是我的网关,
##网关的设置有两种一种是全局网关,一种是网卡网关,当我们有多个网卡,就有多个IP,那我们如何设置一个网关对应所要满足要求的网关生效,我们需要写进满足要求的这个网关配置文件就可以达到要求,我们下面先使用网卡网关的设置方法
[root@localhost network-scripts]# vim ifcfg-ens33##进入第三台主机的配置文件,我们加入网关1.1.1.120,就是意思让这台170的主机把所有的访问请求发送到1.1.1.120,再由120传递到目的地去(192.168.0.200)

[root@localhost network-scripts]# systemctl restart network##重启服务
[root@localhost network-scripts]# route -n##可以看到我们的1.1.1.120网关已经设置成功了
Kernel IP routing table
Destination     Gateway         Genmask         Flags Metric Ref    Use Iface
0.0.0.0			1.1.1.120		0.0.0.0					UG      1024      0 ens33
1.1.1.0         0.0.0.0         255.255.255.0   U     101    0        0 ens33
[root@localhost network-scripts]# ping 192.168.0.200##这个时候从第三台主机ping第一台主机的ip发现已经通了
PING 192.168.0.200 (192.168.0.200) 56(84) bytes of data.
64 bytes from 192.168.0.200: icmp_seq=1 ttl=64 time=0.545 ms
64 bytes from 192.168.0.200: icmp_seq=2 ttl=64 time=0.502 ms
[root@localhost network-scripts]# ssh root@192.168.0.200##我们使用第三台主机远程连接第一台主机
root@192.168.0.200's password:
Last login: Sat Jun 13 03:26:31 2020 from 192.168.0.100
[root@localhost ~]# w -i##查看连通状态时候发现我们连通的时候使用的IP不是我们传输到双网卡路由功能的1.1.1.120这个IP,而是192.168.0.100的这个可以直接和192.168.0.200连通的IP,就是把1.1.1.120伪装成192.168.0.100来与192.168.0.200连接(依靠的是masquerade伪装)
15:57:15 up 6:16, 2 users, load average: 0.03, 0.01, 0.00
USER     TTY      FROM             LOGIN@   IDLE   JCPU   PCPU WHAT
root     tty1     -                13Jun20 21:45   4.29s  4.29s -bash
root     pts/0    192.168.0.100    15:57    2.00s  0.28s  0.24s w -i
##总结:
net.ipv4.ip_forward = 1这个是实现1.1.1.120与192.168.0.100的交互,让1.1.1.120的传输可以传输到192.168.0.100去(同一个主机双网卡)
add-masquerade 这个是给1.1.1.120伪装上192.168.0.100的外壳与192.168.0.200连接。
最终实现1.1.1.170与192.168.0.200的直接连接
##拓展:
刚刚示例的是网卡网关的设置方法,我们现在使用全局网关(当本身的eth0,eth1里面没有设置网关,默认全局网关生效)的方法,我们删除前面网卡网关配置文件的GATEWAY=1.1.1.120把这个设置修改到**/etc/sysconfig/network**里面就可以了
[root@localhost sysconfig]# pwd
/etc/sysconfig
[root@localhost sysconfig]# vim network##在里面加上网关

2.3dns的设定
[root@localhost ~]# ping baidu.com##我们ping百度的网址,可以看到百度的IP为39.156.69.79
PING baidu.com (39.156.69.79) 56(84) bytes of data.
64 bytes from 39.156.69.79 (39.156.69.79): icmp_seq=1 ttl=49 time=16.9 ms
64 bytes from 39.156.69.79 (39.156.69.79): icmp_seq=2 ttl=49 time=16.7 ms
64 bytes from 39.156.69.79 (39.156.69.79): icmp_seq=3 ttl=49 time=15.6 ms
[root@localhost ~]# ping 39.156.69.79##ping一下百度的IP发现也可以ping通
PING 39.156.69.79 (39.156.69.79) 56(84) bytes of data.
64 bytes from 39.156.69.79: icmp_seq=1 ttl=49 time=52.9 ms
64 bytes from 39.156.69.79: icmp_seq=2 ttl=49 time=23.8 ms
64 bytes from 39.156.69.79: icmp_seq=3 ttl=49 time=23.5 ms

##我们在firefox里面输入百度的IP可以直接进入百度,虚拟机只能访问IP,不能通过www.baidu.com的方式进入百度,我们将IP分别转化为域名的方式叫做地址解析
##我们可以采用一种方式来实现地址解析(客户自己输入转化的内容)
[root@localhost ~]# vim /etc/hosts##本地解析文件,里面有写入IP的网址对应的域名

##这下就可以通过输入域名的方式进行访问

##但是如果我们有很多网站需要访问的话,那采用自己写入的方式就太麻烦
因此我们的网络运营商就把这些域名对ip的转化写在dns(域名解析服务)里面,而我们作为用户,就只需要当我们有问题时有可以问的对象
[root@localhost ~]# vim /etc/resolv.conf##这个文件写的是dns服务器的地址
dns服务器就是对我们的客户提供地址解析的服务器
##这个nameserver 114.114.114.114(这个是电信的智能IP,还有8.8.8.8也是智能IP)就是我们询问的对象,当我们输入网址后,这个114.114.114.114就帮忙查询网址域名对应的IP
##但是这个文件的内容在重启网络服务后,又回回到原本的修改之前的状态
##因此etc下的hosts为本地解析文件,这里面必须得我们写进去域名和解析才能询问到域名对应的IP
##而 /etc/resolv.conf是dns服务器的的文件,里面我们输入询问服务器的dns后,就可以在搭建好的dns数据库查询各种域名对应的IP
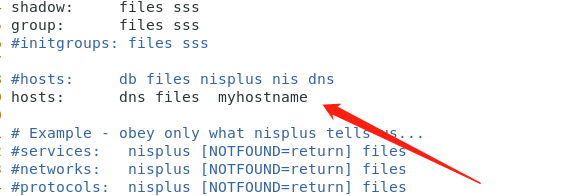
##优先级方面本地的hosts高于服务器,这是默认的,但是我们可以设置服务器高于本地的优先级,怎么设置呢

##原本是files在前,dns在后,我们把他俩调整下顺序就可以了
##上面提到我们修改etc下的reslov.conf文件重启服务后就会还原,那么我们如何让dns固定,重启服务后不会重置
[root@localhost ~]# cd /etc/sysconfig/network-scripts/
[root@localhost network-scripts]# vim ifcfg-ens33##加上一行dns1=114.114.114.114(注意dns这个参数在这里面是错的这里必须是dns1,dns后面的数字可以为1,2,3)
[root@localhost network-scripts]# systemctl restart network
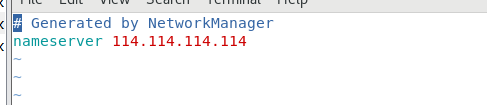
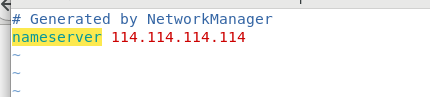
[root@localhost network-scripts]# cat /etc/resolv.conf##查看resol。conf文件 114.114.114.114已经出现了,并且是在重启服务后
# Generated by NetworkManager
nameserver 114.114.114.114
##我们删除掉ifcfg-ens33里面的dns1=114.114.114.114,再重启网络服务,查看resolv.conf发现里面已经没有我们需要查询的dns了
root@localhost network-scripts]# cat /etc/resolv.conf
# Generated by NetworkManager
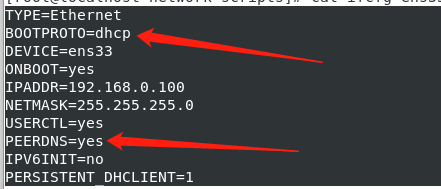
##上面这个增加DNS1=114.114.114.114只是针对静态static的,那么我们的动态dhcp怎么固定dns呢
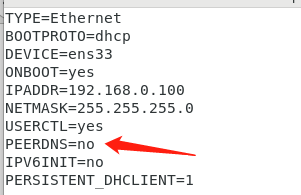
[root@localhost network-scripts]# vim ifcfg-ens333##dhcp动态的,将原本的PEERDNS变为yes,代表自动获取DNS
[root@localhost network-scripts]# cat /etc/resolv.conf##可以看到也自动产生了新的询问的dns地址
# Generated by NetworkManager
nameserver 192.168.1.1
nameserver 192.168.0.1
##我们还是想针对dhcp动态的把resolv.conf改为114.114.114.114怎么办,就算我们vim /etc/resolv.conf将他改为114.114.114.114但是重启网络服务后就会又回到原来的设定,那我们如何设置?[root@localhost network-scripts]# vim ifcfg-ens33##将peerdns=yes改为no
[root@localhost network-scripts]# vim /etc/resolv.conf##给这个里面加上nameserver 114.114.114.114
[root@localhost network-scripts]# systemctl restart network
[root@localhost network-scripts]# cat /etc/resolv.conf##重启服务后我们就可以固定dns为114.114.114.114(针对动态)
# Generated by NetworkManager
nameserver 114.114.114.114
##刚刚我们将网络配置设置为动态的了
[root@localhost network-scripts]# ifconfig ens33##可以看到ens33的IP已经为192.168.0.107,这个是怎么生成的呢
ens33: flags=4163<UP,BROADCAST,RUNNING,MULTICAST>  mtu 1500
        inet 192.168.0.107  netmask 255.255.255.0  broadcast 192.168.0.255
        inet6 fe80::20c:29ff:fe38:40af  prefixlen 64  scopeid 0x20<link>
        ether 00:0c:29:38:40:af  txqueuelen 1000  (Ethernet)
        RX packets 8495  bytes 1519277 (1.4 MiB)
        RX errors 0  dropped 0  overruns 0  frame 0
        TX packets 2695  bytes 290684 (283.8 KiB)
        TX errors 0  dropped 0 overruns 0  carrier 0  collisions 0
[root@localhost network-scripts]# systemctl restart network##重启服务
[root@localhost ~]# cat /var/log/messages##查看日志,可以看到192.168.0.107自动生成了

##所有说我们的IP是又dhcp分配出来的,如果我们所在的电脑没有dhcp的话,那我们如何搭建dhcp呢,我们先把网络配置设置为静态的

##然后再火狐浏览器里面寻找到dhcp的rpm包,然后再复制连接地址

再在terminal里面输入wget再加上复制的链接地址就可以安装dhcp了,然后在systemctl status dhcpd就可以看到hdcp已经被安装好了,接下来是对dhcp进行配置
[root@localhost dhclient.d]# cd /etc/dhcp/##这是dhcp的主配置文件
[root@localhost dhcp]# ls
dhclient.d dhclient-exit-hooks.d dhcpd.conf
[root@localhost dhcp]# vim dhcpd.conf##发现里面没有任何信息但是提示是我们可以去/usr/share/doc/dhcp*/dhcpd.conf.example去查看模板

[root@localhost dhcp]# cp /usr/share/doc/dhcp*/dhcpd.conf.example dhcp.conf##将配置文件复制到dhcpd.conf里面
[root@localhost dhcp]# vim dhcpd.conf##里面的模板就被复制进去了,我们只需要在这里面修改内容,晚上dhcp的搭建

##其中27和28行是重复下面32和33行的,还又下面35行一下的也不需要,这些都删除掉

##我们就可以对剩下的内容进行修改

##第一行这个是公司的域名,比如我们的公司的域名为westos.org,就修改为westos.org

##第二行这个是给客户的dns,我们这里可以先让他为114.114.114.114,也可以是其他的公司规定的dns

##第四行是默认租约期为600个小时,第五行最长租约期是7200个小时,第24行,我们的网段是192.168.0.0(通过IP与子网掩码的and和计算出来) 子网掩码为255.255.255.0(因为IP后面是/24),第26行修改为option
routers 192.168.0.1(网关),第25行修改为range 192.168.0.70 192.168.0 80(这个叫ip地址池,让用户获得的IP在这个范围之内的10个IP)
[root@localhost network-scripts]# vim ifcfg-ens33##将网络设置为动态的
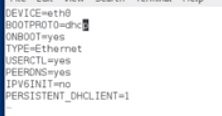
##这里的DEVICE=ens33已经修改
[root@localhost network-scripts]# systemctl start dhcpd##打开配置好的dhcp
[root@localhost network-scripts]# systemctl restart network ##重启网络
##ifconfig ens33的IP地址也在192.168.0.70-192.168.0.80之间,route -n(网关也是)255.255.255.0,cat /etc/resolv.conf(dns)dns也是114.114.114.114
##可以看到动态的已经配置完毕了


 4753
4753


 被折叠的 条评论
为什么被折叠?
被折叠的 条评论
为什么被折叠?
 到【灌水乐园】发言


