


实现jpetstore物理上分层
师弟小骆刚刚到新公司上班,要开发一个基于spring+struts+hessian+hibernate应用。他们项目组没有人熟悉这个架构,他也是没有用过spring。问我,是否有类似的demo可以给他参考。我说,spring自带的所有例子都是最好的demo。
我一直强调,学习各种框架自带的例子是最好的学习方法。我们做开发的都知道,写代码有模板,写文档有模板等等。这些是充分利用别人智慧的好方法。框架的Demo就是最好的工程模板!
现在有很多工具可以生成基于各种框架的工程模板,比如appfuse、grails等等。为什么需要工程模板呢?
我们知道一个工程需要集成成多种框架、技术,而各种技术需要协调、合理地工作又需要各种各样的设置。我们也可以根据各种框架的说明来手工设置,但如果有对框架的专家级实践给我们参考用,为何不用呢?
这些设置从大的地方看有:数据源配置、目录结构安排、文件放置的位置、ant脚本的生成等等。在本例子中,struts、hiberante等技术集成到spring的配置。从小的地方看也学到很多东西,比如,java代码包的组织、jsp文件的组织、各种企业应用架构模式的应用。依稀记得不知道那本书上曾经提倡用框架的demo做工程模板。特别注意的是使用ant来编译、打包、部署似乎是一种事实上的工业标准。各种IDE生成的工程的目录结构都有差异,故建议使用ant来构建项目。
总之,例子为我们的项目提供各种需要的手脚架,方便我们开发软件。我们有更多的时间专注于业务逻辑。
在本例中我们将制作一个远程架构的demo,提供给各位需要的朋友作为项目的工程模板。
回到我们的主题,我们是要将jpetstore应用从逻辑分层实现物理分层。petstore是sun经典的J2EE范例,后来被ibatis框架从性能上改进并做为自己的例子,jpetstore是后来被spring在ibatis的基础上从架构上改进并做为一个实用的J2EE范例。
jpetstore已经实现了逻辑上的分层,我们要把它的代码从物理上剥离。说实话,如果能不这样最好不要从物理上分离代码,毕竟远程调用肯定是没有同在一个vm中的调用速度快!逻辑上的分层是为了代码好维护、偶合性小,更多的是从架构上考虑。
既然小骆需要,这个星期又双休而且外面下着雨,可以试试。再说能学习hessian的使用,何乐而不为呢?
开发环境:Myeclipse6 + jdk1.5 + spring2.0 + hsqldb + tomcat6
将spring2.0完整包解压,并将myeclipse的workspace指向%SPRING_HOME%/samples。
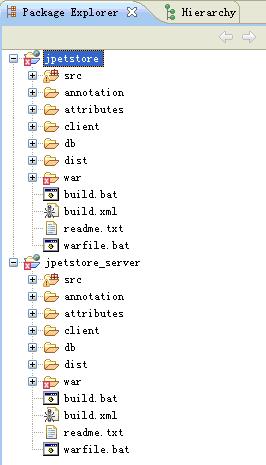
1、复制jpetstore目录,并重命名为jpetstore_server。将jpetstore_server中的. .project和. .mymetadata文件中的jpetstore改jpetstore_server。
2、在myeclipse中分别导入上面两个工程。
使得两个项目都是myeclispe的web project:
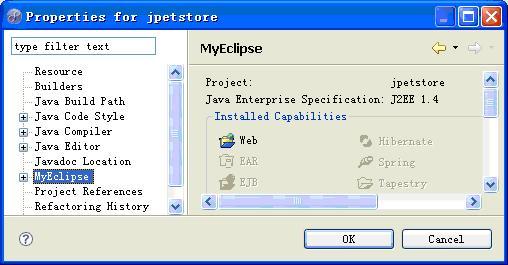
使得output folder指向各自的/war/WEB-INF/classes

运行build.xml的 all将需要的jar包拷贝到war/WEB-INF/lib下。
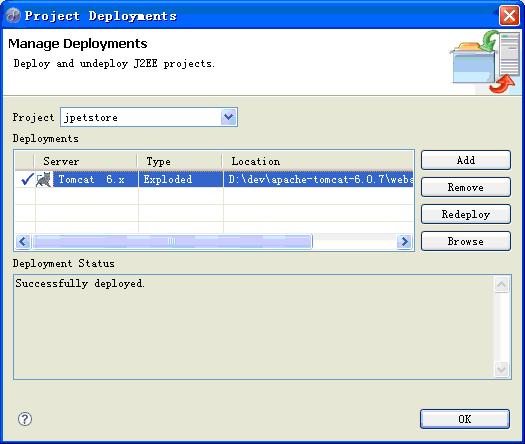
利用myeclipse将两个工程部署到tomcat中
运行%JPETSTORE_SERVER_HOME%/db/hsql/server.bat启动hsqldb数据库。
将两个工程部署到tomcat中,测试两个例子是否能正确运行?
http://localhost:8080/jpetstore/
http://localhost:8080/jpetstore_server/
如果都能运行,那么我们就可以开始物理上分离jpetstore了。
我们将原来的jpetstore工程作为web层,通过hessian远程调用服务层的接口实现原来的功能;将jpetstore_server做为服务层提供后台服务。
3、修改web层的配置,使得原来使用本地调用改为远程调用。
通过阅读代码,我们发现jpetstore是严格按照mvc模式来开发的,我们认为vc都属于web层。在petstore-servlet.xml中所有的.do都需要注入一个叫petStore的bean,通过这个bean来调用业务层的代码。也就是我们找到了,远程调用的分离点。
再来看看,jpetstore自带的远程调用示例,在/client文件夹下。在文件clientContext.xml中,我们看到有很多种远程调用接口,其中我们只需要hessian,其他的我们可以放心删除掉。注意:示例中远程代理的是OrderService接口,其实我们需要代理的是PetStoreFacade接口。把它改过来就可以了。刚才说了我们找到了远程调用的分离点,通过代理远程的这个分离点就ok了。我们看看applicationContext.xml中配置的petStore是什么,它就是配置一个实现PetStoreFacade接口的实现类。那么我们把clientContext.xml中的远程代理bean的id改为petStore就可以了。
修改clientContext.xml后的代码如下:
 <?
xml version="1.0" encoding="UTF-8"
?>
<!
DOCTYPE beans PUBLIC "-//SPRING//DTD BEAN 2.0//EN" "http://www.springframework.org/dtd/spring-beans-2.0.dtd"
>
<!--
- Application context for the remote OrderService client. - Defines various OrderService proxies to be called by OrderServiceClient.
-->
<
beans
>
<!--
========================= BUSINESS OBJECT DEFINITIONS ========================
-->
<!--
Generic validator for Account objects, to be used for example by the Spring web tier
-->
<
bean
id
="accountValidator"
class
="org.springframework.samples.jpetstore.domain.logic.AccountValidator"
/>
<!--
Generic validator for Order objects, to be used for example by the Spring web tier
-->
<
bean
id
="orderValidator"
class
="org.springframework.samples.jpetstore.domain.logic.OrderValidator"
/>
<!--
Resolves ${...} placeholders from client.properties
-->
<
bean
id
="propertyConfigurer"
class
="org.springframework.beans.factory.config.PropertyPlaceholderConfigurer"
>
<
property
name
="location"
><
value
>
WEB-INF/client.properties
</
value
></
property
>
</
bean
>
<!--
Proxy for the Hessian-exported OrderService
-->
<!--
Hessian is a slim binary HTTP remoting protocol
-->
<
bean
id
="petStore"
class
="org.springframework.remoting.caucho.HessianProxyFactoryBean"
>
<
property
name
="serviceUrl"
>
<
value
>
http://${serverName}:${httpPort}/jpetstore_server/remoting/OrderService-hessian
</
value
>
</
property
>
<
property
name
="serviceInterface"
>
<
value
>
org.springframework.samples.jpetstore.domain.logic.PetStoreFacade
</
value
>
</
property
>
</
bean
>
</
beans
>
<?
xml version="1.0" encoding="UTF-8"
?>
<!
DOCTYPE beans PUBLIC "-//SPRING//DTD BEAN 2.0//EN" "http://www.springframework.org/dtd/spring-beans-2.0.dtd"
>
<!--
- Application context for the remote OrderService client. - Defines various OrderService proxies to be called by OrderServiceClient.
-->
<
beans
>
<!--
========================= BUSINESS OBJECT DEFINITIONS ========================
-->
<!--
Generic validator for Account objects, to be used for example by the Spring web tier
-->
<
bean
id
="accountValidator"
class
="org.springframework.samples.jpetstore.domain.logic.AccountValidator"
/>
<!--
Generic validator for Order objects, to be used for example by the Spring web tier
-->
<
bean
id
="orderValidator"
class
="org.springframework.samples.jpetstore.domain.logic.OrderValidator"
/>
<!--
Resolves ${...} placeholders from client.properties
-->
<
bean
id
="propertyConfigurer"
class
="org.springframework.beans.factory.config.PropertyPlaceholderConfigurer"
>
<
property
name
="location"
><
value
>
WEB-INF/client.properties
</
value
></
property
>
</
bean
>
<!--
Proxy for the Hessian-exported OrderService
-->
<!--
Hessian is a slim binary HTTP remoting protocol
-->
<
bean
id
="petStore"
class
="org.springframework.remoting.caucho.HessianProxyFactoryBean"
>
<
property
name
="serviceUrl"
>
<
value
>
http://${serverName}:${httpPort}/jpetstore_server/remoting/OrderService-hessian
</
value
>
</
property
>
<
property
name
="serviceInterface"
>
<
value
>
org.springframework.samples.jpetstore.domain.logic.PetStoreFacade
</
value
>
</
property
>
</
bean
>
</
beans
>
配置好远程调用的代理bean给web层的.do使用了,还要告诉spring启动时候把配置文件加载。在web.xml中,去掉加载项/WEB-INF/dataAccessContext-local.xml /WEB-INF/applicationContext.xml,因为我们web层已经不需要什么数据库等了。增加clientContext.xml,并把clientContext.xml和client.properties文件拷贝到/WEB-INF下。同时把jdbc.properties等跟业务层相关的文件删除,以示我们的web层是多么“纯”。见删除后的文件如下:

<?
xml version="1.0" encoding="ISO-8859-1"
?>
<!
DOCTYPE web-app PUBLIC "-//Sun Microsystems, Inc.//DTD Web Application 2.3//EN" "http://java.sun.com/dtd/web-app_2_3.dtd"
>
<
web-app
>
<
display-name
>
Spring JPetStore
</
display-name
>
<
description
>
Spring JPetStore sample application
</
description
>
<
context-param
>
<
param-name
>
webAppRootKey
</
param-name
>
<
param-value
>
petstore.root
</
param-value
>
</
context-param
>
<
context-param
>
<
param-name
>
log4jConfigLocation
</
param-name
>
<
param-value
>
/WEB-INF/log4j.properties
</
param-value
>
</
context-param
>
<
context-param
>
<
param-name
>
contextConfigLocation
</
param-name
>
<
param-value
>
/WEB-INF/clientContext.xml
</
param-value
>
</
context-param
>
<
listener
>
<
listener-class
>
org.springframework.web.context.ContextLoaderListener
</
listener-class
>
</
listener
>
<
servlet
>
<
servlet-name
>
petstore
</
servlet-name
>
<
servlet-class
>
org.springframework.web.servlet.DispatcherServlet
</
servlet-class
>
<
load-on-startup
>
2
</
load-on-startup
>
</
servlet
>
<
servlet
>
<
servlet-name
>
action
</
servlet-name
>
<
servlet-class
>
org.apache.struts.action.ActionServlet
</
servlet-class
>
<
load-on-startup
>
3
</
load-on-startup
>
</
servlet
>
<
servlet-mapping
>
<
servlet-name
>
petstore
</
servlet-name
>
<!--
<servlet-name>action</servlet-name>
-->
<
url-pattern
>
*.do
</
url-pattern
>
</
servlet-mapping
>
</
web-app
>
重新部署jpetstore到tomcat测试是否可以正确运行。如果可以行,我们就可以进入下一步了。
4、修改服务层的配置及其他。
至此,我们的服务层的web还能运行,我们的要做的是把服务层的web去掉,只提供远程服务。把jpetstore_server中的web.xml注释掉各种servlet,只留remoting配置。跟web相关的配置文件删除。比如java类、jsp、配置文件等。
下面是修改后的web.xml:
<?
xml version="1.0" encoding="UTF-8"
?>
<!
DOCTYPE web-app PUBLIC "-//Sun Microsystems, Inc.//DTD Web Application 2.3//EN" "http://java.sun.com/dtd/web-app_2_3.dtd"
>
<
web-app
>
<
display-name
>
Spring JPetStore
</
display-name
>
<
description
>
Spring JPetStore sample application
</
description
>
<!--
- Key of the system property that should specify the root directory of this - web app. Applied by WebAppRootListener or Log4jConfigListener.
-->
<
context-param
>
<
param-name
>
webAppRootKey
</
param-name
>
<
param-value
>
petstore.root
</
param-value
>
</
context-param
>
<!--
- Location of the Log4J config file, for initialization and refresh checks. - Applied by Log4jConfigListener.
-->
<
context-param
>
<
param-name
>
log4jConfigLocation
</
param-name
>
<
param-value
>
/WEB-INF/log4j.properties
</
param-value
>
</
context-param
>
<!--
- Location of the XML file that defines the root application context. - Applied by ContextLoaderServlet. - - Can include "/WEB-INF/dataAccessContext-local.xml" for a single-database - context, or "/WEB-INF/dataAccessContext-jta.xml" for a two-database context.
-->
<
context-param
>
<
param-name
>
contextConfigLocation
</
param-name
>
<
param-value
>
/WEB-INF/dataAccessContext-local.xml /WEB-INF/applicationContext.xml
</
param-value
>
<!--
<param-value> /WEB-INF/dataAccessContext-jta.xml /WEB-INF/applicationContext.xml </param-value>
-->
</
context-param
>
<!--
- Configures Log4J for this web app. - As this context specifies a context-param "log4jConfigLocation", its file path - is used to load the Log4J configuration, including periodic refresh checks. - - Would fall back to default Log4J initialization (non-refreshing) if no special - context-params are given. - - Exports a "web app root key", i.e. a system property that specifies the root - directory of this web app, for usage in log file paths. - This web app specifies "petclinic.root" (see log4j.properties file).
-->
<!--
Leave the listener commented-out if using JBoss
-->
<!--
<listener> <listener-class>org.springframework.web.util.Log4jConfigListener</listener-class> </listener>
-->
<!--
- Loads the root application context of this web app at startup, - by default from "/WEB-INF/applicationContext.xml". - Note that you need to fall back to Spring's ContextLoaderServlet for - J2EE servers that do not follow the Servlet 2.4 initialization order. - - Use WebApplicationContextUtils.getWebApplicationContext(servletContext) - to access it anywhere in the web application, outside of the framework. - - The root context is the parent of all servlet-specific contexts. - This means that its beans are automatically available in these child contexts, - both for getBean(name) calls and (external) bean references.
-->
<
listener
>
<
listener-class
>
org.springframework.web.context.ContextLoaderListener
</
listener-class
>
</
listener
>
<!--
- Spring web MVC servlet that dispatches requests to registered handlers. - Has its own application context, by default defined in "{servlet-name}-servlet.xml", - i.e. "petstore-servlet.xml" in this case. - - A web app can contain any number of such servlets. - Note that this web app has a shared root application context, serving as parent - of all DispatcherServlet contexts.
-->
<!--
作为服务端,不需要启动web服务 <servlet> <servlet-name>petstore</servlet-name> <servlet-class>org.springframework.web.servlet.DispatcherServlet</servlet-class> <load-on-startup>2</load-on-startup> </servlet>
-->
<!--
- Struts servlet that dispatches requests to registered actions. - Reads its configuration from "struts-config.xml". - - A web app can just contain one such servlet. - If you need multiple namespaces, use Struts' module mechanism.
-->
<!--
作为服务端,不需要启动web服务 <servlet> <servlet-name>action</servlet-name> <servlet-class>org.apache.struts.action.ActionServlet</servlet-class> <load-on-startup>3</load-on-startup> </servlet>
-->
<!--
- Dispatcher servlet definition for HTTP remoting via Hessian, Burlap, and - Spring's HTTP invoker (see remoting-servlet.xml for the controllers).
-->
<
servlet
>
<
servlet-name
>
remoting
</
servlet-name
>
<
servlet-class
>
org.springframework.web.servlet.DispatcherServlet
</
servlet-class
>
<
load-on-startup
>
4
</
load-on-startup
>
</
servlet
>
<!--
- Servlet definition for Web Service remoting via Apache Axis - (see server-config.wsdd for Axis configuration).
-->
<
servlet
>
<
servlet-name
>
axis
</
servlet-name
>
<
servlet-class
>
org.apache.axis.transport.http.AxisServlet
</
servlet-class
>
<
load-on-startup
>
5
</
load-on-startup
>
</
servlet
>
<!--
- Dispatcher servlet mapping for the main web user interface. - Either refering to "petstore" for the Spring web MVC dispatcher, - or to "action" for the Struts dispatcher. - - Simply comment out the "petstore" reference in favour of "action" - to switch from the Spring web tier to the Struts web tier.
-->
<!--
作为服务端,不需要启动web服务 <servlet-mapping> <servlet-name>petstore</servlet-name> <servlet-name>action</servlet-name> <url-pattern>*.do</url-pattern> </servlet-mapping>
-->
<!--
- Dispatcher servlet mapping for HTTP remoting via Hessian, Burlap, and - Spring's HTTP invoker (see remoting-servlet.xml for the controllers).
-->
<
servlet-mapping
>
<
servlet-name
>
remoting
</
servlet-name
>
<
url-pattern
>
/remoting/*
</
url-pattern
>
</
servlet-mapping
>
<!--
- Servlet mapping for Web Service remoting via Apache Axis - (see server-config.wsdd for Axis configuration).
-->
<
servlet-mapping
>
<
servlet-name
>
axis
</
servlet-name
>
<
url-pattern
>
/axis/*
</
url-pattern
>
</
servlet-mapping
>
<!--
作为服务端,不需要启动web服务 <welcome-file-list> <welcome-file>index.html</welcome-file> </welcome-file-list>
-->
<!--
- Reference to main database. - Only needed for JTA (dataAccessContext-jta.xml).
-->
<!--
<resource-ref> <res-ref-name>jdbc/jpetstore</res-ref-name> <res-type>javax.sql.DataSource</res-type> <res-auth>Container</res-auth> </resource-ref>
-->
<!--
- Reference to order database. - Only needed for JTA (dataAccessContext-jta.xml).
-->
<!--
<resource-ref> <res-ref-name>jdbc/jpetstore-order</res-ref-name> <res-type>javax.sql.DataSource</res-type> <res-auth>Container</res-auth> </resource-ref>
-->
</
web-app
>
完整的目录结构图如下:

我们仔细对比一下,会发现在两个工程中,这边有的文件那边没有。但我们的例子却还是可以完整的跑起来,这主要是通过远程调用机制来实现。
另外,虽然从物理上分离的代码,但web还是需要通过一些像DTO之类的类来跟服务层交互,因此,在服务层还是需要打一些dto的jar包给web层,在本demo中打的是jpetstore_server.jar。
例子中通过直接使用hessian来调用远程服务,总感觉好像有点不妥当。如果每次增加一些接口是不是也要增加配置,能不能做一点封装来适配?或者跟服务端的接口解耦?像如果新增像这样的PetStoreFacade接口,如果web端没有那么编译失败。这里应该是一个可以改进的地方!过一段时间,如果深入了解hessian后,可以试试。
源代码放在我的资源里,去掉各种jar包。需要运行的朋友可以下载,原来的jpetstore目录删除,并解压到%SPRING_HOME%/samples下,然后从eclipse导入即可。
由于网速比较慢,无法上传到我的资源里,所以今天补充详细一点,以便需要这个demo的朋友自己动手实现。
到此,一个物理上分离的分层的demo已经出来,唯一没有做到的是没有集成hibernate。建议小骆,自己去参考petclinic集成hibernate。另外,如果你们项目组成员都对strust不是很懂,而且使用了spring。既然都是从头开始学习,为何不用tiles+springmvc+spring呢。毕竟,使用springmvc比struts和spring集成更清爽一些。


 182
182

 被折叠的 条评论
为什么被折叠?
被折叠的 条评论
为什么被折叠?
 到【灌水乐园】发言


