


转自:http://blog.chinaunix.net/uid-25266990-id-3989321.html
在测试了Nginx+Keepalived的负载均衡后,也对Haproxy+Keepalived双主模式做了测试,双主的模式充分利用了服务器资源,这样不会导致服务器浪费。 这里举例说明:
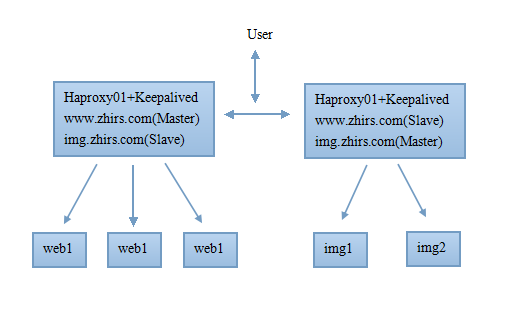
默认情况下,第一台负载均衡器主要分发www.zhirs.com的请求,第二台负载均衡器主要分发img.zhirs.com的请求。任意一台宕机都不会影响网站分发。
实验环境
VIP1=192.168.137.200 (www.zhirs.com)
VIP2=192.168.137.100 (img.zhirs.com)
haproxy01=192.168.137.254
haproxy02=192.168.137.253
web1=192.168.137.201
web2=192.168.137.202
img1=192.168.158.101
img2=192.168.158.102
架构图
安装配置过程
1、安装配置过程,(两台Haproxy的安装配置步骤一样)
haproxy下载地址:http://haproxy.1wt.eu/download/1.4/src/haproxy-1.4.24.tar.gz
|
1
2
3
4
5
6
7
|
#cd /usr/local/src
#tar xf haproxy-1.4.24.tar.gz
#cd haproxy-1.4.24
#make TARGET=linux26 ARCH=x86_64
#TARGET是指定内核版本,ARCH指定CPU架构,我使用的是64bit系统
#make install
|
|
1
2
3
4
5
6
|
#mkdir /etc/haproxy
#cp examples/haproxy.cfg /etc/haproxy
#cp examples/haproxy.init /etc/init.d/haproxy
#chmod +x /etc/init.d/haproxy
#ln -s /usr/local/sbin/haproxy /usr/sbin/
#mkdir /usr/share/haproxy
|
|
1
2
3
4
5
6
7
8
9
10
11
12
13
14
15
16
17
18
19
20
21
22
23
24
25
26
27
28
29
30
31
32
33
34
35
36
37
38
39
40
41
42
43
44
45
46
47
48
49
50
51
52
53
54
55
56
57
58
59
60
61
62
63
|
#vim /etc/haproxy/haproxy.cfg
# this config needs haproxy-1.1.28 or haproxy-1.2.1
global
log 127.0.0.1 local0
#日志输出配置,所有日志都记录在本机,通过local0输出
log 127.0.0.1 local1 notice
#log loghost local0 info
maxconn 4096
#最大连接数
chroot
/usr/share/haproxy
#改变当前工作目录。
uid 99
#所属用户的uid
gid 99
#所属运行的gid
daemon
#以后台形式运行haproxy
#debug
#quiet
defaults
log global
mode http
#默认的模式mode { tcp|http|health },tcp是4层,http是7层,health只会返回OK
option httplog
option dontlognull
option redispatch
#当serverId对应的服务器挂掉后,强制定向到其他健康的服务器
option abortonclose
#当服务器负载很高的时候,自动结束掉当前队列处理比较久的链接
retries 3
#两次连接失败就认为是服务器不可用
maxconn 2000
#默认的最大连接数
#timeout http-keep-alive 10s
# timeout queue 1m
contimeout 5000
#连接超时
clitimeout 50000
#客户端超时
srvtimeout 50000
#服务器超时
timeout check 5s
#心跳检测超时
stats refresh 30s
#统计页面自动刷新时间
stats uri
/stats
#统计页面url
stats realm baison-
test
-Haproxy
#统计页面密码框上提示文本
stats auth admin:admin123
#统计页面用户名和密码设置
stats hide-version
#隐藏统计页面上HAProxy的版本信息
frontend www
bind *:80
#这里建议使用bind *:80的方式,要不然做集群高可用的时候有问题,vip切换到其他机器就不能访问了。
acl web hdr(host) -i www.zhirs.com
#acl后面是规则名称,-i是要访问的域名,如果访问www.zhirs.com这个域名就分发到下面的webserver 的作用域。
acl img hdr(host) -i img.zhirs.com
#如果访问img.baison.com.cn就分发到imgserver这个作用域。
use_backend webserver
if
web
use_backend imgserver
if
img
backend webserver
#webserver作用域
mode http
balance roundrobin
#banlance roundrobin 轮询,balance source 保存session值,支持static-rr,leastconn,first,uri等参数
option httpchk
/index
.html
#检测文件,如果分发到后台index.html访问不到就不再分发给它
server web01 192.168.137.201:80 check inter 2000 fall 3 weight 30
server web01 192.168.137.202:80 check inter 2000 fall 3 weight 20
server web01 192.168.137.203:80 check inter 2000 fall 3 weight 10
backend imgserver
mode http
option httpchk
/index
.php
balance roundrobin
server img01 192.168.137.101:80 check inter 2000 fall 3
server img02 192.168.137.102:80 check inter 2000 fall 3
|
#service haproxy start
5、安装配置keepalived(两台keepalived安装步骤一样)
|
1
2
3
4
5
6
7
8
9
10
11
|
#cd /root/software
#tar -zxvf pcre-8.33.tar.gz
#cd pcre-8.33
#./configure
#make && make install
#tar -zxvf nginx-1.2.9.tar.gz
#cd nginx-1.2.9
#./configure --prefix=/usr/local/nginx --with-http_ssl_module --with-http_sub_module --with-http_stub_status_module --with-http_gzip_static_module
#make && make install
|
|
1
2
3
4
5
6
7
8
9
10
11
12
13
14
15
16
17
18
19
20
21
22
23
24
25
26
27
28
29
30
31
32
33
34
35
36
37
38
39
40
41
42
43
44
45
46
47
48
|
#vim /etc/keepalived/keepalived.conf
global_defs {
notification_email {
admin@centos.bz
}
notification_email_from keepalived@domain.com
smtp_server 127.0.0.1
smtp_connect_timeout 30
router_id LVS_DEVEL
}
vrrp_script chk_http_port {
#script "/opt/nginx_pid.sh"
script
"/opt/check_haproxy.sh"
interval 2
weight 2
}
vrrp_instance VI_1 {
state MASTER
############ 辅机为 BACKUP
interface eth0
virtual_router_id 51
mcast_src_ip 192.168.137.254
priority 100
########### 权值要比 back 高
advert_int 1
authentication {
auth_type PASS
auth_pass 1111
}
track_script {
chk_http_port
### 执行监控的服务
}
virtual_ipaddress {
192.168.137.200
}
}
vrrp_instance VI_2 {
state BACKUP
interface eth0
virtual_router_id 52
priority 99
advert_int 1
authentication {
auth_type PASS
auth_pass 1111
}
virtual_ipaddress {
192.168.137.100
}
}
|
|
1
2
3
4
5
6
7
8
9
10
11
12
13
14
15
16
17
18
19
20
21
22
23
24
25
26
27
28
29
30
31
32
33
34
35
36
37
38
39
40
41
42
43
44
45
46
47
48
|
#vim /etc/keepalived/keepalived.conf
global_defs {
notification_email {
admin@centos.bz
}
notification_email_from keepalived@domain.com
smtp_server 127.0.0.1
smtp_connect_timeout 30
router_id LVS_DEVEL
}
vrrp_script chk_http_port {
#script "/opt/nginx_pid.sh"
script
"/opt/check_haproxy.sh"
interval 2
weight 2
}
vrrp_instance VI_1 {
state BACKUP
interface eth0
virtual_router_id 51
mcast_src_ip 192.168.137.253
priority 99
##########权值 要比master低
advert_int 1
authentication {
auth_type PASS
auth_pass 1111
}
track_script {
chk_http_port
}
virtual_ipaddress {
192.168.137.200
}
}
vrrp_instance VI_2 {
state MASTER
interface eth0
virtual_router_id 52
priority 100
advert_int 1
authentication {
auth_type PASS
auth_pass 1111
}
virtual_ipaddress {
192.168.137.100
}
}
|
|
1
2
3
4
5
6
7
8
9
|
#vim /opt/check_haproxy.sh
#!/bin/bash
if
[ $(
ps
-C haproxy --no-header |
wc
-l) -
eq
0 ];
then
/etc/init
.d
/haproxy
start
fi
sleep
2
if
[ $(
ps
-C haproxy --no-header |
wc
-l) -
eq
0 ];
then
/etc/init
.d
/keepalived
stop
fi
|
|
1
2
|
#servcie haproxy start
#service keepalived start
|
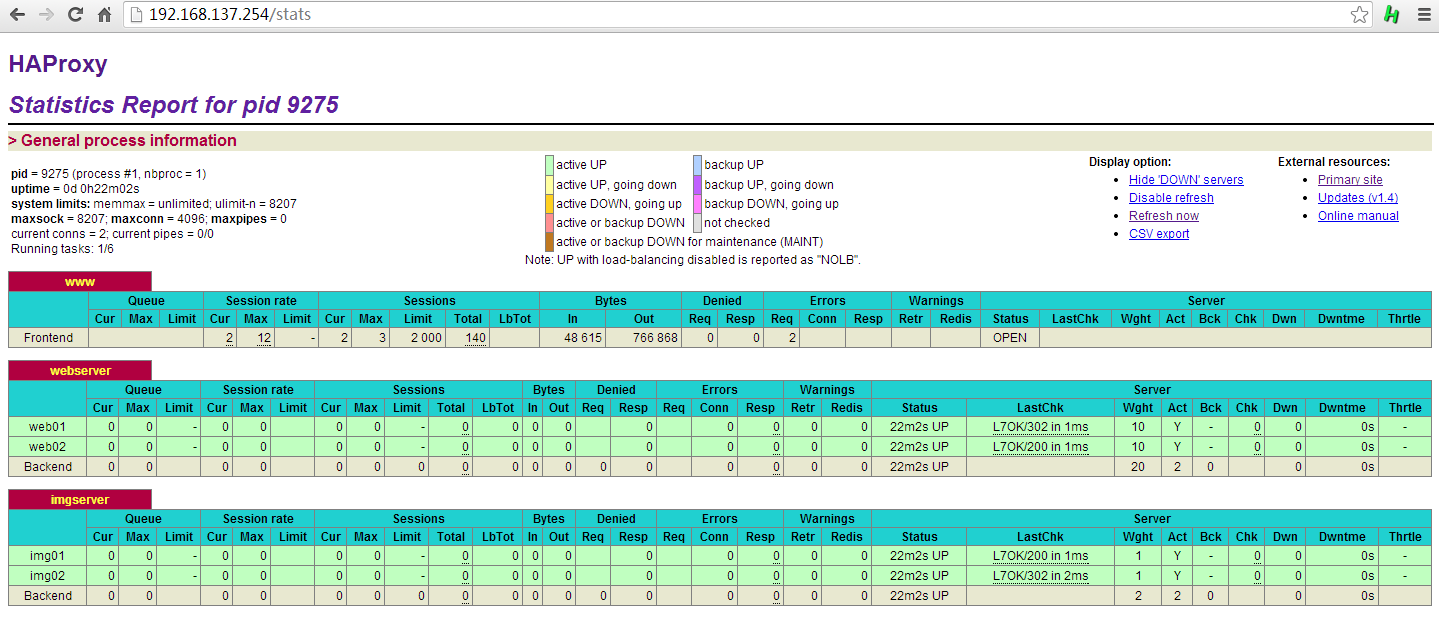
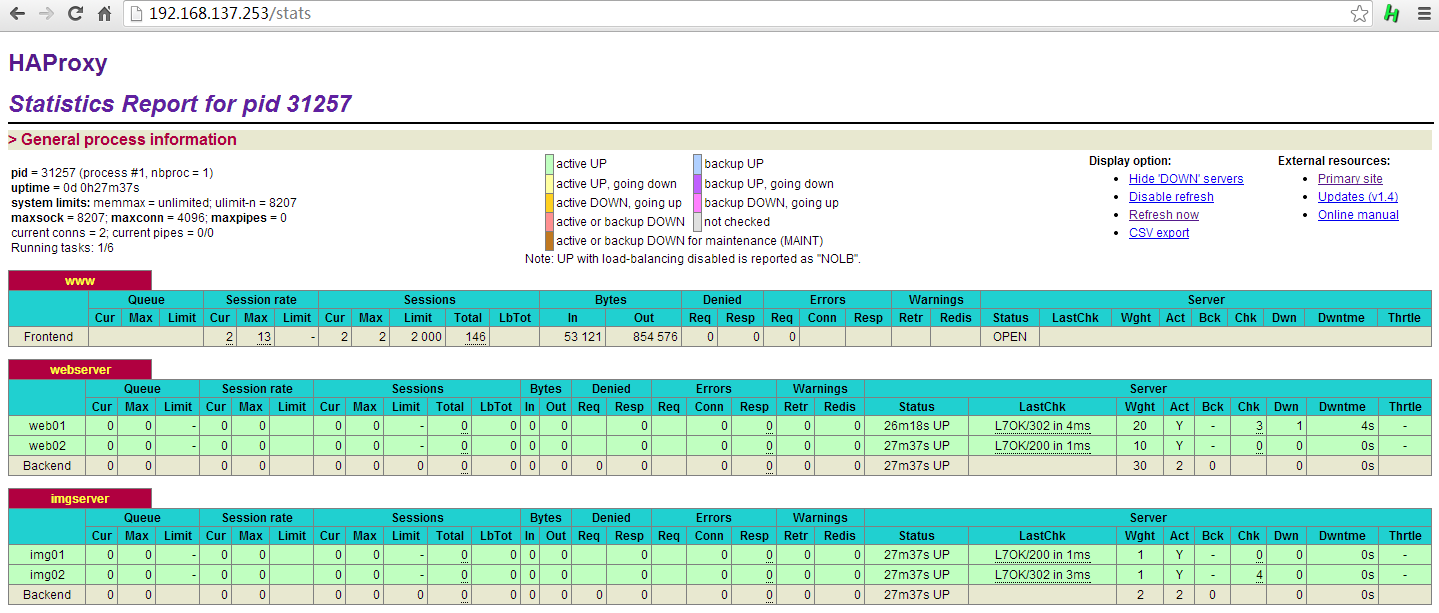
查看192.168.137.254:
2: eth0: <BROADCAST,MULTICAST,UP,LOWER_UP> mtu 1500 qdisc pfifo_fast qlen 1000查看192.168.137.253:
link/ether 00:0c:29:dc:01:3e brd ff:ff:ff:ff:ff:ff
inet 192.168.137.254/24 brd 192.168.137.255 scope global eth0
inet 192.168.137.200/32 scope global eth0
2: eth0: <BROADCAST,MULTICAST,UP,LOWER_UP> mtu 1500 qdisc pfifo_fast qlen 100011、测试,关闭任意一台keepalived,img和www域名访问正常。 后续会对Nginx+Keepalived 双主结果做测试。
link/ether 00:0c:29:d5:e7:3d brd ff:ff:ff:ff:ff:ff
inet 192.168.137.253/24 brd 192.168.137.255 scope global eth0
inet 192.168.137.100/32 scope global eth0
inet6 fe80::20c:29ff:fed5:e73d/64 scope link
valid_lft forever preferred_lft forever


 256
256

 被折叠的 条评论
为什么被折叠?
被折叠的 条评论
为什么被折叠?
 到【灌水乐园】发言


