


转载请注明出处:http://blog.csdn.net/chengbao315/article/details/51062118
相关阅读:
Android服务组件案例: http://blog.csdn.net/chengbao315/article/details/50997218Android广播组件案例:http://blog.csdn.net/chengbao315/article/details/51011358
经过几天假期的休息,我用几天时间完成了一个手机通讯录的案例,这就是今天要讲的安卓四大组件之内容提供器。内容提供器是安卓提供的一种允许不同应用程序间进行数据访问的机制,它可以实现访问手机其他程序中的数据,也可以创建自己的内容提供器供其他应用程序访问。今天的实践就是通过读取手机联系人,实现高仿手机通讯录功能。
闲言少叙,这次先来Po一个效果图,这个功能的UI实现着实费了本人不少时间:
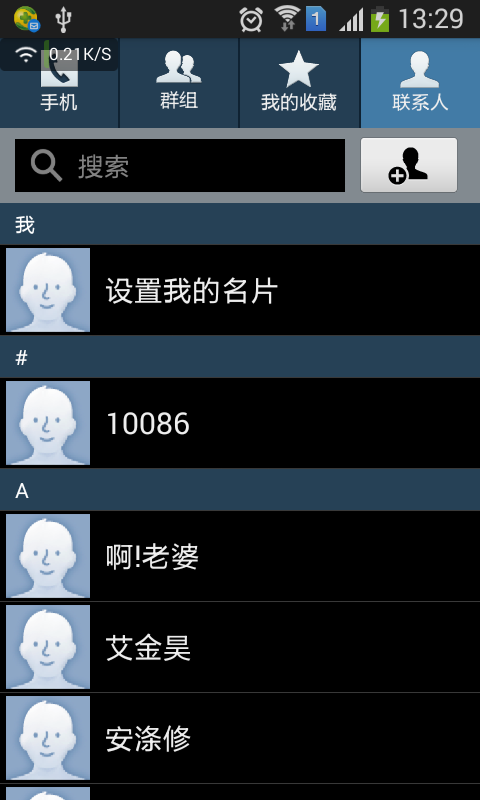


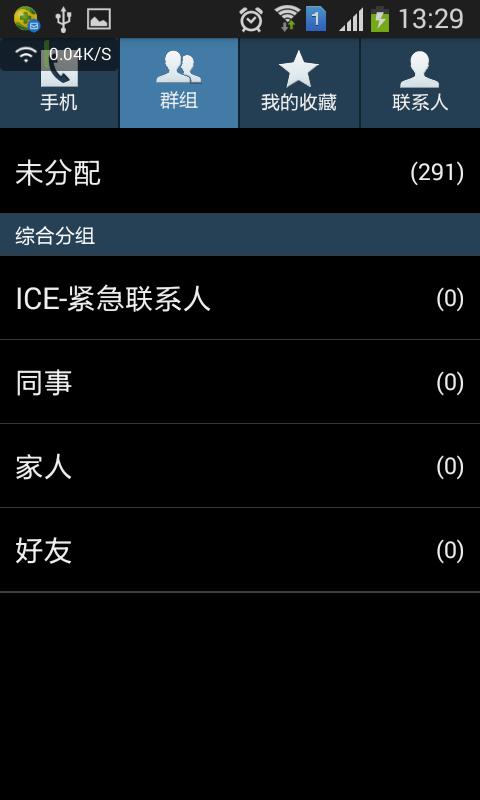
好了,看完觉得激动的小朋友可以继续往下看了,下面我会讲具体的实现过程;看完觉得比较Low的老鸟呢可以直接离开了,或者看完多给小弟提一些意见,在此拜谢!本案例实现应用的技术比较全面了,喜欢读书的朋友请参考郭神《第一行代码》第3章界面布局和ListView控件的使用相关内容,第4章碎片的使用方法,第7章内容提供器访问其他程序中的数据的相关内容。如果对本文有什么不解,欢迎各位留言。
下面来实现功能,在Eclipse中新建一个Android项目。首先我要搭建软件的界面框架,即这个Tab选项卡的功能。实现这个功能的方法很多,感兴趣的朋友可以到网上自行查找和学习,本文采用的方式是RadioGroup+Fragment(说白了,就是在单选按钮的容器中加入4个单选按钮,通过单选按钮的选择情况显示不同的碎片内容)。打开activity_main.xml文件,编写界面布局。布局采用上下结构的线性布局,上部放置一个RadioGroup,里面包含4个RadioButton;下部放置一个FrameLayout,里面包含一个自定义碎片(这个之后再讲)。请看代码(因为代码量越来越大了,这里只截取重要片段,全部代码自行下载阅读):
   <RadioGroup
            android:id="@+id/tab"
            android:layout_width="match_parent"
            android:layout_height="60dp"
            android:layout_alignParentTop="true"
            android:background="#0f2232"
            android:orientation="horizontal" >

            <RadioButton
                android:id="@+id/tab_phone"
                android:layout_width="0pt"
                android:layout_height="match_parent"
                android:layout_weight="20"
                android:background="@drawable/select"
                android:button="@null"
                android:drawableTop="@drawable/shouji"
                android:gravity="center"
                android:padding="8dp"
                android:text="手机"
                android:textColor="#efefef"
                android:textSize="13sp" />

            <RadioButton
                android:id="@+id/tab_group"
                android:layout_width="0pt"
                android:layout_height="match_parent"
                android:layout_marginLeft="1dp"
                android:layout_weight="20"
                android:background="@drawable/select"
                android:button="@null"
                android:drawableTop="@drawable/qunzu"
                android:gravity="center"
                android:padding="8dp"
                android:text="群组"
                android:textColor="#efefef"
                android:textSize="13sp" />

            <RadioButton
                android:id="@+id/tab_collection"
                android:layout_width="0pt"
                android:layout_height="match_parent"
                android:layout_marginLeft="1dp"
                android:layout_weight="20"
                android:background="@drawable/select"
                android:button="@null"
                android:drawableTop="@drawable/shoucang"
                android:gravity="center"
                android:padding="8dp"
                android:text="我的收藏"
                android:textColor="#efefef"
                android:textSize="13sp" />

            <RadioButton
                android:id="@+id/tab_contacts"
                android:layout_width="0pt"
                android:layout_height="match_parent"
                android:layout_marginLeft="1dp"
                android:layout_weight="20"
                android:background="@drawable/select"
                android:button="@null"
                android:checked="true"
                android:drawableTop="@drawable/lianxi"
                android:gravity="center"
                android:padding="8dp"
                android:text="联系人"
                android:textColor="#efefef"
                android:textSize="13sp" />
        </RadioGroup>

        <FrameLayout
            android:id="@+id/content_fragment"
            android:layout_width="match_parent"
            android:layout_height="match_parent"
            android:layout_below="@+id/tab"
            android:layout_weight="10" >

            <fragment
                android:id="@+id/fragement_contacts"
                android:name="com.example.contentprovidertest.ContactsFragment"
                android:layout_width="fill_parent"
                android:layout_height="fill_parent"
                android:layout_weight="10" />
</FrameLayout>接下来编写每个碎片界面的内容,界面比较相似,这里只讲一下联系人界面的布局contacts.xml。布局包括上下两部分内容,上部是一个搜索框和一个按钮,下部是一个联系人列表,请看代码:
   <LinearLayout
        android:layout_width="match_parent"
        android:layout_height="50dp"
        android:background="#828a90"
        android:focusable="true"
        android:focusableInTouchMode="true" >

        <EditText
            android:id="@+id/editText1"
            style="@style/edittext_style"
            android:layout_width="220dp"
            android:layout_height="35dp"
            android:layout_gravity="center_vertical"
            android:background="#000000"
            android:hint="搜索"
            android:inputType="" >
        </EditText>

        <ImageButton
            android:id="@+id/imageButton1"
            android:layout_width="wrap_content"
            android:layout_height="wrap_content"
            android:layout_gravity="center_vertical"
            android:layout_marginLeft="10dp"
            android:background="@drawable/selector_button" />
    </LinearLayout>

    <ListView
        android:id="@+id/list_contacts"
        android:layout_width="match_parent"
        android:layout_height="wrap_content"
        android:background="#3f3f3f" >
</ListView>下面看如何填写ListView的内容,ListView的填写需要一个自定义的适配器Adapter和一个ListView的 Item项布局。Item项布局包含两种形式,一种是索引格式,如“A”、“B”、“C”,一种是具体的联系人(头像+姓名),分别创建index.xml、contacts_item.xml布局文件,实现两种 Item项的布局(非常简单,这里不解释)。请看适配器MyAdapter.java 的代码:
public class MyAdapter extends BaseAdapter {

	private List<ListViewItem> list;
	private Context context;

	public MyAdapter(Context context) {
		this.context = context;
	}

	@Override
	public int getCount() {
		return list.size();
	}

	@Override
	public Object getItem(int arg0) {
		return list.get(arg0);
	}

	@Override
	public long getItemId(int arg0) {
		return 0;
	}

	@Override
	public boolean isEnabled(int position) {
		ListViewItem item = list.get(position);
		if (!item.index.isEmpty()) {
			return false;
		}
		return super.isEnabled(position);
	}

	@Override
	public View getView(int position, View convertView, ViewGroup parent) {
		ListViewItem item = list.get(position);
		switch (item.type) {
		case GlobalVariable.indexType:
			convertView = LayoutInflater.from(context).inflate(R.layout.index,
					null);
			TextView index = (TextView) convertView
					.findViewById(R.id.textView1);
			index.setText(item.index);
			break;
		case GlobalVariable.groupType:
			convertView = LayoutInflater.from(context).inflate(
					R.layout.group_item, null);
			TextView group = (TextView) convertView
					.findViewById(R.id.text_group);
			group.setText(item.group);
			TextView count = (TextView) convertView.findViewById(R.id.text_count);
			count.setText("("+String.valueOf(item.count)+")");
			break;
		case GlobalVariable.contactsType:
			convertView = LayoutInflater.from(context).inflate(
					R.layout.contacts_item, null);
			ImageView touxiang = (ImageView) convertView
					.findViewById(R.id.image_touxiang);
			touxiang.setImageResource(item.touxiangId);
			TextView name = (TextView) convertView.findViewById(R.id.text_name);
			name.setText(item.name);
			break;
		default:
			break;
		}
		return convertView;
	}

	public void listdataSet(List<Map<String, Object>> data_list) {
		list = new ArrayList<ListViewItem>();
		for (int i = 0; i < data_list.size(); i++) {
			ListViewItem item = new ListViewItem();
			switch ((int) data_list.get(i).get("type")) {
			case GlobalVariable.indexType:
				item.index = (String) data_list.get(i).get("index");
				item.type = GlobalVariable.indexType;
				this.list.add(item);
				break;
			case GlobalVariable.contactsType:
				item.name = (String) data_list.get(i).get("name");
				item.touxiangId = (int) data_list.get(i).get("touxiang");
				item.type = GlobalVariable.contactsType;
				this.list.add(item);
				break;
			case GlobalVariable.groupType:
				item.group = (String) data_list.get(i).get("group");
				item.count = (int) data_list.get(i).get("count");
				item.type = GlobalVariable.groupType;
				this.list.add(item);
				break;
			}
		}
	}
}下面编写联系人碎片的代码,加载刚刚完成的界面布局。新建ContactFragment类继承Fragment,在onCreate()方法中加载contacts.xml布局,请看实现代码:
public class ContactsFragment extends Fragment {
	private View view;
	private List<Map<String, Object>> data_list;

	@Override
	public View onCreateView(LayoutInflater inflater, ViewGroup container,
			Bundle savedInstanceState) {
		this.view = inflater.inflate(R.layout.contacts, container, false);
		initData();
		ListView listView = (ListView) view.findViewById(R.id.list_contacts);
		MyAdapter adapter = new MyAdapter(getActivity());
		adapter.listdataSet(data_list);
		listView.setAdapter(adapter);
		listView.setOnItemClickListener(new OnItemClickListener() {

			@Override
			public void onItemClick(AdapterView<?> parent, View view,
					int position, long id) {
				Intent intent = new Intent(getActivity(), ContactActivity.class);
				intent.putExtra("name", (String)data_list.get(position).get("name"));
				getActivity().startActivity(intent);
			}

		});
		return view;
	}

	private void initData() {
		String index = "我";
		data_list = new ArrayList<Map<String, Object>>();
		Map<String, Object> map = new HashMap<String, Object>();
		map.put("type", GlobalVariable.indexType);
		map.put("index", index);
		data_list.add(map);
		map = new HashMap<String, Object>();
		map.put("type", GlobalVariable.contactsType);
		map.put("touxiang", R.drawable.touxiang);
		map.put("name", "设置我的名片");
		data_list.add(map);

		String[] data = new String[GlobalVariable.Contacts.size()];
		for (int i = 0; i < GlobalVariable.Contacts.size(); i++) {
			if (!index.equals(GlobalVariable.Contacts.get(i).getIndex())) {
				index = (String) GlobalVariable.Contacts.get(i).getIndex();
				map = new HashMap<String, Object>();
				map.put("type", GlobalVariable.indexType);
				map.put("index", index);
				data_list.add(map);
			}
			data[i] = (String) GlobalVariable.Contacts.get(i).getName();
			map = new HashMap<String, Object>();
			map.put("type", GlobalVariable.contactsType);
			map.put("touxiang", R.drawable.touxiang);
			map.put("name", data[i]);
			data_list.add(map);
		}
	}
}做完了以上工作,我们的联系人界面就顺理成章的完成了,下面看MainActivity是怎样完成显示和操作的吧,看代码:
@Override
	protected void onCreate(Bundle savedInstanceState) {
		super.onCreate(savedInstanceState);

		readContacts();
		requestWindowFeature(Window.FEATURE_NO_TITLE);
		setContentView(R.layout.activity_main);
		this.mFragmentManager = getFragmentManager();

		// 初始化三个fragment
		phoneFragment = new PhoneFragment();
		groupFragment = new GroupFragment();
		collectionFragment = new CollectionFragment();
		contactsFragment = (ContactsFragment) mFragmentManager
				.findFragmentById(R.id.fragement_contacts);
		transaction = mFragmentManager.beginTransaction();
		transaction.show(contactsFragment).commit();
		setFragment();
	}

	private void setFragment() {
		this.tab = (RadioGroup) findViewById(R.id.tab);
		this.tab.setOnCheckedChangeListener(new OnCheckedChangeListener() {
			@Override
			public void onCheckedChanged(RadioGroup group, int checkedId) {
				transaction = mFragmentManager.beginTransaction();
				switch (checkedId) {
				case R.id.tab_phone:
					transaction.replace(R.id.content_fragment, phoneFragment);
					transaction.commit();
					break;

				case R.id.tab_group:
					transaction.replace(R.id.content_fragment, groupFragment);
					transaction.commit();
					break;

				case R.id.tab_collection:
					transaction.replace(R.id.content_fragment,
							collectionFragment);
					transaction.commit();
					break;

				case R.id.tab_contacts:
					transaction
							.replace(R.id.content_fragment, contactsFragment);
					transaction.commit();
					break;

				default:
					break;
				}
			}
		});
}private void readContacts() {
GlobalVariable.Contacts = new ArrayList<ContactsInfo>();
Cursor cursor = null;
try {
cursor = getContentResolver().query(
ContactsContract.CommonDataKinds.Phone.CONTENT_URI, new String[] { "display_name", "sort_key", "contact_id",
"data1" },null, null, "sort_key");
while (cursor.moveToNext()) {
String name = cursor.getString(cursor.getColumnIndex
(ContactsContract.CommonDataKinds.Phone.DISPLAY_NAME));
String number = cursor.getString(cursor.getColumnIndex
(ContactsContract.CommonDataKinds.Phone.NUMBER));
String sortKey = cursor.getString(1);
int contact_id = cursor.getInt(cursor.getColumnIndex
(ContactsContract.CommonDataKinds.Phone.CONTACT_ID));
ContactsInfo contact = new ContactsInfo(name,number,sortKey,contact_id);
GlobalVariable.Contacts.add(contact);
}
} catch (Exception e) {
e.printStackTrace();
} finally {
if (cursor != null) {
cursor.close();
}
}
}此项目对于新手来说可能过于复杂,所以讲解未尽之处请读者给我留言,我会给以解释,自学的朋友可以点击下面链接下载源码。


 4万+
4万+

 被折叠的 条评论
为什么被折叠?
被折叠的 条评论
为什么被折叠?
 到【灌水乐园】发言


